1、引入依赖及配置
引入rabbitmq依赖
<dependency>
    <groupId>org.springframework.boot</groupId>
    <artifactId>spring-boot-starter-amqp</artifactId>
</dependency>
配置文件application.yml
spring:
  application:
    name: rabbimq-springboot
  rabbitmq:
    host: 安装rabbit的主机
    port: 运行端口
    username: 登录用户
    password: 登录密码
    virtual-host: 虚拟主机(可在图形界面创建,/开头)
RabbiTemplate 用于简化操作rabbitmq,直接注入即可。
2、使用RabbiTemplate 操作rabbitmq
注入rabbitTemplate
// 注入rabbitTemplate
@Autowired
private RabbitTemplate rabbitTemplate;
1)直连模型

直连,不需要经过交换机,生产者直接将消息放进队列中
生产者:(生产者运行不会直接创建队列,必须先有消费者才会自动创建不存在的队列)
@Test
void test() {
    /**
     * 参数说明:
     * 参数1:队列名称
     * 参数2:发生消息,可直接发生对象
     */
    rabbitTemplate.convertAndSend("hello","hello rabbitMq");
}
消费者:
@RabbitListener(queuesToDeclare = @Queue("hello"))声明监听的队列
@RabbitHandler代表队列中取出的消息的回调函数
@Component @RabbitListener(queuesToDeclare = @Queue("hello")) public class HelloCustomer { @RabbitHandler public void raceivel(String message){ System.out.println("massage = "+message); } }
需要设置队列属性时在消费者端声明队列时指定
@RabbitListener(queuesToDeclare = @Queue(value = "hello",declare = "true",autoDelete = "false",exclusive = "false"))
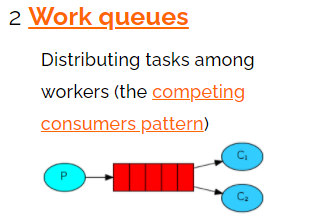
2)工作队列
同样不需要通过交换机,多个消费者

与Hello模型基本一致,多个消费者会平均消费消息。存在问题:两个消费者处理速度不同时,任然是平均分配。
@RabbitListener(queuesToDeclare = @Queue("hello"))声明监听的队列注解直接注解在方法上时可以不用@RabbitHandler
生产者:
@Test
void testWork() {
    /**
     * 参数说明:
     * 参数1:队列名称
     * 参数2:发生消息,可直接发生对象
     */
    for (int i = 0; i < 10; i++) {
        rabbitTemplate.convertAndSend("work","workQuque "+i);
    }
}
消费者:
@RabbitListener(queuesToDeclare = @Queue(value = "work"))
public void work1(String massage){
System.out.println("work1 :massage = "+massage);
}
@RabbitListener(queuesToDeclare = @Queue(value = "work"))
public void work2(String massage){
System.out.println("work2 :massage = "+massage);
}
运行结果

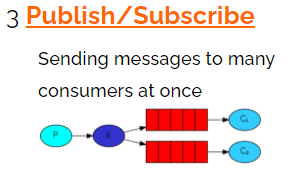
3)发布订阅(广播模型)
该模式生产者生产的消息会广播给所有消费者

生产者:
@Test
void testfanout() {
    /**
     * 参数说明:
     * 参数1:交换机名称
     * 参数2:路由key(该模式下该参数无意义)
     * 参数3:发送的消息
     */
    rabbitTemplate.convertAndSend("log","","fanout 模型发生消息");
}
消费者:
消费者需生成临时队列,并绑定队列与路由交换机的关系
@RabbitListener(bindings = { @QueueBinding( value = @Queue, exchange = @Exchange(value = "log",type = "fanout") ) }) public void fanout1(String massage){ System.out.println("fanout1 massage = "+massage); } @RabbitListener(bindings = { @QueueBinding( value = @Queue, //不指定名称,生成临时队列 exchange = @Exchange(value = "log",type = "fanout") //交换机信息 ) }) public void fanout2(String massage){ System.out.println("fanout2 massage = "+massage); }
运行结果:

两个消费者绑定不同的临时队列,消费了相同的消息。
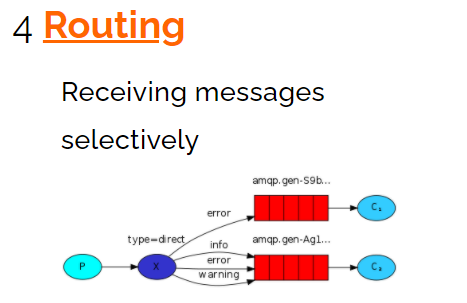
4)路由模式
与发布订阅不同的是可以指定不同的路由key,可指定特定想消费者消费。

消费者:
@RabbitListener(bindings = { @QueueBinding( value = @Queue, exchange = @Exchange(value = "direct",type = "direct"), key = {"info","error"} ) }) public void route1(String massage){ System.out.println("route1 massage = "+massage); } @RabbitListener(bindings = { @QueueBinding( value = @Queue, //不指定名称,生成临时队列 exchange = @Exchange(value = "direct",type = "direct") ,//交换机信息, key = {"error"} ) }) public void route2(String massage){ System.out.println("route2 massage = "+massage); }
生产者:
@Test
void testRoute() {
    /**
     * 参数说明:
     * 参数1:交换机名称
     * 参数2:路由key 用于指定哪些消费者可以消费
     * 参数3:发送的消息
     */
    rabbitTemplate.convertAndSend("direct","info","route 模型发生info消息");
}
输出:

由于生产者发生时指定路由key为info,只有绑定key为info的消费者可以消费
修改生产者
@Test
void testRoute() {
    /**
     * 参数说明:
     * 参数1:交换机名称
     * 参数2:路由key 用于指定哪些消费者可以消费
     * 参数3:发送的消息
     */
    rabbitTemplate.convertAndSend("direct","error","route 模型发生error消息");
}
运行结果:

由于两个消费者都绑定了error可以,则两个消费者都能消费error消息
5)Topic模型
与路由模式基本相同,唯一不同是可以使用通配符指定消费者绑定的路由key。
通配符
-
#代表0个或多个单词
-
*代表一个单词
消费者:
@Component public class TopicCusomer { @RabbitListener(bindings = { @QueueBinding( value = @Queue, exchange = @Exchange(value = "topic",type = "topic"), key = {"user.#"} ) }) public void topic1(String massage){ System.out.println("topic1 massage = "+massage); } @RabbitListener(bindings = { @QueueBinding( value = @Queue, //不指定名称,生成临时队列 exchange = @Exchange(value = "topic",type = "topic") ,//交换机信息, key = {"user.*"} ) }) public void topic2(String massage){ System.out.println("topic2 massage = "+massage); } }
生产者:
@Test
void testTopic() {
    /**
     * 参数说明:
     * 参数1:交换机名称
     * 参数2:路由key 用于指定哪些消费者可以消费
     * 参数3:发送的消息
     */
    rabbitTemplate.convertAndSend("topic","user.order","topic 模型发生user.order消息");
}
结果:

两个消费者都消费了消息
修改生产者:
@Test
void testTopic() {
    /**
     * 参数说明:
     * 参数1:交换机名称
     * 参数2:路由key 用于指定哪些消费者可以消费
     * 参数3:发送的消息
     */
    rabbitTemplate.convertAndSend("topic","user.order.info","topic 模型发生user.order消息");
}
结果:

@Configuration
public class TopicRabbitConfig {

    //路由key
    public final static String key= "topic.key";

    //队列名称
     public final static String key="queueName";

  //交换机名称
   public final static String exchangeName = "topicExchange";
//交换机 名称为topicExchange 类型为TOpic
    @Bean
    TopicExchange exchange() {
        return new TopicExchange(TopicRabbitConfig.exchangeName);
    }

    // 队列
    @Bean
    public Queue testQueue() {
        return new Queue(TopicRabbitConfig.queueName);
    }

     @Bean
    Binding bindingExchangeMessage() {
        return BindingBuilder.bind(testQueue()).to(exchange()).with(TopicRabbitConfig.key);
    }

}
生产者发送消息:
Map<String, Object> map = new HashMap<>();
map .put("messageId", messageId);
map .put("messageData", messageData);
map .put("createTime", createTime);
rabbitTemplate.convertAndSend(TopicRabbitConfig.exchangeName,TopicRabbitConfig.key, map);
消费者消费消息:
@Component
@RabbitListener(queues = "queueName")
public class TopicReceiver {

    @RabbitHandler
    public void process(Map message) {
        System.out.println("消费者收到消息  : " + testMessage.toString());
    }
}