【疯狂造轮子-iOS】JSON转Model系列之二
本文转载请注明出处 —— polobymulberry-博客园
1. 前言
上一篇《【疯狂造轮子-iOS】JSON转Model系列之一》实现了一个简陋的JSON转Model的库,不过还存在很多问题。下面我会尝试一个个去解决。
2. 存在问题及解决思路
2.1 没有考虑JSON数据并不一定是NSDictionary类型
有时候JSON并不一定是NSDictionary类型,可能是一个字符串,也可能是NSData类型的数据。不过不管是哪种类型,统统先将其转化为NSData数据,然后使用+[NSJSONSerialization JSONObjectWithData:options:error:]来转化。所以我在initWithAttributes:上面又封装了一层。
- (instancetype)initWithJSONData:(id)json
{
    NSDictionary *dict = [self pjx_dictionaryWithJSON:json];
    return [self initWithAttributes:dict];
}

/**
 * @brief 将NSString和NSData格式的json数据转化为NSDictionary类型
 */
- (NSDictionary *)pjx_dictionaryWithJSON:(id)json
{
    if (!json) {
        return nil;
    }
    // 若是NSDictionary类型,直接返回
    if ([json isKindOfClass:[NSDictionary class]]) {
        return json;
    }

    NSDictionary *dict = nil;
    NSData *jsonData = nil;

    if ([json isKindOfClass:[NSString class]]) {
        // 如果是NSString,就先转化为NSData
        jsonData = [(NSString*)json dataUsingEncoding:NSUTF8StringEncoding];
    } else if ([json isKindOfClass:[NSData class]]) {
        jsonData = json;
    }

    if (jsonData && [jsonData isKindOfClass:[NSData class]]) {
        // 如果时NSData类型,使用NSJSONSerialization
        NSError *error = nil;
        dict = [NSJSONSerialization JSONObjectWithData:jsonData options:0 error:&error];
        if (error) {
            NSLog(@"pjx_dictionaryWithJSON error:%@", error);
            return nil;
        }
        if (![dict isKindOfClass:[NSDictionary class]]) {
            return nil;
        }
    }

    return dict;
}
为此,我在ViewController添加了两个sample。分别用来解析NSString类型的JSON数据和NSData类型的JSON数据。
// NSString类型的JSON数据
- (void)runSimpleSample2
{
    NSString *userStr = @"
                        {
                            "username"       : "shuaige",
                            "password"       : "123456",
                            "avatarImageURL" : "http://www.example.com/shuaige.png"
                        }";

    PJXUser *user = [[PJXUser alloc] initWithJSONData:userStr];

    NSLog(@"runSimpleSample2
");
    NSLog(@"----------------------------------------");
    NSLog(@"username:%@
",user.username);
    NSLog(@"password:%@
",user.password);
    NSLog(@"avatarImageURL:%@
",user.avatarImageURL);
}

// NSData类型的JSON数据
- (void)runSimpleSample3
{
    NSString *userInfoFilePath = [[NSBundle mainBundle] pathForResource:@"UserInfo" ofType:@"txt"];
    NSData *data = [NSData dataWithContentsOfFile:userInfoFilePath];
    PJXUser *user = [[PJXUser alloc] initWithJSONData:data];

    NSLog(@"runSimpleSample3
");
    NSLog(@"----------------------------------------");
    NSLog(@"username:%@
",user.username);
    NSLog(@"password:%@
",user.password);
    NSLog(@"avatarImageURL:%@
",user.avatarImageURL);
}
输出结果也是正确的:
2.2 没有考虑用户传入的JSON数据的key值和property的名称不一致
我第一反应是使用一个映射表。也就是说用户使用时需要自定义一套property和key的映射表。YYModel中使用了一个+ (NSDictionary *)modelCustomPropertyMapper函数,用户可以自定义该函数达到映射表的效果,而这个函数是放在一个protocol中的。我挺认同这种设计的,因为modelCustomPropertyMapper这种函数和Model是一种组合关系,可有可无(optional),所以设计成协议更合适。但是作者在设计protocol又说了一句:
// There's no need to add '<YYModel>' to your class header.
@protocol YYModel <NSObject>
什么意思呢,就是说你自定义一个NSObject子类(如YYBook)时,如果想实现自定义的property映射关系,只需要实现modelCustomPropertyMapper函数即可,而不需要写成@interface YYBook : NSObject <YYModel>。作者的意思是你遵不遵循YYModel这个protocol都没事,反正你只要在YYBook实现了modelCustomPropertyMapper即可。具体解释,大家请参考这个issue。
这种设计我不是很赞同,我是有洁癖的人,要不然你就别定义YYModel这个protocol,说明文档里面着重说明一下就行。所以此处我还是选择判断NSObject的子类是否遵循protocol,也就是说只有遵循了这个protocol,才能自定义property映射关系。
首先我们看如何使用自定义propertyMapper。我先建立一个PJXUserPropertyMapper类,遵循了JSONProtocol协议,并实现了propertyMapper协议函数。
// 遵循JSONProtocol协议,这个JSONProtocol中定义的就是我的propertyMapper协议函数
@interface PJXUserPropertyMapper : NSObject <JSONProtocol>

@property (nonatomic, copy) NSString* username; // 用户名
@property (nonatomic, copy) NSString* password; // 密码
@property (nonatomic, copy) NSString* avatarImageURL; // 头像的URL地址

@end

@implementation PJXUserPropertyMapper
// 实现propertyMapper这个协议方法
+ (NSDictionary *)propertyMapper
{
    return @{@"Username" : @"username",
             @"Password" : @"password",
             @"AvatarImageURL" : @"avatarImageURL"};
}

@end
随后我定义了一个example。
#pragma mark - PropertyMapper Sample
- (void)runPropertyMapperSample
{
    NSDictionary *userDict = @{@"Username" : @"shuaige",
                               @"Password" : @"123456",
                               @"AvatarImageURL" : @"http://www.example.com/shuaige.png"};
    PJXUserPropertyMapper *user = [[PJXUserPropertyMapper alloc] initWithJSONData:userDict];

    NSLog(@"runPropertyMapperSample
");
    NSLog(@"----------------------------------------");
    NSLog(@"username:%@
",user.username);
    NSLog(@"password:%@
",user.password);
    NSLog(@"avatarImageURL:%@
",user.avatarImageURL);
}
是不是感觉调用上和之前的非property映射没什么区别?那是因为我们需要在initWithJSONData中增加一些东西。
具体的做法是在PropertyWithDictionary函数增加了一个查表操作。
// 注意我传入的dictionary就是用户提供的JSON数据
// 比如此处传入的key==@"username",value==@"shuaige"
static void PropertyWithDictionaryFunction(const void *key, const void *value, void *context)
{
    NSString *keyStr    = (__bridge NSString *)(key);

    ......

    // 如果使用了JSONProtocol,并且自定义了propertyMapper,那么还需要将keyStr转化下
    if ([modelSelf conformsToProtocol:@protocol(JSONProtocol)] && [[modelSelf class] respondsToSelector:@selector(propertyMapper)]) {
        keyStr = [[[modelSelf class] propertyMapper] objectForKey:keyStr];
    }

    ......
}
这样就可以啦.我们看看效果:
2.3 没有考虑JSON数据的value值不一定是NSString类型
开始的时候,挺担心我这种写法会不会不兼容别的数据类型。不过我觉得应该没什么问题,毕竟我使用的setter方法本质上没啥问题,我的类型全用id来代替了(事实上,我的想法大错特错):
((void (*)(id, SEL, id))(void *) objc_msgSend)(modelSelf, info.setter, setValue);
不过本着不怕一万,就怕万一的心态。我还是做了一个example来试验一下:
@interface PJXUserVariousType : NSObject

@property (nonatomic, copy) NSString *blogTitle; // 博客标题
@property (nonatomic, strong) NSURL *blogURL; // 博客网址
@property (nonatomic, assign) NSInteger blogIndex; // 博客索引值
@property (nonatomic, strong) NSDate *postDate; // 博客发布时间
@property (nonatomic, strong) NSArray *friends; // 我的好友名称
@property (nonatomic, strong) NSSet *collections; // 我的收藏

@end

@implementation PJXUserVariousType

@end

#pragma mark - VariousType Sample
- (void)runVariousTypeSample
{
    NSDictionary *userDict = @{@"blogTitle" : @"iOS developer",
                               @"blogURL" : @"http://www.example.com/blog.html",
                               @"blogIndex" : @666,
                               @"postDate" : [NSDate date],
                               @"friends" : @[@"meinv1", @"meinv2", @"meinv3"],
                               @"collections" : @[@"shuaige1", @"shuaige2", @"shuaige3"]};
    PJXUserVariousType *user = [[PJXUserVariousType alloc] initWithJSONData:userDict];

    NSLog(@"runVariousTypeSample
");
    NSLog(@"----------------------------------------");
    NSLog(@"blogTitle:%@
",user.blogTitle);
    NSLog(@"blogURL:%@
",user.blogURL);
    NSLog(@"blogIndex:%ld
",user.blogIndex);
    NSLog(@"postDate:%@
",user.postDate);
    NSLog(@"friends:%@
",user.friends);
    NSLog(@"collections:%@
",user.collections);
}
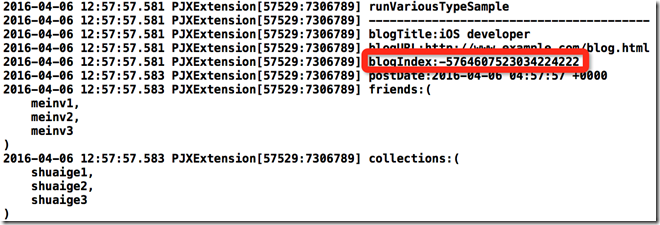
你猜输出啥?
其他都正确,唯独我们的blogIndex出错了。这里确实是我欠考虑了,类似NSInteger,BOOL这些NSNumber类型(我暂时只考虑这些常用类型)需要单独处理一下。这一部分看起来容易,但是为了处理这种特殊情况确实要下很大功夫。比如你得先判断该属性是不是double或int这种类型,只有判断除了该属性是double还是int,你才能正确使用setter方法,而此处的调用方式也要单独写一个,因为和之前调用方式有一些些区别,需要判断Number的类型是double,是int,还是BOOl…….
对此我在PJXPropertyInfo中定义了两个函数,一个叫isNumber,用来判断该属性是不是一个Number,另一个叫setNumberValue:withModelSelf:,用来给是Number类型的属性赋值。另外,我仿照YYModel(比YYModel简化很多了)建了一个PJXEncodingType的enum类型,用来存储Number的类型(int?double?BOOL?……),与之配套的还有一个PJXGetEncodingType函数,来获取当前属性的类型(是int?double?BOOL?),具体怎么做还挺复杂的,后面会详细说明。
代码如下:
// Number类型
typedef NS_ENUM(NSUInteger, PJXEncodingType) {
    PJXEncodingTypeUnknown    = 0, ///< unknown
    PJXEncodingTypeBool       = 1, ///< bool
    PJXEncodingTypeInt8       = 2, ///< char / BOOL
    PJXEncodingTypeUInt8      = 3, ///< unsigned char
    PJXEncodingTypeInt16      = 4, ///< short
    PJXEncodingTypeUInt16     = 5, ///< unsigned short
    PJXEncodingTypeInt32      = 6, ///< int
    PJXEncodingTypeUInt32     = 7, ///< unsigned int
    PJXEncodingTypeInt64      = 8, ///< long long
    PJXEncodingTypeUInt64     = 9, ///< unsigned long long
    PJXEncodingTypeFloat      = 10, ///< float
    PJXEncodingTypeDouble     = 11, ///< double
    PJXEncodingTypeLongDouble = 12, ///< long double
};

// 根据objc_property_attribute_t可以获取到property的类型PJXEncodingType
// 参考YYModel
PJXGetEncodingType(const char *encodingType) {
    char *type = (char *)encodingType;
    if (!type) return PJXEncodingTypeUnknown;
    size_t len = strlen(type);
    if (len == 0) return PJXEncodingTypeUnknown;

    switch (*type) {
        case 'B': return PJXEncodingTypeBool;
        case 'c': return PJXEncodingTypeInt8;
        case 'C': return PJXEncodingTypeUInt8;
        case 's': return PJXEncodingTypeInt16;
        case 'S': return PJXEncodingTypeUInt16;
        case 'i': return PJXEncodingTypeInt32;
        case 'I': return PJXEncodingTypeUInt32;
        case 'l': return PJXEncodingTypeInt32;
        case 'L': return PJXEncodingTypeUInt32;
        case 'q': return PJXEncodingTypeInt64;
        case 'Q': return PJXEncodingTypeUInt64;
        case 'f': return PJXEncodingTypeFloat;
        case 'd': return PJXEncodingTypeDouble;
        case 'D': return PJXEncodingTypeLongDouble;

        default: return PJXEncodingTypeUnknown;
    }
}

/**
 * @brief 存储Model中每个property的信息
 * ......
 * @param type 是一个PJXEncodingType类型变量,为了存储该属性是哪种Number(int?double?BOOL?)
 */
@interface PJXPropertyInfo : NSObject
......
@property (nonatomic, assign) PJXEncodingType type;
@end

@implementation PJXPropertyInfo

- (instancetype)initWithPropertyInfo:(objc_property_t)property
{
    self = [self init];

    if (self) {
        ......

        // 判断属性类型
        unsigned int attrCount;
        // 关于objc_property_attribute_t,这里有一篇文章介绍的很好
        // http://www.henishuo.com/runtime-property-ivar/
        objc_property_attribute_t *attrs = property_copyAttributeList(property, &attrCount);
        for (unsigned int i = 0; i < attrCount; i++) {
            switch (attrs[i].name[0]) {
                case 'T': {//  EncodingType
                    if (attrs[i].value) {
                        //NSLog(@"attrs[%d].value = %s", i, attrs[i].value);
                        // 可以根据value获取到property类型
                        _type = PJXGetEncodingType(attrs[i].value);
                    }
                    break;
                }
                default:
                    break;
            }
        }
        ......
    }

    return self;
}

// 根据propertyInfo中存储的type判断其是否为Number
- (BOOL)isNumber
{
    switch (self.type) {
        case PJXEncodingTypeBool:
        case PJXEncodingTypeInt8:
        case PJXEncodingTypeUInt8:
        case PJXEncodingTypeInt16:
        case PJXEncodingTypeUInt16:
        case PJXEncodingTypeInt32:
        case PJXEncodingTypeUInt32:
        case PJXEncodingTypeInt64:
        case PJXEncodingTypeUInt64:
        case PJXEncodingTypeFloat:
        case PJXEncodingTypeDouble:
        case PJXEncodingTypeLongDouble:
            return YES;
        default:
            return NO;
            break;
    }
}

// 使用objc_msgSend调用modelSelf中该属性对应的setter方法
- (void)setNumberValue:(NSNumber *)number withModelSelf:(id)modelSelf
{
    switch (self.type) {
        case PJXEncodingTypeBool:
            ((void (*)(id, SEL, BOOL))(void *) objc_msgSend)(modelSelf, self.setter, number.boolValue);
            break;
        case PJXEncodingTypeInt8:
            ((void (*)(id, SEL, BOOL))(void *) objc_msgSend)(modelSelf, self.setter, number.charValue);
            break;
        case PJXEncodingTypeUInt8:
            ((void (*)(id, SEL, BOOL))(void *) objc_msgSend)(modelSelf, self.setter, number.unsignedCharValue);
            break;
        case PJXEncodingTypeInt16:
            ((void (*)(id, SEL, BOOL))(void *) objc_msgSend)(modelSelf, self.setter, number.shortValue);
            break;
        case PJXEncodingTypeUInt16:
            ((void (*)(id, SEL, BOOL))(void *) objc_msgSend)(modelSelf, self.setter, number.unsignedShortValue);
            break;
        case PJXEncodingTypeInt32:
            ((void (*)(id, SEL, BOOL))(void *) objc_msgSend)(modelSelf, self.setter, number.intValue);
            break;
        case PJXEncodingTypeUInt32:
            ((void (*)(id, SEL, BOOL))(void *) objc_msgSend)(modelSelf, self.setter, number.unsignedIntValue);
            break;
        case PJXEncodingTypeInt64:
            ((void (*)(id, SEL, uint64_t))(void *) objc_msgSend)(modelSelf, self.setter, number.longLongValue);
            break;
        case PJXEncodingTypeUInt64:
            ((void (*)(id, SEL, uint64_t))(void *) objc_msgSend)(modelSelf, self.setter, number.unsignedLongLongValue);
            break;
        case PJXEncodingTypeFloat:
            ((void (*)(id, SEL, float))(void *) objc_msgSend)(modelSelf, self.setter, number.floatValue);
            break;
        case PJXEncodingTypeDouble:
            ((void (*)(id, SEL, double))(void *) objc_msgSend)(modelSelf, self.setter, number.doubleValue);
            break;
        case PJXEncodingTypeLongDouble:
            ((void (*)(id, SEL, long double))(void *) objc_msgSend)(modelSelf, self.setter, number.doubleValue);
            break;
        default:
            break;
    }
}

@end
有了上述的几个方法,后面就好办了,只需在PropertyWithDictionaryFunction函数中添加一个Number的判断就行:
static void PropertyWithDictionaryFunction(const void *key, const void *value, void *context)
{
    ......

    // 如果该属性是Number,那么就用Number赋值方法给其赋值
    if ([info isNumber]) {
        [info setNumberValue:setValue withModelSelf:modelSelf];
    } else {
        ((void (*)(id, SEL, id))(void *) objc_msgSend)(modelSelf, info.setter, setValue);
    }
}
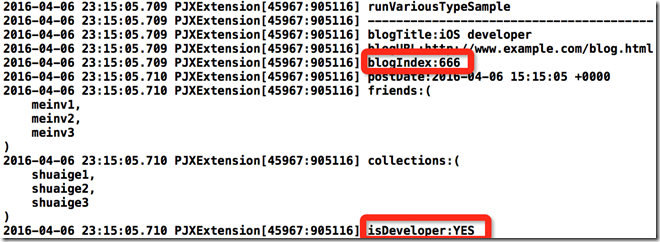
这下终于成功了:
2.4 没有考虑用户自定义了Model属性的setter方法
这个其实比较简单,只需要对property的attribute(objc_property_attribute_t)进行判断即可:
- (instancetype)initWithPropertyInfo:(objc_property_t)property
{
        ......

        BOOL isCustomSetter = NO;
        // 判断属性类型
        unsigned int attrCount;
        // 关于objc_property_attribute_t,这里有一篇文章介绍的很好
        // http://www.henishuo.com/runtime-property-ivar/
        objc_property_attribute_t *attrs = property_copyAttributeList(property, &attrCount);
        for (unsigned int i = 0; i < attrCount; i++) {
            switch (attrs[i].name[0]) {
                case 'T': { // EncodingType
                    if (attrs[i].value) {
                        //NSLog(@"attrs[%d].value = %s", i, attrs[i].value);
                        // 可以根据value获取到property类型
                        _type = PJXGetEncodingType(attrs[i].value);
                    }
                    break;
                }
                case 'S': { // 自定义setter方法
                    if (attrs[i].value) {
                        isCustomSetter = YES;
                        _setter = NSSelectorFromString([NSString stringWithUTF8String:attrs[i].value]);
                    }
                } break;
                default:
                    break;
            }
        }

        if (!isCustomSetter) {
            // 如果没有自定义setter方法,只考虑系统默认生成setter方法
            // 也就是说属性username的setter方法为setUsername:
            NSString *setter = [NSString stringWithFormat:@"%@%@", [_name substringToIndex:1].uppercaseString, [_name substringFromIndex:1]];
            _setter = NSSelectorFromString([NSString stringWithFormat:@"set%@:", setter]);
        }
    }

    return self;
}
使用下面这个例子测试:
@interface PJXUserCustomSetter : NSObject

@property (nonatomic, copy, setter=setCustomUserName:) NSString* username; // 用户名
@property (nonatomic, copy, setter=setCustomBirthday:) NSDate* birthday; // 生日

@end

@implementation PJXUserCustomSetter

- (void)setCustomUserName:(NSString *)username
{
    _username = [NSString stringWithFormat:@"My name is %@", username];
}

- (void)setCustomBirthday:(NSDate *)birthday
{
    NSTimeInterval timeInterval = 24*60*60; // 过一天
    _birthday = [NSDate dateWithTimeInterval:timeInterval sinceDate:birthday];
}

@end

#pragma mark - Custom Setter Sample
- (void)runCustomSetterSample
{
    NSDateFormatter *dateFormatter = [[NSDateFormatter alloc] init];
    [dateFormatter setDateFormat:@"yyyy-MM-dd HH:mm:ss"];
    NSDate *birthday = [dateFormatter dateFromString:@"2016-04-07 00:20:03"];
    NSDictionary *userDict = @{@"username" : @"shuaige",
                               @"birthday" : birthday};
    PJXUserCustomSetter *user = [[PJXUserCustomSetter alloc] initWithJSONData:userDict];

    NSLog(@"runCustomSetterSample
");
    NSLog(@"----------------------------------------");
    NSLog(@"username:%@
",user.username);
    NSLog(@"birthday:%@
",user.birthday);
}
得到的结果为:
2.5 没有考虑用户传入的JSON数据有嵌套
我个人感觉这个应该没什么问题,为什么这么说呢?因为我嵌套的无非也是一个NSObject类型,那么就调用其自身的setter方法就OK啊.不过还是以防万一,我构造了一下案例:
@interface PJXBlog : NSObject

@property (nonatomic, copy) NSString *title; // 博客名称
@property (nonatomic, strong) NSDate *postDate; // 博客发表日期
@property (nonatomic, copy) PJXUser *author; // 博客作者

@end

@implementation PJXBlog

@end

#pragma mark - Nest Sample
- (void)runNestSample
{
    NSDictionary *blogDict = @{@"title" : @"how to convert JSON to Model?",
                               @"postDate" : [NSDate date],
                               @"author" : @{@"username" : @"shuaige",
                                             @"password" : @"123456",
                                             @"avatarImageURL":@"http://www.example.com/shuaige.png"}};
    PJXBlog *blog = [[PJXBlog alloc] initWithJSONData:blogDict];

    NSLog(@"runNestSample
");
    NSLog(@"----------------------------------------");
    NSLog(@"title:%@
",blog.title);
    NSLog(@"postDate:%@
",blog.postDate);
    NSLog(@"author:%@
",blog.author);
}
输出结果如下:
结果没什么问题.不过这样说可能不是很负责任,但是目前我也想不到反例.暂时先当做成功了.
3. 总结
以我的能力,目前只能将JSON转化Model实现到这个地步了.总体来说,实现的难度不是很大(因为我考虑的情况还是比较少的,另外还有些功能没添加),不过涉及的知识点还是挺多的,挺不错的一个练手项目:).
附上GitHub地址。


