在做这个项目练手时碰到的一些问题记录一下,加深印象
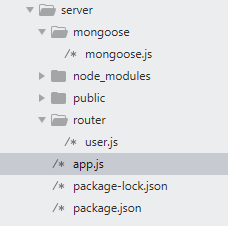
服务器的目录层级如下:

一、简单的搭建一个服务器,如何划分路由
1.在搭建好的后端服务器 app.js 中导入路由,代码如下:
var express = require('express')

// 导入路由  用户
var user = require('./router/user.js')

var app = express()

app.use(express.static('public'))

// 在路由配置前添加以下代码  解决跨域问题
app.all('*', function(req, res, next) {
    res.header("Access-Control-Allow-Origin", "*");
    res.header("Access-Control-Allow-Headers", "X-Requested-With,Content-Type");
    res.header("Access-Control-Allow-Methods","PUT,POST,GET,DELETE,OPTIONS");
    next();
});

app.use('/user',user);    //挂载路由,如果没有路由,或者只有/ ,映射到index路由

app.listen(3000, () => {
    console.log('Server Running...')
})
2.路由页面 user.js 代码如下:
var express = require('express');

// 导入 mongoose 数据库
var User = require('../mongoose/mongoose.js')

var router = express.Router();

router.get('/register',function(req, res, next) {
    console.log(req)
    res.send('请求数据成功')
})

module.exports = router;
二、如何引用数据库
在上述步骤当中,在 user.js 内已经导入mongoose 数据库,现在挂上数据库 mongoose。js 文件代码如下:
var mongoose = require("mongoose")

// mongoose.connect('mongodb://数据库的ip地址:端口号/数据库名');
mongoose.connect('mongodb://localhost:27017/txl')

// 通过Schema来创建Model
// Model代表的是数据库中的集合(users),通过Model才能对数据库进行操作
// mongoose.model(modelName,schema) (集合名,Schema)
// modelName 就是要映射的集合名,mongoose会自动将集合名变成复数
var Schema = mongoose.Schema;

// 定义一个user的Schema
var UserSchema = new Schema({
    username : { type: String },                // 用户账号
    password: { type: String },                 // 密码
    email: { type: Number },                    // 邮箱
    birthday : { type: Date },                  // 出生年月
    qq : { type: String },                      // QQ
    tel: { type: String },                      // 手机
    gender : { type: String },                  // 性别
    signature : { type: String }                // 个性签名
});

// 监听连接状态
mongoose.connection.on('connected', function () {
    console.log('Mongoose connection open to ' + 'mongodb://localhost:27017/txl...');
});
mongoose.connection.on('error',function (err) {
    console.log('Mongoose connection error: ' + err + '...');
});
mongoose.connection.on('disconnected', function () {
    console.log('Mongoose connection disconnected...');
});

// 对上面的定义的user的schema生成一个User的model并导出
module.exports = mongoose.model('User',UserSchema);
三、前端页面发送数据请求
1. npm i axios
2. 在 main.js 中插入如下代码:
// axios 发送请求
import axios from 'axios'
Vue.prototype.$ajax = axios
3. 在所需页面使用 axios 发送数据请求
this.$refs[formName].validate((valid) => {
    if (valid) {
        this.$ajax.get('/user/register', { data }).then((resData) => {
          console.log(resData)
        })
    } else {
      return false
    }
})
4.做好这些之后,会报错

因为 vue 是 8080 的端口,而本地服务器是 3000 的端口,存在跨域问题,解决这个问题要在 vue项目 config 文件夹下的 index.js 文件内进行配置
找到 proxytable属性,进行如下配置:
proxyTable: {
    '/':{
        target:'http://127.0.0.1:3000',
        changeOrigin: true
    }
},
打开界面,发送请求显示

则服务器代理成功