一、nginx介绍
nginx是一个支持高并发连接和反向代理功能的轻量级的web服务器。
1.nginx源码包下载地址
[root@ping ~]# wget -p http://nginx.org/download/nginx-1.12.2.tar.gz
2.配置nginx本地yum源
[root@ping yum.repos.d]# cat /etc/yum.repos.d/nginx.repo
[nginx]
name=nginx repo
baseurl=http://nginx.org/packages/mainline/rhel/6/$basearch/
gpgcheck=0
enabled=1
二、安装nginx
1.安装nginx依赖包
[root@ping ~]# yum -y install make zlib zlib-devel gcc-c++ pcre pcre-devel openssl openssl-devel libxslt-devel libxml2 libxml2-dev
2.解压nginx安装包
[root@ping soft]# tar -xf nginx-1.12.1.tar.gz -C /usr/local/
3.创建www用户组
[root@ping ~]# groupadd www
4.创建www用户并指定用户组为www,www用户不能登录,不创建www家目录
[root@ping ~]# useradd -g www -s /sbin/nologin -M
5.预编译nginx
[root@ping nginx-1.12.1]# # ./configure --prefix=/usr/local/nginx-1.12 --user=www --group=www --with-http_stub_status_module --with-http_ssl_module
6.编译并安装
[root@ping ~]# make && make install
7.查看以上命令是否正确执行
[root@ping ~]# echo $?
8.安装nginx目录创建软链接
[root@ping ~]# ln -s /usr/local/nginx-1.12 /usr/local/nginx
9.nginx重启、nginx关闭、nginx平滑重启、nginx查看配置
[root@ping ~] /usr/local/nginx -s reopen
[root@ping ~] /usr/local/nginx -s stop
[root@ping ~] /usr/local/nginx -s reload
[root@ sbin]# ./nginx  -V
nginx version: nginx/1.12.1
built by gcc 4.4.7 20120313 (Red Hat 4.4.7-16) (GCC)
built with OpenSSL 1.0.1e-fips 11 Feb 2013
TLS SNI support enabled
configure arguments: --prefix=/application/nginx --user=www --group=www --with-http_ssl_module --with-http_stub_status_module
三、连接状态模块
1.配置文件修改使用 “stub_status_module”模块
[root@ping nginx]# sed -n '18,20p' conf/nginx.conf
        location /status {
	  stub_status;
       }
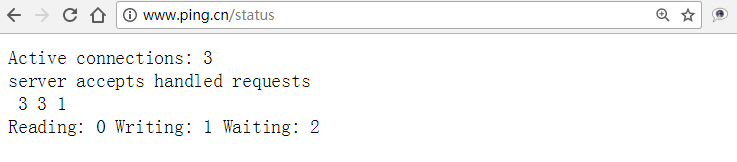
2.使用浏览器打开,查看页面连接状态
四、随机选择html页面模块
1.创建页面代码目录,并写好html页面
[root@ping /]# mkdir /opt/html/
[root@ping /]# ls -lh /opt/html/
总用量 12K
-rw-r--r-- 1 root root 113 3月   6 13:50 1.html
-rw-r--r-- 1 root root 121 3月   6 13:50 2.html
-rw-r--r-- 1 root root 114 3月   6 13:50 3.html
[root@ping /]# cat /opt/html/1.html
<html>
	<head>
	<style type="text/css">
		body {background-color: red}
	</style>
	</head>

<body>
<body>
</html>

[root@ping /]# cat  /opt/html/2.html
<html>
	<head>
		<style type="text/css">
		body {background-color:yellow}
		</style>
	</head>
	<body>

	</body>
<html>
2.查看创建页面代码目录的权限
[root@ping /]# ls -lh /opt/ -d
drwxr-xr-x. 4 root root 4.0K 3月   6 13:50 /opt/
3.修改配置文件,将随机选择页面模块开启
[root@ping /]# sed -n '8,12p' /usr/local/nginx/conf/nginx.conf
    location / {
        root   /root/app/html/;
		random_index on;
    }
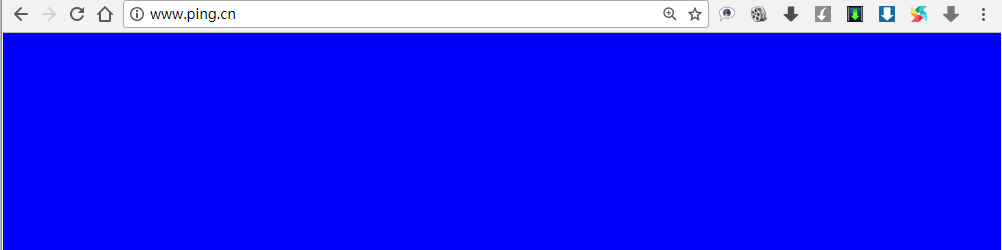
4.使用浏览器测试查看

五、虚拟主机
一台物理服务器划分成多个“虚拟”的服务器,每一个虚拟主机都可以有独立的域名和独立的目录。nginx的虚拟主机就是通过nginx.conf主配置文件,中的server节点指定的。想要设置多个虚拟主机,配置多个server节点即可。
1.将nginx主配置文件中的注释和空格去除
[root@ping nginx]# egrep -v '^$|#' conf/nginx.conf.default > conf/nginx.conf
2.配置基于域名的虚拟主机
[root@slave1 conf]# sed  -n '5,27p' nginx.conf
http {
    include       mime.types;
    default_type  application/octet-stream;
    sendfile        on;
    keepalive_timeout  65;
    server {
        listen       80;
        server_name  blog.ping.cn;
        location / {
            root   html/blog/;
            index  index.html index.htm;
        }
    }

	server {
        listen       80;
        server_name  bbs.ping.cn;
        location / {
            root   html/bbs/;
            index  index.html index.htm;
        }
    }
六、基于IP的访问控制
1.查看配置文件
[root@ping ~]# sed -n '8,13p' /etc/nginx/conf.d/default.conf
location / {
root /opt/html/;
deny 192.168.100.1;
allow all;
random_index on;
}
2.检查配置文件,并重启
[root@ping ~]# nginx -t -s reload
nginx: the configuration file /etc/nginx/nginx.conf syntax is ok
nginx: configuration file /etc/nginx/nginx.conf test is successful
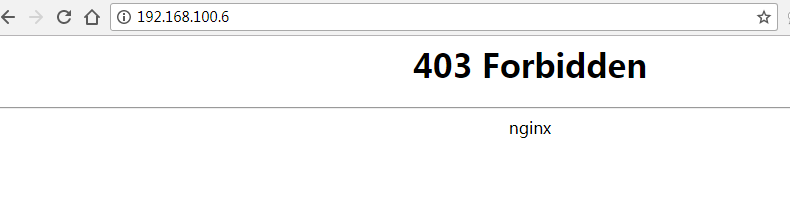
3.192.168.100.1访问nginx
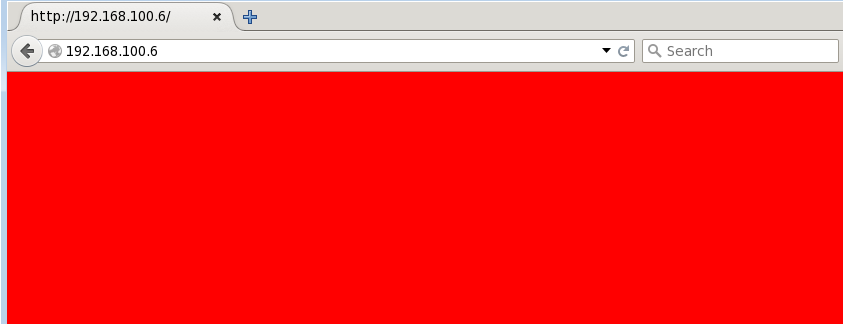
4.192.168.100.5访问nginx
七、基于密码的访问认证
1.修改配置文件
[root@ping nginx]# sed -n '10,18p' conf/nginx.conf
    server {
        listen       80;
        server_name  localhost;
        location / {
            root   html;
            index  index.html index.htm;
            auth_basic "User Authentication ping";
            auth_basic_user_file /application/nginx/conf/passwd.db;
          }
2.查看htpass命令的包是否安装
[root@ping /]# rpm -qa | grep httpd-tools
httpd-tools-2.2.15-45.el6.x86_64
3.创建用户认证密码
[root@ping nginx]# htpasswd -cb /application/nginx/conf/passwd ping 123456
4.平滑重启nginx服务
[root@ping nginx]# ./sbin/nginx -s reload
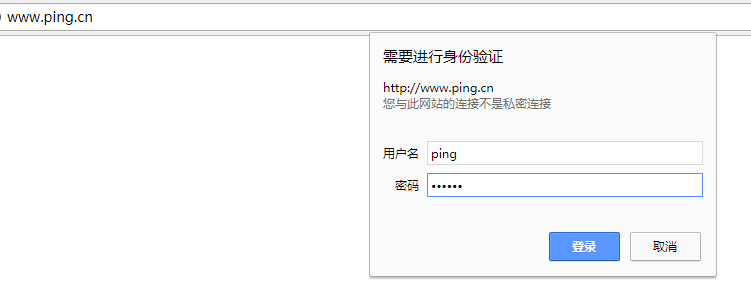
5.浏览器访问

八、对geoip_module的基本配置
1.对geoip_module模块的介绍
- 基于IP地址匹配MaxMind GeoIP 二进制文件,读取IP所在地址信息
- 区别国内外国家,写http访问规则,屏蔽国内或者国外的http请求
2.安装nginx模块geoip_module
[root@ping ~]# yum -y install nginx-module-geoip
3.查看nginx的geoip_module文件是否下载
[root@ping ~]# ls /etc/nginx/modules/
ngx_http_geoip_module-debug.so  ngx_stream_geoip_module-debug.so
ngx_http_geoip_module.so        ngx_stream_geoip_module.so
4.nginx主配置文件加载geoip_module相关模块,在use组件上面配置
[root@ping ~]# head -3 /etc/nginx/nginx.conf
load_module "modules/ngx_stream_geoip_module.so";
load_module "modules/ngx_http_geoip_module.so";
user nginx;
5.下载nginx可以配置的nginx国家和城市地域文件
[root@ping ~]# wget http://geolite.maxmind.com/download/geoip/database/GeoLiteCountry/GeoIP.dat.gz
[root@ping ~]# wget http://geolite.maxmind.com/download/geoip/database/GeoLiteCity.dat.gz
6.解压地域文件
[root@ping ~]# gunzip GeoIp.dat.gz GeoLiteCity.dat.gz
7.在http下的主配置文件下加载国家和地市地域文件
[root@ping ~]# sed -n '29,30p' /etc/nginx/nginx.conf
    geoip_country /etc/nginx/geoip/GeoIP.dat;
    geoip_city /etc/nginx/geoip/GeoLiteCity.dat;
8.location匹配,在浏览器中打印客户端IP地址、客户端国家名、客户端国家码,如:US、CN。、客户端城市
[root@ping ~]# sed -n '12,16p' /etc/nginx/conf.d/default.conf
   location /ip {
	return 200 "$remote_addr $geoip_country_name $geoip_country_code $geoip_city";
	}
$remote_addr 客户端访问nginx的IP地址
$geoip_country_name 客户端国家名字
$geoip_country_code 客户端国家的国家码,如:CN,US
$geoip_city 客户端的城市名字
9.如果客户端的编码是CN就返回404,不是就返回门户首页;
[root@ping ~]# sed -n '12,17p' /etc/nginx/conf.d/default.conf
location / {
if ($geoip_country_code = CN){
return 404;
}
index index.html
}
九、搭建LNMP
1.Nginx服务器如何动态解析PHP脚本语言
- FastCGI是HTTP服务器和动态脚本语言间通信的接口或者工具
- FastCGI的优点是动态语言解析和HTTP服务器分离开来
- FastCGI接口方式采用C/S结构,分为客户端和服务端
- PHP动态语言服务端可以启动多个FastCGI的守护进程
- HTTP服务器通过,FastCGI客户端和动态语言FastCGI服务端进行通信
2.主配置文件修改
[root@ping nginx]# sed -n '17,22p' conf/nginx.conf
        location ~ .*.php$ {
        root            /usr/local/nginx/project;
        fastcgi_pass    127.0.0.1:9000;
        fastcgi_index   wordpress/index.php;
        include         fastcgi.conf;
        }
[root@ping nginx]# ./sbin/nginx -s reload
3.编写PHP脚本文件用于测试
[root@ping nginx]# cat project/index.php
<?php
phpinfo();
?>
4.使用浏览器,测试Nginx是否与PHP进程通信解析PHP脚本文件
