typora-copy-images-to: media
Vue - 组件
组件化开发思想
现实中的组件化思想体现
标准、分治、重用、组合
编程中的组件化思想体现
组件化规范: Web Components
- 我们希望尽可能多的重用代码
- 自定义组件的方式不太容易(html、css和js)
- 多次使用组件可能导致冲突
Web Components 通过创建封装好功能的定制元素解决上述问题
官网:https://developer.mozilla.org/zh-CN/docs/Web/Web_Components
Vue部分实现了上述规范
组件注册
全局注册
语法
Vue.component({string} name, {Function | Object} [definition])

用法:
  注册或检索全局组件。注册还会使用给定的 name 参数自动设置组件的 name。

参数:
- {string} name 组件名称
- {Function | Object} [definition] 组件定义
	- { props, data, methods, computed... }

返回值:
- 如果传入 definition 参数,返回应用实例(注册组件)。
- 如果不传入 definition 参数,返回组件定义(检索组件是否存在)。
示例
/* 注册一个名为my-component的组件 */
+ Vue.component('my-component', {
+   // ...
+   data: function(){
+     return {
+       msg: 'hello'
+     }
+   },
+   methods:{},
+   template: `
+ 	<div>
+ 		<h3>{{msg}}</h3>
+ 		<p>段落</p>
+ 	</div>
+   `
+ })

/* 检索注册的组件(始终返回构造函数) */
const MyComponent = Vue.component('my-component')
使用注册好的组件
/* 使用注册好的组件 */
<div id="app">
  <my-component></my-component>
  <my-component></my-component>
  <my-component></my-component>
</div>
组件注册注意事项
-
data必须是一个函数
-
组件模板内容必须是单个跟元素
-
组件模板内容可以是模板字符串
-
组件命名方式
/* 短横线方式 */
Vue.component('my-component', { /* ... */ })

/* 驼峰方式 */
Vue.component('MyComponent', { /* ... */ })
局部注册
语法
var ComponentA = { /* ... */ }
var ComponentB = { /* ... */ }
var ComponentC = { /* ... */ }
new Vue({
  el: '#app',
  components: {
    'component-a': ComponentA,
    'component-b': ComponentB,
    'component-c': ComponentC,
  }
})
示例
// 注册 局部组件
new Vue({
  el: '#app',
  data: {
    msg: 'hello'
  },
+  components: {
+    'com-son1': {
+      data: function(){
+        return {
+          msg: '子组件'
+        }
+      },
+      template: '<div>{{msg}}</div>'
+    }
+  }
});

// 使用 局部组件
<div id="app">
  <com-son1></com-son1>
</div>
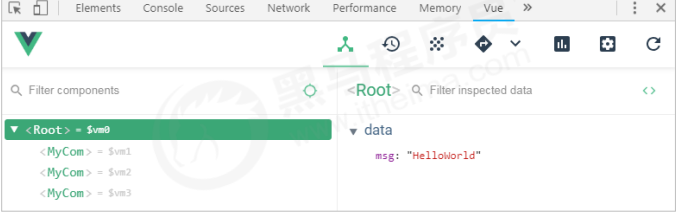
Vue调试工具用法
Vue调试工具:Devtools
安装
- 克隆仓库
- 安装依赖包
- 构建
- 打开Chrome扩展页面
- 选中开发者模式
- 加载已解压的扩展,选择shells/chrome
用法
组件间数据交互
父组件向子组件传值
-
组件内部通过props接收传递过来的值
Vue.component(‘menu-item', { props: ['title'], template: '<div>{{ title }}</div>' }) -
父组件通过属性将值传递给子组件
<menu-item title="来自父组件的数据"></menu-item> <menu-item :title="title"></menu-item> -
props属性名规则
- 在props中使用驼峰形式,模板中需要使用短横线的形式
- 字符串形式的模板中没有这个限制
Vue.component('menu-item', { // 在 JavaScript 中是驼峰式的 props: ['menuTitle'], template: '<div>{{ menuTitle }}</div>' }) <!-- 在html中是短横线方式的 --> <menu-item menu-title="nihao"></menu-item> -
props属性值类型
- 字符串 String
- 数值 Number
- 布尔值 Boolean
- 数组 Array
- 对象 Object
子组件向父组件传值
-
子组件通过自定义事件向父组件传递信息
<button v-on:click='$emit("enlarge-text") '>扩大字体</button> -
父组件监听子组件的事件
<menu-item v-on:enlarge-text='fontSize += 0.1'></menu-item> -
子组件通过自定义事件向父组件传递信息
<button v-on:click='$emit("enlarge-text", 0.1) '>扩大字体</button> -
父组件监听子组件的事件
<menu-item v-on:enlarge-text='fontSize += $event'></menu-item>
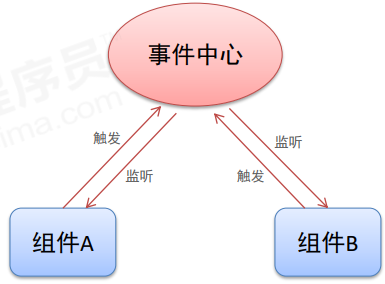
非父子组件间传值
-
单独的事件中心管理组件间的通信
var eventHub = new Vue() -
监听事件与销毁事件
eventHub.$on('add-todo', addTodo) eventHub.$off('add-todo') -
触发事件
eventHub.$emit(‘add-todo', id)
组件插槽
作用:父组件向子组件传递内容
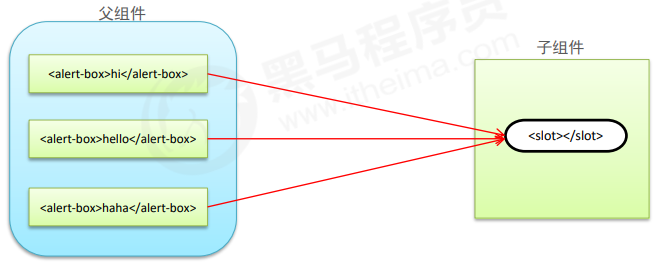
基本用法
-
插槽位置
Vue.component('alert-box', { template: ` <div class="demo-alert-box"> <strong>Error!</strong> <slot></slot> </div> ` }) -
插槽内容
<alert-box>Something bad happened.</alert-box>
具名插槽
-
插槽定义
<div class="container"> <header> <slot name="header"></slot> </header> <main> <slot></slot> </main> <footer> <slot name="footer"></slot> </footer> </div> -
插槽内容
<base-layout>
  <h1 slot="header">标题内容</h1>
  <p>主要内容1</p>
  <p>主要内容2</p>
  <p slot="footer">底部内容</p>
</base-layout>
作用域插槽
应用场景:父组件对子组件的内容进行加工处理
-
插槽定义
<ul> <li v-for= "item in list" v-bind:key= "item.id" > <slot v-bind:item="item">{{item.name}}</slot> </li> </ul> -
插槽内容
<fruit-list v-bind:list= "list">
  <template slot-scope="slotProps">
    <strong v-if="slotProps.item.current">{{ slotProps.item.text }}</strong>
  </template>
</fruit-list>
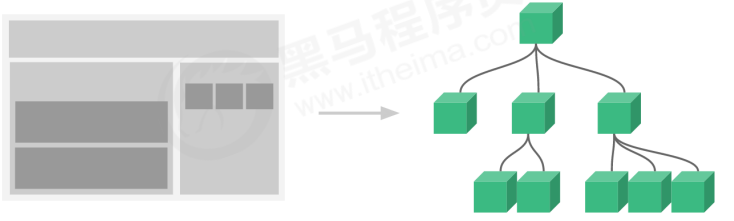
基于组件的案例
案例:购物车
UI

案例:需求分析
按照组件化方式实现业务需求
根据业务功能进行组件化划分
- 标题组件(展示文本)
- 列表组件(列表展示、商品数量变更、商品删除)
- 结算组件(计算商品总额)
案例:实现步骤
- 实现整体布局和样式效果
- 划分独立的功能组件
- 组合所有的子组件形成整体结构
- 逐个实现各个组件功能
- 标题组件
- 列表组件
- 结算组件