前言
上一节我们讲解了在Android平台如何通过MvvmCross实现启动界面,以及如何处理启动时的白屏问题。
这一节我们讲解一下如何在Android平台使用Fragment。
Fragment 应用
什么是Fragment
Fragment是Android开发常用的一种组件。通过Fragment的使用可以降低内存的使用,增加App的流畅度。已经有很多大神讲解过Fragment的内容了,请看这里。
MvvmCross中与Fragment相关的对象
在MvvmCross中,已经实现了很多与Fragment相关的对象,极大的方便我们的使用。
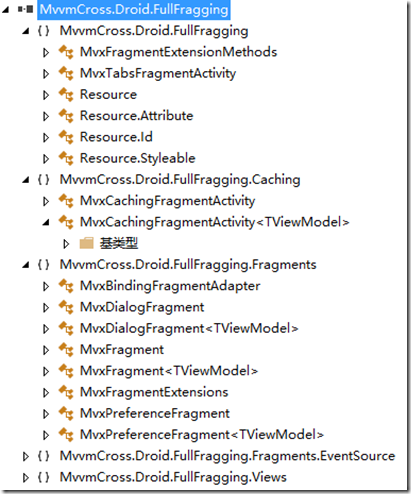
首先我们需要通过nuget 添加MvvmCross对Fragment的支持库 MvvmCross.Droid.FullFragging。现在我们来看一下MvvmCross为我们实现了哪些相关的对象。
这里我们会使用以下几个MvvmCross定义的几个对象:
- MvxFragment: Fragment对象的基类,所有基于MvvvmCross实现的Fragment都需要从此对象继承。

namespace MvvmCross.Droid.FullFragging.Fragments
{
    [Register("mvvmcross.droid.fullfragging.fragments.MvxFragment")]
    public class MvxFragment : MvxEventSourceFragment, IMvxFragmentView, IMvxBindingContextOwner, IMvxView, IMvxDataConsumer
    {
        protected MvxFragment();
        protected MvxFragment(IntPtr javaReference, JniHandleOwnership transfer);

        public IMvxBindingContext BindingContext { get; set; }
        public object DataContext { get; set; }
        public string UniqueImmutableCacheTag { get; }
        public virtual IMvxViewModel ViewModel { get; set; }

        public static MvxFragment NewInstance(Bundle bundle);
        public virtual void OnViewModelSet();
    }
}
- MvxFragmentAttribute,Fragment特性标签,标识了当前Fragment的嵌入的宿主以及显示时后些参数

namespace MvvmCross.Droid.Shared.Attributes
{
    [AttributeUsage(AttributeTargets.Class, AllowMultiple = true)]
    public class MvxFragmentAttribute : Attribute
    {
        public MvxFragmentAttribute(Type parentActivityViewModelType, int fragmentContentId, bool addToBackStack = false);

        public bool AddToBackStack { get; set; }
        public int FragmentContentId { get; }
        public bool IsCacheableFragment { get; set; }
        public Type ParentActivityViewModelType { get; }
        public Type ViewModelType { get; set; }
    }
}
- MvxCachingFragmentActivity:Fragment的宿主窗口

namespace MvvmCross.Droid.FullFragging.Caching
{
    [Register("mvvmcross.droid.fullfragging.caching.MvxCachingFragmentActivity")]
    public class MvxCachingFragmentActivity : MvxActivity, IFragmentCacheableActivity, IMvxFragmentHost
    {
        public const string ViewModelRequestBundleKey = "__mvxViewModelRequest";

        protected MvxCachingFragmentActivity();
        protected MvxCachingFragmentActivity(IntPtr javaReference, JniHandleOwnership transfer);

        public IFragmentCacheConfiguration FragmentCacheConfiguration { get; }

        public virtual IFragmentCacheConfiguration BuildFragmentCacheConfiguration();
        public virtual bool Close(IMvxViewModel viewModel);
        public override void OnBackPressed();
        public virtual void OnBeforeFragmentChanging(IMvxCachedFragmentInfo fragmentInfo, FragmentTransaction transaction);
        public virtual void OnFragmentChanged(IMvxCachedFragmentInfo fragmentInfo);
        public virtual void OnFragmentChanging(IMvxCachedFragmentInfo fragmentInfo, FragmentTransaction transaction);
        public virtual void OnFragmentCreated(IMvxCachedFragmentInfo fragmentInfo, FragmentTransaction transaction);
        public virtual void OnFragmentPopped(IList<IMvxCachedFragmentInfo> currentFragmentsInfo);
        public virtual bool Show(MvxViewModelRequest request, Bundle bundle, Type fragmentType, MvxFragmentAttribute fragmentAttribute);
        protected virtual void CloseFragment(string tag, int contentId);
        protected virtual string FragmentJavaName(Type fragmentType);
        protected virtual IEnumerable<Fragment> GetCurrentCacheableFragments();
        protected virtual List<IMvxCachedFragmentInfo> GetCurrentCacheableFragmentsInfo();
        protected IMvxCachedFragmentInfo GetFragmentInfoByTag(string tag);
        protected virtual string GetFragmentTag(MvxViewModelRequest request, Bundle bundle, Type fragmentType);
        protected virtual IMvxCachedFragmentInfo GetLastFragmentInfo();
        protected virtual string GetTagFromFragment(Fragment fragment);
        protected override void OnCreate(Bundle bundle);
        protected override void OnPostCreate(Bundle savedInstanceState);
        protected override void OnSaveInstanceState(Bundle outState);
        protected virtual void ReplaceFragment(FragmentTransaction ft, IMvxCachedFragmentInfo fragInfo);
        protected virtual FragmentReplaceMode ShouldReplaceCurrentFragment(IMvxCachedFragmentInfo newFragment, IMvxCachedFragmentInfo currentFragment, Bundle replacementBundle);
        protected virtual void ShowFragment(string tag, int contentId, Bundle bundle, bool forceAddToBackStack = false, bool forceReplaceFragment = false);

        protected enum FragmentReplaceMode
        {
            NoReplace = 0,
            ReplaceFragment = 1,
            ReplaceFragmentAndViewModel = 2
        }
    }
}
- MvxFragmentsPresenter,实对Fragment对象的显示,内部对象,MvvmCross框架将自动调用

namespace MvvmCross.Droid.Shared.Presenter
{
    public class MvxFragmentsPresenter : MvxAndroidViewPresenter
    {
        public const string ViewModelRequestBundleKey = "__mvxViewModelRequest";
        protected FragmentHostRegistrationSettings _fragmentHostRegistrationSettings;
        protected Lazy<IMvxNavigationSerializer> _lazyNavigationSerializerFactory;

        public MvxFragmentsPresenter(IEnumerable<Assembly> AndroidViewAssemblies);

        protected IMvxNavigationSerializer Serializer { get; }

        public sealed override void Close(IMvxViewModel viewModel);
        public sealed override void Show(MvxViewModelRequest request);
        public void Show(MvxViewModelRequest request, MvxViewModelRequest fragmentRequest);
        protected virtual void CloseActivity(IMvxViewModel viewModel);
        protected virtual void CloseFragment(IMvxViewModel viewModel);
        protected IMvxFragmentHost GetActualFragmentHost();
        protected virtual void ShowActivity(MvxViewModelRequest request, MvxViewModelRequest fragmentRequest = null);
        protected virtual void ShowFragment(MvxViewModelRequest request);
    }
}
仿微信的首页来一发
好了,对MvvmCross对Fragment的支持对象我们已经介绍完毕,下面我就动手做一个Fragment的示例,我们就仿照微信的主窗口来试一下
- 首先,定义好宿主,我们用上一节使用的Sample,修改一下主窗口的布局,下部为四个导航按钮,其余部分为当前功能模块的显示窗口,功能模块通过Fragment方式进行展示

using Android.App;
using Android.OS;
using Android.Widget;
using MvvmCross.Droid.Views;
using MvxSample.ViewModels;

namespace MvxSample.Droid.Views
{
    [Activity(Label = "MainView", MainLauncher = false, Theme ="@android:style/Theme.Light.NoTitleBar")]
    public class MainView : MvvmCross.Droid.FullFragging.Caching.MvxCachingFragmentActivity<MainViewModel>
    {
        protected override void OnCreate(Bundle savedInstanceState)
        {
            base.OnCreate(savedInstanceState);

            SetContentView(Resource.Layout.MainPage);

            var grp = FindViewById<RadioGroup>(Resource.Id.main_rg_toolbar);
            grp.CheckedChange += (s, e) =>
            {
                var btn = FindViewById<RadioButton>(e.CheckedId);
                if (btn.Checked == false) return;
                if (e.CheckedId == Resource.Id.main_rb_chat)
                {
                    ViewModel.ShowChat();
                }
                else if (e.CheckedId == Resource.Id.main_rb_friends)
                {
                    ViewModel.ShowFriends();
                }
                else if (e.CheckedId == Resource.Id.main_rb_extras)
                {
                    ViewModel.ShowExtras();
                }
                else if (e.CheckedId == Resource.Id.main_rb_my)
                {
                    ViewModel.ShowMy();
                }
            };
            ViewModel.ShowChat();
        }
    }
}

<?xml version="1.0" encoding="utf-8"?>
<LinearLayout xmlns:android="http://schemas.android.com/apk/res/android"
    android:layout_width="match_parent"
    android:layout_height="match_parent"
    android:orientation="vertical">
    <LinearLayout
        android:id="@+id/main_container"
        android:layout_width="match_parent"
        android:layout_weight="10"
        android:layout_height="match_parent" />
    <RadioGroup
        android:minHeight="50dp"
        android:layout_width="match_parent"
        android:layout_height="wrap_content"
        android:orientation="horizontal"
        android:layoutMode="clipBounds"
        android:id="@+id/main_rg_toolbar"
        android:layout_weight="1">
        <RadioButton
            android:layout_width="match_parent"
            android:layout_height="wrap_content"
            android:checked="true"
            android:text="微信"
            android:gravity="center"
            android:layout_weight="1"
            android:button="@null"
            android:background="@drawable/radiobtn"
            android:id="@+id/main_rb_chat" />
        <RadioButton
            android:layout_width="match_parent"
            android:layout_height="wrap_content"
            android:text="联系人"
            android:gravity="center"
            android:layout_weight="1"
            android:button="@null"
            android:background="@drawable/radiobtn"
            android:id="@+id/main_rb_friends" />
        <RadioButton
            android:layout_width="match_parent"
            android:layout_height="wrap_content"
            android:text="发现"
            android:gravity="center"
            android:layout_weight="1"
            android:button="@null"
            android:background="@drawable/radiobtn"
            android:id="@+id/main_rb_extras" />
        <RadioButton
            android:layout_width="match_parent"
            android:layout_height="wrap_content"
            android:text="我"
            android:gravity="center"
            android:layout_weight="1"
            android:button="@null"
            android:background="@drawable/radiobtn"
            android:id="@+id/main_rb_my" />
    </RadioGroup>
</LinearLayout>
- 下来,我们定义好要展示的Fragment及布局

namespace MvxSample.Droid.Views
{
    [MvxFragment(typeof(MainViewModel), Resource.Id.main_container)]
    [Register("mvxsample.droid.views.ChatFragment")]
    public class ChatFragment: MvxFragment<ChatViewModel>
    {
        public override View OnCreateView(LayoutInflater inflater, ViewGroup container, Bundle savedInstanceState)
        {
            var ignore = base.OnCreateView(inflater, container, savedInstanceState);

            var view = this.BindingInflate(Resource.Layout.ChatFragment, container, false);
            return view;
        }
    }
}

<?xml version="1.0" encoding="utf-8"?>
<RelativeLayout xmlns:android="http://schemas.android.com/apk/res/android"
    android:layout_width="match_parent"
    android:layout_height="match_parent"
    android:background="@android:color/holo_purple">
    <RelativeLayout
        android:background="@android:drawable/screen_background_dark_transparent"
        android:layout_alignParentTop="true"
        android:layout_height="50dp"
        android:layout_width="match_parent">
        <TextView
            android:id="@+id/chat_top_title"
            android:allowUndo="true"
            android:layout_centerInParent="true"
            android:layout_width="match_parent"
            android:layout_height="match_parent"
            android:text="微信"
            android:textSize="20dip"
            android:gravity="center"
            android:textColor="@android:color/black" />
    </RelativeLayout>
</RelativeLayout>
按照定义好的ChatFragment,我们定义其它的几个Fragment,分别为FriendsFragment、ExtrasFragment、MyFragment。
- 在Setup重载方法 CreateViewPresenter:

namespace MvxSample.Droid
{
    public class Setup : MvxAndroidSetup
    {
        public Setup(Context applicationContext) : base(applicationContext)
        {

        }

        protected override IMvxApplication CreateApp()
        {
            return new App();
        }

        protected override IMvxAndroidViewPresenter CreateViewPresenter()
        {
            var mvxFragmentsPresenter = new MvxFragmentsPresenter(AndroidViewAssemblies);
            Mvx.RegisterSingleton<IMvxAndroidViewPresenter>(mvxFragmentsPresenter);
            return mvxFragmentsPresenter;
        }
    }
}
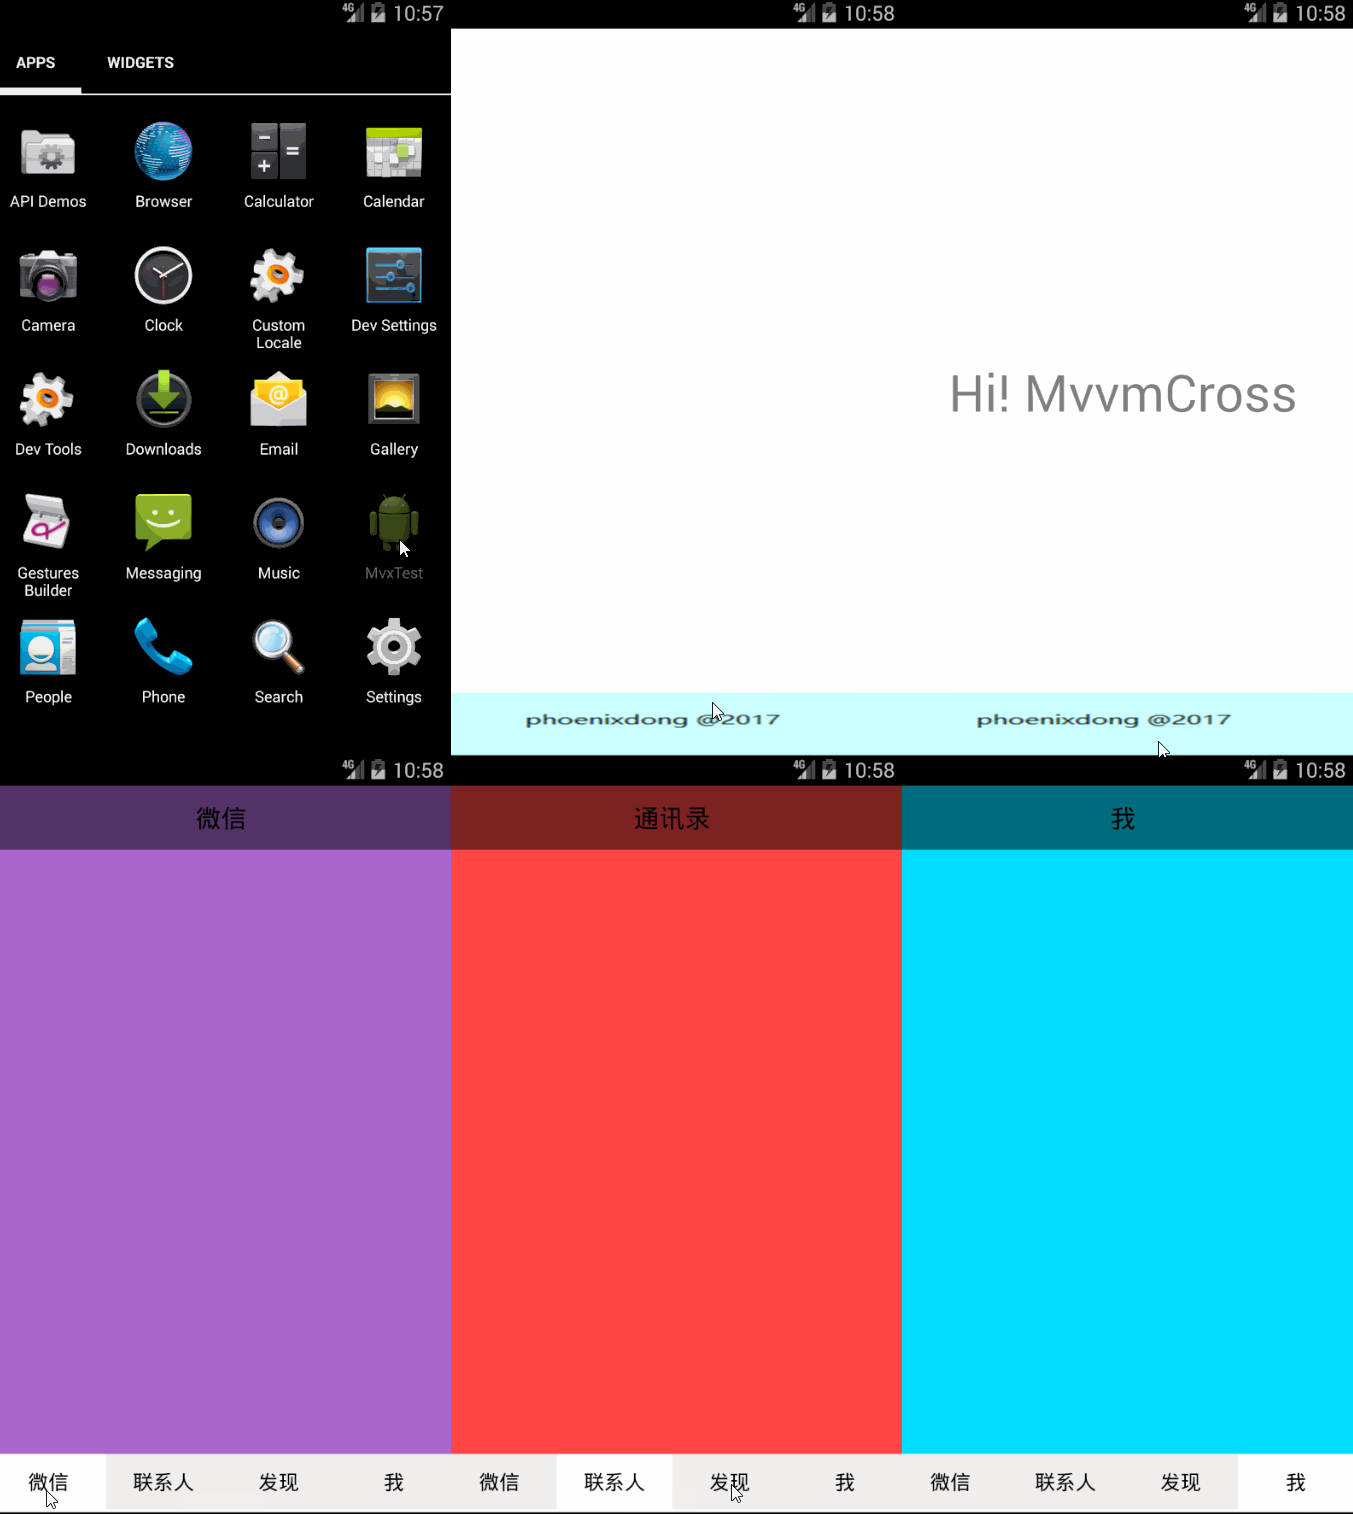
- OK,全部代码就完成了,我们运行一下看看效果吧

我们可以看到,根据选中的导航项不时,会展示不同的Fragment的内容。
小结
这一节我们讲解了Framgent在MvvmCross的应用。包括宿主窗口的定义,Fragment的定义以及如何在Setup中使用MvxFragmentPresenter。


