tkinter 的pack()可以设置的属性如下:
pack_configure(self, cnf={}, **kw)Pack a widget in the parent widget. Use as options:
after=widget - pack it after you have packed widget
anchor=NSEW (or subset) - position widget according to
given direction
before=widget - pack it before you will pack widget
expand=bool - expand widget if parent size grows
fill=NONE or X or Y or BOTH - fill widget if widget grows
in=master - use master to contain this widget
in_=master - see 'in' option description
ipadx=amount - add internal padding in x direction
ipady=amount - add internal padding in y direction
padx=amount - add padding in x direction
pady=amount - add padding in y direction
side=TOP or BOTTOM or LEFT or RIGHT - where to add this widget.
中文解释如下:
anchor=NSEW,表示设置我们要加的当前部件的位置
side=TOP or BOTTOM or LEFT or RIGHT 表示在父类容器的什么地方家我们的部件
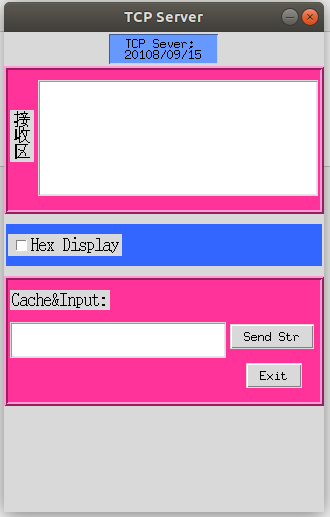
Python 入坑的pack()方法:
 1 #coding:utf-8
 2 import tkinter
 3 # 导入TK的符号常亮
 4 from tkinter.constants import *
 5
 6 def sendStr():
 7     print('Data Send Ok!')
 8
 9
10 #  实例化TK类,主窗口必须为.TK(),而其他子窗口为.Toplevel()
11 top = tkinter.Tk()
12
13 # 设置窗口的尺寸大小
14 top.wm_geometry('320x480+1000+100')
15
16 # 不允许 改变 窗口的宽和高
17 top.wm_resizable(False,False)
18
19 # 设置窗口标题
20 top.title('TCP Server')
21
22 # 设置label标签
23 L1 = tkinter.Label(top, text='TCP Sever;
20108/09/15',
24                    width=15, justify=LEFT, relief=RIDGE, background='#6699ff', )
25     .pack_configure(anchor=S, side=TOP, ipady=2, pady=2, fill=NONE)
26
27 # 设置容器
28 frame1 = tkinter.Frame(top,height=80,width=60,relief=RIDGE, bg='#ff3399',bd=5,borderwidth=4)
29 # 设置填充和布局
30 frame1.pack(fill=NONE,ipady=2,expand=False)
31
32 # 添加接收区文字标签
33 L2 = tkinter.Label(frame1,text='接
收
区',width=2, justify=LEFT, font=("宋体", 12, "bold"),)
34     .pack(padx=2,pady=40,side=LEFT,anchor=N)
35
36 # 添加接收区的文本框
37 txt1 = tkinter.Text(frame1,width = 40, height = 10).pack(padx=2,pady=10,side=RIGHT,anchor=N)
38
39
40 frame2 = tkinter.Frame(top, relief=RIDGE,bg='#3366ff')
41 frame2.pack(fill=X, padx=2,pady=10,side=TOP)
42
43 # 加一个复选框,一个按键
44 chk_text = 'Hex Display'
45 int_if_choise = tkinter.IntVar()
46 chk1 = tkinter.Checkbutton(frame2,text=chk_text,font=('黑体',12),variable=int_if_choise,onvalue='OK',offvalue='NO')
47 chk1.pack(fill=NONE,side=LEFT,padx=2,pady=10)
48 print('shuchu:',int_if_choise)
49
50
51 # 设置容器
52 frame3 = tkinter.Frame(top,height=120,width=60,relief=RIDGE, bg='#ff3399',bd=5,borderwidth=4)
53 # 设置填充和布局
54 frame3.pack(fill=X,ipady=2,expand=False)
55
56 # 设置字符串变量
57 ServerReceiveVar = tkinter.StringVar(top,'')
58
59 L3 = tkinter.Label(frame3, text='Cache&Input:',font=('黑体',12))
60 L3.pack(fill=NONE, expand=NO, side=TOP, anchor=W, padx=2,pady=10)
61
62
63
64 txt2 = tkinter.Text(frame3, height = 2, width = 30).pack(padx=2, pady=2, ipady=4, side=LEFT, anchor=N)
65
66
67 button1 = tkinter.Button(frame3,text='Send Str', command=sendStr).pack(side=TOP, anchor=W, padx=2, pady=4)
68
69 # IP 列表
70 button2 = tkinter.Button(frame3,text="Exit",command=top.destroy).pack(side=TOP, anchor=N, padx=2, pady=10)
71
72 top.mainloop()
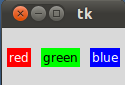
 1 from Tkinter import *
 2
 3 root = Tk()
 4
 5 w = Label(root, text="red", bg="red", fg="white")
 6 w.pack(padx=5, pady=10, side=LEFT)
 7 w = Label(root, text="green", bg="green", fg="black")
 8 w.pack(padx=5, pady=20, side=LEFT)
 9 w = Label(root, text="blue", bg="blue", fg="white")
10 w.pack(padx=5, pady=20, side=LEFT)
11
12 mainloop()
dd