1.打开vscode安装插件
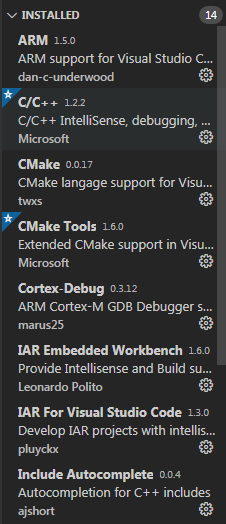
主要用到IAR for visual studio code,没有使用IAR Embedded workbench,在编译的时候卡住,目前不知道什么原因,可能是IAR的版本过低,7.0版本。
2.打开工程文件夹
会由IAR for visual studio code 这个插件自动生成2个文件:c_cpp_properties.json和iar-vsc.json。如果不能自动识别,手动输入路径
iar-vsc.json
{
    "ewp": "c:\Users\Administrator\Desktop\raspi12\EWARM\Project.ewp",
    "configuration": "Debug",
    "compiler": "C:\Program Files (x86)\IAR Systems\Embedded Workbench 7.0\arm\bin\iccarm.exe",
    "workbench": "C:\Program Files (x86)\IAR Systems\Embedded Workbench 7.0"
}
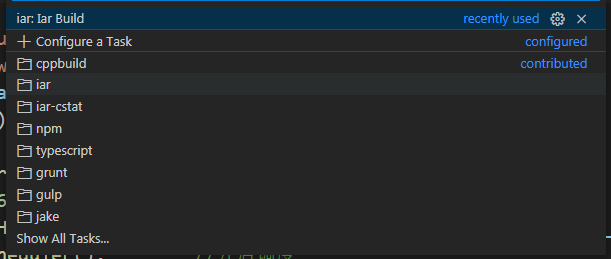
点击Terminal -> RUN TASK,选择iar -> iar:build
会自动生成tasks.json
{
	"version": "2.0.0",
	"tasks": [
		{
			"type": "iar",
			"command": "build",
			"project": "${command:iar-settings.project-file}",
			"config": "${command:iar-settings.project-configuration}",
			"builder": "${command:iar-settings.workbench}/common/bin/IarBuild.exe",
			"label": "iar: Iar Build",
			"problemMatcher": [
				"$iar-cc",
				"$iar-linker"
			],
			"group": {
				"kind": "build",
				"isDefault": true
			}
		}
	]
}
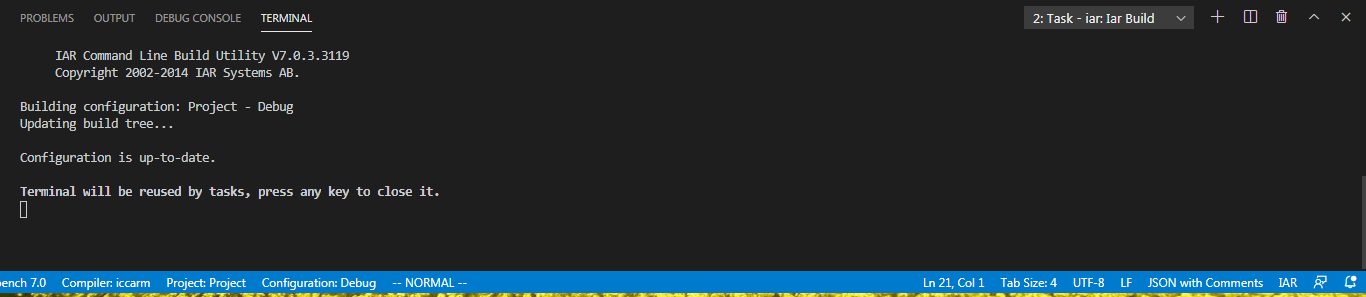
3.编译
通过Terminal -> RUN build Task
也可以快捷键 Ctrl + Shift + B 来进行编译
4.调试
调试需要用到一个调试器,这里用到了arm交叉编译工具 gcc-arm-none-eabi。安装,配置环境变量。
直接在文件夹创建launch.json。按Ctrl + space或右下角点add configuration。
选择 。
。
需要修改的地方:
 "program": "${workspaceFolder}/EWARM/TEST/Exe/Project.out"    //out路径
 "miDebuggerPath": "arm-none-eabi-gdb.exe",          //上面安装的交叉编译工具里的调试器,因为加入了环境变量,所以不需要路径
 "debugServerPath": "C:/Program Files (x86)/SEGGER/JLink_V502e/JLinkGDBServerCL.exe",  //这里使用了j-link进行调试,该路径是安装的j-link驱动的服务路径
 "debugServerArgs": "-if swd -singlerun -strict -endian little -speed auto -port 3333 -device STM32F405RG -vd -strict -halt",   //这里修改设备名,  STM32F405RG
完整的文件:
launch.json
{
    "configurations": [
    {
        "name": "Debug GDBServer",
        "type": "cppdbg",
        "request": "launch",
        "program": "${workspaceFolder}/EWARM/TEST/Exe/Project.out",
        "stopAtEntry": true,
        "cwd": "${workspaceFolder}",
        "externalConsole": true,
        "MIMode": "gdb",
        "miDebuggerPath": "arm-none-eabi-gdb.exe",
        "debugServerPath": "C:/Program Files (x86)/SEGGER/JLink_V502e/JLinkGDBServerCL.exe",
        "debugServerArgs": "-if swd -singlerun -strict -endian little -speed auto -port 3333 -device STM32F405RG -vd -strict -halt",
        "serverStarted": "Connected\ to\ target",
        "serverLaunchTimeout": 5000,
        "filterStderr": false,
        "filterStdout": true,
        "setupCommands": [
            {
                "text": "target remote localhost:3333"
            },
            {
                "text": "monitor flash breakpoints = 1"
            },
            {
                "text": "monitor flash download = 1"
            },
            {
                "text": "monitor reset"
            },
            {
                "text": "monitor reset"
            }
        ]
    }
    ]
}