在.net framework框架下可以使用WebApiTestClientWebApi生成WebAPI接口文档与方便接口测试用,而在DotnetCore却没有找到这个工具了,baidu查找一下发现有一个相类似的工具,它就是Swagger,和使用WebApiTestClientWebApi差不多的,这里Swagger配置过程整理如下:
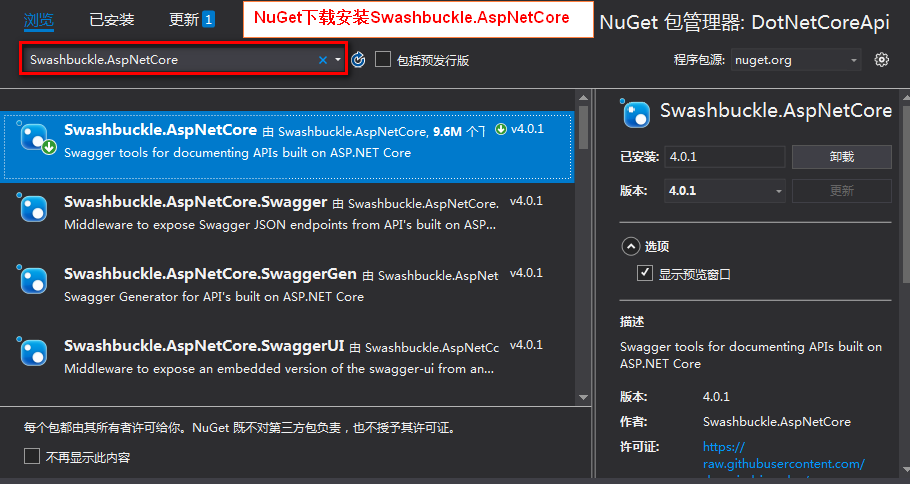
一.下载Swashbuckle.AspNetCore
NuGet下载安装Swashbuckle.AspNetCore

二.Startup.cs代码修改
1.ConfigureServices方法加入Swagger新增以下代码
        //运行时调用此方法。使用此方法向容器中添加服务。
        public void ConfigureServices(IServiceCollection services)
        {
            services.AddMvc().SetCompatibilityVersion(CompatibilityVersion.Version_2_2);
            //Swagger新增代码
            services.AddSwaggerGen(options =>
            {
                //API文档信息
                options.SwaggerDoc("v1", new Info
                {
                    Version = "V1",
                    Title = "PCB WebApi",
                    Description = "Web Api文档",
                    TermsOfService = "None"
                });
                //API调用说明(包含Model类)
                var basePath = AppContext.BaseDirectory;
                var xmlPath = Path.Combine(basePath, "DotNetCoreApi.xml"); //xml为解决方案名
                //Model类在另外一个解决方案相应也需加进来
                options.IncludeXmlComments(xmlPath, true);
            });
        }
2.Configure方法加入Swagger新增以下代码
       // 运行时调用此方法。使用此方法配置HTTP请求管道。
        public void Configure(IApplicationBuilder app, IHostingEnvironment env)
        {
            if (env.IsDevelopment())
            {
                app.UseDeveloperExceptionPage();
            }
            else
            {
                // 默认的hsts值为30天。您可能希望为生产场景更改此设置,请参阅https://aka.ms/aspnetcore-hsts。
                app.UseHsts();
            }
            app.UseHttpsRedirection();
            app.UseMvc();
            //Swagger新增以下代码
            app.UseStaticFiles();//启用默认文件夹wwwroot
            app.UseSwagger();
            app.UseSwaggerUI(action =>
            {
                action.ShowExtensions();
                action.SwaggerEndpoint("/swagger/v1/swagger.json", "V1 Docs");
            });
        }
三.增加Index.html
在wwwroot节点目录下新增Index.html做为启动页(当然不加也可以的)
以下是Index.html内容
<!DOCTYPE html>
<html>
<head>
    <meta charset="utf-8" />
    <title>swagger</title>
    <style type="text/css">
        html, body {
            padding: 0;
            margin: 0;
            width: 100%;
            height: 96%;
        }

        iframe {
            padding: 0;
            margin: 0;
            width: 100%;
            height: 100%;
            border: 0;
        }
    </style>
</head>
<body>
    <iframe src="/swagger/index.html" id="iframe_swagger" name="iframe_swagger"></iframe>
</body>
</html>
四.修改aunchSettings.json启动项
l
aunchSettings.json改后配置

{
  "$schema": "http://json.schemastore.org/launchsettings.json",
  "iisSettings": {
    "windowsAuthentication": false,
    "anonymousAuthentication": true,
    "iisExpress": {
      "applicationUrl": "http://localhost:24324",
      "sslPort": 44394
    }
  },
  "profiles": {
    "IIS Express": {
      "commandName": "IISExpress",
      "launchBrowser": true,
      "launchUrl": "Index.html",
      "environmentVariables": {
        "ASPNETCORE_ENVIRONMENT": "Development"
      }
    },
    "DotNetCoreApi": {
      "commandName": "Project",
      "launchBrowser": true,
      "launchUrl": "api/values",
      "applicationUrl": "https://localhost:5001;http://localhost:5000",
      "environmentVariables": {
        "ASPNETCORE_ENVIRONMENT": "Development"
      }
    }
  }
}
五.输出XML设置

六.写2个WebApi测试用
    /// <summary>
    /// 获取工艺流程
    /// </summary>
    [Route("api/[controller]")]
    [ApiController]
    public class ppeflowController : ControllerBase
    {
        /// <summary>
        /// 获取工艺流程1
        /// </summary>
        /// <param name="ino"></param>
        /// <returns></returns>
        [HttpGet]
        public List<ppeflow> getPpeflow([FromQuery] InputInfo ino)
        {
            return new List<ppeflow>() {
                new ppeflow() {  Id = 15,  techname = "开料" },
                new ppeflow() { Id = 15, techname = "钻孔" },
                new ppeflow() { Id = 15, techname = "沉铜" },
                new ppeflow() { Id = 15, techname = "板镀" }
            };
        }
        /// <summary>
        /// 获取工艺流程2
        /// </summary>
        /// <param name="ino"></param>
        /// <returns></returns>
        [HttpPost]
        public List<ppeflow> getPpeflow2( InputInfo ino)
        {
            return new List<ppeflow>() {
                new ppeflow() {  Id = 15,  techname = "开料" },
                new ppeflow() { Id = 15, techname = "钻孔" },
                new ppeflow() { Id = 15, techname = "沉铜" },
                new ppeflow() { Id = 15, techname = "板镀" }
            };
        }
    }
七 .启动WebAPI查看Swagger 生成WebAPI文档效果

