Process Automation Accredited Professional Exam Guide
- Process Automation Accredited Professional Exam Guide
- 个人备考心得感想
- 证书
- Process Automation Accredited Professional Exam Guide
- About the Exam
- Process Automation Accredited Professional Exam Outline
- Exam Study Course
- Process Automation Accredited Professional Exam Important Topics
- Context
- Flow Screen Input Component: Lookup
Let users search for a record in a flow.- Set Up Approvals for External Users in Your Experience Cloud site
- Run Flow As Another User
- Per-Transaction Flow Limits
- Flow Interviews
- Enable User Access For Your Flow
- Testing/Debug Options in Flow Builder (Run Flow as another User, Run & Debug Buttons)
- Debugging and Testing a Flow
- Which Context Do Flows Run In?
- Running User of a Flow
- Monitor Flows and Processes
- Path
- Kanban
- Flow Best Practices
- Best Practices for Designing Processes
- Flow vs Workflow Rule
- Add Automated Actions to an Approval Process
- Approval Limits
- Einstein Next Best Action
- Sample Exam Questions
个人备考心得感想
Accredited Professional(AP)是Salesforce跟Partner Community联合推出的新认证体系。
不像Trailhead,AP认证一般只专注对SFDC平台某项功能进行考察。就比如我2022/4/27考取的 Process Automation。
如果你考过Administrator和App Builder认证,你知道,这两个认证都涉及 Process Automation的内容。
主要解决就是:给你一个需求,你可以判断出,是可以用配置方式实现还是必须用代码方式实现。
但这个考试也考察了一些:Best Practice,步骤,核心组件,限制。
意外的是,官方的给的5道example exam question,我考试时候竟然出了2道原题。
个人大概备考时间是1个月。
有个考试时需要注意的点,需要VPN来安装一个拓展才能开始考试,这点辛亏我们公司有,要不我就扒瞎了。
考试时候接近于Administrator考试,可以Flag稍后答题。
提交考试后,立马就可以知道结果,过了还是没过。
证书
大概过了2天,给我发了邮件。

Process Automation Accredited Professional Exam Guide
Process Automation Accredited Professional Exam covers Process Automation capabilities of Salesforce. (Process Builder, Approval Process, Flow, Workflow, Einstein Next Best Action)
About the Exam
- Content: 60 multiple-choice / multi-select questions
- Passing Score: 41 out of 60 questions
- Registration Fee: $150 ($75 until Jan 31, 2022), plus applicable taxes
- Retake Exam Fee: $75, plus applicable taxes
Process Automation Accredited Professional Exam Outline
| Topics | Weighting |
|---|---|
| Flow Basics: Given a scenario, choose the right automation tool Describe how and when to use Flow Builder and Process Builder Describe how and when to use Approvals |
17% |
| Tools and Best Practices: Elaborate on the capabilities, limitations, components, and elements of process automation tools Explain the options and steps involved in creating Flows, Processes, and Approvals Describe automation best practices |
34% |
| **Testing, Distribution, and Monitoring: ** Identify test cases Describe declarative distribution options Describe monitoring capabilities including Flow Interviews |
22% |
| **Use Cases: ** Map process automation capabilities to specific requirements for various use cases including sales, service, and portals |
27% |
Exam Study Course
Exam curriculum is available on Salesforce Partner Learning Camp. Please refer to Accredited Professional Partner Community Page for details.
Process Automation Accredited Professional Exam Important Topics
-
Given a scenario identify the recommended process automation to be used. (Workflow vs Process Builder vs Flow)
-
Given a scenario identify where flow should be run is User Mode Vs System Mode
-
Given a scenario identify use of Apex vs Automation Tools (Flow, Process Builder)
-
General Flow Limits
- Versions per flow: 50
- Executed elements at runtime per flow: 2,000
-
- A flow interview is an instance of a flow, much like a record is an instance of an object. The flow interview can do many things, including look up and manipulate Salesforce data. In an interview, you can pass data into variables and other resources. The data can come from a variety of sources, such as Salesforce records that the flow queries, information that a user enters in a screen input field, or something that you manually enter.
-
Testing/Debug Options in Flow Builder (Run Flow as another User, Run & Debug Buttons)
-
Where can flows be accessed on screen
- Lightning pages
- Flow actions
- Utility bar
- Experience Builder page
- Custom Lightning components
- Visualforce pages
- Web tabs
- Custom Buttons and links
-
Automated Actions
- When can a process be triggered
- A record change process starts when a record is created or updated
- An event process starts when a platform event message is received
- An invocable process starts when something else, like another process, invokes it
-
Different Action Types available Process builder
-
Apex (Apex Method with
@InvocableMethodAnnotation)@InvocableMethod(label='yourLabel' description='yourDescription')- Only one method in a class can have the
@InvocableMethodannotation. - The invocable method must be
staticandpublic or global, and its class must be anouter class. - Other annotations CAN NOT be used with the InvocableMethod annotation.
- Invocable methods can have 0 OR 1 AND ONLY 1 parameter.
- These methods can accept only a list of X or list-of-lists of X.
- primitive data types (List
,List<List >) - sObject type (List
,List<List >) - generic sObject type (List
,List<List >) - user-defined type (custom global or public Class must contain at least one
@InvocableVariablevariable)@InvocableVariable(label='yourLabel' description='yourDescription' required=(true | false))
- primitive data types (List
-
Create a Record
-
Email Alerts
-
Flows (Autolaunched Flow)
-
Post to Chatter
-
Processes (Invocable Process)
-
Quick Actions
-
Quip
-
Send Custom Notification
-
Submit for Approval
-
Update Records (Any related record)
-
-
Set Time options for Scheduled Actions

X Days(Hours) After(Before) Date(Now)
-
Flow Types
- Screen Flow
- Record-Triggered Flow
- Schedule-Triggered Flow
- Start Date

- Start Time

- Frequency

- Start Date
- Platform Event-Triggered Flow
- Autolaunched Flow

-
Steps to use Logic Elements in a Flow (Assignment, Decision, Loop, Collection Sort)
-
Approval Process Actions (Initial Submission, Final Approval, Final Rejection, Recall)
-
Options for responding to Approval Requests (Approve / Reject Button on UI, Email, Chatter)
-
Recommendation Automation with Einstein Next Best Action - https://trailhead.salesforce.com/content/learn/modules/recommendation-automation-next-best-action
-
Salesforce Anywhere Automation Tool - https://trailhead.salesforce.com/en/content/learn/modules/quip-automation-tools
-
Lightning Flow for Service - https://trailhead.salesforce.com/en/content/learn/modules/service_lightning_flow_for_service
-
Be an Innovator with Flow Series - https://www.youtube.com/watch?v=_z7S1dFG-q4
Context
Process Builder - Scheduled Action
https://help.salesforce.com/s/articleView?id=sf.process_action_schedule.htm&type=5
To schedule actions in a record-change process, make sure that one of the following options is true for your action group.
- The process starts only when a record is created (1).
- The process starts when a record is created or edited (2), and the associated criteria node executes actions only when specified changes are made (3).

Approval Process
In creating Approval Processes we have follow 8 steps. Understand each and every step clearly.
- Selecting Approval wizard
- Enter Name, Unique name and description.
- Select Criteria for Entering Process.
- Specify Approver Field and Record Editability.
- Select Email Notification Template.
- Configure Approval Request Page Selecting Approval wizard.layout.
- Specify Initial submitters.
- Activate the approval process.
Step 1:- Selecting Approval wizard.
We have two different types of wizards they are
- Jump Start wizard :– Jump start will have automatic default settings and it is quick way to create simple approval processes.
- Standard Setup Wizard :- By using standard setup Wizard we can create complex approval processes which have multiple steps.
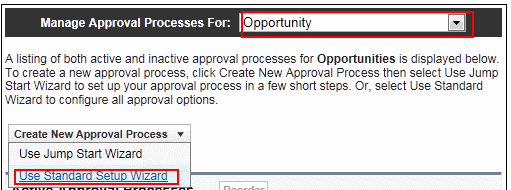
use standard setup wizard
Here we selected Standard Setup Wizard and selected Standard Object opportunity.
Step 2 :- Enter name, Unique name and description.
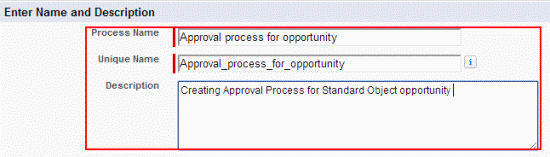
Approval Process example in salesforce
Now specify the entry criteria and this is optional . This option is used to mention which record should enter the approval process. We can enter formula logic or Selecting certain fields, operator and value as shown below.
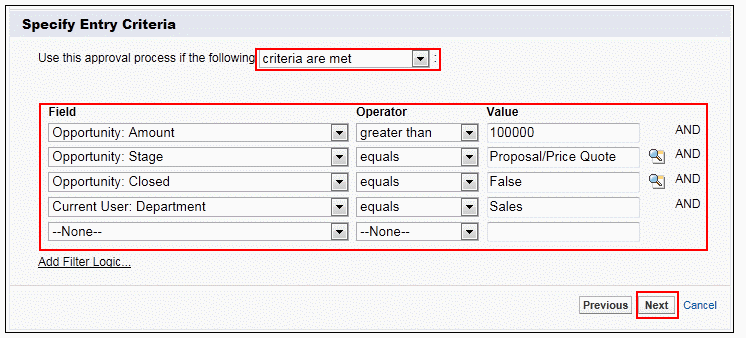
Specify entry criteria
In the above screenshot we made only the sales team is to submit opportunity reviews so we entered the criteria Current User : Department equals to Sales.
Select Next.
Step 3 :- Selecting Approver Field and Record Editability Properties.
In this step we want to sent automatic approval request to a user called manager so select manager as shown below.
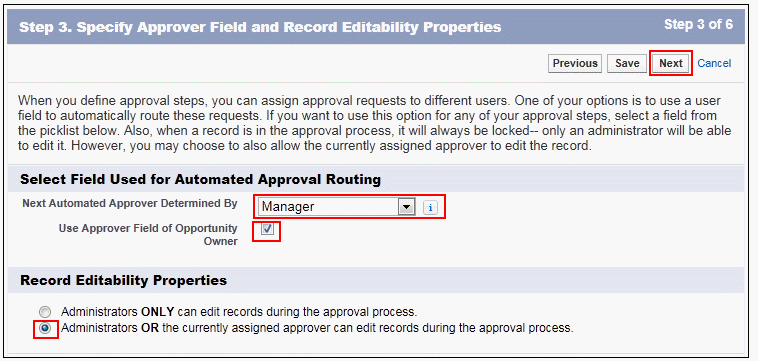
specify Approver field and record editability properties
We have selected use Approver Field of Opportunity Owner check box, we can set the approval process to use the the standard manager field or Custom Field and then select appropriate record Editability Properties as shown above.
When a approval process is assigned to a user, salesforce.com automatically sends e-mail so we have to create E-mail template to select E-mail notification template in Step 4.
Step 4 :- Select Email Notification Template.

Approval Process example in salesforce
Step 5 :- Select Fields to Display on approval page Layout page.
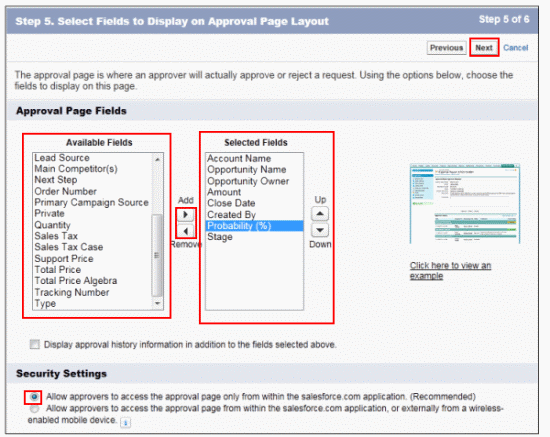
Approval Process example in salesforce
Approver page is that where approver approves or rejects a request. Here we select the fields that to display on the approval request request page. We have selected the field to display like Date, Status, Assigned to, Actual Approver, Comments and Overall Status as shown below.

Approval Process example in salesforce
Step 6 :- Specify initial Submitters.
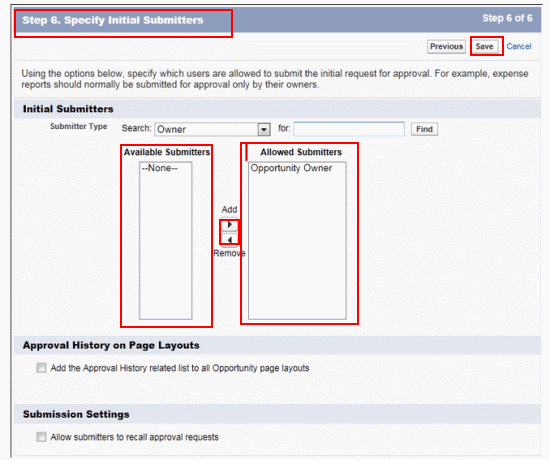
Approval Process example in salesforce
We have selected opportunity owner user to submit records for approval and optionally we can select Add the approval history relates list to all opportunity page layouts and Allow submitters to recall approval requests.
Select Save Button.
Creating Approval Steps.
We are able to activate the approval process until we have created at least one approval step for approval processes.
To create approval steps go to Setup=>Build=>Create=>Workflows & approvals=>Approvals=>select the approval process we have created=>Approval Steps=>New approval Step.

creating approval steps
Enter name, Unique name description and Step number as shown below.
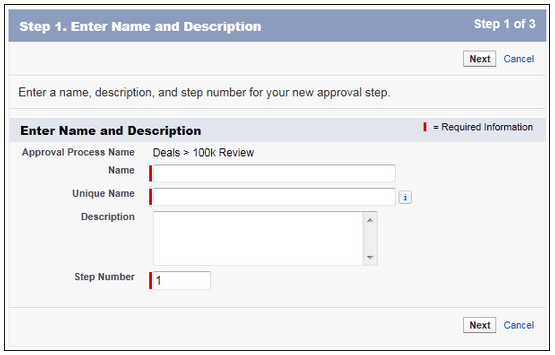
creating approval steps
Select Next.
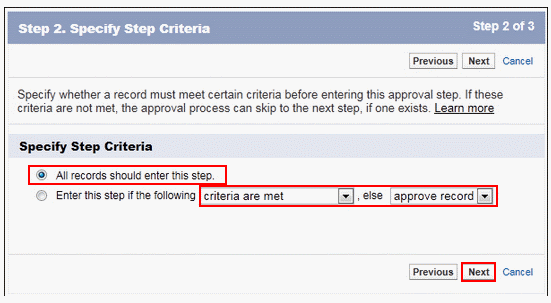
creating approval steps
In the above option we can select all records should enter this step or only the records who have certain attributes.
Now select Next.

creating approval steps
In Step 3 : Select Assigned Approver where we choose to approve he record.
When we select Automatically assign to approver(s) option the page will be like below.
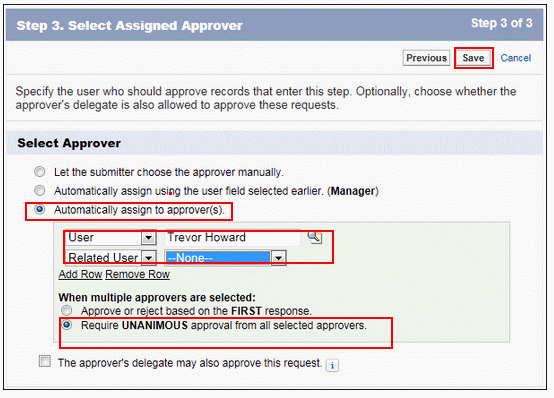
creating approval steps
Delegate approvers cannot reassign approval request
Now Select Save Button.
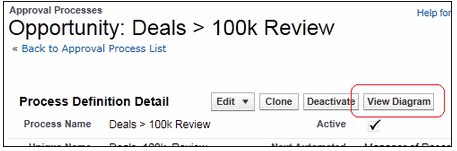
Now go to detail view of the approval processes and select View Diagram as shown below.
Approval Process example in salesforce
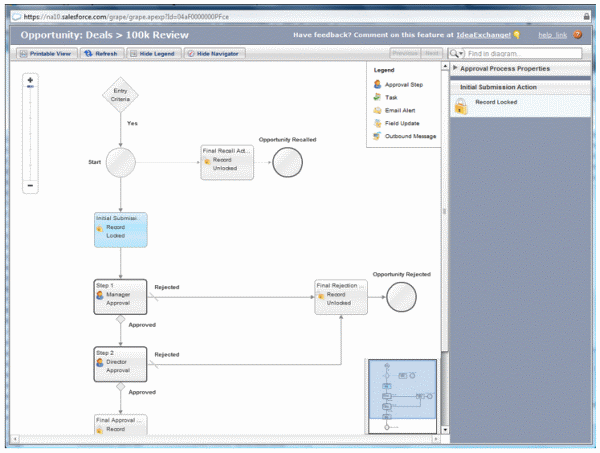
When we click on View Diagram a simple two-step approval step will be displayed like below screenshot.
Approval Process example in salesforce
By using the above process visualizer we can take a printout for understanding.
Use Jump Start Wizard
-
For Manage Approval Processes For, select Opportunity

-
Click Create New Approval Process | Use Jump Start Wizard.
The Jump Start Wizard helps you create a simple approval process by making some decisions for you.
-
Configure the approval process.

Field Value Name Approve Opportunity Amount Approval Assignment Email Template Approve Opportunity Amount Specify Entry Criteria Opportunity: Opportunity Amount greater than 500K Select Approver Let the submitter choose the approver manually -
Save the approval process.
-
Click View Approval Process Detail Page.
-
Under Final Approval Actions, click Add New | Field Update, and configure it with these values.

Field Value Name Approved Field to Update Approval Status A Specific value Approved -
Click Save.
-
Under Final Rejection Actions, click Add New | Field Update, and configure it with these values.
Field Value Name Not Approved Field to Update Approval Status A Specific value Not Approved -
Click Save.


Great job! Your Approval Process has been successfully configured.
Which Automation Tool Do I Use?
Salesforce provides multiple tools to automate your organization’s repetitive business processes: Approvals, Process Builder, Workflow, and Flow Builder.
How a Record Gets Approved
For example, when an employee requests time off, that time has to be approved by the employee’s manager. You need to ensure that when a time-off request is submitted for approval, the right person (the employee’s manager) receives the request.
To automate your organization’s processes for approving records, create Approval Processes.
What to Do When a Record Has Certain Values
Three of our tools can address this use case: Workflow, Process Builder, and Flow Builder. Respectively, these tools create workflow rules, processes, and flows.
We recommend starting with Process Builder, especially for business processes that can be simplified to if/then statements. For example: if a case is escalated, then notify the account owner.
Process Builder includes almost all the functionality that’s available in workflow rules, and more. In fact, a single process can do what it would normally take multiple workflow rules to do.
If the process is too complicated for the Process Builder or requires more advanced functionality, create a flow by using Flow Builder. For example, create a flow to:
-
Use complex branching logic (if certain conditions are true, evaluate for further conditions)
Example:
First, check whether a case is escalated. If the case is escalated, check the account’s region and route the case accordingly. -
Sort through, iterate over, and operate on several records
Example:
After an opportunity is closed and won, calculate the opportunity’s discount. Then apply that discount to all the related opportunity products.
Getting Information from Users or Customers and Then Doing Something with It
If you need to build a wizard to collect information, Flow Builder is the tool for you. Create a flow that displays information to and requests information from a user. Then take the information that they enter and perform actions in Salesforce with it.
For example, create a flow that walks customer support representatives through a call script. The flow uses information that the representative entered, such as the caller’s name and account number, to create a case that’s assigned to the right person.
You can add more complexity to the flow to match your business process. For example:
- Route the representative to different screens, depending on earlier choices. This flow prevents the representative from doing things like trying to upsell a product to a customer who already bought that product.
- Check whether the reported problem is blocking the customer’s business and the account is high-value. If so, the flow notifies the region director.
Automation Tool Features
Here’s the breakdown of all the features and actions that are supported in each of our automation tools. Use it to figure out which tool is best for your business needs.
| PROCESS BUILDER | FLOW BUILDER | WORKFLOW | APPROVALS | |
|---|---|---|---|---|
| Complexity | Multiple if/then statements | Complex | A single if/then statement | A single if/then statement |
| Visual designer |  |
|
||
| Starts when | - Record is changed - Invoked by another process - Platform event message is received |
- User clicks button or link - User accesses Lightning page, Experience Cloud site page, Visualforce page, or custom tab - User accesses item in a utility bar - Process starts - Apex is called |
Record is changed | - User clicks button or link - Process or flow starts that includes a Submit for Approval action - Apex is called |
| Supports time-based actions | |
|
|
|
| Supports user interaction | |
|||
| - | - | Supported Actions | - | - |
| Call Apex code | |
|
||
| Create records | |
|
Tasks only | Tasks only |
| Invoke processes | |
|||
| Delete records | |
|||
| Launch a flow |  |
|
(Pilot)1 |
|
| Post to Chatter | |
|
||
| Send email | (Email alerts only) |
|
(Email alerts only) |
(Email alerts only) |
| Send custom notification | |
|
||
| Send outbound messages without code | |
|
|
|
| Submit for approval | |
|
||
| Update fields | Any related record | Any record | The record or its parent | The record or its parent |
1The Process Builder has superseded flow trigger workflow actions, previously available in a pilot program. Orgs that are using flow trigger workflow actions can continue to create and edit them, but they aren’t available for new orgs.
- Browser Requirements
These are the web browsers supported by our automation tools.
Flow: How To Launch Your Flows And In What Context
| Flow type | Launch method | run CONTEXT |
|---|---|---|
| Screen Flow | – Lightning Page – Button – Action |
– Depends on how the flow is launched – Always in system with sharing – Always in system without sharing |
| Auto-launched Flow | – Lightning Page – Button – Action – With Process Builder |
– Depends on how the flow is launched – Always in system with sharing – Always in system without sharing |
| Record-Triggered Flow | – Record Changes | – System |
| Schedule-Triggered Flow | – Schedule Met | – System |
| Platform Event-Triggered Flow | – Platform Event Received | – System |
As the trigger for last three types can be configured directly in flow, in this article we will focus on how to launch flow in Lightning Page, Button, Action, and in Process Builder.
Launch On Lightning Page – Will Run In User Context
[
You can access the Lightning Page by going to Setup > Lightning App Builder, or simply go to a record of that object > Click on the gear > Edit Page.
[
Look for the flow component, and drag it to where you want.
[
When clicking on the placed component, you can configure the details of the flow, including the input variables and display layout.
Launch With Button – Will Run In User Context

Go to Object Manager and the object where you want to launch the flow > Buttons, Links, and Actions > New Button or Link on the upper right.
[
Choose detail page button and paste in the flow url. If you want to assign the input variables, type “?[Variable name] = xxxx“. Note that if you have two input variables, use “&” to connect them.
Example: /flow/Main_Flow_2_Task?variableA=”Yes”&variableB=”No”
Launch With Action – Will Run In User Context

Go to Object Manager and the object where you want to launch the flow > Buttons, Links, and Actions > New Action on the upper right.
[
Please note that you cannot paste in any other input variables except from ***recordId in actions.
Launch In Process Builder – Will Run In System Context

In the actions, click Add Action > Choose Flows as Action Type > Choose the flow you want to launch and configure the input variables below. Please note that only active auto-launched flow can be called from Process Builder.
[
What Is Context?
Think about it as “Who requests the actions to run”. Take withdrawing money from your bank account for example, for yourself you can withdraw as much as you want, but for a stranger they can get nothing (Hopefully!). You and the stranger are the different contexts here, and the result of actions will differ because you have different permissions.
It is the same in Salesforce. There are currently two context – system and user. System is like the super admin, so it can bypass any object or field permissions or sharing rules, while user context is restricted to the access of that current user who calls the action. However validation rules cannot be bypassed even in system context.
Let’s look at an example to make it clearer. There are two flows to update a case, flow A runs in system context and flow B in user context. Lulu is an user without permission to Case object. In this case, when Lulu triggers flow A, the case can be updated, but not when Lulu triggers flow B.
However, if there is a validation rule says “Lulu cannot edit any cases!” (Poor Lulu), then none of the flows will work.
How Can I Change The Context?
As mentioned above, the flows the are launched by Lightning Page, Buttons, and Actions are run in user context, and since Process Builder always runs in system context, the flows that are launched by PB is also in system context.
However, this is only true if you set the flows to run on default mode, which is “Depends on How Flow is Launched“
To change the default, after you save the flow, click the gear on the upper left.

| Context Type | Can Flow access: RECORDS THAT USER HAS NO ACCESS | FIELDS THAT USER HAS NO ACCESS | OBJECTS THAT USER HAS NO ACCESS |
|---|---|---|---|
| User Context |  |
 |
 |
| System Context With Sharing | |
 |
|
| System Context Without Sharing | |
|
 |
System Mode and User Mode in Salesforce
System Mode
- System mode means running apex code by ignoring user’s permissions. For example, if logged in user does not have permission to one object but they will able to access that object.
- In system mode, Apex code has access to all objects and fields. permissions, field-level security, sharing rules aren’t applied for the current user. This is to ensure that code won’t fail to run because of hidden fields or objects for a user.
- In Salesforce, all apex code run in system mode. It ignores user’s permissions. Only exception is anonymous blocks like developer console and standard controllers. Even
runAs()method doesn’t enforce user permissions or field-level permissions, it only enforces record sharing.
User Mode
- User mode means running apex code by respecting user’s permissions and sharing of records. For example, if logged in user does not access to objector a record, then they will not be able to access that object..
- In User mode, Profile level permissions, field-level security, and sharing rules are applied for the current user.
- In Salesforce, only standard controllers and anonymous blocks like developer console run in user mode.
Here is list of all operations in salesforce and their execution mode:
- Apex Trigger: System Mode
- Anonymous Apex: User Mode
- Apex Webservices (SOAP API and REST API) – System Mode
- Chatter in Apex – User Mode
- Email Service – User Mode
- All types of Jobs – System Mode
- Test method with System.runAs() – User Mode
- Test method without System.runAs() – System Mode
- Validation Rule: System Mode
- Auto-Response Rule – System Mode
- Assignment Rule: System Mode
- Workflow Rule: System Mode
- Escalation Rule: System Mode
- All Types of calculation behind the formula, Rollup Summary – System Mode
- Process Builder: System Mode
- Visual Workflow or Flow Builder - By default it runs on User Mode
- if flow(auto-launch only) is called from Process Builder – System Mode
- if flow is called from Workflow – System Mode
- if flow is called from Apex – (depends on with or without sharing of apex class)
- if flow is called from Custom Button – System Mode
- if flow is embed in Visualforce – (depends on VF Page context)
- if flow is called from REST API – System Mode
- Approval Process – System Mode
- Publisher Action – System Mode
- Invocable Method
- if this is called from flow – User Mode
- if this is called from Process Builder (does it depends on with or without sharing is specified on that Class) – System Mode
- if this is called from REST API – (depends on with or without sharing of the class)
- Custom Button – System Mode
- Visualforce Page (StandardController) – User Mode
- Visualforce Page (StandardController with extension) – System Mode
- Visualforce Page (Custom Controller) – (depends on with or without sharing of the controller)
Flow Screen Components
-
Flow Screen Input Component: Address
Make gathering address information easier by adding the Address component to a flow screen. The Address screen component displays a complete address form that’s customized to your settings. It can also use State and Country/Territory Picklists. -
Flow Screen Input Component: Checkbox
Offer flow users a yes-or-no choice with a checkbox. -
Flow Screen Input Component: Checkbox Group
Let users choose multiple options in a checkbox format. -
Flow Screen Input Component: Currency
Let users enter currency values from a flow screen. -
Flow Screen Input Component: Date
Let users enter date values from a flow screen. -
Flow Screen Input Component: Date & Time
Let users enter date and time values from a flow screen, such as to request an appointment. -
Flow Screen Input Component: Dependent Picklists
Display picklists in a flow screen in which the options for one picklist depend on the selected value of another picklist. The Dependent Picklists screen component determines which options to display in each picklist by using an existing field dependency in your org. A field dependency connects two picklist fields on the same object. -
Flow Screen Input Component: Display Image
Easily insert images in flow screens. Upload images into your Salesforce org as static resources and then you can reference them while configuring the component. -
Flow Screen Input Component: Email
Let users enter email address values from a flow screen. -
Flow Screen Input Component: File Upload
Let users upload files from a flow screen. -
Flow Screen Input Component: Long Text Area
Let users enter a paragraph or two of text from a flow screen. -
Flow Screen Input Component: Lookup
Let users search for a record in a flow. -
Flow Screen Input Component: Multi-Select Picklist
Let users choose multiple options in a picklist format. -
Flow Screen Input Component: Name
Let users enter multiple name values with one screen component. Instead of the Name screen component, you can use Text input fields to capture name information, but it takes a lot more configuration. -
Flow Screen Input Component: Number
Let users enter number values from a flow screen. -
Flow Screen Input Component: Password
Let users enter sensitive information in a flow screen, such as a social security number. Text entered by the user is masked. -
Flow Screen Input Component: Phone
Let users enter phone values from a flow screen. -
Flow Screen Input Component: Picklist
Let users choose from a list of options in a picklist format. -
Flow Screen Input Component: Radio Buttons
Let users choose from a list of options in a radio button format. -
Flow Screen Input Component: Slider
Let users visually specify number values from a flow screen. -
Flow Screen Input Component: Text
Let users enter text from a flow screen, such as the name of the user’s company. -
Flow Screen Input Component: Toggle
Let users flip a toggle in a flow screen. -
Flow Screen Input Component: URL
Let users enter URL values in a flow screen. -
Flow Screen Output Component: Display Text
Display information in a flow screen. -
Flow Screen Output Component: Section
Organize screen components and record fields into multiple columns. -
Choice Resources for Flow Screen Components
A key part of configuring flow screen components that display choices is selecting the choices to display in that field. The choices appear as radio buttons, checkboxes, or picklist options. Use at least one of these resources: choices, record choice sets, or picklist choice sets.


Set Up Approvals for External Users in Your Experience Cloud site
Q:How can Experience cloud users be assigned approvers
An approval process automates how records are approved in Salesforce. An approval process specifies each step of approval, including who to request approval from and what to do at each point of the process. Customer Community Plus and Partner users in your Experience Cloud site can be assigned as approvers on records or added directly to queues. They can see and take action through the My Approvals and Approval History related lists on the record. Approvals can also be triggered directly from the site’s feed.
When setting up approvals or queues, use the lookup fields to find customer and partner users.
For example, when setting up an approval, if you want to automatically assign a customer user as an approver use the lookup list to find and specify the user.

If you set up email notifications for your approval workflows, emails are sent based on site membership. If the user is a member of multiple active site, the email comes from the oldest active one. Any links included in the email point users directly to the approval within the site.
In the Salesforce mobile app, users can see and take action from the Approval History related list, but they can’t submit requests for approval. To submit requests for approvals, the user must do so from the full Salesforce site.
Do you want approval requests delegated to another user for approval?
Prepare to Create an Approval Process
An approver can designate a delegate to approve requests, but you can disable this option. To assign delegates, for each user, populate the Delegated Approver field on the user’s detail page.
Note: Internal Salesforce users are listed by and can be added using the Delegated Approver lookup field. Use Data Loader and a comma-delineated (CSV) file to add users with communities licenses as Delegated Approvers. The CSV uses the CommunityUserId rather than the UserId for DelegatedApproverId. Communities licenses are used with Experience Cloud sites and legacy portals.
Run Flow As Another User
Process Automation - Process Automation Settings
When this setting is enabled, users with the Manage Flow and View All Data permissions can specify the running user each time they debug a flow.
Let admins debug flows as other users
When you debug a flow as another user, the flow’s record changes and actions are performed as that user. Also, the user’s profile and permission sets determine the object permissions and field-level access of the flow. However, flows that always run in system context ignore the user’s object permissions and field-level access.
Per-Transaction Flow Limits
Salesforce strictly enforces limits to ensure that any runaway flows don’t monopolize shared resources in the multitenant environment. Per-transaction limits, which Apex enforces, govern flows. If an element causes the transaction to exceed governor limits, the system rolls back the entire transaction. The transaction rolls back even if the element has a defined fault connector path.
| PER-TRANSACTION LIMIT1 | VALUE |
|---|---|
| Total number of SOQL queries issued(All executions of Get Records elements, and executions of Update Records or Delete Records elements that use filter conditions) | 100 |
| Total number of records retrieved by SOQL queries(All executions of Get Records elements, and executions of Update Records or Delete Records elements that use filter conditions) | 50,000 |
| Total number of DML statements issued(Create Records, Update Records, and Delete Records executions) | 150 |
| Total number of records processed as a result of DML statements | 10,000 |
| Maximum CPU time on the Salesforce servers | 10,000 milliseconds |
| Total number of duplicate updates allowed in one batch | 12 |
1 Autolaunched flows are part of the larger transaction that they were launched through and share that transaction’s limits. For example, flows launched from Apex or a process are executed with the Apex or process actions as part of the larger transaction. Flows with Screen elements can span multiple transactions. A new transaction begins each time the user clicks Next in a screen. Flows with Pause elements span multiple transactions. A transaction ends when a flow interview pauses for an event. When the flow interview resumes, a new transaction begins. Everything after the Pause element is executed as part of a batch transaction that includes other resumed interviews. The batch includes interviews executed by the same user ID, have the same execution time, and have the same flow version ID.
Flow Interviews
Each time a flow runs, a flow interview starts. A flow interview is an instance of a flow.
Enable User Access For Your Flow
- Only flow admins (users with the Manage Flows permission) can run inactive flows.
Grant Permissions to Flow Users
Now any user can run this flow, as long as they have either:
- The
Run Flowsuser permission - The
Flow Userfield enabled on their user detail page - If Override default behavior and restrict access to enabled profiles or permission sets is selected for an individual flow, access to that flow is given to users by profile or permission set
| Type | Declarative Option |
|---|---|
| Screen Flow | Flow actions Lightning pages Lightning community pages Custom buttons or custom links Web tabs Direct flow URLs Snap-in deployments |
| Auto-launched Flow | Process Builder Custom buttons or custom links Web tabs |
| If... | Use this option... |
|---|---|
| The flow should be available to external users | Lightning community page |
| The flow needs the context of a record | Lightning record page or flow action |
| The flow should be available from every page | Utility bar |
| The flow will be used every time someone accesses a page | Lightning page |
| The flow will be used occasionally | Flow action |
Testing/Debug Options in Flow Builder (Run Flow as another User, Run & Debug Buttons)
You don’t have to leave Flow Builder to make sure your flow works. The button bar includes two buttons for running a flow: Run and Debug.
- Run runs the most recent saved version of the flow that you have open.
- Debug does everything that Run does, but with some superpowers thrown in. It lets you enter values for the flow’s input variables and display debug details while running the flow. That way, you can verify how the flow processes data.
Tips: Unless you need to test how your flow works in Classic runtime, always use Debug to test your flows. While Debug always uses Lightning runtime, Run obeys the Enable Lightning runtime preference in your org’s Process Automation settings.
Debugging and Testing a Flow
- Debugging or testing a flow runs the flow and performs its actions, including any DML operations and Apex code execution. Remember, closing or restarting a running flow doesn’t roll back its previously executed actions, callouts, and changes committed to the database.
- Be careful when testing flows that contain delete elements. Even if the flow is inactive, it triggers the delete operation.
- You CAN'T pass values into
input variablesof type collection, record, and record collection. - Clicking Pause or executing a Pause element closes the flow and ends debugging.
- When you click Finish in a flow, the debug details incorrectly state “Selected Navigation Button: NEXT.”
- When you debug a schedule-triggered flow, the flow starts only for one record.


Which Context Do Flows Run In?
Flows run in user context or system context. For a flow running in user context, the running user’s profile and permission sets determine the object permissions and field-level access of the flow. A flow that runs in system context has permission to access and modify all data.
Context impacts what the following flow elements can do with Salesforce data:
- Action
- Create Records
- Delete Records
- Get Records
- Subflow
- Update Records
Flows run in user context or system context, depending on the flow is launched. A flow launched in the user context runs as the user that initiated the flow. A flow launched in the system context ignores access checks.
| FLOW LAUNCH METHOD | DEFAULT CONTEXT |
|---|---|
| Apex | Depends on code |
| Experience Cloud site | User |
| Embedded as a visual component inside a custom Aura component | User |
| Embedded as a visual component inside a Visualforce page | User |
| Custom button | User |
| Custom link | User |
| Direct link | User |
| Flow action | User |
| Lightning page | User |
| Process Builder | System |
| Record-triggered | System, without sharing |
| Rest API | User |
| Run from an Apex method of a custom Aura component controller | Depends on code |
| Run from an Apex method of a Visualforce controller | Depends on code |
| Scheduled Flow | System |
| Web tab | User |
If the context depends on code, Apex uses the with sharing and without sharing keywords to specify whether to enforce org-wide default settings, role hierarchies, sharing rules, manual sharing, teams, and territories. A flow called by Apex always ignores object and field-level access permissions.
If Process Builder is the distribution method, the user that triggered the process sometimes requires other permissions. For example, if a process launches a flow that attempts to save permission set license assignments, and the running user doesn’t have the Assign Permission Sets permission, an error occurs.
Running User of a Flow
The running user of a flow is the user that launched the flow. The running user determines what a flow that runs in user context can do with Salesforce data.
For a flow running in user context, the running user’s profile and permission sets determine the object permissions and field-level access of the flow. When a flow attempts to create, read, edit, or delete Salesforce data, it enforces the running user’s permissions and field-level access. For example, if the running user doesn’t have the edit permission for the Account object, and the flow attempts to update account records, an error occurs. If the running user doesn’t have permission to edit the Rating field on the Account object, and the flow attempts to update that field, an error occurs.
Org-wide default settings, role hierarchies, sharing rules, manual sharing, teams, and territories also impact what data is accessible to flows that run in user context. If the org-wide default of the Opportunity object is private, and no opportunity records have been shared with the running user, the flow can’t read or edit any opportunity records.
Monitor Flows and Processes
Monitor your org’s usage of flows and processes. See a list of paused interviews and scheduled actions from processes. Control who can view and how they view monitoring information for flows and processes.
- Control Your Views of Flows, Paused Interviews, and Scheduled Actions
You have two options for viewing flows,paused flow interviews, andscheduled actions from processes. We recommend using the enhanced option that you get by default. But you can switch to the other option, for example, to use a custom list view that you haven’t recreated with the enhanced option. - Analyze Flows and Processes (Beta)
Get a quick view of your most commonly used automation types. See your org’s flow activity in charts, such as total errors and total started automations. Learn how much time it’s taking users to complete screen flows, so that you can make changes as needed. - Require Access to Automation Home Charts (Beta)
By default, all users with theView Setup and Configurationpermission can view all charts in Automation Home. To limit access, you can require that users have theManage Flowpermission to view all charts in Automation Home. Then users withView Setup and Configurationpermission can view only the Total Started Automations by Process Type chart.
NOTE You can complete these steps in Salesforce Classic or Lightning Experience, but the changes affect only the pages and list views in Lightning Experience.
-
From Setup, enter Automation Settings in the Quick Find box, then select Process Automation Settings.
-
Select or deselect In Lightning Experience, use the enhanced Flows page and separate Paused and Scheduled Automations page.
This setting affects where lists appear and what they contain.
WHEN THE SETTING IS... SELECTED DESELECTED The Flows page in Setup... Lists both standard and custom flows Lists only custom flows The list of flows... Can include the packages that flows are installed from Never includes the packages that flows are installed from The list of paused flow interviews and scheduled actions from processes... Appears on its own Paused Flow Interviews page in Setup Appears as a related list on the Flows page in Setup


Path
Boost productivity and help reps gather complete data. Create paths to guide your users through steps of a business process, such as working an opportunity from a fresh lead to a successfully closed deal. At each step of a path, you can highlight key fields and include customized guidance for success.
Path is available for the following objects:
- Accounts (business accounts and person accounts)
- Campaigns
- Cases
- Contacts
- Contracts
- Fulfillment order
- Leads
- Opportunities
- Orders
- Quotes
- Service appointments
- Work orders
- Work order line items
- Custom objects
Path is supported on Lightning record pages in the new Salesforce mobile app.
- Enable Path
To start creating paths, first enable Path in Setup. - Create a Path
Create one path for each available combination of object, picklist, and record type for supported objects. And help your teams celebrate their successes by tossing virtual confetti when reps reach designated path steps. - Configure the Last Path Step
The order of path steps is based on the order of the values in the picklist that the path is based on. For most objects, the last step represents a closed stage or status. On certain objects and fields, you can change the picklist value or values applied to records when they’re moved to the last step. - Considerations and Guidelines for Creating Paths
Before creating paths for your users, review considerations and guidelines for paths in combination with various objects and features.
Enable Path
- In Setup, use the Quick Find box to find Path Settings.
- Click Enable.
- To let users decide whether the path remembers its previous state, select Remember User's Path Preferences. If this option isn’t selected, the path’s details are hidden whenever the page that the path is on loads.

Create a Path
Create one path for each available combination of object, picklist, and record type for supported objects. And help your teams celebrate their successes by tossing virtual confetti when reps reach designated path steps.

Steps for each path (1) are based on picklist values that you select when you create the path. At each step, show up to five key fields to help users focus on the most important information (2). And help users succeed with guidance such as tips, links, and company policy information (3).

Help users celebrate their successes by tossing virtual confetti when reps reach path steps such as Closed - Won.
-
In Setup, use the Quick Find box to find Path Settings.
-
In step 1 of creating a path, enter basic information about the path: a unique path name, the object to base the path on, the record type, and the picklist to base the path on.

-
Click Next.
-
In step 2 of creating a path, select key fields and enter success guidance, and then click Next.
-
For each step on the path, select up to five key fields.

-
For each step on the path, enter up to 1,000 characters of guidance.

-
-
In step 3 of creating a path, activate the path and enable confetti celebration animations.

-
Decide whether to activate the path immediately. To activate the path later, return to Path Settings.
-
Select picklist values and a frequency for triggering the celebration animation.
For frequency, if average users reach celebration values more often, set celebrations to occur less often. For example, for a New Business path where opportunities are hard won, select a frequency of Always. Or let’s say you have a Renewal Business path where reps can close a lot of opportunities every day. Trigger the animation on random closed opportunities by selecting Often or Sometimes.

-
Click Finish.
-
For most objects, the order of path steps is based on the order of the values in the picklist that the path is based on. The last step represents a closed stage or status. For example, in the last step of an opportunity path based on the Stage field, by default users select Closed Won or Closed Lost.
On some objects and fields, you can customize the field value represented by the last step of the path.
Configure the Last Path Step
The order of path steps is based on the order of the values in the picklist that the path is based on. For most objects, the last step represents a closed stage or status. On certain objects and fields, you can change the picklist value or values applied to records when they’re moved to the last step.
-
In the Object Manager, find the object that your path is based on. Click Fields and Relationships. Next to the field your path is based on, click Edit.
-
Find the list of picklist values for the field. For each picklist value that represents completion of the path, verify the field attribute indicating closed or completed status.
The field attributes indicating closed or completed status vary by object and field. Here are some examples.
-
Opportunity Path: Stage Field
Select a Type of Closed/Won or Closed/Lost.
-
Case Path: Status Field
Select the Closed option.
-
Work Order, Work Order Line Item, or Service Appointment Path: Status Field
Select a Status Category of Canceled, Cannot Complete, Completed, or Closed.
-
-
Click Save.

Considerations and Guidelines for Creating Paths
Before creating paths for your users, review considerations and guidelines for paths in combination with various objects and features.
All Objects
-
Key Fields and Guidance for Success
When you configure key fields and success guidance in a Path, kanban views configured for the same object, record type, and picklist also show the information.
-
Celebrations (Confetti Animations)
- When you configure celebrations in a Path, the confetti animation is also triggered in kanban views configured for the same object, record type, and picklist.
- Celebrations don’t work on the lead status Converted.
- Celebrations don’t support field values with a comma in the API name. Delete the comma from the API name or re-create the value. A comma in the label for a field value is OK.
-
Editing and Validation
- The record type and owner fields aren’t editable in the Key Fields panel. To transfer ownership, users must use the Details tab. To change the record type, they must use the Change Record Type action.
- If a path exists for a Record Type that you delete, the path is also deleted.
- You can’t use the page layout to require different fields in different steps. However, you can set up validation rules based on a path step.
- Validation messages appear as page-level messages, even when you configure the rules to display them near the fields.
-
Setup in Orgs with Many Objects, Record Types, and Picklists
If your org has a large combination of objects, record types, and picklists, path creation can take a couple of minutes.
-
Translation
To translate Guidance for Success content, use the Path Step Rich Text component in Translation Workbench.
-
Packages
- You can’t include images in path packages.
- You can’t package custom values in standard picklist fields on paths.
Leads, Opportunities, and Accounts
-
Lead Paths
If you create a path for leads, we recommend making Unqualified status the first step.
-
Opportunity Stage Durations in Paths and Reports
- Opportunity stage durations are displayed differently in paths and reports. In paths, durations are rounded up to the nearest day; a duration of a minute is still displayed as 1 day. In reports, durations aren’t rounded up; a duration of less than 24 hours is displayed as 0 days.
- Opportunity stage durations aren’t shown in paths in Experience Cloud sites.
-
Business Accounts Versus Person Accounts
If person accounts are enabled, the account record type selected determines whether a path is for business accounts or person accounts.
Kanban
Arrange a kanban view to show a graphical view of records in a list view. Each kanban view is based on a list view, and kanban view settings are applied separately for each list view.
-
In a kanban view, click
 , and then select Kanban Settings.
Kanban settings control the amount or number total in each column heading (1) and the column groupings (2).

-
Summarize each column by a key number or amount, such as opportunity amount or expected revenue.
In Summarize By, select a numeric or currency field, or omit column summaries by selecting None.
-
Group your records into columns representing the progress you want to track.
In Group By, select a field such as Stage or Opportunity Owner.
Kanban views don’t show records without a value in the selected Group By field.
-
Click Save.
Work in a Kanban View
Narrow the records you want to focus on by searching and filtering a kanban view, and view records by record type. Update records by dragging, or edit a card without leaving the kanban view. If your Salesforce admin has set up key fields and guidance, you see them in the details panel. If you’re viewing opportunities, alerts help you move deals ahead.
-
In a list view, click
 and select Kanban
  .
.Toggle between a kanban view and the corresponding list view any time.
-
Zero in on the records you want to track.
-
If your records are assigned to two or more record types, click to view each type.
-
To narrow the view by keyword, search the list.
-
To narrow the view by field or record owner, click
 and set the filters you want.
-
-
Move a record to the next column by dragging the card.

-
Show or hide the details panel by clicking
 . You can edit key fields inline, without leaving the kanban view. If your Salesforce admin has configured key fields and guidance for the step, the panel includes that information.
In a kanban view of opportunities, hover over an alert for a tip on moving the deal ahead, such as creating a task.

Considerations for Using Kanban Views
If you use kanban views, review considerations for using them with certain objects and other features.
All Objects
- Editing
- If you don’t have Edit access to a record, you can’t drag its card to a different kanban column.
- In the kanban details panel, you can’t change a record’s record type or transfer it to a different owner. To edit those fields, navigate to the record or, to transfer ownership, use the kanban card.
- You can’t perform mass actions in a kanban view.
- Currency
- If your company uses multiple currencies in Salesforce, kanban views show amounts in your personal currency.
- You can’t use the Currency field to group records in a kanban view.
Contracts
- You can’t activate a contract in a kanban view.
- Kanban views don’t show columns for the standard contract status of Activated.
- You can’t group contracts by the Owner Expiration Notice field in a kanban view.
Knowledge
- You can only group Knowledge articles by owner in a kanban view. Grouping by the other standard knowledge fields isn’t supported.
Leads
- You can’t convert a lead in a kanban view.
- Converted leads are hidden in kanban views.
Opportunities
- You can’t group opportunities by the Forecast Category field.
- Kanban cards on opportunities show alerts for overdue tasks, no open activities, and no activity in the last 30 days.
- Closed Lost opportunities are hidden in kanban views.
Considerations and Guidelines for Administering Kanban
If your users work with kanban views, review considerations and guidelines for setup and customization.
All Objects
-
Display and Editing
- Kanban views show up to 200 cards. Kanban cards show up to four fields.
- The fields at the top of the details panel in kanban views are the first four fields defined in the Compact Layout.
- Users can move cards in kanban views even if their access to the field used for column grouping is read-only.
- In the kanban details panel, users can't change a record’s record type or owner, regardless of whether the path includes those fields.
- Suppose that the selected Group By and Summarize By fields are in a page layout assigned to a record type that the user can’t access. The kanban view doesn’t show records assigned to that record type.
-
Subtabs
A subtab is created for a record type if both of the following conditions apply:
- The Group By and Summarize By fields are included in a page layout assigned to a record type that the user can access.
- At least one record is assigned to the record type.
-
Column Summaries
Users can’t create column summaries from rollup summary or formula fields.
-
Picklist Fields and Values
Kanban views don’t show columns that are based on inactive picklist fields or records associated with inactive picklist values.
-
Path Configurations Exposed in Kanban Views
- When you configure key fields and success guidance in a path, kanban views configured for the same object, record type, and picklist also show the information.
- When you configure celebrations in a path, the confetti animation is also triggered in kanban views configured for the same object, record type, and picklist.
- Whichever celebration frequency you select, the animation is triggered once until the page is reloaded. For example, suppose that you select Always, and a kanban user moves two records to the column that triggers the animation. The animation plays only the first time the user moves a record.
- Celebrations don’t work on the lead status Converted.
Opportunities
Kanban cards on opportunities show alerts for overdue tasks, no open activities, and no activity in the last 30 days. Activity alerts in kanban views aren’t customizable. If the links New Event and New Task aren’t displayed in activity alerts, do the following.
- Add a Create a Record global action for events and tasks. Give the actions these exact names: NewEvent and NewTask. Label them New Event and New Task.
- Assign a record type to each global action. New Event and New Task actions are each supported for only one record type.
- Add the actions to Lightning Experience Actions.
Flow Best Practices
Before you begin building and distributing flows, understand the best practices.
REQUIRED EDITIONS
| Available in: both Salesforce Classic and Lightning Experience |
|---|
| Available in: Essentials, Professional, Enterprise, Performance, Unlimited, and Developer Editions |
-
Plan out your flow before you start building.
Write or draw out all the details of your business process. That way, you have a clear idea of what information you need, where you’re getting that information from, and what logic and actions to perform. Doing so makes building the corresponding flow much easier.
-
Build your flows in a test environment—like a sandbox or Developer Edition org.
The last thing you want to do is accidentally change records in your company’s production org. Build your flows in a separate environment. That way, you can enter fake data and test various permutations of your flow without worrying about changing or deleting data that your users actually need.
-
Never hard-code Salesforce IDs.
IDs are org-specific, so don’t hard-code new or existing IDs. Instead, let Salesforce create the IDs, and pass them into variables when the flow starts. You can do so, for example, by using merge fields in URL parameters or by using a Get Records element.
-
Wait until the end of the flow to make changes to the database.
Have you heard about flow limits? Because flows operate under Apex governor limits, the sky is not the limit. To avoid hitting those limits, we recommend bunching all your database changes together at the end of the flow, whether those changes create, update, or delete records.
-
Control when running users can navigate backward.
If the flow commits changes to the database or performs actions between two screens, don't let users navigate from the later screen to the previous screen. Otherwise, the flow can make duplicate changes to the database.
-
Provide an error handler.
Sad to say, but sometimes a flow doesn’t perform an operation that you configured it to do. Perhaps the flow is missing crucial information, or the running user doesn’t have the required permissions. By default, the flow shows an error message to the user and emails the admin who created the flow. However, you can control that behavior. See Customize What Happens When a Flow Fails for more information and recommendations.


-
Save early and often.
Sometimes Flow Builder falls victim to unexpected problems, like losing Internet access. Salesforce doesn’t save your changes automatically, so it’s up to you to save your work. Save as often as possible, so that you don’t accidentally lose a few hours’ worth of work.
-
Test as many permutations of your flow as you possibly can.
As with all customizations in Salesforce, it’s important to test your work. This is especially true if your flow uses branching or other complex logic. Make sure that you test as many possibilities as you can think of before you distribute the flow to your users.
-
Avoid accessing external objects after DML operations in a transaction.
If Salesforce creates, updates, or deletes data in your org and then accesses external data in the same transaction, an error occurs. In your flow, we recommend using a separate transaction to access data in an external system. To do so, end the prior transaction by 1.adding a screen or 2.local action to a screen flow or 3.a Pause element to an autolaunched flow. If you use a Pause element, don't use a record-based resume time.
For example, a screen flow creates a contact and then displays a confirmation screen. Next, the flow updates the contact in the external system. The flow doesn’t fail because it uses a separate transaction to access the external data.
-
Plan out your flow before you start building
-
Build your flows in a test environment—like a sandbox or Developer Edition org.
-
Never hard-code Salesforce IDs
-
Wait until the end of the flow to make changes to the database
-
Control when running users can navigate backward
-
Provide an error handler
-
While configuring a flow save early and often
-
Test as many permutations of your flow as you possibly can
-
Avoid accessing external objects after DML operations in a transaction
Best Practices for Designing Processes
- Build in a test environment.
To test whether a process is working properly, you must activate it. Build and test your processes in a sandbox environment, so that you can identify any issues without affecting your production data.
- For each object, use one automation tool.
If an object has one process, one Apex trigger, and three workflow rules, you can’t reliably predict the results of a record change.
TIP When you replace a workflow rule with a process, deactivate the workflow rule before you activate the process. Otherwise, you can get unexpected results, such as overwritten records or redundant email messages. This best practice also applies when you replace an Apex trigger with a process.
-
Have only one record-change process per object.
Each time a record is created or updated, all record-change processes for its object are evaluated. We recommend restricting your org to one record-change process per object. Here’s why.
-
Get a consolidated view of your org’s automation for an object
With one consolidated record-change process for an object, you can see all the criteria that are evaluated each time that object’s records are updated, as well as the actions that are performed when the criteria are met.
-
Avoid hitting limits
When you consolidate your processes for one object into one master process, you also consolidate the actions in those processes. With fewer actions, your org is less likely to hit limits, such as number of SOQL queries.
-
Determine the order of operations
If you create multiple record-change processes for an object, Salesforce can’t guarantee the order in which those processes are evaluated. When you automate everything in a single process, you explicitly set the order. The first criteria node is evaluated first, the second criteria node is evaluated second, and so on.
-
Here are a couple features that can ease your path to one master process.
- ISNEW()
Some automation applies only to created records. The rest applies to created and edited records. How could you possibly combine all of them into one process? Meet the formula function that detects whether the record being evaluated was just created: ISNEW().
To add a create-only automation to a process that starts when a record is created or edited, convert the associated criterion’s conditions to a formula. Then add && ISNEW() to your formula.
- Invocable processes
Just like a process can call flows, a process can call other processes. Invocable processes are modular processes that start only when another process tells them to.
For example, several criteria nodes in your “Account” process each evaluate some conditions, including whether the account is high value. Move those criteria nodes, without the high-value condition that they have in common, into a “Top Account” invocable process. Then configure your ”Account” process to invoke the “Top Account” process if the account is high value.
- Combine actions when possible.
The more actions that a process executes, the more likely your org is to reach limits, such as the number of DML statements or total CPU usage. Avoid creating multiple actions when a single action would do.
For example, a process updates an account’s address. Instead of creating a different action to update each individual field, create one action to update all the address fields.
- Build reusable actions.
Some process actions are always reusable: email alerts, quick actions, processes, flows, and Apex. But how do you reuse other types of actions in multiple criteria groups or multiple processes?
-
To reuse a Create a Record action or an Update Records action, build a quick action.
Quick actionscan be used in processes, flows, and on record pages. -
To reuse other process actions, configure the actions in an
invocable process. In the relevant criteria groups, add a Processes action to call the invocable process. Invocable processes can be used only in processes. -
Watch out for actions that overwrite previous changes.
Avoid having or be careful when multiple action groups update the same field.
- Avoid generating infinite loops.
For example, an Update Records action in Process1 triggers Process2, and a Create a Record action in Process2 triggers Process1. The looping causes your org to exceed its limits.
- Make sure that immediate actions don’t cancel scheduled actions.
Pending scheduled actions are canceled when the associated criteria are no longer true. Make sure that the later immediate actions in your process don’t unintentionally cancel pending scheduled actions.
- Test as many permutations of your process as you possibly can.
As with all customizations in Salesforce, it’s important to test your work. Make sure that you test as many possibilities as you can think of before you deploy the process to your production org.
- To access external data after changing Salesforce data, use scheduled actions.
If Salesforce creates, updates, or deletes data in your org and then accesses external data in the same transaction, an error occurs. In your processes, we recommend using a separate transaction to access data in an external system. To do so, end the prior transaction by adding a scheduled action. For a record-change process, don't use a field-based schedule.
For example, an event process starts when it receives a platform event message from the custom platform event, Order Status. If the order status is new, the process creates a contact and schedules an action to update the order status in the external system. The event process doesn’t fail because the scheduled action creates a separate transaction to access the external system.
Flow vs Workflow Rule
Salesforce offers several features that automate standard internal procedures and business processes to save time across your org. Despite their similar names, workflow rules and flows are separate Salesforce features for automating business processes.
-
Workflow rule
A workflow rule is the main container for a set of workflow instructions, which can be broken into two main components.
- Criteria: what must be true of the record for the workflow rule to execute the associated actions. A workflow rule’s criteria is always tied to ONE object.
- Actions: what to do when the record meets the criteria.
-
Flow
A flow is an application that automates a business process by collecting data and doing something in your Salesforce org or an external system. Unlike workflow rules, which always execute behind the scenes, flows can provide screens to guide users through your business process.
Flows aren’t tied to any one object. They can look up, create, update, and delete records for multiple objects. You build flows using Flow Builder, which is a point-and-click tool.
 NOTE You may also have heard the term Visual Workflow. That’s a retired product name for designing, managing, and running flows. Visual Workflow has been superseded by Salesforce Flow. Salesforce Flow is the product that encompasses building, managing, and running flows and processes.
Add Automated Actions to an Approval Process
| ACTION TYPE | DESCRIPTION |
|---|---|
| Task | Assigns a task to a user who you specify. You can specify the subject, status, priority, and due date of the task. |
| Email Alert | Sends an email to a designated recipient using a specified email template. |
| Field Update | Changes the value of a selected field. You can specify a value or create a formula for the new value. |
| Outbound Message | Sends a message to a designated endpoint. You can also specify a username and the data to include in the message.Not supported for approval processes on junction objects. |
Approval Limits
| PER-ORG LIMIT | VALUE |
|---|---|
| Active approval processes | 1,000 |
| Total approval processes | 2,000 |
| Active approval processes per object | 300 |
| Total approval processes per object | 500 |
| Steps per approval process | 30 |
| Approvers per step | 25 |
| Initial submission actions per approval process | 40 |
| Final approval actions per approval process | 40 |
| Final rejection actions per approval process | 40 |
| Recall actions per approval process | 40 |
| Maximum characters in approval request comments | 4,000 In Chinese, Japanese, or Korean, the limit is 1,333 characters. |
Einstein Next Best Action
Create Recommendations
Create offers or actions to recommend to users using Einstein Next Best Action. Recommendations are standard Salesforce records, similar to accounts and contacts, that are processed by strategies and associated with flows. Strategies determine which recommendation records are surfaced using business rules, predictive models, and other data sources. The result of this process is context-specific recommendations that you present to your users.
-
In the Recommendations tab, click New Recommendation.

-
Enter a friendly name (1) and brief description (2) for your recommendation. The description appears on the recommendation that is surfaced to users.
-
Optionally, click to upload an image (3) that you can display as a header for your recommendation. For best results, use a 1000 by 380 pixel image at 72 DPI, or an image with a similar ratio. You can choose whether the image displays using component properties. Once uploaded, a thumbnail of your image displays on the Recommendations page. Customers see the full image as a header for your recommendation in either the Lightning App Builder or Experience Builder component.
-
Enter an acceptance label (4) and a rejection label (5) for the buttons that customers click to, respectively, accept and reject the recommendation.
-
Create a flow. When a user accepts your recommendation, they are taken to the flow specified in Action (6).
-
Choose the flow that runs when a customer accepts the recommendation (6) and click Save. You can also choose a flow that runs when a customer accepts or rejects the recommendation. The Action list displays both active and inactive flows. Choosing a flow that isn't active hides the recommendation. Once you’ve saved your recommendation, you can see if the flow is active from Is Action Active (7).

-
Create a recommendation strategy in Strategy Builder that determines how your recommendations surface.
-
Optionally add a custom Category field to the Recommendation object and the Recommendation Layout. Adding a custom Category field can simplify loading, filtering, and sorting recommendations in Strategy Builder.
- Recommendation Fields
Recommendations are suggested actions that users see and interact with through Einstein Next Best Action strategies. When creating a recommendation, use these fields to define its look and feel. - Launch a Flow When a Recommendation Is Accepted
Each recommendation is associated with a single flow. By default, Next Best Action launches a flow when a user accepts a recommendation. The flow then performs an action, such as updating a case or sending an email. - Launch a Flow When a Recommendation Is Accepted or Rejected
Each recommendation is associated with a single flow. By default, Next Best Action launches a flow when a user accepts a recommendation. The flow then performs an action, such as updating a case or sending an email. But you can also launch a flow when a user rejects a recommendation, which gives you more flexibility. For example, a flow could run an automated process, write to another system, or create a reminder email when a recommendation is rejected.
Recommendation Fields
Recommendations are suggested actions that users see and interact with through Einstein Next Best Action strategies. When creating a recommendation, use these fields to define its look and feel.
You can use these methods to create recommendations.
- Assemble recommendations as needed in Flow Builder or Strategy Builder.
- Create recommendations as standard Salesforce records, similar to accounts and contacts, in the Recommendation object. You can create recommendation records on the Recommendations tab in the App Launcher.
- Generate recommendations automatically through AI with Einstein Recommendation Builder.

-
Image (1)
The image that is shown in the recommendation. To display this image with the Einstein Next Best Action Lightning page component, select Show Image when configuring the Lightning page component.
-
Name (2)
The header text at the top of the recommendation. To display this text with the Einstein Next Best Action Lightning page component, select Show Title when configuring the Lightning page component.
-
Description (3)
Additional descriptive text displayed in the recommendation. To display this text with the Einstein Next Best Action Lightning page component, select Show Description when configuring the Lightning page component.
-
Acceptance Label (4)
The text of the button that accepts the recommendation. This option is always displayed.
-
Rejection Label (5)
The text of the button that rejects the recommendation. To display this option with the Einstein Next Best Action Lightning page component, select Show Reject Option when configuring the Lightning page component.
Use these fields to define how the recommendation runs.
-
Action
The flow that runs when a user selects the Accept option. To run this flow when the user accepts or rejects the recommendation, select Launch Flow on Rejection when configuring the Einstein Next Best Action Lightning page component. If the referenced flow is inactive, invalid, or has an unsupported Flow Type, the recommendation isn’t displayed to users. The supported flow types are screen flows and autolaunched flows.
Launch a Flow When a Recommendation Is Accepted or Rejected
Each recommendation is associated with a single flow. By default, Next Best Action launches a flow when a user accepts a recommendation. The flow then performs an action, such as updating a case or sending an email. But you can also launch a flow when a user rejects a recommendation, which gives you more flexibility. For example, a flow could run an automated process, write to another system, or create a reminder email when a recommendation is rejected.
For example, at a telecommunications company, the admin configures the Next Best Action component to display recommendations to its customer service representatives (CSRs). When a CSR accepts a recommendation for a customer who wants to purchase a discounted service, a flow is launched to calculate the discount. The admin analyzes the reactions to the recommendation, and is confused about why the CSRs are rejecting it. To help get answers, the admin uses Next Best Action to launch a questionnaire flow every time the recommendation is rejected.
This feature is available for:
- The Einstein Next Best Action component used with Lightning record pages
- The Suggested Actions component used in Experience Builder
- The Actions and Recommendations component used with Lightning console apps
To assign a flow that runs when a customer accepts or rejects the recommendation, create an input variable in the flow to accept the isRecommendationAccepted value. Then add a Decision element to the flow that’s based on that value.
-
In Flow Builder, configure a flow that’s associated with a recommendation. Be sure to activate the flow because Next Best Action can’t call an inactive flow from a recommendation.
-
Create the Boolean
isRecommendationAcceptedinput variable. -
Create a Decision element and use the
isRecommendationAcceptedvariable in your outcome conditions. -
Create a decision outcome for what the flow does when the recommendation is accepted.
-
Create a decision outcome for what the flow does when the recommendation is rejected.

-
Add any additional flow elements to handle each outcome path.
-
Add a flow action.
-
To add the flow, edit the recommendation.
-
When you add the Next Best Action component to a Lightning record page, select Launch Flow on Rejection.

Sample Exam Questions
Question 1. The CEO at Universal Containers wants to be notified with a sign-off request whenever an opportunity’s discount is higher than 25%. The CEO also wants to have an option to leave comments. Which declarative tool would allow Universal Containers (UC) to meet these requirements?
A. Process Builder
B. Flow Builder
C. Approvals
D. Apex Trigger
key words: a sign-off request
Question 2. Which two are the provided Screen Flow components?
A. File Upload
B. Animations
C. MIME Image
D. Phone number
Question 3. An admin can schedule actions based on which two conditions?
A. Run Date specified under Flow Preferences in Setup
B. A specific date/time field on the record that started the process
C. The time that the process ran last time e.g. 180 days from now
D. Date/time field on the running user reaches the Cutoff date/time
Question 4. To override the context a flow normally runs in, an admin can set the flow to run in which context?
A. User Context
B. RunAs Context
C. Debug Context
D. System Context
Question 5. Universal Containers (UC) is accepting registrations for speaking opportunities at its annual conference. Registrants are interviewed and the interview notes are stored in the system for approvers to approve/deny the request. UC wants to designate certain partner users as approvers. How can UC accomplish this?
A. Use Data Loader to add partner users as Delegated Approvers
B. Add partner users using the Delegated Approver lookup field
C. Upgrade partner users to internal users and give them approver permissions
D. Give partner users "super user" access and update their role to Approver