转载:http://blog.csdn.net/chenxiao_ji/article/details/50019963
Step 1 – Grab The SD Card
将树莓派关机,移除sd卡,插入到你的电脑(这时需要一个读卡器)
Step 2 – Edit cmdline.txt
编辑cmdline.txt的内容为:
dwc_otg.lpm_enable=0 console=ttyAMA0,115200 kgdboc=ttyAMA0,115200 console=tty1 root=/dev/mmcblk0p2 rootfstype=ext4 elevator=deadline rootwait init=/bin/sh
确保所有内容在同一行。保存文本内容,从pi出取出sd卡
Step 3 – Reset the Password
步骤3-重设密码
Insert the card into a Pi that is connected to a monitor and keyboard. Power up the Pi. There may be a delay but you should be presented with a flashing cursor.
将sd卡插入树莓派(我们在这里需要连上显示器和键盘)。将树莓派开机,估计在显示闪动的光标前需要等一会。
At the prompt type the following command :
在标识符后,输入以下命令:
passwd pi
You will then be prompted for a new password. Enter it carefully and press the [Return] key. It will now ask you to retype the password.
你会被提示输入一个新的密码,请仔细输入后并敲下回车键。系统会提示你再次确认输入密码
passwd pi
Enter new UNIX password:
Retype new UNIX password:
passwd: password updated successfully
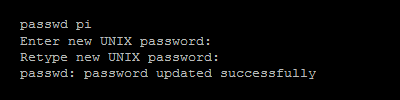
The password has been changed.
这样密码就修改完成了
Now type the following commands :
现在输入以下命令去同步并执行初始化程序
sync
exec /sbin/init
The Pi will continue to boot and return you to the normal command line prompt.
树莓派会继续启动
Shutdown the Pi and power it off.
关掉树莓派并且断电
sudo halt
Step 4 – Edit cmdline.txt
第四步-编辑cmdline.txt文本
Using the PC edit the “cmdline.txt” file again and remove the “init=/bin/sh” text you added in Step 2.
用电脑再次编辑这个文本:把我们在第二步加入的最后数据删除
You can now return the SD card to your Pi, reboot and use the new password.
现在你可以插入sd卡到你的树莓派啦,再次启动就可以使用新的密码啦。