在 Vue.js 的项目中,如果项目结构简单, 父子组件之间的数据传递可以使用 props 或者 $emit 等方式。
但是如果是大型项目,很多时候都需要在子组件之间传递数据,使用之前的方式就不太方便。Vue 的状态管理工具 Vuex 完美的解决了这个问题。
一、安装并引入 Vuex
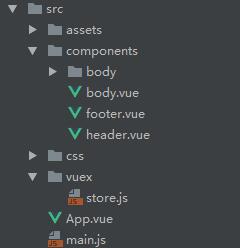
项目结构:

首先使用 npm 安装 Vuex
然后在 main.js 中引入
二、构建核心仓库 store.js
Vuex 应用的状态 state 都应当存放在 store.js 里面,Vue 组件可以从 store.js 里面获取状态,可以把 store 通俗的理解为一个全局变量的仓库。
但是和单纯的全局变量又有一些区别,主要体现在当 store 中的状态发生改变时,相应的 vue 组件也会得到高效更新。
在 src 目录下创建一个 vuex 目录,将 store.js 放到 vuex 目录下
import Vue from'vue'import Vuex from'vuex'
Vue.use(Vuex)
const store =newVuex.Store({// 定义状态state: {author:'Wise Wrong'}})
exportdefaultstore
这是一个最简单的 store.js,里面只存放一个状态 author
虽然在 main.js 中已经引入了 Vue 和 Vuex,但是这里还得再引入一次
三、将状态映射到组件
<template><footer class="footer"><ul><li v-for="lis in ul">{{lis.li}}</li></ul><p>Copyright © {{author}} - 2016 All rights reserved</p></footer></template>
<script>exportdefault{name:'footerDiv',data () {return{ul: [{ li:'琉璃之金'},{ li:'朦胧之森'},{ li:'缥缈之滔'},{ li:'逍遥之火'},{ li:'璀璨之沙'}]}},computed: {author () {returnthis.$store.state.author}}}</script>
这是 footer.vue 的 html 和 script 部分
主要在 computed 中,将 this.$store.state.author 的值返回给 html 中的 author
页面渲染之后,就能获取到 author 的值

四、在组件中修改状态
然后在 header.vue 中添加一个输入框,将输入框的值传给 store.js 中的 author
这里我使用了 Element-UI 作为样式框架

上面将输入框 input 的值绑定为 inputTxt,然后在后面的按钮 button 上绑定 click 事件,触发 setAuthor 方法
methods: {setAuthor:function() {this.$store.state.author =this.inpuTxt}}
在 setAuthor 方法中,将输入框的值 inputTxt 赋给 Vuex 中的状态 author,从而实现子组件之间的数据传递

五、官方推荐的修改状态的方式
上面的示例是在 setAuthor 直接使用赋值的方式修改状态 author,但是 vue 官方推荐使用下面的方法:

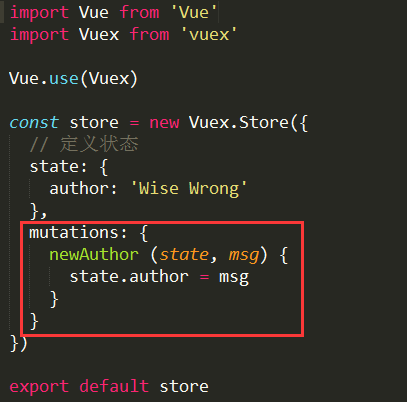
首先在 store.js 中定义一个方法 newAuthor,其中第一个参数 state 就是 $store.state,第二个参数 msg 需要另外传入
然后修改 header.vue 中的 setAuthor 方法

这里使用 $store.commit 提交 newAuthor,并将 this.inputTxt 传给 msg,从而修改 author
这样显式地提交(commit) mutations,可以让我们更好的跟踪每一个状态的变化,所以在大型项目中,更推荐使用第二种方法。
总结
以上就是这篇文章的全部内容了,希望本文的内容对大家的学习或者工作能带来一定的帮助。