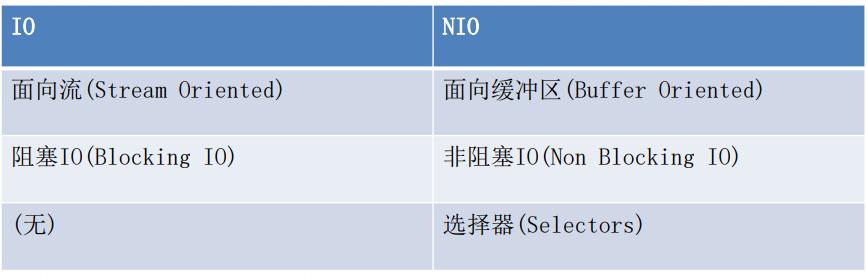
3. Java NIO系统的核心在于:通道(Channel)和缓冲区 (Buffer)。通道表示打开到 IO 设备(例如:文件、 套接字)的连接。若需要使用 NIO 系统,
需要获取 用于连接 IO 设备的通道以及用于容纳数据的缓冲 区。然后操作缓冲区,对数据进行处理。
4. 缓冲区(Buffer):一个用于特定基本数据类 型的容器。由 java.nio 包定义的,所有缓冲区 都是 Buffer 抽象类的子类。
Java NIO 中的 Buffer 主要用于与 NIO 通道进行 交互,数据是从通道读入缓冲区,从缓冲区写 入通道中的。
5 . Buffer 就像一个数组,可以保存多个相同类型的数据。根 据数据类型不同(boolean 除外) ,
有以下 Buffer 常用子类:
ByteBuffer
CharBuffer
ShortBuffer
IntBuffer
LongBuffer
FloatBuffer
DoubleBuffer
上述 Buffer 类 他们都采用相似的方法进行管理数据,只是各自管理的数据类型不同而已。都是通过如下方法获取一个 Buffer 对象:
static XxxBuffer allocate(int capacity) : 创建一个容量为 capacity 的 XxxBuffer 对象
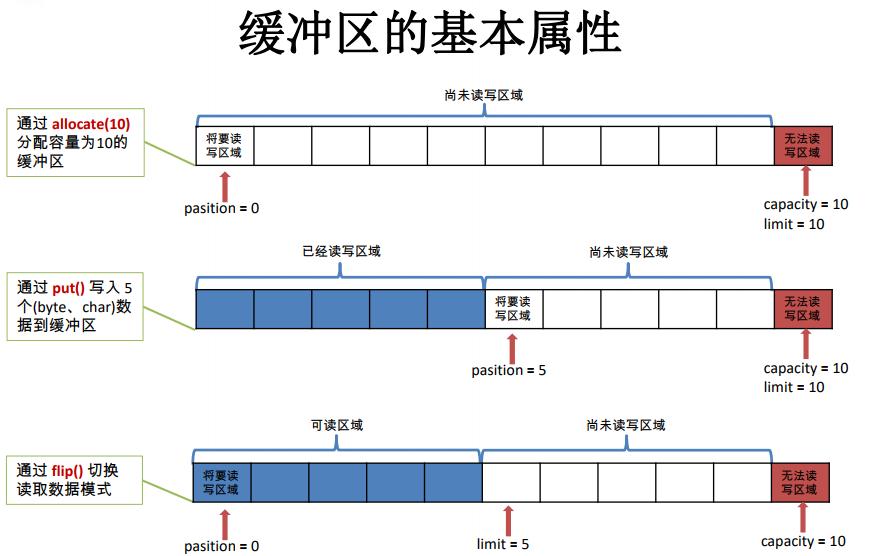
6. 缓冲区的基本属性
Buffer 中的重要概念:
容量 (capacity) :表示 Buffer 最大数据容量,缓冲区容量不能为负,并且创 建后不能更改。
限制 (limit):第一个不应该读取或写入的数据的索引,即位于 limit 后的数据 不可读写。缓冲区的限制不能为负,并且不能大于其容量。
位置 (position):下一个要读取或写入的数据的索引。缓冲区的位置不能为 负,并且不能大于其限制
标记 (mark)与重置 (reset):标记是一个索引,通过 Buffer 中的 mark() 方法 指定 Buffer 中一个特定的 position,之后可以通过调用 reset() 方法恢复到这 个 position.
标记、位置、限制、容量遵守以下不变式: 0 <= mark <= position <= limit <= capacity
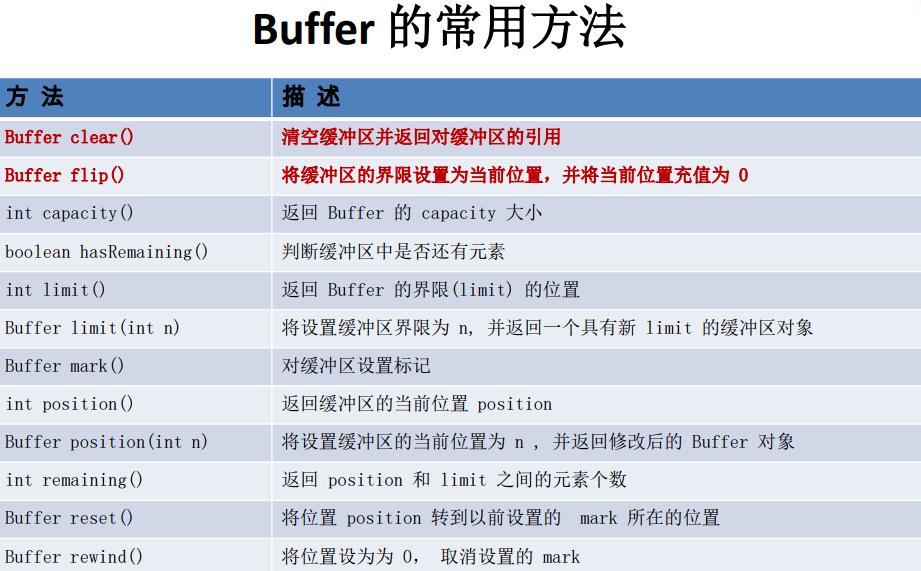
7. 缓冲区的数据操作
Buffer 所有子类提供了两个用于数据操作的方法:get() 与 put() 方法
获取 Buffer 中的数据 get() :读取单个字节 get(byte[] dst):批量读取多个字节到 dst 中 get(int index):读取指定索引位置的字节(不会移动 position)
放入数据到 Buffer 中 put(byte b):将给定单个字节写入缓冲区的当前位置 put(byte[] src):将 src 中的字节写入缓冲区的当前位置 put(int index, byte b):
将指定字节写入缓冲区的索引位置(不会移动 position)
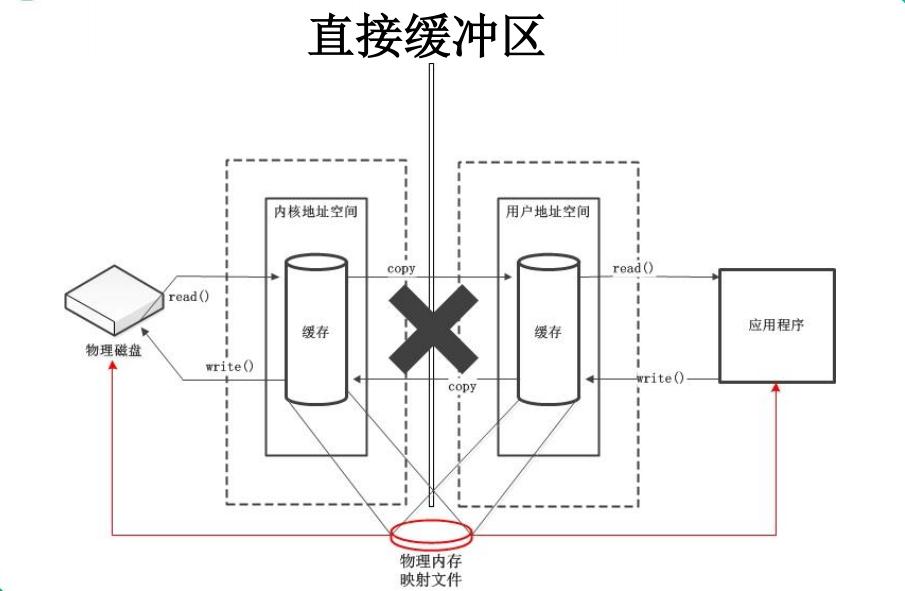
8. 直接与非直接缓冲区
字节缓冲区要么是直接的,要么是非直接的。如果为直接字节缓冲区,则 Java 虚拟机会尽最大努力直接在 此缓冲区上执行本机 I/O 操作。也就是说,在每次调用基础操作系统的一个本机 I/O 操作之前 (或 之后), 虚拟机都会尽量避免将缓冲区的内容复制到中间缓冲区中(或从中间缓冲区中复制内容)。
直接字节缓冲区可以通过调用此类的 allocateDirect() 工厂方法来创建。此方法返回的缓冲区进行分配和取消 分配所需成本通常高于非直接缓冲区。直接缓冲区的内容可以驻留在常规的垃圾回收堆之外,因 此,它们对 应用程序的内存需求量造成的影响可能并不明显。所以,建议将直接缓冲区主要分配给那些易受基础系统的 本机 I/O 操作影响的大型、持久的缓冲区。一般情况下,最好仅在直接缓冲区能在程 序性能方面带来明显好 处时分配它们。
直接字节缓冲区还可以通过 FileChannel 的 map() 方法 将文件区域直接映射到内存中来创建。该方法返回 MappedByteBuffer 。Java 平台的实现有助于通过 JNI 从本机代码创建直接字节缓冲区。如果以上 这些缓冲区 中的某个缓冲区实例指的是不可访问的内存区域,则试图访问该区域不会更改该缓冲区的内容,并且将会在 访问期间或稍后的某个时间导致抛出不确定的异常。
字节缓冲区是直接缓冲区还是非直接缓冲区可通过调用其 isDirect() 方法来确定。提供此方法是为了能够在 性能关键型代码中执行显式缓冲区管理。
9 通道(Channel):由 java.nio.channels 包定义 的。Channel 表示 IO 源与目标打开的连接。 Channel 类似于传统的“流”。只不过 Channel 本身不能直接访问数据,Channel 只能与 Buffer 进行交互。

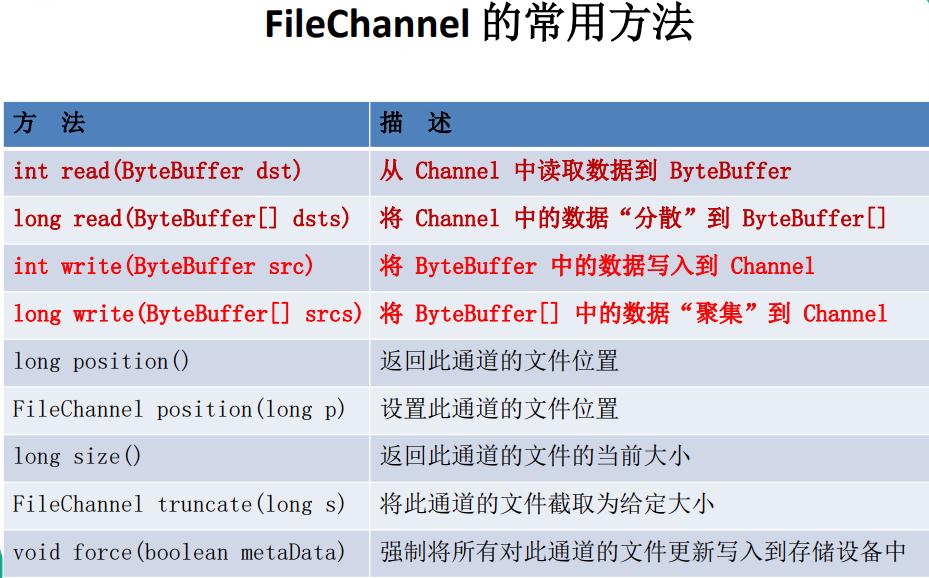
10. Java 为 Channel 接口提供的最主要实现类如下:
•FileChannel:用于读取、写入、映射和操作文件的通道。
•DatagramChannel:通过 UDP 读写网络中的数据通道。
•SocketChannel:通过 TCP 读写网络中的数据。
•ServerSocketChannel:可以监听新进来的 TCP 连接,对每一个新进来 的连接都会创建一个 SocketChannel。


package com.atguigu.nio;

import java.nio.ByteBuffer;

import org.junit.Test;

/*
 * 一、缓冲区(Buffer):在 Java NIO 中负责数据的存取。缓冲区就是数组。用于存储不同数据类型的数据
 *
 * 根据数据类型不同(boolean 除外),提供了相应类型的缓冲区:
 * ByteBuffer
 * CharBuffer
 * ShortBuffer
 * IntBuffer
 * LongBuffer
 * FloatBuffer
 * DoubleBuffer
 *
 * 上述缓冲区的管理方式几乎一致,通过 allocate() 获取缓冲区
 *
 * 二、缓冲区存取数据的两个核心方法:
 * put() : 存入数据到缓冲区中
 * get() : 获取缓冲区中的数据
 *
 * 三、缓冲区中的四个核心属性:
 * capacity : 容量,表示缓冲区中最大存储数据的容量。一旦声明不能改变。
 * limit : 界限,表示缓冲区中可以操作数据的大小。(limit 后数据不能进行读写)
 * position : 位置,表示缓冲区中正在操作数据的位置。
 *
 * mark : 标记,表示记录当前 position 的位置。可以通过 reset() 恢复到 mark 的位置
 *
 * 0 <= mark <= position <= limit <= capacity
 *
 * 四、直接缓冲区与非直接缓冲区:
 * 非直接缓冲区:通过 allocate() 方法分配缓冲区,将缓冲区建立在 JVM 的内存中
 * 直接缓冲区:通过 allocateDirect() 方法分配直接缓冲区,将缓冲区建立在物理内存中。可以提高效率
 */
public class TestBuffer {

    @Test
    public void test3(){
        //分配直接缓冲区
        ByteBuffer buf = ByteBuffer.allocateDirect(1024);

        System.out.println(buf.isDirect());
    }

    @Test
    public void test2(){
        String str = "abcde";
        ByteBuffer buf = ByteBuffer.allocate(1024);
        buf.put(str.getBytes());

        buf.flip();

        byte[] dst = new byte[buf.limit()];
        buf.get(dst, 0, 2);
        System.out.println(new String(dst, 0, 2));
        System.out.println(buf.position());

        //mark() : 标记
        buf.mark();

        buf.get(dst, 2, 2);
        System.out.println(new String(dst, 2, 2));
        System.out.println(buf.position());

        //reset() : 恢复到 mark 的位置
        buf.reset();
        System.out.println(buf.position());

        //判断缓冲区中是否还有剩余数据
        if(buf.hasRemaining()){

            //获取缓冲区中可以操作的数量
            System.out.println(buf.remaining());
        }
    }
/*
ab
2
cd
4
2
3

 */
    @Test
    public void test1(){
        String str = "abcde";

        //1. 分配一个指定大小的缓冲区
        ByteBuffer buf = ByteBuffer.allocate(1024);

        System.out.println("-----------------allocate()----------------");
        System.out.println(buf.position());
        System.out.println(buf.limit());
        System.out.println(buf.capacity());


        //2. 利用 put() 存入数据到缓冲区中
        buf.put(str.getBytes());

        System.out.println("-----------------put()----------------");
        System.out.println(buf.position());
        System.out.println(buf.limit());
        System.out.println(buf.capacity());

        //3. 切换读取数据模式
        buf.flip();

        System.out.println("-----------------flip()----------------");
        System.out.println(buf.position());
        System.out.println(buf.limit());
        System.out.println(buf.capacity());

        //4. 利用 get() 读取缓冲区中的数据
        byte[] dst = new byte[buf.limit()];
        buf.get(dst);
        System.out.println(new String(dst, 0, dst.length));

        System.out.println("-----------------get()----------------");
        System.out.println(buf.position());
        System.out.println(buf.limit());
        System.out.println(buf.capacity());

        //5. rewind() : 可重复读
        buf.rewind();

        System.out.println("-----------------rewind()----------------");
        System.out.println(buf.position());
        System.out.println(buf.limit());
        System.out.println(buf.capacity());

        //6. clear() : 清空缓冲区. 但是缓冲区中的数据依然存在,但是处于“被遗忘”状态
        buf.clear();

        System.out.println("-----------------clear()----------------");
        System.out.println(buf.position());
        System.out.println(buf.limit());
        System.out.println(buf.capacity());

        System.out.println((char)buf.get());

    }
/*
 -----------------allocate()----------------
0
1024
1024
-----------------put()----------------
5
1024
1024
-----------------flip()----------------
0
5
1024
abcde
-----------------get()----------------
5
5
1024
-----------------rewind()----------------
0
5
1024
-----------------clear()----------------
0
1024
1024
a

 */
}
package com.atguigu.nio;

import java.io.FileInputStream;
import java.io.FileOutputStream;
import java.io.IOException;
import java.io.RandomAccessFile;
import java.nio.ByteBuffer;
import java.nio.CharBuffer;
import java.nio.MappedByteBuffer;
import java.nio.channels.FileChannel;
import java.nio.channels.FileChannel.MapMode;
import java.nio.charset.CharacterCodingException;
import java.nio.charset.Charset;
import java.nio.charset.CharsetDecoder;
import java.nio.charset.CharsetEncoder;
import java.nio.file.Paths;
import java.nio.file.StandardOpenOption;
import java.util.Map;
import java.util.Map.Entry;
import java.util.Set;

import org.junit.Test;

/*
 * 一、通道(Channel):用于源节点与目标节点的连接。在 Java NIO 中负责缓冲区中数据的传输。Channel 本身不存储数据,因此需要配合缓冲区进行传输。
 *
 * 二、通道的主要实现类
 *     java.nio.channels.Channel 接口:
 *         |--FileChannel
 *         |--SocketChannel
 *         |--ServerSocketChannel
 *         |--DatagramChannel
 *
 * 三、获取通道
 * 1. Java 针对支持通道的类提供了 getChannel() 方法
 *         本地 IO:
 *         FileInputStream/FileOutputStream
 *         RandomAccessFile
 *
 *         网络IO:
 *         Socket
 *         ServerSocket
 *         DatagramSocket
 *
 * 2. 在 JDK 1.7 中的 NIO.2 针对各个通道提供了静态方法 open()
 * 3. 在 JDK 1.7 中的 NIO.2 的 Files 工具类的 newByteChannel()
 *
 * 四、通道之间的数据传输
 * transferFrom()
 * transferTo()
 *
 * 五、分散(Scatter)与聚集(Gather)
 * 分散读取(Scattering Reads):将通道中的数据分散到多个缓冲区中
 * 聚集写入(Gathering Writes):将多个缓冲区中的数据聚集到通道中
 *
 * 六、字符集:Charset
 * 编码:字符串 -> 字节数组
 * 解码:字节数组  -> 字符串
 *
 */
public class TestChannel {

    //字符集
    @Test
    public void test6() throws IOException{
        Charset cs1 = Charset.forName("GBK");

        //获取编码器
        CharsetEncoder ce = cs1.newEncoder();

        //获取解码器
        CharsetDecoder cd = cs1.newDecoder();

        CharBuffer cBuf = CharBuffer.allocate(1024);
        cBuf.put("尚硅谷威武!");
        cBuf.flip();

        //编码
        ByteBuffer bBuf = ce.encode(cBuf);

        for (int i = 0; i < 12; i++) {
            System.out.println(bBuf.get());
        }

        //解码
        bBuf.flip();
        CharBuffer cBuf2 = cd.decode(bBuf);
        System.out.println(cBuf2.toString());

        System.out.println("------------------------------------------------------");

        Charset cs2 = Charset.forName("GBK");
        bBuf.flip();
        CharBuffer cBuf3 = cs2.decode(bBuf);
        System.out.println(cBuf3.toString());
    }

    @Test
    public void test5(){
        Map<String, Charset> map = Charset.availableCharsets();

        Set<Entry<String, Charset>> set = map.entrySet();

        for (Entry<String, Charset> entry : set) {
            System.out.println(entry.getKey() + "=" + entry.getValue());
        }
    }

    //分散和聚集
    @Test
    public void test4() throws IOException{
        RandomAccessFile raf1 = new RandomAccessFile("1.txt", "rw");

        //1. 获取通道
        FileChannel channel1 = raf1.getChannel();

        //2. 分配指定大小的缓冲区
        ByteBuffer buf1 = ByteBuffer.allocate(100);
        ByteBuffer buf2 = ByteBuffer.allocate(1024);

        //3. 分散读取
        ByteBuffer[] bufs = {buf1, buf2};
        channel1.read(bufs);

        for (ByteBuffer byteBuffer : bufs) {
            byteBuffer.flip();
        }

        System.out.println(new String(bufs[0].array(), 0, bufs[0].limit()));
        System.out.println("-----------------");
        System.out.println(new String(bufs[1].array(), 0, bufs[1].limit()));

        //4. 聚集写入
        RandomAccessFile raf2 = new RandomAccessFile("2.txt", "rw");
        FileChannel channel2 = raf2.getChannel();

        channel2.write(bufs);
    }

    //通道之间的数据传输(直接缓冲区)
    @Test
    public void test3() throws IOException{
        FileChannel inChannel = FileChannel.open(Paths.get("d:/1.mkv"), StandardOpenOption.READ);
        FileChannel outChannel = FileChannel.open(Paths.get("d:/2.mkv"), StandardOpenOption.WRITE, StandardOpenOption.READ, StandardOpenOption.CREATE);

//        inChannel.transferTo(0, inChannel.size(), outChannel);
        outChannel.transferFrom(inChannel, 0, inChannel.size());

        inChannel.close();
        outChannel.close();
    }

    //使用直接缓冲区完成文件的复制(内存映射文件)
    @Test
    public void test2() throws IOException{//2127-1902-1777
        long start = System.currentTimeMillis();

        FileChannel inChannel = FileChannel.open(Paths.get("d:/1.mkv"), StandardOpenOption.READ);
        FileChannel outChannel = FileChannel.open(Paths.get("d:/2.mkv"), StandardOpenOption.WRITE, StandardOpenOption.READ, StandardOpenOption.CREATE);

        //内存映射文件
        MappedByteBuffer inMappedBuf = inChannel.map(MapMode.READ_ONLY, 0, inChannel.size());
        MappedByteBuffer outMappedBuf = outChannel.map(MapMode.READ_WRITE, 0, inChannel.size());

        //直接对缓冲区进行数据的读写操作
        byte[] dst = new byte[inMappedBuf.limit()];
        inMappedBuf.get(dst);
        outMappedBuf.put(dst);

        inChannel.close();
        outChannel.close();

        long end = System.currentTimeMillis();
        System.out.println("耗费时间为:" + (end - start));
    }

    //利用通道完成文件的复制(非直接缓冲区)
    @Test
    public void test1(){//10874-10953
        long start = System.currentTimeMillis();

        FileInputStream fis = null;
        FileOutputStream fos = null;
        //①获取通道
        FileChannel inChannel = null;
        FileChannel outChannel = null;
        try {
            fis = new FileInputStream("d:/1.mkv");
            fos = new FileOutputStream("d:/2.mkv");

            inChannel = fis.getChannel();
            outChannel = fos.getChannel();

            //②分配指定大小的缓冲区
            ByteBuffer buf = ByteBuffer.allocate(1024);

            //③将通道中的数据存入缓冲区中
            while(inChannel.read(buf) != -1){
                buf.flip(); //切换读取数据的模式
                //④将缓冲区中的数据写入通道中
                outChannel.write(buf);
                buf.clear(); //清空缓冲区
            }
        } catch (IOException e) {
            e.printStackTrace();
        } finally {
            if(outChannel != null){
                try {
                    outChannel.close();
                } catch (IOException e) {
                    e.printStackTrace();
                }
            }

            if(inChannel != null){
                try {
                    inChannel.close();
                } catch (IOException e) {
                    e.printStackTrace();
                }
            }

            if(fos != null){
                try {
                    fos.close();
                } catch (IOException e) {
                    e.printStackTrace();
                }
            }

            if(fis != null){
                try {
                    fis.close();
                } catch (IOException e) {
                    e.printStackTrace();
                }
            }
        }

        long end = System.currentTimeMillis();
        System.out.println("耗费时间为:" + (end - start));

    }

}