主要处理下图部分(主右边模块)设置:
![]()
由于 /layouts 全部只是布局相关的,与具体显示内容信息无关
-- / ***.js 提供对应方法
-- /****.less 布局设置
其具体实现在 src/components/GlobalHeader/ RightContent.js 里面:
return (
      <div className={className}>
        //搜索框
        <HeaderSearch
          className={`${styles.action} ${styles.search}`}
          placeholder={formatMessage({ id: 'component.globalHeader.search' })}
          dataSource={[
            formatMessage({ id: 'component.globalHeader.search.example1' }),
            formatMessage({ id: 'component.globalHeader.search.example2' }),
            formatMessage({ id: 'component.globalHeader.search.example3' }),
          ]}
          onSearch={value => {
            console.log('input', value); // eslint-disable-line
          }}
          onPressEnter={value => {
            console.log('enter', value); // eslint-disable-line
          }}
        />

        //帮助文档
        <Tooltip title={formatMessage({ id: 'component.globalHeader.help' })}>
          <a
            target="_blank"
            href="https://pro.ant.design/docs/getting-started"
            rel="noopener noreferrer"
            className={styles.action}
          >
            <Icon type="question-circle-o" />
          </a>
        </Tooltip>

        //未处理提醒
        <NoticeIcon
          className={styles.action}
          count={currentUser.unreadCount}
          onItemClick={(item, tabProps) => {
            console.log(item, tabProps); // eslint-disable-line
            this.changeReadState(item, tabProps);
          }}
          loading={fetchingNotices}
          locale={{
            emptyText: formatMessage({ id: 'component.noticeIcon.empty' }),
            clear: formatMessage({ id: 'component.noticeIcon.clear' }),
            viewMore: formatMessage({ id: 'component.noticeIcon.view-more' }),
            notification: formatMessage({ id: 'component.globalHeader.notification' }),
            message: formatMessage({ id: 'component.globalHeader.message' }),
            event: formatMessage({ id: 'component.globalHeader.event' }),
          }}
          onClear={onNoticeClear}
          onPopupVisibleChange={onNoticeVisibleChange}
          onViewMore={() => message.info('Click on view more')}
          clearClose
        >
          <NoticeIcon.Tab
            count={unreadMsg.notification}
            list={noticeData.notification}
            title="notification"
            emptyText={formatMessage({ id: 'component.globalHeader.notification.empty' })}
            emptyImage="https://gw.alipayobjects.com/zos/rmsportal/wAhyIChODzsoKIOBHcBk.svg"
            showViewMore
          />
          <NoticeIcon.Tab
            count={unreadMsg.message}
            list={noticeData.message}
            title="message"
            emptyText={formatMessage({ id: 'component.globalHeader.message.empty' })}
            emptyImage="https://gw.alipayobjects.com/zos/rmsportal/sAuJeJzSKbUmHfBQRzmZ.svg"
            showViewMore
          />
          <NoticeIcon.Tab
            count={unreadMsg.event}
            list={noticeData.event}
            title="event"
            emptyText={formatMessage({ id: 'component.globalHeader.event.empty' })}
            emptyImage="https://gw.alipayobjects.com/zos/rmsportal/HsIsxMZiWKrNUavQUXqx.svg"
            showViewMore
          />
        </NoticeIcon>
        {currentUser.name ? (
          <HeaderDropdown overlay={menu}>
            <span className={`${styles.action} ${styles.account}`}>
              <Avatar
                size="small"
                className={styles.avatar}
                src={currentUser.avatar}
                alt="avatar"
              />
              <span className={styles.name}>{currentUser.name}</span>
            </span>
          </HeaderDropdown>
        ) : (
          <Spin size="small" style={{ marginLeft: 8, marginRight: 8 }} />
        )}

        //语言选择
        <SelectLang className={styles.action} />
      </div>
    );
现更改如下:
- 搜索提示删除:删除 <HeaderSearch /> 里的 DataSource={} 属性
- 增加 help 页面,设置帮助跳转路由:直接跳转自己新添加的 help 页面
新建一个页面
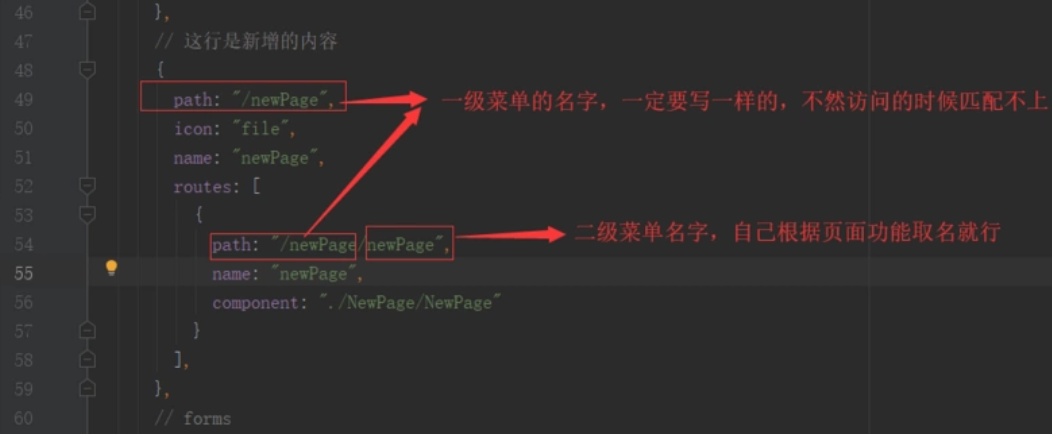
1. 在路由中新建一条页面的配置。先不要管报错,因为路由对应的 component 和 models 你还没有,继续往下看。建立类似如下:
1.1 在src->pages->『新建文件夹』Help->『新建js文件』index.js 和 『新建less文件』index.less, 如下: 
填入如下代码:// 这是 src/pages/Help/index.js 内容 import React, { PureComponent } from "react"; // 面包屑 import PageHeaderWrapper from "@/components/PageHeaderWrapper"; // 引入less import styles from "./NewPage.less"; export default class Help extends PureComponent { render() { return ( <PageHeaderWrapper> <div> HELLO WORD! </div> </PageHeaderWrapper> ); } };
// 这是src/pages/Help/index.less内容
//样式文件默认使用 CSS Modules,如果需要,你可以在样式文件的头部引入 antd 样式变量文件:
//这样可以很方便地获取 antd 样式变量并在你的文件里使用,有利于保持页面的一致性,也方便实现定制主题。
@import "~antd/lib/style/themes/default.less";
2. routes 添加路由
2.1 在config->router.config.js->『47行新增如下内容』:// 这行是新增的内容 { path: "/help", icon: "file", name: "help", component: "./Help" }, 
类似如下:

2.2 做完如上步骤其实功能是完成了,但是 pro 2.x 版本中加入了菜单国际化中。所以进行修改:在src->locales->zh-CN->menu.js->『11行新增如下内容』
'menu.help': '帮助文档',
其余 zh-**/menu.js 下类似。
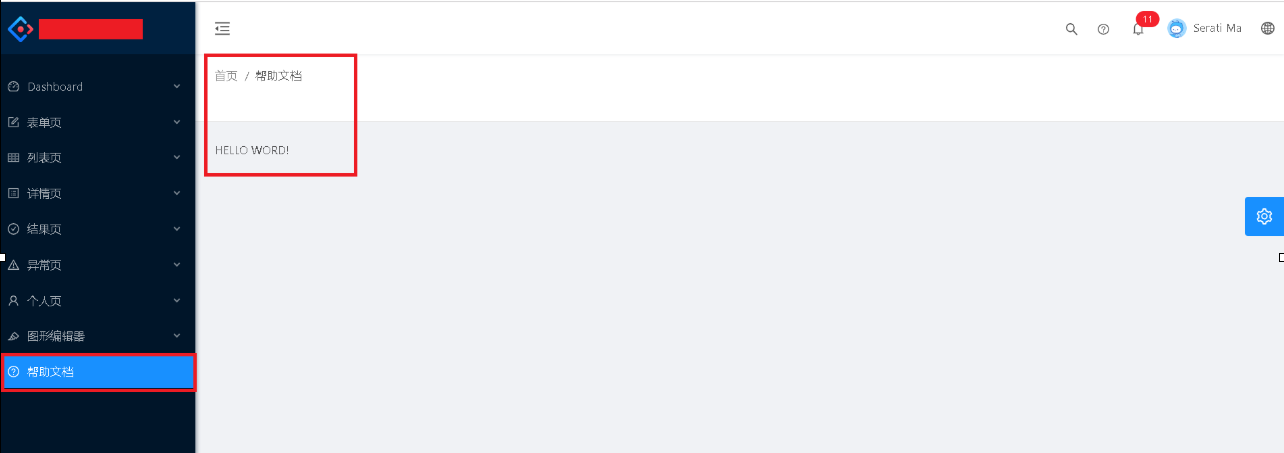
3. 查看效果
3.1 运行效果

3.2 让我做一道连线题吧

4. 页面头部 help 跳转更改:
更改 src/components/GlobalHeader/RightContent.js 里 render 部分的 <a> 链接部分
//  src/components/GlobalHeader/RightContent.js 原来代码:
//帮助文档
<Tooltip title={formatMessage({ id: 'component.globalHeader.help' })}>
    <a
        target="_blank"   // 指定在新页面打开
        href="https://pro.ant.design/docs/getting-started"  //新页面打开的路由
        rel="noopener noreferrer"
        className={styles.action}
     >
         <Icon type="question-circle-o" /> //显示内容:此处为图标
     </a>
</Tooltip>
将 此处代码替换为:
<Tooltip title={formatMessage({ id: 'component.globalHeader.help' })}>
   <Link
      to="/help"
      rel="noopener noreferrer"
      className={styles.action}
   >
      <Icon type="question-circle-o" />
   </Link>
</Tooltip>

//注意:使用 Link, 需引入: import Link from '@umi/link'