GitHub: https://github.com/Qihoo360/wayne
文档: 由于wayne 官方文档链接已经失效了,我们可以通过这里查看 wayne 文档, 除了这个地方,我们询问之前开发者是还有一个地方存有官方文档的。 https://github.com/Qihoo360/cloud-website 这个地方存有历史官网文档。
一、wayne 构建原因
wayne 自己构建的原因: 由于1.8.5 和 1.8.6 是不支持 k8s 高一点的版本(1.16+)。 由于我们近期新项目使用了的k8s 版本是 1.20 我们在我们老的wayne版本上是不支持的.
1.1 、老版本报错内容
具体现象就是: 点击发布提示没有找到对应的资源,后端报错。
E1220 17:35:19.031666       1 reflector.go:126] pkg/mod/k8s.io/client-go@v11.0.0+incompatible/tools/cache/reflector.go:94: Failed to list *v1beta1.DaemonSet: the server could not find the requested resource
E1220 17:35:19.031758       1 reflector.go:126] pkg/mod/k8s.io/client-go@v11.0.0+incompatible/tools/cache/reflector.go:94: Failed to list *v1beta1.StatefulSet: the server could not find the requested resource
E1220 17:35:19.035617       1 reflector.go:126] pkg/mod/k8s.io/client-go@v11.0.0+incompatible/tools/cache/reflector.go:94: Failed to list *v1beta1.Deployment: the server could not find the requested resource
E1220 17:35:19.073638       1 reflector.go:126] pkg/mod/k8s.io/client-go@v11.0.0+incompatible/tools/cache/reflector.go:94: Failed to list *v1beta1.ReplicaSet: the server could not find the requested resource
E1220 17:35:19.073648       1 reflector.go:126] pkg/mod/k8s.io/client-go@v11.0.0+incompatible/tools/cache/reflector.go:94: Failed to list *v1beta1.ReplicaSet: the server could not find the requested resource
1.2 、wayne 官方
支持1.16+ 代码 issue: https://github.com/Qihoo360/wayne/pull/565, 也合并到master了,前后端都有更新, 但是目前看wayne-frontend前端镜像是没有更新的。 后端镜像是有更新的,
二、构建步骤
目前我们的策略是, 前端镜像自己构建,后端镜像使用 dockerhub 上面的 latest。
2.1 、前端镜像
构建需要环境:
-
docker 需要安装
yum install -y yum-utils \ device-mapper-persistent-data \ lvm2 # 阿里的源,国内使用较快 yum-config-manager --add-repo http://mirrors.aliyun.com/docker-ce/linux/centos/docker-ce.repo # 生成缓存 yum makecache # 安装最新稳定版本 Docker CE yum install docker-ce docker-ce-cli containerd.io systemctl start docker -
git 需要安装
yum install git -y -
拉取代码
-
拉取
cd /opt && git clone https://github.com/Qihoo360/wayne.git cd wayne git submodule update --init --recursive # 这个必须执行,首次执行会有输出,如果没有输出的话,那么从新拉取下,然后执行。 -
使用down zip 方式不要使用这个,这个存在一些问题。
-
-
我们看下 Makefile
.PHONY: run-backend run-worker run-frontend syncdb release

MAKEFLAGS += --warn-undefined-variables

# Build variables
REGISTRY_URI :=360cloud
RELEASE_VERSION :=$(shell git describe --always --tags)
UI_BUILD_VERSION :=v1.0.2
SERVER_BUILD_VERSION :=v1.0.2

update-version:
	./hack/updateversion.sh

# run module
run-backend:
	cd src/backend/ && go run main.go

run-frontend:
	cd src/frontend/ && npm start

# dev
syncdb:
	go run src/backend/database/syncdb.go orm syncdb

sqlall:
	go run src/backend/database/syncdb.go orm sqlall > _dev/wayne.sql

initdata:
	go run src/backend/database/generatedata/main.go > _dev/wayne-data.sql

swagger-openapi:
	cd src/backend && swagger generate spec -o ./swagger/openapi.swagger.json

## server builder image
build-server-image:
	docker build --no-cache -t $(REGISTRY_URI)/wayne-server-builder:$(SERVER_BUILD_VERSION) -f hack/build/server/Dockerfile .

## ui builder image
build-ui-image:
	docker build --no-cache -t $(REGISTRY_URI)/wayne-ui-builder:$(UI_BUILD_VERSION) -f hack/build/ui/Dockerfile .

# release, requiring Docker 17.05 or higher on the daemon and client
build-backend-image:
	@echo "version: $(RELEASE_VERSION)"
	docker build --no-cache -t $(REGISTRY_URI)/wayne-backend:$(RELEASE_VERSION) .

build-frontend-image:
	@echo "version: $(RELEASE_VERSION)"
	docker build --no-cache -t $(REGISTRY_URI)/wayne-frontend:$(RELEASE_VERSION) -f hack/build/frontend/Dockerfile .

push-image:
	docker tag $(REGISTRY_URI)/wayne-backend:$(RELEASE_VERSION) $(REGISTRY_URI)/wayne-backend:latest
	docker push $(REGISTRY_URI)/wayne-backend:$(RELEASE_VERSION)
	docker push $(REGISTRY_URI)/wayne-backend:latest
	docker tag $(REGISTRY_URI)/wayne-frontend:$(RELEASE_VERSION) $(REGISTRY_URI)/wayne-frontend:latest
	docker push $(REGISTRY_URI)/wayne-frontend:$(RELEASE_VERSION)
	docker push $(REGISTRY_URI)/wayne-frontend:latest
我们找到
build-frontend-image, 我们可以看到是使用了./hack/build/frontend/Dockerfile# requiring Docker 17.05 or higher on the daemon and client # see https://docs.docker.com/develop/develop-images/multistage-build/ # BUILD COMMAND : # docker --build-arg RELEASE_VERSION=v1.0.0 -t infra/wayne:v1.0.0 . # build ui FROM 360cloud/wayne-ui-builder:v1.0.2 as frontend COPY src/frontend /workspace RUN cd /workspace && \ npm run build:aot # build server FROM openresty/openresty:1.15.8.1-1-centos COPY --from=frontend /workspace/dist/ /usr/local/openresty/nginx/html/ RUN ln -sf /usr/share/zoneinfo/Asia/Shanghai /etc/localtime && \ sed -i '/index index.html index.htm;/a\ try_files $uri $uri/ /index.html;' /etc/nginx/conf.d/default.conf CMD ["/usr/local/openresty/bin/openresty", "-g", "daemon off;"]看这个dockerfile ,我们会发现,这个镜像的构建是通过将src 的源码,然后 npm run build 进行构建,然后将构建好了包,然后拷贝到openresty 镜像了。
如果拉取镜像慢的话,网上找下教程。
配置 163 镜像源
sudo mkdir -p /etc/docker sudo tee /etc/docker/daemon.json <<-'EOF' { "registry-mirrors": ["http://hub-mirror.c.163.com"] } EOF sudo systemctl daemon-reload sudo systemctl restart docker -
构建前端镜像
make build-frontend-image如果遇到一些问题,可以看末尾。
-
给镜像增加tag,上传至 dockerhub
docker pull djxslp/wayne-frontend:latest # 这个是我已经构建好了的镜像。是自己基于github 代码的master 分支编译的(2021.12.21 15:00)
2.1 、后端镜像
使用dockerhub 上面最新的
360cloud/wayne-backend:latest
自己构建
Dockerfile 的内容
# requiring Docker 17.05 or higher on the daemon and client
# see https://docs.docker.com/develop/develop-images/multistage-build/
# BUILD COMMAND :
# docker --build-arg RELEASE_VERSION=v1.0.0 -t infra/wayne:v1.0.0 .

# build server
FROM 360cloud/wayne-server-builder:v1.0.2 as backend

COPY go.mod /go/src/github.com/Qihoo360/wayne
COPY go.sum /go/src/github.com/Qihoo360/wayne
COPY src/backend /go/src/github.com/Qihoo360/wayne/src/backend

RUN export GO111MODULE=on && \
    export GOPROXY=https://goproxy.io && \
    cd /go/src/github.com/Qihoo360/wayne/src/backend && \
    bee generate docs && \
    bee pack -o /_build

# build release image
FROM 360cloud/centos:7

RUN ln -sf /usr/share/zoneinfo/Asia/Shanghai /etc/localtime

COPY --from=backend /_build/backend.tar.gz /opt/wayne/

WORKDIR /opt/wayne/

RUN tar -xzvf backend.tar.gz

CMD ["./backend"
构建命令
make build-backend-image
自己构建的
docker pull djxslp/wayne-backend:latest # 是自己基于github 代码的master 分支编译的(2021.12.21 15:00),最终容器内的监听端口是 8081, 需要注意下。
三、配置和数据库导入
基于 docker-compose 部署, cd hack/docker-compose/
3.1 、前端配置
./conf/config.js
window.CONFIG = {
    URL: 'http://yourip:8080',
    RAVEN: false,
    RAVEN_DSN: 'RAVEN_DSN'
};
需要改的参数 URL: 值为需要为后端后面绑定的域名,示例: https://backend-wayne.baidu.com
3.2、后端配置
./conf/app.conf
必须需要修改的:数据库配置,其他的可以根据情况进行配置。
## mysql
DBName = "wayne"
DBTns = "tcp(127.0.0.1:3306)"
DBUser = "wayne"
DBPasswd = "123456"
DBLoc = "Asia%2FShanghai"
DBConnTTL = 30
3.3 、数据库导入
- 后端数据库
- 手动导入, 我把一个刚安装的数据库导出了。 链接: https://djxblog.oss-cn-shenzhen.aliyuncs.com/picture/typora/wayne.sql
- 程序自动创建, 这个需要给到一个较高的权限,且
wayne库原本不存在,如果库存在,则不会进行自动创建。
3.4、 启动服务
-
安装docker-compose
curl -L https://github.com/docker/compose/releases/download/1.24.0/docker-compose-`uname -s`-`uname -m` -o /usr/local/bin/docker-compose chmod +x /usr/local/bin/docker-compose -
启动服务
cd  hack/docker-compose
docker-compose up -d
四、中途遇到的问题和一些思考
登录无效参数 Invalid Param
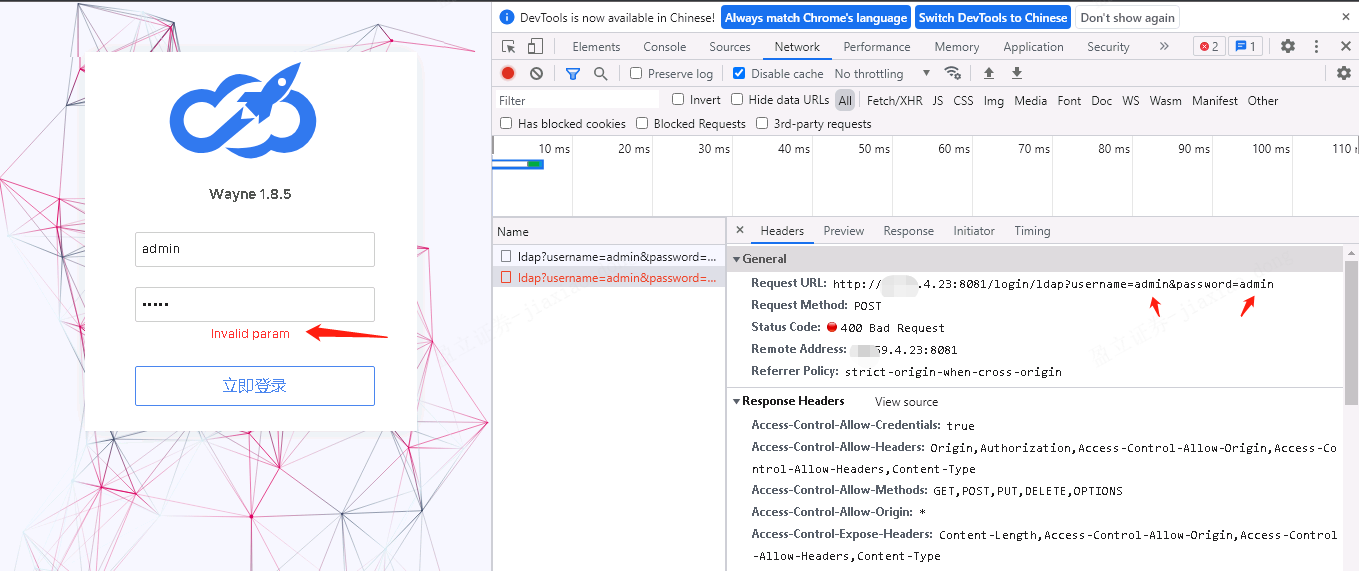
问题原因:
https://github.com/Qihoo360/wayne/pull/578
之前版本(1.8.5/1.8.6), 用户名和密码都是在 URL 中的,也就是如图所示,现在新的版本是改为JSON 了。
版本未找到, 也就是tag 未指定。
[root@ops-pinpoint-185 wayne]# make  build-frontend-image
fatal: Not a valid object name HEAD
version:
docker build --no-cache -t 360cloud/wayne-frontend: -f hack/build/frontend/Dockerfile .
invalid argument "360cloud/wayne-frontend:" for "-t, --tag" flag: invalid reference format
See 'docker build --help'.
我们直接在 Makefile 里面写死版本。
RELEASE_VERSION :=v1.8.7.1