-
创建一个名为
HelloWeb的动态Web项目,并在创建的项目中的src文件夹下创建一个包com.eduask -
将下面提到的Spring和其他库拖放到文件夹
WebContent/WEB-INF/lib中。 - 在
com.eduask包下创建一个Java类HelloController。 - 在
WebContent/WEB-INF文件夹下创建Spring配置文件web.xml和helloworld-servlet.xml。 - 在
WebContent/WEB-INF文件夹下创建一个名为jsp的子文件夹。在此子文件夹下创建视图文件hello.jsp。
工程结构如图:

HelloController.java
package com.eduask;
import org.springframework.stereotype.Controller;
import org.springframework.ui.ModelMap;
import org.springframework.web.bind.annotation.RequestMapping;
import org.springframework.web.bind.annotation.RequestMethod;
@Controller
//@RequestMapping("/hello")
public class HelloController {
@RequestMapping(value="/hello" , method=RequestMethod.GET)
//注解中 value= 请求的名字 method= 枚举值 RequestMethod.GET 浏览器的get方法请求
public String printHello(ModelMap model) {
model.addAttribute("message", "Hello Spring MVC Framework-get!");
return "hello";
}
//注解中 value= 请求的名字 method= 枚举值 RequestMethod.POST 浏览器的POST方法请求
@RequestMapping(value="/hello" , method=RequestMethod.POST)
public String printHello2(ModelMap model) {
model.addAttribute("message", "Hello Spring MVC Framework-post!");
return "hello";
}
}
web.xml
<?xml version="1.0" encoding="UTF-8"?>
<web-app version="2.5"
    xmlns="http://java.sun.com/xml/ns/javaee"
    xmlns:xsi="http://www.w3.org/2001/XMLSchema-instance"
    xsi:schemaLocation="http://java.sun.com/xml/ns/javaee
    http://java.sun.com/xml/ns/javaee/web-app_2_5.xsd">
  <display-name></display-name>
  <servlet>
      <servlet-name>helloworld</servlet-name>
      <servlet-class>org.springframework.web.servlet.DispatcherServlet</servlet-class>
  <load-on-startup>1</load-on-startup>
  </servlet>

  <servlet-mapping>
      <servlet-name>helloworld</servlet-name>
      <url-pattern>/</url-pattern>
  </servlet-mapping>

  <context-param>
   <param-name>contextConfigLocation</param-name>
   <param-value>WEB-INF/helloworld-servlet.xml</param-value>
</context-param>

<listener>
   <listener-class>
      org.springframework.web.context.ContextLoaderListener
   </listener-class>
</listener>
  <welcome-file-list>
    <welcome-file>index.jsp</welcome-file>
  </welcome-file-list>
</web-app>
helloworld-servlet.xml
<beans
   xmlns="http://www.springframework.org/schema/beans"
   xmlns:context="http://www.springframework.org/schema/context"
   xmlns:xsi="http://www.w3.org/2001/XMLSchema-instance"
   xsi:schemaLocation="
   http://www.springframework.org/schema/beans
   http://www.springframework.org/schema/beans/spring-beans-3.0.xsd
   http://www.springframework.org/schema/context
   http://www.springframework.org/schema/context/spring-context-3.0.xsd">
   <context:component-scan base-package="com.eduask" />
   <bean class="org.springframework.web.servlet.view.InternalResourceViewResolver">
      <!-- 指定前缀 -->
      <property name="prefix" value="/WEB-INF/jsp/" />
       <!-- 指定后缀 -->
      <property name="suffix" value=".jsp" />
   </bean>

</beans>
hello.jsp
<%@ page language="java" import="java.util.*" pageEncoding="utf-8"%>
<%
String path = request.getContextPath();
String basePath = request.getScheme()+"://"+request.getServerName()+":"+request.getServerPort()+path+"/";
%>

<!DOCTYPE HTML PUBLIC "-//W3C//DTD HTML 4.01 Transitional//EN">
<html>
  <head>
    <base href="<%=basePath%>">

    <title>My JSP 'hello.jsp' starting page</title>

    <meta http-equiv="pragma" content="no-cache">
    <meta http-equiv="cache-control" content="no-cache">
    <meta http-equiv="expires" content="0">
    <meta http-equiv="keywords" content="keyword1,keyword2,keyword3">
    <meta http-equiv="description" content="This is my page">
  </head>
  <body>
    <h1>${message}</h1>
  </body>
</html>
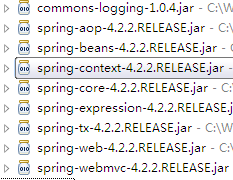
在WebContent/WEB-INF/lib文件夹中放入下列jar包:
工程部署到tomcat服务器中, 然后启动tomcat 在浏览器地址栏输入
http://localhost:8080/springMVC/hello
如果没敲错代码或文件名,那么就应该出现下面的内容。

到此 恭喜您 成功配置一个springmvc的工程 ,以后再继续。
jar包下载路径
链接: http://pan.baidu.com/s/1pLdoQmB 密码: j99r