转:http://www.cnblogs.com/carysun/archive/2009/01/11/receiveactivity.html
在.NET3.5中WF提供了和WCF的整合,就是工作流服务,即使用工作流创作的 WCF服务。服务协定的实现是通过一个或多个 ReceiveActivity 活动处理的。
在WCF中提供了三种消息交换模式分别为One-Way Calls,Request/Response和Duplex,在工作流服务中只支持One-Way Calls和Request/Response两种模式。
下面就举例说明,新建一个顺序工作流库CaryWFLib项目
1.先定义服务契约接口,我们建立的是一个无状态的工作流服务,所以要设置如下SessionMode = SessionMode.NotAllowed
namespace CaryWFLib
{
    [ServiceContract(Namespace = "http://CaryWF",
        SessionMode = SessionMode.NotAllowed)]
    public interface IAddService
    {
        [OperationContract]
        Double Add(Double num1, Double num2);
    }
}
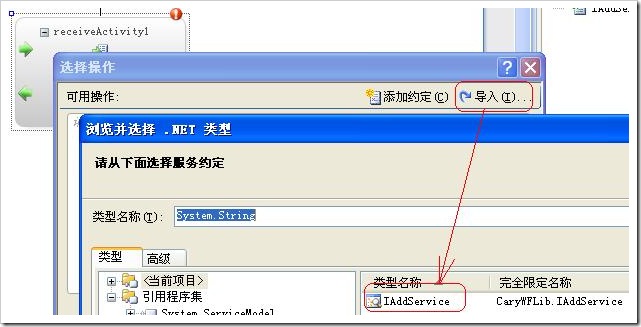
2.在工作流设计器中拖入ReceiveActivity,设置ServiceOperationInfo属性,该属性来实现的协定和服务操作,如下图:
3.设置该活动的CanCreateInstance属性为true,当服务客户端调用时,服务将创建工作流的新实例。 如果设置为 false,客户端无法使用服务操作调用来创
建工作流的新实例,只能使用关联的 WorkflowRuntime 对象的 CreateWorkflow 方法可以创建。
在IIS中宿主工作流服务
主要通过以下步骤:
1.创建AddServiceWorkflow.svc放到IIS虚拟目录中,代码如下:
<%@ServiceHost language=c# Debug="true" Service="CaryWFLib.AddWorkflow"
Factory="System.ServiceModel.Activation.WorkflowServiceHostFactory" %>
2.增加web.config文件,在web.config中我加载了持久化服务,当然我已经建立好了持久化数据库,代码如下:
<?xml version="1.0" encoding="utf-8" ?>
<configuration>
  <system.serviceModel>
    <services>
      <service name="CaryWFLib.AddWorkflow"
               behaviorConfiguration="ServiceBehavior">
        <endpoint address="" binding="wsHttpContextBinding" contract="CaryWFLib.IAddService"/>
      </service>
    </services>
    <behaviors>
      <serviceBehaviors>
        <behavior name="ServiceBehavior">
          <serviceMetadata httpGetEnabled="true"/>
          <serviceDebug includeExceptionDetailInFaults="true"/>
          <workflowRuntime name="WorkflowServiceHostRuntime"
                           validateOnCreate="true"
                           enablePerformanceCounters="true">
            <services>
              <add type=
                   "System.Workflow.Runtime.Hosting.SqlWorkflowPersistenceService,
                   System.Workflow.Runtime,Version=3.0.00000.0,
                   Culture=neutral,PublicKeyToken=31bf3856ad364e35"
                   connectionString="Initial Catalog=WorkflowPersistence;
                   Data Source=localhostSQLEXPRESS; Integrated Security=SSPI; Trusted_Connection=True;"
                   LoadIntervalSeconds="1" UnLoadOnIdle="true" />
            </services>
          </workflowRuntime>
        </behavior>
      </serviceBehaviors>
    </behaviors>
  </system.serviceModel>

  <system.web>
    <compilation>
      <assemblies>
        <add assembly="System.WorkflowServices,Version=3.5.0.0,
             Culture=neutral,PublicKey Token=31bf3856ad364e35"/>
      </assemblies>
    </compilation>
  </system.web>
</configuration>
3.将编译后生成的CaryWFLib.dll放到IIS的虚拟目录的bin目录下
4.然后你就可以在浏览器中输入http://localhost/CaryWFWCF/AddServiceWorkflow.svc来测试是否部署成功了。
5.有几点要注意的:
5.1.在使用iis承载wcf时,如果遇到无法访问iis元数据的权限的错误,可以使用如下命令
aspnet_regiis –ga <WindowsUserAccount>来给制定用户权限。
5.2.无法打开登录所请求的数据库 "WorkflowPersistence"。登录失败。用户 XXXXASPNET' 登录失败。
这个时候需要给aspnet用户访问持久化数据库的权限,可以将aspnet用户添加到state_persistence_users角色中,该角色是随着持久化数据库创建
而产生的。我使用的是express版,我的方法是利用sql server 2005外围应用配置器的添加新管理员,将aspnet账户添加为管理员。
5.3.如果在安装 WCF之后安装了 IIS,必须运行以下命令:
"%WINDIR%Microsoft.NetFrameworkv3.0Windows Communication FoundationServiceModelReg.exe" -r
这将在 IIS 中注册所需的脚本映射。 还必须确保将 .svc 文件类型映射到 aspnet_isapi.dll。
创建客户端测试
1.在你的项目中添加服务引用,添加完成后,项目中会自动添加System.ServiceModel和System.Runtime.Serialization引用,和App.config配置文件。
测试代码如下:
namespace AddServiceConsole
{
    class Program
    {
        static void Main(string[] args)
        {
            try
            {
                AddServiceClient client = new AddServiceClient();
                Console.WriteLine("Server endpoint: {0}", client.Endpoint.Address.ToString());
                Double result = client.Add(1, 2);
                Console.WriteLine("1加2的结果为:{0}", result);
                client.Close();
            }
            catch (Exception exception)
            {
                Console.WriteLine("未处理的异常: {0} - {1}", exception.GetType().Name, exception.Message);
            }
            Console.WriteLine("Press any key to exit");
            Console.ReadKey();
        }
    }
}
2.结果如下:
手动宿主工作流服务
1.代码如下:
WorkflowServiceHost serviceHost = null;
           try
           {
               serviceHost = new WorkflowServiceHost(typeof(CaryWFLib.AddWorkflow));
               serviceHost.Description.Behaviors.Find<WorkflowRuntimeBehavior>().WorkflowRuntime.WorkflowCompleted
               += delegate(object sender, WorkflowCompletedEventArgs e)
               { Console.WriteLine("WorkflowCompleted: " + e.WorkflowInstance.InstanceId.ToString()); };
               serviceHost.Open();

               if (serviceHost.Description.Endpoints.Count > 0)
               {
                   Console.WriteLine("Contract: {0}",serviceHost.Description.Endpoints[0].Contract.ContractType);
                   Console.WriteLine("Endpoint: {0}",serviceHost.Description.Endpoints[0].Address);
               }
               Console.WriteLine("Press any key to exit");
               Console.ReadKey();
           }
           catch (Exception exception)
           {
               Console.WriteLine("Exception hosting service: {0}",exception.Message);
           }
           finally
           {
               try
               {
                   if (serviceHost != null)
                   {
                       serviceHost.Close(new TimeSpan(0, 0, 10));
                   }
               }
               catch (CommunicationObjectFaultedException exception)
               {
                   Console.WriteLine("CommunicationObjectFaultedException on close: {0}",exception.Message);
               }
               catch (TimeoutException exception)
               {
                   Console.WriteLine("TimeoutException on close: {0}",exception.Message);
               }
           }
2.手动宿主要使用WorkflowServiceHost类为基于工作流的服务提供主机。使用 WorkflowServiceHost 对象可加载工作流服务、配置终结点、应用
安全设置并启动侦听器来处理传入的请求。
3.可以通过如下代码来得到WorkflowRuntime:
serviceHost.Description.Behaviors.Find<WorkflowRuntimeBehavior>().WorkflowRuntime
4.然后要配置app.config文件,如下:
<?xml version="1.0" encoding="utf-8" ?>
<configuration>
  <system.serviceModel>
    <services>
      <service name="CaryWFLib.AddWorkflow"
        behaviorConfiguration="ServiceBehavior" >
        <host>
          <baseAddresses>
            <add baseAddress=
             http://localhost:8802/CaryWFWCF/AddServiceWorkflow.svc />
          </baseAddresses>
        </host>
        <endpoint address="" binding="basicHttpBinding"
          contract="CaryWFLib.IAddService" />
      </service>
    </services>
    <behaviors>
      <serviceBehaviors>
        <behavior name="ServiceBehavior"  >
          <serviceMetadata httpGetEnabled="true" />
          <serviceDebug includeExceptionDetailInFaults="true" />
          <workflowRuntime name="WorkflowServiceHostRuntime"
            validateOnCreate="true"
            enablePerformanceCounters="true">
            <services>
              <add type=
            "System.Workflow.Runtime.Hosting.SqlWorkflowPersistenceService,
             System.Workflow.Runtime, Version=3.0.00000.0,
             Culture=neutral, PublicKeyToken=31bf3856ad364e35"
             connectionString="Initial Catalog=WorkflowPersistence;
             Data Source=localhostSQLEXPRESS;Integrated Security=SSPI;"
            LoadIntervalSeconds="1" UnLoadOnIdle= "true" />
            </services>
          </workflowRuntime>
        </behavior>
      </serviceBehaviors>
    </behaviors>
  </system.serviceModel>
</configuration>
运行自己host的程序后,就可以使用前面的测试程序来再次测试,测试得到的结果是一样。
工作流服务创作样式
协定优先
协定优先的工作流服务是一种使用预先存在的服务协定信息的工作流。 我们上面的例子使用的都是这种方式,他的服务契约部分和WCF是一样的方式。
工作流优先
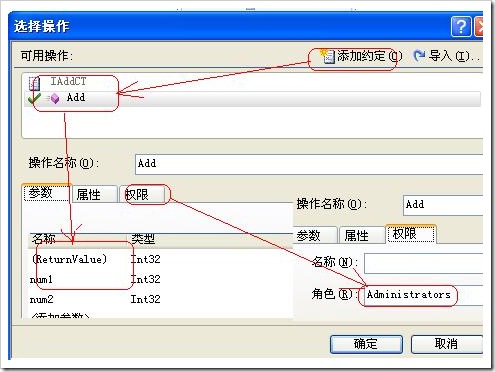
WF还支持另一种叫做工作流优先的模型,在ReceiveActivity的ServiceOperationInfo属性对话框中可以直接添加约定就是这种方式。在自动生成的代码中
是使用 ContractName 属性定义的,而操作名称是使用 Name 参数设置的。 操作的参数(包括返回值)是使用 OperationParameterInfo 类并将每个参数
添加到 OperationInfo 对象的参数集合中。下面的例子我就将使用这种方式。
工作流服务中的安全性
工作流服务为服务提供两个级别的安全性。 在第一个级别中,您可对操作指定原则权限安全性。 服务运行时会在将消息传递到工作流之前检查权限。 如果消息不满足原则权限安全性,则不会将消息发送到工作流。 第二个级别是“操作验证条件”,OperationValidation事件在ReceiveActivity活动即将收到消息时激发。可以使用关联的处理程序来执行基于 ClaimSet 的安全检查,以对由 ReceiveActivity活动实现的服务操作的客户端调用进行授权,如果OperationValidationEventArgs.IsValid设置为 false 会拒绝服务操作调用,并且客户会收到 FaultException。如果将 OperationValidationEventArgs.IsValid设置为 true,则服务操作调用将成功完成,并且 ReceiveActivity活动将接收并处理消息。下面我就举例说明:
1.我们新建一个WFFirstWorkflow并实现同样的加法运算的功能,这次我们使用的是工作流优先的创作样式,并指定只允许 Administrators 组中的用户调用此操作。具体如下图所示:
ReceiveActivity的OperationValidation事件的代码如下:
public string owner;
private void AddValidate(object sender, OperationValidationEventArgs e)
        {
            if (string.IsNullOrEmpty(owner))
            {
                owner = ExtractCallerName(e.ClaimSets);
                e.IsValid = true;
                Console.WriteLine("Owner: " + owner);
            }
            if (owner.Equals(ExtractCallerName(e.ClaimSets)))
                e.IsValid = true;
        }

        private string ExtractCallerName(ReadOnlyCollection<ClaimSet> claimSets)
        {
            string owner = string.Empty;
            foreach (ClaimSet claims in claimSets)
            {
                foreach (Claim claim in claims)
                {
                    if (claim.ClaimType.Equals(ClaimTypes.Name) && claim.Right.Equals(Rights.PossessProperty))
                    {
                        owner = claim.Resource.ToString();
                        break;
                    }
                }
            }
            return owner;
        }
2.AddValidate方法的OperationValidationEventArgs 参数的ClaimSets属性中存储ClaimSet对象的集合,这些对象包含已添加到操作的授权上下文的声明。 我们就使用这些声明集来完成消息验证。 注意,此时实际的消息正文参数尚不可用。 ExtractCallerName 方法从 Name 声明中提取调用方名称并将其存储起来。 在后续请求中,将根据传入消息的 Name 声明检查调用方名称,以便验证发送第一个消息(导致实例创建)和发送后续消息的是否是同一个人。
可以使用上面的方面来宿主并进行相关测试。


