【本文版权归微信公众号"代码艺术"(ID:onblog)所有,若是转载请务必保留本段原创声明,违者必究。若是文章有不足之处,欢迎关注微信公众号私信与我进行交流!】
一:唠嗑
- 鼓捣了两天的Spring Security,踩了不少坑。如果你在学Spring Security,恰好又是使用的Spring Boot,那么给我点个赞吧!这篇博客将会让你了解Spring Security的各种坑!
- 阅读前说一下,这篇博客是我一字一字打出来的,转载务必注明出处哦!
- 另外,本文已授权微信公众号“后端技术精选”独家发布
二:开始
1.准备
- Spring boot 1.5
- Mysql 5.7
- 导入依赖
<!-- Web工程 -->
<dependency>
    <groupId>org.springframework.boot</groupId>
    <artifactId>spring-boot-starter-web</artifactId>
</dependency>
<!-- 数据库相关 -->
<dependency>
    <groupId>org.springframework.boot</groupId>
    <artifactId>spring-boot-starter-data-jpa</artifactId>
</dependency>
<dependency>
    <groupId>mysql</groupId>
    <artifactId>mysql-connector-java</artifactId>
</dependency>
<!-- security 核心 -->
<dependency>
    <groupId>org.springframework.boot</groupId>
    <artifactId>spring-boot-starter-security</artifactId>
</dependency>
<!-- thymeleaf 模板-->
<dependency>
    <groupId>org.springframework.boot</groupId>
    <artifactId>spring-boot-starter-thymeleaf</artifactId>
</dependency>
<!-- 可以在HTML使用sec标签操作Security -->
<dependency>
    <groupId>org.thymeleaf.extras</groupId>
    <artifactId>thymeleaf-extras-springsecurity4</artifactId>
</dependency><br />
2.开启Security并配置
package cn.zyzpp.security.config;

import org.springframework.beans.factory.annotation.Autowired;
import org.springframework.context.annotation.Configuration;
import org.springframework.security.authentication.AuthenticationProvider;
import org.springframework.security.config.annotation.authentication.builders.AuthenticationManagerBuilder;
import org.springframework.security.config.annotation.web.builders.HttpSecurity;
import org.springframework.security.config.annotation.web.builders.WebSecurity;
import org.springframework.security.config.annotation.web.configuration.EnableWebSecurity;
import org.springframework.security.config.annotation.web.configuration.WebSecurityConfigurerAdapter;
import org.springframework.security.core.userdetails.UserDetailsService;

/**
 * Create by yster@foxmail.com 2018/6/10/010 18:07
 */
@EnableWebSecurity
public class MySerurityConfig extends WebSecurityConfigurerAdapter {
    /*自己实现下面两个接口*/
    @Autowired
    private AuthenticationProvider authenticationProvider;
    @Autowired
    private UserDetailsService userDetailsService;

    @Override
    protected void configure(HttpSecurity http) throws Exception {
        http.authorizeRequests()
                .antMatchers("/", "/signIn").permitAll()//所有人都可以访问
                .antMatchers("/leve/1").hasRole("VIP1") //设置访问角色
                .antMatchers("/leve/2").hasRole("VIP2")
                .antMatchers("/leve/3").hasAuthority("VIP2")//设置访问权限
                .anyRequest().authenticated() //其他所有资源都需要认证,登陆后访问
                .and()
                .formLogin()//开启自动配置的授权功能
                .loginPage("/login")    //自定义登录页(controller层需要声明)
                .usernameParameter("username")  //自定义用户名name值
                .passwordParameter("password")  //自定义密码name值
                .failureUrl("/login?error") //登录失败则重定向到此URl
                .permitAll() //登录页都可以访问
                .and()
                .logout()//开启自动配置的注销功能
                .logoutSuccessUrl("/")//注销成功后返回到页面并清空Session
                .and()
                .rememberMe()
                .rememberMeParameter("remember")//自定义rememberMe的name值,默认remember-Me
                .tokenValiditySeconds(604800);//记住我的时间/秒
    }

    /*定义认证规则*/
    @Override
    protected void configure(AuthenticationManagerBuilder auth) throws Exception {
    /*  保存用户信息到内存中
        auth.inMemoryAuthentication()
             .withUser("张三").password("123456").roles("VIP1")
             .and()
             .withUser("李四").password("123456").roles("VIP2");
    */

        /*自定义认证*/
        auth.authenticationProvider(authenticationProvider);
        auth.userDetailsService(userDetailsService);//不定义的话rememberMe报错
    }

    /*忽略静态资源*/
    @Override
    public void configure(WebSecurity web) {
        web.ignoring().antMatchers("/resources/static/**");
    }

}
讲一下:
- 我们基本不会把用户信息保存在内存中,所以我们自定义认证方法。这里我推荐阅读 认证(Authentication)与源码解读 了解。
- 自定义认证也有两种方法,第一是注入DaoAuthenticationProvider(org.springframework.security.authentication.dao)
@Bean
public DaoAuthenticationProvider daoAuthenticationProvider(){
    DaoAuthenticationProvider daoAuthenticationProvider = new DaoAuthenticationProvider();
    daoAuthenticationProvider.setUserDetailsService(userDetailsService);//获取用户信息
    daoAuthenticationProvider.setPasswordEncoder(new Md5PasswordEncoder());//MD5加密
    daoAuthenticationProvider.setSaltSource(new SaltSource() {  //加盐
        @Override
        public Object getSalt(UserDetails user) {
            return user.getUsername();
        }
    });
    return daoAuthenticationProvider;
}
- 然后改一下设置
auth.authenticationProvider(authenticationProvider);
-
这种方法我并不推荐,因为我们把密码错误的异常交给了Security底层去抛出,然而抛出的消息只是
Bad credentials这样的消息提示你会需要? -
所以我们使用第二种方法,如下:
3.自定义AuthenticationProvider接口实现类
package cn.zyzpp.security.config;

import org.springframework.beans.factory.annotation.Autowired;
import org.springframework.security.authentication.AuthenticationProvider;
import org.springframework.security.authentication.DisabledException;
import org.springframework.security.authentication.UsernamePasswordAuthenticationToken;
import org.springframework.security.authentication.encoding.Md5PasswordEncoder;
import org.springframework.security.core.Authentication;
import org.springframework.security.core.userdetails.UserDetails;
import org.springframework.stereotype.Component;

/**
 * Create by yster@foxmail.com 2018/6/21/021 15:53
 * Authentication 是一个接口,用来表示用户认证信息的
 */
@Component
public class MyAuthenticationProvider implements AuthenticationProvider{
    @Autowired
    private MyUserDetailsService userDetailsService;

    @Override
    public Authentication authenticate(Authentication authentication){
        //1.获取用户输入的用户名 密码
        String username = authentication.getName();
        String password = (String) authentication.getCredentials();
        //2.关于MD5加密:
        //因为我们是自定义Authentication,所以必须手动加密加盐而不需要再配置。
        password = new Md5PasswordEncoder().encodePassword(password,username);
        //3.由输入的用户名查找该用户信息,内部抛出异常
        UserDetails user = userDetailsService.loadUserByUsername(username);
        //4.密码校验
        if (!password.equals(user.getPassword())) {
            throw new DisabledException("---->UserName :" + username + " password error!");
        }
        return new UsernamePasswordAuthenticationToken(user, password, user.getAuthorities());
    }

    @Override
    public boolean supports(Class<?> aClass) {
        return (UsernamePasswordAuthenticationToken.class
                .isAssignableFrom(aClass));
    }

}
讲一下:
-
这里说Security的一个坑:
-
相信你也看到了有的教程上说抛出
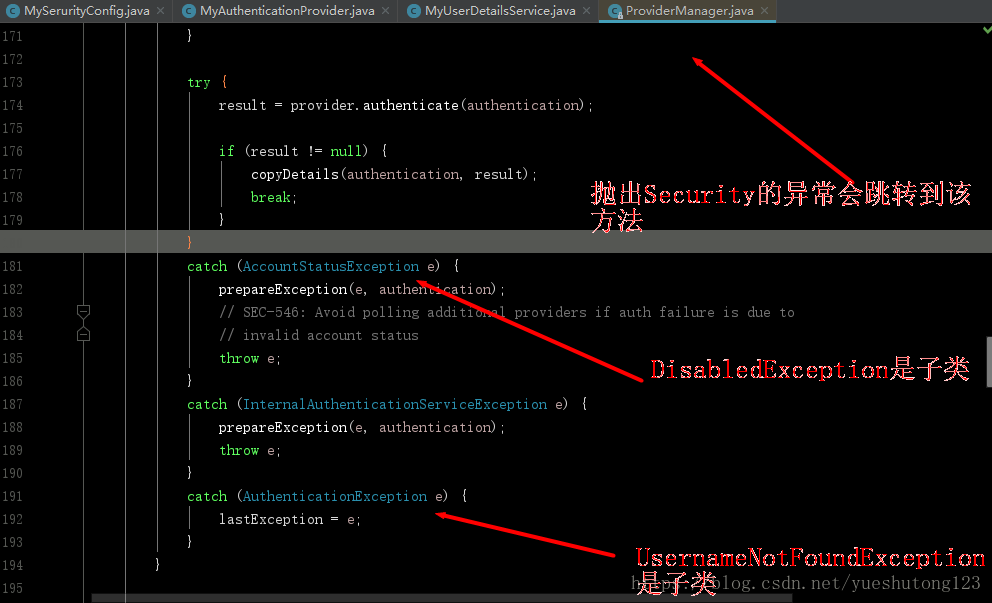
UsernameNotFoundException用户找不到,BadCredentialsException坏的凭据,但这两个类都是继承自AuthenticationException抽象类,当你抛出这俩异常时,Security底层会捕捉到你抛出的异常,如图:
-
看到了吧,
AuthenticationException异常并不会被抛出,debug调式一下,你就会感受到它的曲折历程,相当感人!然后莫名其妙的被换掉了,而且无解。 -
没错,你没看错,
AccountStatusException异常被直接抛出了,这正是我们需要的;有的同学可能想到了自定义异常,但我们是结合Security框架,要按人家的规则来,不信你试试。 -
附一些常用异常
<span class="hljs-comment">/*
   AuthenticationException常用的的子类:(会被底层换掉,不推荐使用)
   UsernameNotFoundException 用户找不到
   BadCredentialsException 坏的凭据

   AccountStatusException用户状态异常它包含如下子类:(推荐使用)
   AccountExpiredException 账户过期
   LockedException 账户锁定
   DisabledException 账户不可用
   CredentialsExpiredException 证书过期
/</span>
4.自定义UserDetailsService接口实现类
package cn.zyzpp.security.config;

import cn.zyzpp.security.entity.Role;
import cn.zyzpp.security.service.UserService;
import org.springframework.beans.factory.annotation.Autowired;
import org.springframework.security.authentication.DisabledException;
import org.springframework.security.core.GrantedAuthority;
import org.springframework.security.core.authority.SimpleGrantedAuthority;
import org.springframework.security.core.userdetails.User;
import org.springframework.security.core.userdetails.UserDetails;
import org.springframework.security.core.userdetails.UserDetailsService;
import org.springframework.stereotype.Component;

import java.util.ArrayList;
import java.util.List;

/**
 * 进行认证的时候需要一个 UserDetailsService 来获取用户的信息 UserDetails,
 * 其中包括用户名、密码和所拥有的权限等。
 * Create by yster@foxmail.com 2018/6/21/021 15:56
 */
@Component
public class MyUserDetailsService implements UserDetailsService {

    @Autowired
    private UserService userService;

    /*
     * 采坑笔记:
     * new SimpleGrantedAuthority("...")时
     * 加前戳是Role,通过hasRole()获取,用来认证角色;
     * 不加前戳是Authoritiy,通过hasAuthority()获取,用来鉴定权限;
     * 总结:加前戳是角色,不加前戳是权限。此前戳只用于本类。
     */
    String role_ = "ROLE_";

    @Override
    public UserDetails loadUserByUsername(String username) {
        //1.业务层根据username获取该用户
        cn.zyzpp.security.entity.User user = userService.findUserByUserName(username);
        if (user == null) {
            //这里我们不抛出UsernameNotFoundException因为Security会把我们抛出的该异常捕捉并换掉;
            //这里要明确Security抛出的异常无法被ControllerAdvice捕捉到,无法进行统一异常处理;
            //而我们只需要打印正确的异常消息即可,Security自动把异常添加到HttpServletRequest或HttpSession中
            throw new DisabledException("---->UserName :" + username + " not found!");
        }
        //2.从业务层获取用户权限并转为Authorities
        List<GrantedAuthority> authorities = new ArrayList<>();
        for (Role role : user.getRoleList()) {
            authorities.add(new SimpleGrantedAuthority(role.getName()));//设置权限
            authorities.add(new SimpleGrantedAuthority(role_ + role.getName()));//设置角色
        }
        //3.返回Spring定义的User对象
        return new User(username, user.getPassword(), authorities);
    }

}
讲一下:
【本文版权归微信公众号"代码艺术"(ID:onblog)所有,若是转载请务必保留本段原创声明,违者必究。若是文章有不足之处,欢迎关注微信公众号私信与我进行交流!】
- 我们在保存用户信息到内存中时是这样的
auth.inMemoryAuthentication()
    .withUser("张三")
    .password("123456")
    .roles("ROLE_VIP1")
    .authorities("VIP1")
- 角色和权限是分开设置的,但我们在自定义时只有权限设置,
authorities.add(new SimpleGrantedAuthority("权限名"));
-
定义以后你会发现这真真真…的是权限,不是角色,联想到上面Security的角色和权限其实是不同的,我想我应该是错过了什么?
-
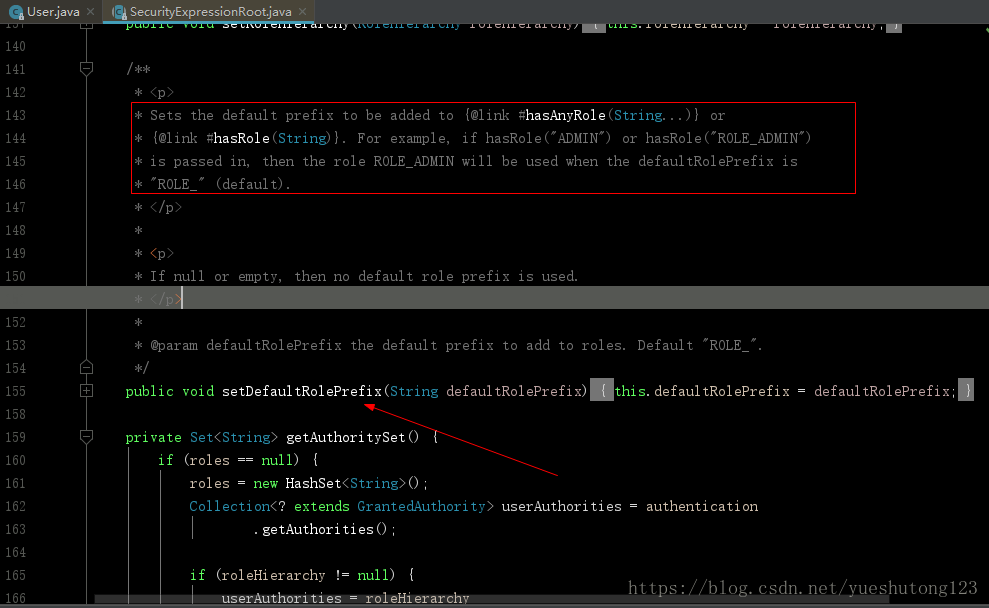
然后翻看Security源码:

-
翻译过来:如果调用hasRole(“ADMIN”)或hasRole(“ROLE_ADMIN”)
方法时,当Role前缀为”ROLE_”(默认)时将使用ROLE_ADMIN角色。 -
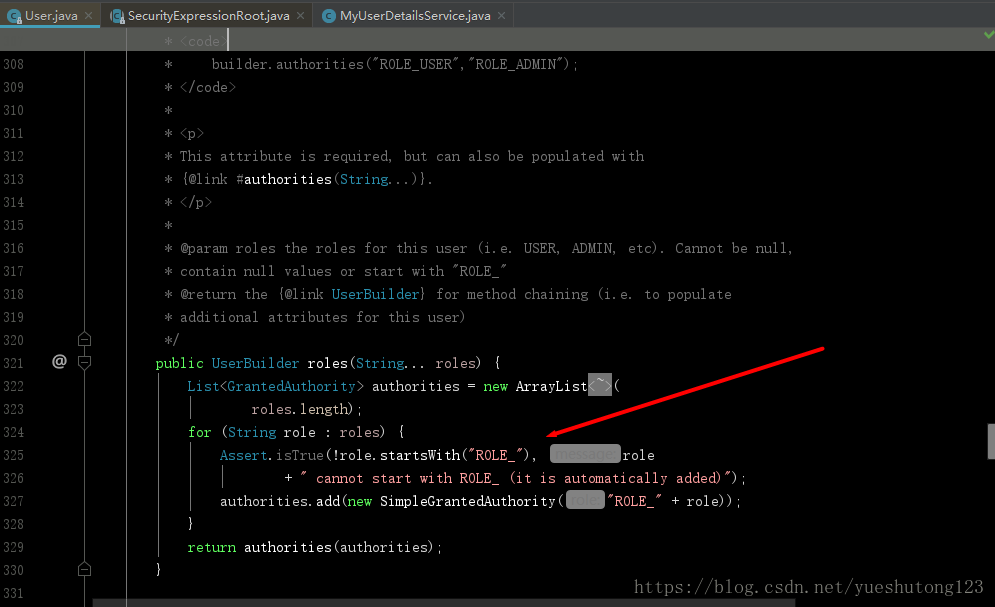
而我们在把用户信息保存到内存时,底层是这样的:

-
解读一下就是在调用
.roles("ROLE_VIP1")方法注册Role时,先通过role.startsWith("ROLE_")断言输入的角色名是否是"ROLE_"开头的,如果不是,补充"RELE_"前戳。 -
所以,Security解决角色和权限分开的依据就是是否含有
"ROLE_"前戳,该默认前戳也是可以自己修改的。 -
ok,继续我们的Security学习之路。
5.获取Security登录异常信息
package cn.zyzpp.security.controller;

import cn.zyzpp.security.service.UserService;
import javax.servlet.http.HttpServletRequest;
import javax.servlet.http.HttpSession;

/**
 * Create by yster@foxmail.com 2018/6/10/010 18:35
 */
@Controller
public class MyController {
    @Autowired
    UserService userService;

    @Autowired
    HttpSession session;
    @Autowired
    HttpServletRequest request;

    /*ModelMap的Key*/
    final String ERROR = "error";

    /**
     * 自定义登录页并进行异常信息提示
     * 需要在Security中设置
     */
    @RequestMapping(value = "/login")
    public String login(ModelMap modelMap){
      /*
       security的AuthenticationException异常自动保存在request或session中
       官方默认保存在Session,但我们自定义过多。我测试是在request中。
       所以在html页面还需要搭配th:if="${param.error!=null}"检查Url是否有参数error
        */
        String key = WebAttributes.AUTHENTICATION_EXCEPTION;

        if (session.getAttribute(key)!=null){
//            System.out.println("request");
            AuthenticationException exception = (AuthenticationException) session.getAttribute(key);
            modelMap.addAttribute(ERROR,exception.getMessage());
        }
        if (request.getAttribute(key)!=null){
//            System.out.println("session");
            AuthenticationException exception = (AuthenticationException) request.getAttribute(key);
            modelMap.addAttribute(ERROR,exception.getMessage());
        }

        return "login";
    }

}
自定义login登录页面
- Security规定若是GET访问则是请求页面,POST访问则为提交登录
<!DOCTYPE html>
<html xmlns:th="http://www.thymeleaf.org">
<head>
    <meta charset="UTF-8"/>
    <title>登录页面</title>
</head>
<body>
<form th:action="@{/login}" method="post">
    用户名:<input type="text" placeholder="username" name="username" required=""/><br/>
    密码:<input type="password" placeholder="password" name="password" required=""/><br/>
    记住我:<input type="checkbox" name="remember"/>
    <input type="submit" value="提交"/>
    <span th:if="${param.error!=null}" th:text="${error}"/>
</form>
</body>
</html>
讲一下:
- 如果你debug追踪一下,你就可以了解Security的运行原理
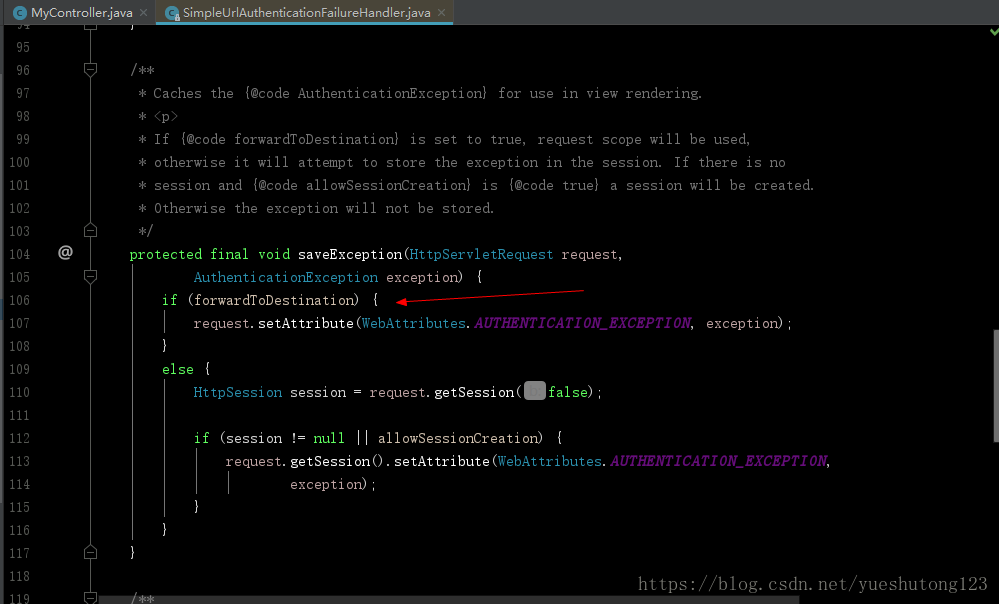
- Security的
SimpleUrlAuthenticationFailureHandler(简单认证故障处理)会把异常保存到request或session中,forwardToDestination默认为false,也就是保存在session,实际我们测试是保存在request。

6.在view层使用Security
6.1 使用HTML sec标签 (推荐)
<!DOCTYPE html>
<html xmlns:th="http://www.thymeleaf.org" xmlns:sec="http://www.thymeleaf.org/thymeleaf-extras-springsecurity4">
<head>
    <meta charset="UTF-8"/>
    <title>首页</title>
</head>
<body>
<div sec:authorize="isAuthenticated()">
    <form th:action="@{/logout}" method="POST">
        <input type="submit" value="注销" />
    </form>
    user:<b sec:authentication="name"></b><br/>
    <!-- principal对应org.springframework.security.core.userdetails.User类 -->
    Role:<b sec:authentication="principal.authorities"></b>
</div>
<div sec:authorize="!isAuthenticated()">
    <h2>游客你好!</h2>请<a th:href="@{/login}">登录</a>
</div>
<div sec:authorize="hasRole('VIP1')">
    <h2>ROLE_VIP1_可见</h2>
</div>
<div sec:authorize="hasRole('VIP2')">
    <h2>ROLE_VIP2_可见</h2>
</div>
<div sec:authorize="hasAuthority('VIP1')">
    <h2>Authority:VIP1_可见</h2>
</div>
</body>
</html>
6.2 编码获取用户登录信息
- 下面为我自己写的方法,看看就好!
/**
 * 不使用sec标签(不推荐)
 * 在Controller获取用户信息
 */
@RequestMapping("/index")
public String index1(ModelMap model){
    userAndRoles(model);
    return "index";
}

/**
 * Security辅助方法:获取用户信息
 */
private void userAndRoles(ModelMap model) {
    //从Security获取当前用户会话
    Object principal = SecurityContextHolder.getContext()
            .getAuthentication()
            .getPrincipal();
    User user = null;
    //判断用户已经登录
    if (principal instanceof User){
        user = (User) principal;
        //遍历迭代器获取用户权限
        Iterator<GrantedAuthority> iterator = user.getAuthorities().iterator();
        List<String> roles = new ArrayList<>();
        while (iterator.hasNext()){
            roles.add(iterator.next().getAuthority());
        }
        //保存角色信息
        model.addAttribute("roles",roles.toString());
    }
    //保存用户信息,未登录为空
    model.addAttribute("user",user);
}
6.权限及用户的Entity类
- 权限表
/**
 * 权限表
 * Create by yster@foxmail.com 2018/6/21/021 18:00
 */
@Entity
@Table(name = "role")
public class Role {
    @Id
    @GeneratedValue
    private int id;
    private String name;
    ...
}
- 用户表
/**
 * Create by yster@foxmail.com 2018/6/21/021 17:59
 */
@Entity
@Table(name = "user",uniqueConstraints = {@UniqueConstraint(columnNames="username")})
public class User {
    @Id
    @GeneratedValue
    private int id;
    private String username;
    private String password;
    @OneToMany(cascade={CascadeType.ALL}, fetch=FetchType.EAGER)
    @JoinColumn(name = "r_id")
    private List<Role> roleList;
    ....
}
- 关于Security的部分先到这里,之所以写这篇博客,源于网上的相关资料略少,坑略多,毕竟做伸手党做惯了,一些坑踩的还是不容易的!
2019/1/9补充
Spring Security在方法级别上的保护
Spring Security从2.0版本开始,提供了方法级别的安全支持,并提供了 JSR-250 的支持。写一个配置类 SecurityConfig 继承 WebSecurityConfigurationAdapter,并加上相关注解,就可以开启方法级别的保护。
@EnableWebSecurity
@Configuration
@EnableGlobalMethodSecurity(prePostEnabled = true)
public class SerurityConfig extends WebSecurityConfigurerAdapter {
}
在上面的配置代码中,@EnableGlobalMethodSecurity(prePostEnabled = true) 注解开启了方法级别的保护,括号后面的参数可选,可选的参数如下。
- prePostEnabled:Spring Security 的 Pre 和 Post 注解是否可用,即 @PreAuthorize 和 @PostAuthorize 是否可用。
- secureEnabled:Spring Security 的 @Service 注解是否可用。
- jsr250Enabled:Spring Security 对 JSR-250 的注解是否可用。
一般来说,只会用到 prePostEnabled。因为 即 @PreAuthorize 注解比 @PostAuthorize 注解更适合方法级别的安全控制,并且支持 Spring EL 表达式,适合 Spring 开发者。其中,@PreAuthorize 注解会在进入方法钱进行权限验证,@PostAuthorize 注解在方法执行后再进行权限验证。
如何在方法上写权限注解呢?
例如有权限点字符串“ROLE_ADMIN”,在方法上可以写为 @PreAuthorize(“hasRole(‘ADMIN’)”),也可以写为 @PreAuthorize(“hasAuthority(‘ROLE_ADMIN’)”),这二者是等价的。加多个权限点,可以写为 @PreAuthorize(“hasRole(‘ADMIN’,‘USER’)”)、@PreAuthorize(“hasAuthority(‘ROLE_ADMIN’,‘ROLE_USER’)”)。
版权声明
【本文版权归微信公众号"代码艺术"(ID:onblog)所有,若是转载请务必保留本段原创声明,违者必究。若是文章有不足之处,欢迎关注微信公众号私信与我进行交流!】
