Shiro简介
1. 什么是shiro
shiro是apache的一个开源框架,是一个权限管理的框架,实现 用户认证、用户授权。
spring中有spring security (原名Acegi),是一个权限框架,它和spring依赖过于紧密,没有shiro使用简单。
shiro不依赖于spring,shiro不仅可以实现 web应用的权限管理,还可以实现c/s系统,
分布式系统权限管理,shiro属于轻量框架,越来越多企业项目开始使用shiro。
2. 在应用程序角度来观察如何使用Shiro完成工作
Subject:主体,代表了当前“用户”,这个用户不一定是一个具体的人,与当前应用交互的任何东西都是Subject,如网络爬虫,机器人等;即一个抽象概念;所有Subject 都绑定到SecurityManager,与Subject的所有交互都会委托给SecurityManager;可以把Subject认为是一个门面;SecurityManager才是实际的执行者;
SecurityManager:安全管理器;即所有与安全有关的操作都会与SecurityManager 交互;且它管理着所有Subject;可以看出它是Shiro 的核心,它负责与后边介绍的其他组件进行交互,如果学习过SpringMVC,你可以把它看成DispatcherServlet前端控制器;
Realm:域,Shiro从从Realm获取安全数据(如用户、角色、权限),就是说SecurityManager要验证用户身份,那么它需要从Realm获取相应的用户进行比较以确定用户身份是否合法;也需要从Realm得到用户相应的角色/权限进行验证用户是否能进行操作;可以把Realm看成DataSource,即安全数据源。

3. shiro架构
3.1 subject:主体,可以是用户也可以是程序,主体要访问系统,系统需要对主体进行认证、授权。
3.2 securityManager:安全管理器,主体进行认证和授权都是通过securityManager进行。securityManager是一个集合,
真正做事的不是securityManager而是它里面的东西。
3.3 authenticator:认证器,主体进行认证最终通过authenticator进行的。
3.4 authorizer:授权器,主体进行授权最终通过authorizer进行的。
3.5 sessionManager:web应用中一般是用web容器(中间件tomcat)对session进行管理,shiro也提供一套session管理的方式。
shiro不仅仅可以用于web管理也可以用于cs管理,所以他不用web容器的session管理。
3.6 SessionDao: 通过SessionDao管理session数据,针对个性化的session数据存储需要使用sessionDao
(如果用tomcat管理session就不用SessionDao,如果要分布式的统一管理session就要用到SessionDao)。
3.7 cache Manager:缓存管理器,主要对session和授权数据进行缓存(权限管理框架主要就是对认证和授权进行管理,
session是在服务器缓存中的),比如将授权数据通过cacheManager进行缓存管理,
和ehcache整合对缓存数据进行管理(redis是缓存框架)。
3.8 realm:域,领域,相当于数据源,通过realm存取认证、授权相关数据(原来是通过数据库取的)。
注意:authenticator认证器和authorizer授权器调用realm中存储授权和认证的数据和逻辑。
3.9 cryptography:密码管理,比如md5加密,提供了一套加密/解密的组件,方便开发。比如提供常用的散列、加/解密等功能。比如 md5散列算法(md5只有加密没有解密)。

Shiro入门案例
1、导入相关依赖
2、编写shiro.ini文件
Pom.xml
<?xml version="1.0" encoding="UTF-8"?>
<project xmlns="http://maven.apache.org/POM/4.0.0" xmlns:xsi="http://www.w3.org/2001/XMLSchema-instance"
         xsi:schemaLocation="http://maven.apache.org/POM/4.0.0 http://maven.apache.org/maven-v4_0_0.xsd">

    <modelVersion>4.0.0</modelVersion>
    <packaging>war</packaging>

    <name>shiro</name>
    <groupId>com.lingerqi</groupId>
    <artifactId>shiro</artifactId>
    <version>1.0-SNAPSHOT</version>
    <properties>
        <project.build.sourceEncoding>UTF-8</project.build.sourceEncoding>
        <maven.compiler.source>1.7</maven.compiler.source>
        <maven.compiler.target>1.7</maven.compiler.target>
        <maven.compiler.plugin.version>3.7.0</maven.compiler.plugin.version>

        <!-- 添加相关依赖 -->
        <junit.version>4.12</junit.version>
        <servlet.version>4.0.0</servlet.version>
        <log4j2.version>2.9.1</log4j2.version>
        <slf4j.version>1.7.7</slf4j.version>
        <log4j2.disruptor.version>3.2.0</log4j2.disruptor.version>

        <shiro.version>1.2.5</shiro.version>
    </properties>
    <build>
        <resources>
            <!--解决mybatis-generator-maven-plugin运行时没有将XxxMapper.xml文件放入target文件夹的问题-->
            <resource>
                <directory>src/main/java</directory>
                <includes>
                    <include>**/*.xml</include>
                </includes>
            </resource>
            <!--解决mybatis-generator-maven-plugin运行时没有将jdbc.properites文件放入target文件夹的问题-->
            <resource>
                <directory>src/main/resources</directory>
                <includes>
                    <include>*.properties</include>
                    <include>*.xml</include>
                    <include>*.ini</include>
                </includes>
            </resource>
        </resources>
        <!-- lock down plugins versions to avoid using Maven defaults (may be moved to parent pom) -->
        <plugins>
            <plugin>
                <groupId>org.mortbay.jetty</groupId>
                <artifactId>maven-jetty-plugin</artifactId>
                <version>6.1.7</version>
                <configuration>
                    <connectors>
                        <connector implementation="org.mortbay.jetty.nio.SelectChannelConnector">
                            <port>8888</port>
                            <maxIdleTime>30000</maxIdleTime>
                        </connector>
                    </connectors>
                    <webAppSourceDirectory>${project.build.directory}/${pom.artifactId}-${pom.version}
                    </webAppSourceDirectory>
                    <contextPath>/</contextPath>
                </configuration>
            </plugin>
        </plugins>
        <pluginManagement><!-- lock down plugins versions to avoid using Maven defaults (may be moved to parent pom) -->
            <plugins>
                <!-- 编码和编译和JDK版本 -->
                <plugin>
                    <groupId>org.apache.maven.plugins</groupId>
                    <artifactId>maven-compiler-plugin</artifactId>
                    <version>${maven.compiler.plugin.version}</version>
                    <configuration>
                        <source>${maven.compiler.source}</source>
                        <target>${maven.compiler.target}</target>
                        <encoding>${project.build.sourceEncoding}</encoding>
                    </configuration>
                </plugin>


                <plugin>
                    <artifactId>maven-clean-plugin</artifactId>
                    <version>3.1.0</version>
                </plugin>
                <!-- see http://maven.apache.org/ref/current/maven-core/default-bindings.html#Plugin_bindings_for_war_packaging -->
                <plugin>
                    <artifactId>maven-resources-plugin</artifactId>
                    <version>3.0.2</version>
                </plugin>
                <plugin>
                    <artifactId>maven-compiler-plugin</artifactId>
                    <version>3.8.0</version>
                </plugin>
                <plugin>
                    <artifactId>maven-surefire-plugin</artifactId>
                    <version>2.22.1</version>
                </plugin>
                <plugin>
                    <artifactId>maven-war-plugin</artifactId>
                    <version>3.2.2</version>
                </plugin>
                <plugin>
                    <artifactId>maven-install-plugin</artifactId>
                    <version>2.5.2</version>
                </plugin>
                <plugin>
                    <artifactId>maven-deploy-plugin</artifactId>
                    <version>2.8.2</version>
                </plugin>
            </plugins>
        </pluginManagement>
    </build>

    <dependencies>
        <!-- shiro核心包 -->
        <dependency>
            <groupId>org.apache.shiro</groupId>
            <artifactId>shiro-core</artifactId>
            <version>${shiro.version}</version>
        </dependency>
        <!-- 添加shiro web支持 -->
        <dependency>
            <groupId>org.apache.shiro</groupId>
            <artifactId>shiro-web</artifactId>
            <version>${shiro.version}</version>
        </dependency>
        <!--**********junit**********-->
        <dependency>
            <groupId>junit</groupId>
            <artifactId>junit</artifactId>
            <version>${junit.version}</version>
            <scope>test</scope>
        </dependency>
        <!--**********servlet**********-->
        <dependency>
            <groupId>javax.servlet</groupId>
            <artifactId>javax.servlet-api</artifactId>
            <version>${servlet.version}</version>
            <scope>provided</scope>
        </dependency>
        <!-- **********************  日志配置  ********************** -->
        <dependency>
            <groupId>org.slf4j</groupId>
            <artifactId>slf4j-api</artifactId>
            <version>${slf4j.version}</version>
        </dependency>
        <dependency>
            <groupId>org.slf4j</groupId>
            <artifactId>jcl-over-slf4j</artifactId>
            <version>${slf4j.version}</version>
            <scope>runtime</scope>
            <exclusions>
                <exclusion>
                    <artifactId>slf4j-api</artifactId>
                    <groupId>org.slf4j</groupId>
                </exclusion>
            </exclusions>
        </dependency>
        <!--2) 用于与slf4j保持桥接-->
        <dependency>
            <groupId>org.apache.logging.log4j</groupId>
            <artifactId>log4j-slf4j-impl</artifactId>
            <version>${log4j2.version}</version>
            <exclusions>
                <exclusion>
                    <artifactId>slf4j-api</artifactId>
                    <groupId>org.slf4j</groupId>
                </exclusion>
            </exclusions>
        </dependency>
        <!--3) 核心log4j2jar包-->
        <dependency>
            <groupId>org.apache.logging.log4j</groupId>
            <artifactId>log4j-api</artifactId>
            <version>${log4j2.version}</version>
        </dependency>
        <dependency>
            <groupId>org.apache.logging.log4j</groupId>
            <artifactId>log4j-core</artifactId>
            <version>${log4j2.version}</version>
        </dependency>
        <!--4) web工程需要包含log4j-web,非web工程不需要-->
        <dependency>
            <groupId>org.apache.logging.log4j</groupId>
            <artifactId>log4j-web</artifactId>
            <version>${log4j2.version}</version>
            <scope>runtime</scope>
        </dependency>
        <!--5) 需要使用log4j2的AsyncLogger需要包含disruptor-->
        <dependency>
            <groupId>com.lmax</groupId>
            <artifactId>disruptor</artifactId>
            <version>${log4j2.disruptor.version}</version>
        </dependency>

    </dependencies>

</project>
log4j2.xml
<?xml version="1.0" encoding="UTF-8" ?>
<!--
  Licensed to the Apache Software Foundation (ASF) under one or more
  contributor license agreements.  See the NOTICE file distributed with
  this work for additional information regarding copyright ownership.
  The ASF licenses this file to You under the Apache License, Version 2.0
  (the "License"); you may not use this file except in compliance with
  the License.  You may obtain a copy of the License at

      http://www.apache.org/licenses/LICENSE-2.0

  Unless required by applicable law or agreed to in writing, software
  distributed under the License is distributed on an "AS IS" BASIS,
  WITHOUT WARRANTIES OR CONDITIONS OF ANY KIND, either express or implied.
  See the License for the specific language governing permissions and
  limitations under the License.
-->
<!DOCTYPE log4j:configuration SYSTEM "log4j.dtd">

<log4j:configuration xmlns:log4j="http://jakarta.apache.org/log4j/">
  <!--
    - This is a sample configuration for log4j.
    - It simply just logs everything into a single log file.
    - Note, that you can use properties for value substitution.
    -->
  <appender name="CORE" class="org.apache.log4j.FileAppender">
    <param name="File"   value="${org.apache.cocoon.work.directory}/cocoon-logs/log4j.log" />
    <param name="Append" value="false" />
    <layout class="org.apache.log4j.PatternLayout">
      <param name="ConversionPattern" value="%d %-5p %t %c - %m%n"/>
    </layout>
  </appender>

  <root>
    <priority value="${org.apache.cocoon.log4j.loglevel}"/>
    <appender-ref ref="CORE"/>
  </root>
</log4j:configuration>
shiro.ini
[users]
lsq=123
lzq=456
xyl=789
ShiroTest
package com.lingerqi;

/**
 * @author xyls
 * @blog name & blog address 027@0030
 * @create  2019-11-01 16:09
 */

import org.apache.shiro.SecurityUtils;
import org.apache.shiro.authc.UsernamePasswordToken;
import org.apache.shiro.config.IniSecurityManagerFactory;
import org.apache.shiro.mgt.SecurityManager;
import org.apache.shiro.subject.Subject;

/**
 * Shiro的认证初体验
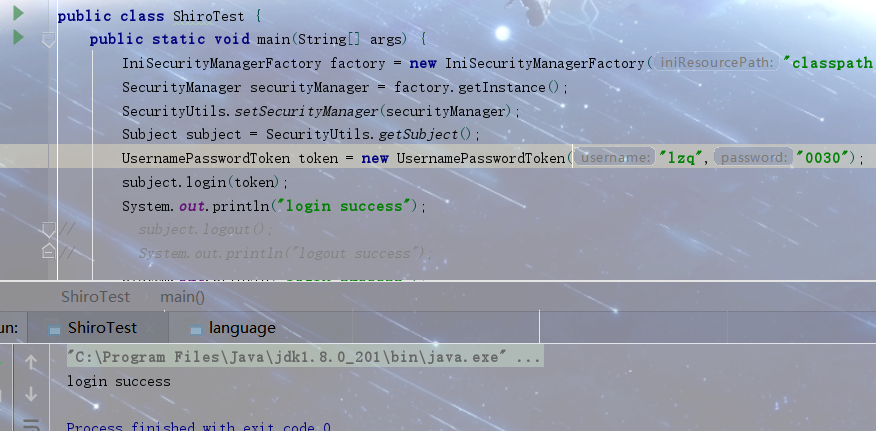
 * 1、读取ini数据源文件,得到securitymanager工厂
 * 2、获取securitymanager实例
 * 3、将securitymanager交给securityutil进行管理
 * 4、通过securityutil获取登入用户主体subject
 * 5、创建登入令牌token
 * 6、利用主体subject进行登入
 * 7、退出也使用subject
 */
public class ShiroTest {
    public static void main(String[] args) {
        IniSecurityManagerFactory factory = new IniSecurityManagerFactory("classpath:shiro.ini");
        SecurityManager securityManager = factory.getInstance();
        SecurityUtils.setSecurityManager(securityManager);
        Subject subject = SecurityUtils.getSubject();
        UsernamePasswordToken token = new UsernamePasswordToken("zs","123");
        subject.login(token);
        System.out.println("login success");
//        subject.logout();
//        System.out.println("logout success");

    }
}

Shiro与web容器的集成
1、准本一个shiro-web.ini文件
2、通过web.xml将shiro与web容器进行集成
3、编写servlet
4、测试
shiro-web.ini:
[main]
#定义身份认证失败后的请求url映射,loginUrl是身份认证过滤器中的一个属性
authc.loginUrl=/login
#定义角色认证失败后的请求url映射,unauthorizedUrl是角色认证过滤器中的一个属性
roles.unauthorizedUrl=/unauthorized.jsp
#定义权限认证失败后请求url映射,unauthorizedUrl是角色认证过滤器中的一个属性
perms.unauthorizedUrl=/unauthorized.jsp

[users]
lzq=0030,role1
lsq=0030,role2
xyl=0030,role3
xyls=509796,admin


[roles]
role1=user:create
role2=user:create,user:update
role3=user:create,user:update,user:delete,user:view,user:load
admin=user:*


#定义请求的地址需要做什么验证
[urls]
#请求login的时候不需要权限,游客身份即可(anon)
/login.do=anon

#请求/user/updatePwd.jsp的时候,需要身份认证(authc)
/user/updatePwd.jsp=authc

#请求/admin的时候,需要角色认证,必须是拥有admin角色的用户才行
/admin/*.jsp=roles[admin]

#请求/teacher的时候,需要权限认证,必须是拥有user:create权限的角色的用户才行
/user/teacher.jsp=perms["user:update"]
配置web.xml
<?xml version="1.0" encoding="UTF-8"?>
<web-app xmlns="http://xmlns.jcp.org/xml/ns/javaee"
         xmlns:xsi="http://www.w3.org/2001/XMLSchema-instance"
         xsi:schemaLocation="http://xmlns.jcp.org/xml/ns/javaee http://xmlns.jcp.org/xml/ns/javaee/web-app_3_1.xsd"
         version="3.1">
  <display-name>Archetype Created Web Application</display-name>
  <context-param>
    <param-name>shiroConfigLocations</param-name>
    <param-value>classpath:shiro-web.ini</param-value>
  </context-param>
  <listener>
    <listener-class>org.apache.shiro.web.env.EnvironmentLoaderListener</listener-class>
  </listener>

  <filter>
    <filter-name>ShiroFilter</filter-name>
    <filter-class>org.apache.shiro.web.servlet.ShiroFilter</filter-class>
  </filter>
  <filter-mapping>
    <filter-name>ShiroFilter</filter-name>
    <url-pattern>/*</url-pattern>
  </filter-mapping>

</web-app>
LoginServlet.java
package com.lingerqi;

import org.apache.shiro.SecurityUtils;
import org.apache.shiro.authc.UsernamePasswordToken;
import org.apache.shiro.subject.Subject;

import javax.servlet.ServletException;
import javax.servlet.annotation.WebServlet;
import javax.servlet.http.HttpServlet;
import javax.servlet.http.HttpServletRequest;
import javax.servlet.http.HttpServletResponse;
import java.io.IOException;

/**
 * @author xyls
 * @blog name & blog address 027@0030
 * @create  2019-11-01 16:15
 */
@WebServlet("/login")
public class LoginServlet extends HttpServlet {
    @Override
    protected void doGet(HttpServletRequest req, HttpServletResponse resp) throws ServletException, IOException {
        doPost(req,resp);
    }

    @Override
    protected void doPost(HttpServletRequest req, HttpServletResponse resp) throws ServletException, IOException {
        String username = req.getParameter("username");
        String password = req.getParameter("password");
        UsernamePasswordToken usernamePasswordToken = new UsernamePasswordToken(username, password);
        Subject subject = SecurityUtils.getSubject();
        try {
            subject.login(usernamePasswordToken);
            req.getSession().setAttribute("username",username);
            req.getRequestDispatcher("main.jsp").forward(req, resp);
        } catch (Exception e) {
            req.setAttribute("message", "您的用户名或密码输入有误!!!");
            req.getRequestDispatcher("login.jsp").forward(req, resp);
        }
    }
}
LogoutServlet.java
package com.lingerqi;

import org.apache.shiro.SecurityUtils;
import org.apache.shiro.subject.Subject;

import javax.servlet.ServletException;
import javax.servlet.annotation.WebServlet;
import javax.servlet.http.HttpServlet;
import javax.servlet.http.HttpServletRequest;
import javax.servlet.http.HttpServletResponse;
import java.io.IOException;

/**
 * @author xyls
 * @blog name & blog address 027@0030
 * @create  2019-11-01 16:16
 */
@WebServlet("/logout")
public class LogoutServlet extends HttpServlet {
    @Override
    protected void doGet(HttpServletRequest req, HttpServletResponse resp) throws ServletException, IOException {
        doPost(req, resp);
    }

    @Override
    protected void doPost(HttpServletRequest req, HttpServletResponse resp) throws ServletException, IOException {
        Subject subject = SecurityUtils.getSubject();
        subject.logout();
        resp.sendRedirect(req.getContextPath()+"/login.jsp");
    }
}
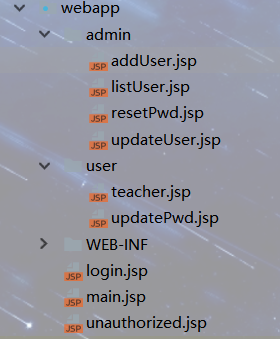
jsp界面:

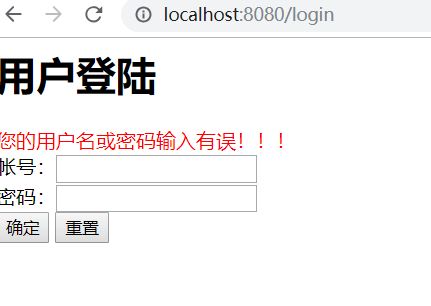
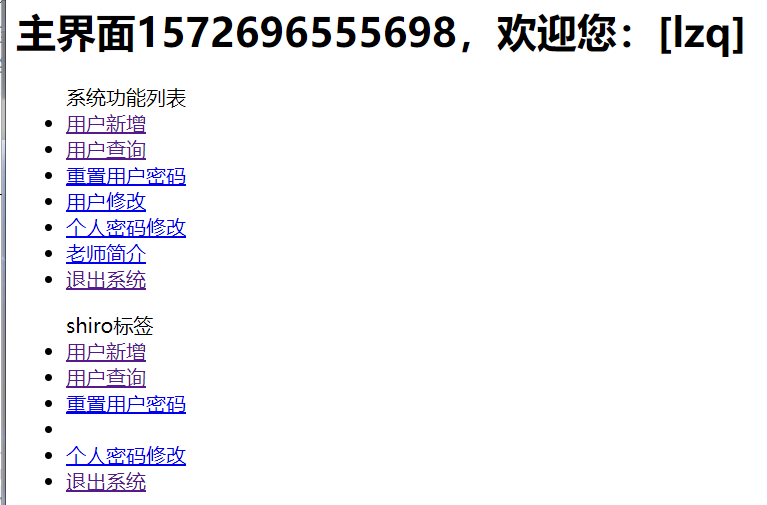
1、身份认证成功与失败的结果
3、权限认证成功与失败的结果
2、角色认证成功与失败的结果


