iOS10更新之后,推送也是做了一些小小的修改,下面我就给大家仔细说说。希望看完我的这篇文章,对大家有所帮助。
一、简单入门篇---看完就可以简单适配完了
相对简单的推送证书以及环境的问题,我就不在这里讲啦,我在这里说的,是指原有工程的适配。
1.首先我们需要打开下面的开关。所有的推送平台,不管是极光还是什么的,要想收到推送,这个是必须打开的哟~

之后,系统会生成一个我们以前没见过的文件,如图:


可能产生的问题:之前有朋友反馈过,将开发环境由 development 变成 production ,在开关这里会产生错误,如图:

如果大家点击Fix issue之后,会惊奇的发现,APS Environment由 production 又变成 development 了。
解决办法:我的建议是不做任何修改。
经过我的测试,打包之后,生成的ipa包内,是没有这个.entitlements 文件的。经过测试,我发现是可以正常收到推送信息的。测试的方法如下,大家也可以测试一下。
测试方法:打包之后安装ipa文件,然后利用极光推送,选择生产环境,推送,即可。
经过上面的操作,你就会惊奇的发现,推送已经适配完毕了,iOS10的系统,已经可以正常接收通知了。
二、中级篇
这里我会给大家讲一讲iOS10的推送,如何注册,通过什么代理,哪些方法可以用,哪些方法不可以用。
1.系统自带方法
大家不管是使用三方平台的推送,还是系统自带的推送,都先应该了解下系统自带方法,如何实现远程通知的实现。
- 第一步导入#import <UserNotifications/UserNotifications.h>
且要遵守<UNUserNotificationCenterDelegate>的协议,在Appdelegate.m中。
这里需要注意,我们最好写成这种形式#ifdef NSFoundationVersionNumber_iOS_9_x_Max #import <UserNotifications/UserNotifications.h> #endif- 第二步我们需要在
(BOOL)application:(UIApplication *)application didFinishLaunchingWithOptions:(NSDictionary *)launchOptions中注册通知,代码如下:
- 第二步我们需要在
 - (BOOL)application:(UIApplication *)application didFinishLaunchingWithOptions:(NSDictionary *)launchOptions {

    if ([[UIDevice currentDevice].systemVersion floatValue] >= 10.0) {
        //iOS10特有
        UNUserNotificationCenter *center = [UNUserNotificationCenter currentNotificationCenter];
        // 必须写代理,不然无法监听通知的接收与点击
        center.delegate = self;
        [center requestAuthorizationWithOptions:(UNAuthorizationOptionAlert | UNAuthorizationOptionBadge | UNAuthorizationOptionSound) completionHandler:^(BOOL granted, NSError * _Nullable error) {
            if (granted) {
                // 点击允许
                NSLog(@"注册成功");
                [center getNotificationSettingsWithCompletionHandler:^(UNNotificationSettings * _Nonnull settings) {
                    NSLog(@"%@", settings);
                }];
            } else {
                // 点击不允许
                NSLog(@"注册失败");
            }
        }];
    }else if ([[UIDevice currentDevice].systemVersion floatValue] >8.0){
        //iOS8 - iOS10
        [application registerUserNotificationSettings:[UIUserNotificationSettings settingsForTypes:UIUserNotificationTypeAlert | UIUserNotificationTypeSound | UIUserNotificationTypeBadge categories:nil]];

    }else if ([[UIDevice currentDevice].systemVersion floatValue] < 8.0) {
        //iOS8系统以下
        [application registerForRemoteNotificationTypes:UIRemoteNotificationTypeBadge | UIRemoteNotificationTypeAlert | UIRemoteNotificationTypeSound];
    }
    // 注册获得device Token
    [[UIApplication sharedApplication] registerForRemoteNotifications];
其中,获得Device Token的方法是没有改变的。
// 获得Device Token
 - (void)application:(UIApplication *)application
didRegisterForRemoteNotificationsWithDeviceToken:(NSData *)deviceToken {
    NSLog(@"%@", [NSString stringWithFormat:@"Device Token: %@", deviceToken]);
}
// 获得Device Token失败
- (void)application:(UIApplication *)application
didFailToRegisterForRemoteNotificationsWithError:(NSError *)error {
    NSLog(@"did Fail To Register For Remote Notifications With Error: %@", error);
}
此次iOS10系统的更新,苹果给了我们2个代理方法来处理通知的接收和点击事件,这两个方法在<UNUserNotificationCenterDelegate>的协议中,大家可以查看下。此外,苹果把本地通知跟远程通知合二为一。区分本地通知跟远程通知的类是UNPushNotificationTrigger.h类中,UNPushNotificationTrigger的类型是新增加的,通过它,我们可以得到一些通知的触发条件,在使用时,我们不应该直接使用这个类,应当使用它的子类。
- 我简单点说
-
1.UNPushNotificationTrigger (远程通知) 远程推送的通知类型
-
2.UNTimeIntervalNotificationTrigger (本地通知) 一定时间之后,重复或者不重复推送通知。我们可以设置timeInterval(时间间隔)和repeats(是否重复)。
-
3.UNCalendarNotificationTrigger(本地通知) 一定日期之后,重复或者不重复推送通知 例如,你每天8点推送一个通知,只要dateComponents为8,如果你想每天8点都推送这个通知,只要repeats为YES就可以了。
-
4.UNLocationNotificationTrigger (本地通知)地理位置的一种通知,
当用户进入或离开一个地理区域来通知。在CLRegion标识符必须是唯一的。因为如果相同的标识符来标识不同区域的UNNotificationRequests,会导致不确定的行为。
接收通知的代码如下:
// iOS 10收到通知
- (void)userNotificationCenter:(UNUserNotificationCenter *)center willPresentNotification:(UNNotification *)notification withCompletionHandler:(void (^)(UNNotificationPresentationOptions options))completionHandler{
    NSDictionary * userInfo = notification.request.content.userInfo;
    UNNotificationRequest *request = notification.request; // 收到推送的请求
    UNNotificationContent *content = request.content; // 收到推送的消息内容
    NSNumber *badge = content.badge;  // 推送消息的角标
    NSString *body = content.body;    // 推送消息体
    UNNotificationSound *sound = content.sound;  // 推送消息的声音
    NSString *subtitle = content.subtitle;  // 推送消息的副标题
    NSString *title = content.title;  // 推送消息的标题

    if([notification.request.trigger isKindOfClass:[UNPushNotificationTrigger class]]) {
        NSLog(@"iOS10 前台收到远程通知:%@", [self logDic:userInfo]);

    }
    else {
        // 判断为本地通知
        NSLog(@"iOS10 前台收到本地通知:{\\nbody:%@,\\ntitle:%@,\\nsubtitle:%@,\\nbadge:%@,\\nsound:%@,\\nuserInfo:%@\\n}",body,title,subtitle,badge,sound,userInfo);
    }
    completionHandler(UNNotificationPresentationOptionBadge|UNNotificationPresentationOptionSound|UNNotificationPresentationOptionAlert); // 需要执行这个方法,选择是否提醒用户,有Badge、Sound、Alert三种类型可以设置
}
下面的代码则是通知的点击事件:
// 通知的点击事件
- (void)userNotificationCenter:(UNUserNotificationCenter *)center didReceiveNotificationResponse:(UNNotificationResponse *)response withCompletionHandler:(void(^)())completionHandler{

    NSDictionary * userInfo = response.notification.request.content.userInfo;
    UNNotificationRequest *request = response.notification.request; // 收到推送的请求
    UNNotificationContent *content = request.content; // 收到推送的消息内容
    NSNumber *badge = content.badge;  // 推送消息的角标
    NSString *body = content.body;    // 推送消息体
    UNNotificationSound *sound = content.sound;  // 推送消息的声音
    NSString *subtitle = content.subtitle;  // 推送消息的副标题
    NSString *title = content.title;  // 推送消息的标题
    if([response.notification.request.trigger isKindOfClass:[UNPushNotificationTrigger class]]) {
        NSLog(@"iOS10 收到远程通知:%@", [self logDic:userInfo]);

    }
    else {
        // 判断为本地通知
        NSLog(@"iOS10 收到本地通知:{\\nbody:%@,\\ntitle:%@,\\nsubtitle:%@,\\nbadge:%@,\\nsound:%@,\\nuserInfo:%@\\n}",body,title,subtitle,badge,sound,userInfo);
    }

    // Warning: UNUserNotificationCenter delegate received call to -userNotificationCenter:didReceiveNotificationResponse:withCompletionHandler: but the completion handler was never called.
    completionHandler();  // 系统要求执行这个方法

}在点击事件中,如果我们不写completionHandler()这个方法,可能会报一下的错误,希望大家注意下~Warning: UNUserNotificationCenter delegate received call to -userNotificationCenter:didReceiveNotificationResponse:withCompletionHandler: but the completion handler was never called.
最后最后,我们要大家补充一下,旧版本的一些方法,方便大家扩充iOS10的通知的通知,不影响原有逻辑。
- (void)application:(UIApplication *)application
didReceiveRemoteNotification:(NSDictionary *)userInfo {
    NSLog(@"iOS6及以下系统,收到通知:%@", [self logDic:userInfo]);
}

- (void)application:(UIApplication *)application
didReceiveRemoteNotification:(NSDictionary *)userInfo
fetchCompletionHandler:
(void (^)(UIBackgroundFetchResult))completionHandler {

    NSLog(@"iOS7及以上系统,收到通知:%@", [self logDic:userInfo]);
    completionHandler(UIBackgroundFetchResultNewData);
}
2.极光推送(需要下载最新的版本)
如果用到三方的一些平台,做推送就会更为简单。
1.注册通知的代码如下
if ([[UIDevice currentDevice].systemVersion floatValue] >= 10.0) {
#ifdef NSFoundationVersionNumber_iOS_9_x_Max
    JPUSHRegisterEntity * entity = [[JPUSHRegisterEntity alloc] init];
    entity.types = UNAuthorizationOptionAlert|UNAuthorizationOptionBadge|UNAuthorizationOptionSound;
    [JPUSHService registerForRemoteNotificationConfig:entity delegate:self];
#endif
  } else if ([[UIDevice currentDevice].systemVersion floatValue] >= 8.0) {
      //可以添加自定义categories
      [JPUSHService registerForRemoteNotificationTypes:(UIUserNotificationTypeBadge |
                                                        UIUserNotificationTypeSound |
                                                        UIUserNotificationTypeAlert)
                                            categories:nil];
  } else {
      //categories 必须为nil
      [JPUSHService registerForRemoteNotificationTypes:(UIRemoteNotificationTypeBadge |
                                                        UIRemoteNotificationTypeSound |
                                                        UIRemoteNotificationTypeAlert)
                                            categories:nil];
  }
注册完成之后,我们则需要加入极光推送更新后,新加入的2个方法,这两个方法在<JPUSHRegisterDelegate>代理方法中。
/*
 * @brief handle UserNotifications.framework [willPresentNotification:withCompletionHandler:]
 * @param center [UNUserNotificationCenter currentNotificationCenter] 新特性用户通知中心
 * @param notification 前台得到的的通知对象
 * @param completionHandler 该callback中的options 请使用UNNotificationPresentationOptions
 */
- (void)jpushNotificationCenter:(UNUserNotificationCenter *)center willPresentNotification:(UNNotification *)notification withCompletionHandler:(void (^)(NSInteger options))completionHandler;
/*
 * @brief handle UserNotifications.framework [didReceiveNotificationResponse:withCompletionHandler:]
 * @param center [UNUserNotificationCenter currentNotificationCenter] 新特性用户通知中心
 * @param response 通知响应对象
 * @param completionHandler
 */
- (void)jpushNotificationCenter:(UNUserNotificationCenter *)center didReceiveNotificationResponse:(UNNotificationResponse *)response withCompletionHandler:(void(^)())completionHandler;
使用时,只需要在上面的代码中添加极光的处理方法就可以了,具体使用如下图:
if([response.notification.request.trigger isKindOfClass:[UNPushNotificationTrigger class]]) {
    // 这个方法,不管是收到通知代理还是点击通知的代理,如果使用极光推送,我们都是需要增加这个方法的。
    [JPUSHService handleRemoteNotification:userInfo];

    NSLog(@"iOS10 收到远程通知:%@", [self logDic:userInfo]);
    [rootViewController addNotificationCount];
  }
  else {
    // 判断为本地通知
    NSLog(@"iOS10 收到本地通知:{\\nbody:%@,\\ntitle:%@,\\nsubtitle:%@,\\nbadge:%@,\\nsound:%@,\\nuserInfo:%@\\n}",body,title,subtitle,badge,sound,userInfo);
  }
通过上面的文章,相信大家已经可以初步了解新版本的推送,要如何处理啦~
稍后,我会更新以下的内容,希望大家支持:
UNNotificationContentExtension - 通知内容扩展
UNNotificationServiceExtension- 通知服务扩展
UNNotificationAction - 通知响应的方法
UNErrorCode - 通知错误
UNNotificationAttachment - 附件通知
稍后我还会上传demo路径。
如果你喜欢我的文章,不要忘记关注我,谢谢大家了~
另外如果你要转载,希望可以注明出处,我会写出更多更好的文章,来回馈大家~
虽然这篇文章比较长,也不好理解,但是还是建议大家收藏,以后用到的时候,可以看看,有耐心的还是读一读。
这篇文章开始,我会跟大家好好讲讲,苹果新发布的iOS10的所有通知类。
一、创建本地通知事例详解:
注意啊,小伙伴们,本地通知也必须在appdelegate中注册中心,通知的开关打不打开无所谓的,毕竟是本地通知,但是通知的接收的代理,以及通知点击的代理,苹果给合二为一了。所以大家还是需要在appdelegate中写上这2个方法,还有不要忘记在- (BOOL)application:(UIApplication *)application didFinishLaunchingWithOptions:(NSDictionary *)launchOptions注册通知中心。如果使用极光推送的小伙伴,写看一下我的基础篇,辛苦大家啦
创建一个UNNotificationRequest类的实例,一定要为它设置identifier, 在后面的查找,更新, 删除通知,这个标识是可以用来区分这个通知与其他通知
把request加到UNUserNotificationCenter, 并设置触发器,等待触发
如果另一个request具有和之前request相同的标识,不同的内容, 可以达到更新通知的目的
创建一个本地通知我们应该先创建一个UNNotificationRequest类,并且将这个类添加到UNUserNotificationCenter才可以。代码如下:
// 1.创建一个UNNotificationRequest
    NSString *requestIdentifer = @"TestRequest";
    UNNotificationRequest *request = [UNNotificationRequest requestWithIdentifier:requestIdentifer content:content trigger:trigger];

// 2.将UNNotificationRequest类,添加进当前通知中心中
[[UNUserNotificationCenter currentNotificationCenter] addNotificationRequest:request withCompletionHandler:^(NSError * _Nullable error) {

    }];
在创建UNNotificationRequest类时,官方的解释是说,一个通知请求可以在预定通过时间和位置,来通知用户。触发的方式见UNNotificationTrigger的相关说明。调用该方法,在通知触发的时候。会取代具有相同标识符的通知请求,此外,消息个数受系统限制。
上面的翻译,看上去可能有些拗口,简单来说,就是我们需要为UNNotificationRequest设置一个标识符,通过标识符,我们可以对该通知进行添加,删除,更新等操作。
以下是完整的创建通知的代码:
    // 1.创建通知内容
    UNMutableNotificationContent *content = [[UNMutableNotificationContent alloc] init];
    content.title = @"徐不同测试通知";
    content.subtitle = @"测试通知";
    content.body = @"来自徐不同的简书";
    content.badge = @1;
    NSError *error = nil;
    NSString *path = [[NSBundle mainBundle] pathForResource:@"icon_certification_status1@2x" ofType:@"png"];
    // 2.设置通知附件内容
    UNNotificationAttachment *att = [UNNotificationAttachment attachmentWithIdentifier:@"att1" URL:[NSURL fileURLWithPath:path] options:nil error:&error];
    if (error) {
        NSLog(@"attachment error %@", error);
    }
    content.attachments = @[att];
    content.launchImageName = @"icon_certification_status1@2x";
    // 2.设置声音
    UNNotificationSound *sound = [UNNotificationSound defaultSound];
    content.sound = sound;

    // 3.触发模式
    UNTimeIntervalNotificationTrigger *trigger = [UNTimeIntervalNotificationTrigger triggerWithTimeInterval:5 repeats:NO];

    // 4.设置UNNotificationRequest
    NSString *requestIdentifer = @"TestRequest";
    UNNotificationRequest *request = [UNNotificationRequest requestWithIdentifier:requestIdentifer content:content trigger:trigger1];

    //5.把通知加到UNUserNotificationCenter, 到指定触发点会被触发
    [[UNUserNotificationCenter currentNotificationCenter] addNotificationRequest:request withCompletionHandler:^(NSError * _Nullable error) {
    }];
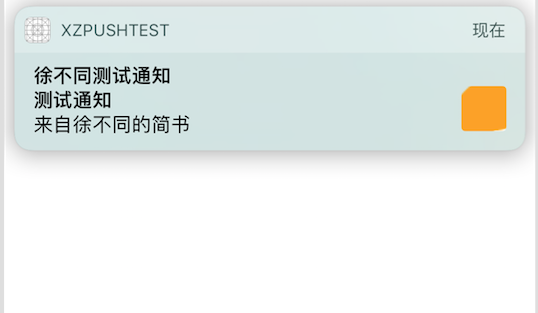
通过以上代码,我们就可以创建一个5秒触发本地通知,具体样式可以看下图
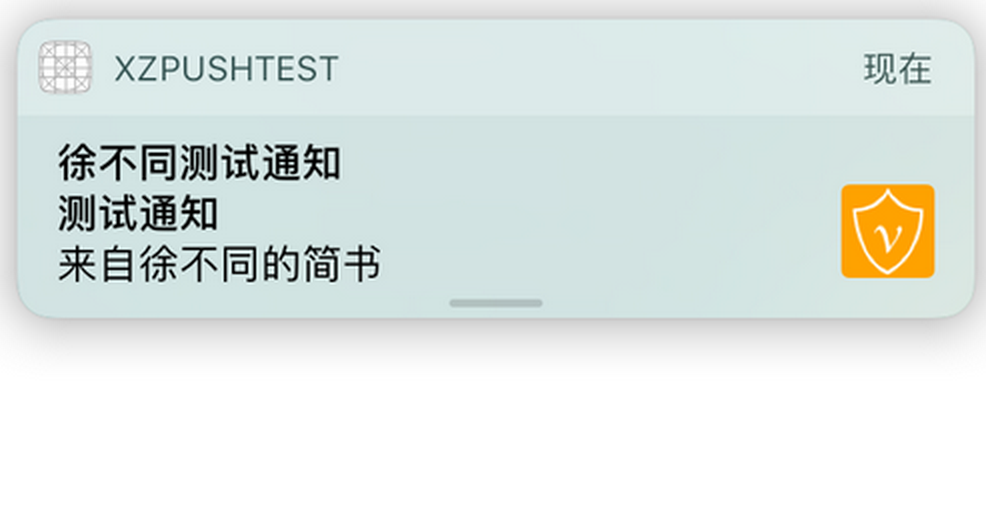
下拉放大content.launchImageName = @"icon_certification_status1@2x";显示的图片是这行代码的效果,如图
根据上面内容,大家会发现在创建UNNotificationRequest的时候,会需要UNMutableNotificationContent以及UNTimeIntervalNotificationTrigger这两个类。下面我就对相关的类,以及类扩展,做相应的说明。
1.UNNotificationContent以及UNMutableNotificationContent(通知内容和可变通知内容)
通知内容分为可变的以及不可变的两种类型,类似于可变数组跟不可变数组。后续我们通过某一特定标识符更新通知,便是用可变通知了。
不管是可变通知还是不可变通知,都有以下的几个属性:
// 1.附件数组,存放UNNotificationAttachment类
@property (NS_NONATOMIC_IOSONLY, copy) NSArray <UNNotificationAttachment *> *attachments ;

// 2.应用程序角标,0或者不传,意味着角标消失
@property (NS_NONATOMIC_IOSONLY, copy, nullable) NSNumber *badge;

// 3.主体内容
@property (NS_NONATOMIC_IOSONLY, copy) NSString *body ;

// 4.app通知下拉预览时候展示的图
@property (NS_NONATOMIC_IOSONLY, copy) NSString *launchImageName;

// 5.UNNotificationSound类,可以设置默认声音,或者指定名称的声音
@property (NS_NONATOMIC_IOSONLY, copy, nullable) UNNotificationSound *sound ;

// 6.推送内容的子标题
@property (NS_NONATOMIC_IOSONLY, copy) NSString *subtitle ;

// 7.通知线程的标识
@property (NS_NONATOMIC_IOSONLY, copy) NSString *threadIdentifier;

// 8.推送内容的标题
@property (NS_NONATOMIC_IOSONLY, copy) NSString *title ;

// 9.远程通知推送内容
@property (NS_NONATOMIC_IOSONLY, copy) NSDictionary *userInfo;

// 10.category标识
@property (NS_NONATOMIC_IOSONLY, copy) NSString *categoryIdentifier;
以上的的属性,我都增加了相应的说明,大家可以对照我的注释来使用。
2.UNNotificationAttachment (附件内容通知)
在UNNotificationContent类中,有个附件数组的属性,这就是包含UNNotificationAttachment类的数组了。
@property (NS_NONATOMIC_IOSONLY, copy) NSArray <UNNotificationAttachment *> *attachments ;苹果的解释说,UNNotificationAttachment(附件通知)是指可以包含音频,图像或视频内容,并且可以将其内容显示出来的通知。使用本地通知时,可以在通知创建时,将附件加入即可。对于远程通知,则必须实现使用UNNotificationServiceExtension类通知服务扩展。
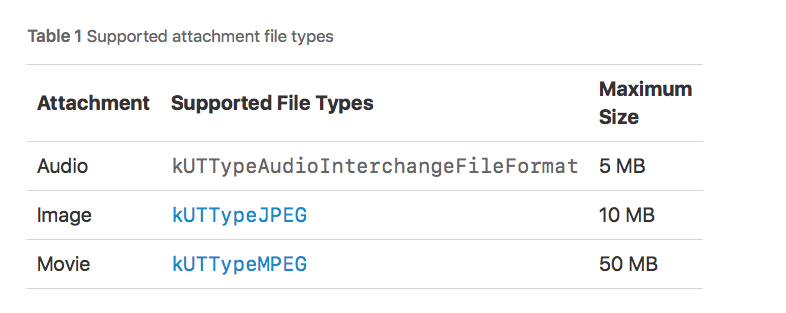
创建附件的方法是attachmentWithIdentifier:URL:options:error:。在使用时,必须指定使用文件附件的内容,并且文件格式必须是支持的类型之一。创建附件后,将其分配给内容对象的附件属性。 (对于远程通知,您必须从您的服务扩展做到这一点。)
附件通知支持的类型如下图:
下面是创建UNNotificationAttachment的方法:
+ (nullable instancetype)attachmentWithIdentifier:(NSString *)identifier URL:(NSURL *)URL options:(nullable NSDictionary *)options error:(NSError *__nullable *__nullable)error;注意:URL必须是一个有效的文件路径,不然会报错
这里我再在说下options的属性,一共有4种选项(这几个属性可研究死我了)
- 1UNNotificationAttachmentOptionsTypeHintKey此键的值是一个包含描述文件的类型统一类型标识符(UTI)一个NSString。如果不提供该键,附件的文件扩展名来确定其类型,常用的类型标识符有
kUTTypeImage,kUTTypeJPEG2000,kUTTypeTIFF,kUTTypePICT,kUTTypeGIF ,kUTTypePNG,kUTTypeQuickTimeImage等。看到这里你一定有疑问,这些类型导入报错了啊!!我研究了苹果文档,发现大家需要添加以下框架才可以,具体大家可以通过以下类型来处理。
注意:
框架就是#import<MobileCoreServices/MobileCoreServices.h>
使用方法如下:
dict[UNNotificationAttachmentOptionsTypeHintKey] = (__bridge id _Nullable)(kUTTypeImage);-
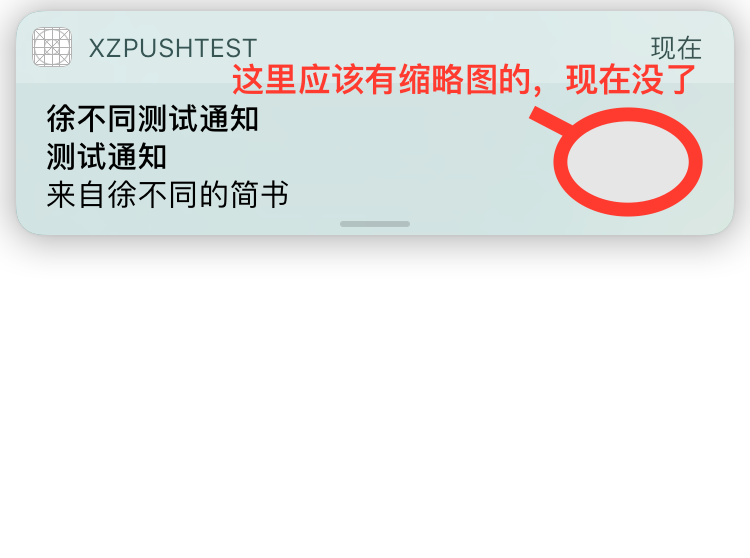
2UNNotificationAttachmentOptionsThumbnailHiddenKey,是一个BOOL值,为YES时候,缩略图将隐藏,默认为YES。如图:
IMG_0124.PNG-67.2kB
大家可以对照上面的图来看,就明白是哪里的图消失了。使用方法如下:
dict[UNNotificationAttachmentOptionsThumbnailHiddenKey] = @YES; -
3UNNotificationAttachmentOptionsThumbnailClippingRectKey剪贴矩形的缩略图。这个密钥的值是包含一个归一化的CGRect - 也就是说,一个单元的矩形,其值是在以1.0〜 0.0 ,表示要显示的原始图像的所述部分的字典。例如,指定的(0.25 , 0.25)的原点和大小(0.5 ,0.5 )定义了剪辑矩形,只显示图像的中心部分。使用CGRectCreateDictionaryRepresentation函数来创建字典的矩形。
上面这句话是苹果的翻译,太绕口了。我简单说,就是我下面这幅图。
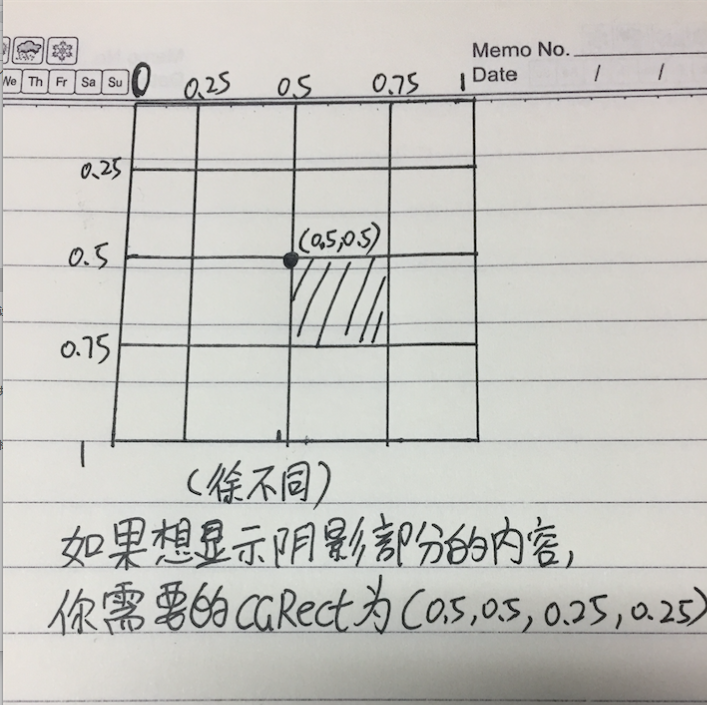
整张图被分割了,整体比例为1,如果想得到图中阴影面积,就需要写的CGRect(0.5,0.5,0.25,0.25),意思是,从(0.5,0.5)为原点,面积为(0.25,0.25),大家可以理解成,即下面的方法。
使用方法如下:
dict[UNNotificationAttachmentOptionsThumbnailClippingRectKey] = (__bridge id _Nullable)((CGRectCreateDictionaryRepresentation(CGRectMake(0.5, 0.5, 0.25 ,0.25))));;使用上面的方法,可以得到一张图的阴影部分的图像,这张图像会是通知的缩略图。比如我下面的这个图,缩略图大家应该可以发现变了吧。
这里为了理解,在给大家说几个"坐标点":
(0,0,0.25,0.25)左上角的最小正方形
(0,0,0.5,0.5) 四分之一的正方形,左上角
(0.5,0.5,0.5,0.5)四分之一的正方形,右下角
(0.5,0,0.5,0.5)四分之一的正方形,左下角
(0.25,0.25,0.5,0.5)最中心的正方形
特别注意:
调试到这里的时候,我感觉苹果应该是有个bug,就是我在来回变化这个显示缩略图的frame的时候,来回改,永远显示为第一次写的frame。我在修改UNNotificationRequest的requestIdentifer属性后,可以变换属性。所以我猜测可能相同requestIdentifer的通知,算一个通知,所以只能调用更新的方法,来变化缩略图的吃不腻吧,或许也不是bug。
- 4UNNotificationAttachmentOptionsThumbnailTimeKey,一般影片附件会用到,指的是用影片中的某一秒来做这个缩略图;
使用方法如下:
dict[UNNotificationAttachmentOptionsThumbnailTimeKey] =@10;这里我们可以直接传递一个NSNumber的数值,比如使用影片第10s的画面来做缩略图就按照上面的来写。此外,要注意的是,这个秒数必须是这个影片长度范围内的,不然报错。
3.UNTimeIntervalNotificationTrigger (通知触发模式)
这个我在iOS开发 iOS10推送必看(基础篇)这篇文章中已经初步介绍了,现在我在详细介绍下。
-
1.UNPushNotificationTrigger (远程通知触发)一般我们不会使用的
-
2.UNTimeIntervalNotificationTrigger (本地通知) 一定时间之后,重复或者不重复推送通知。我们可以设置timeInterval(时间间隔)和repeats(是否重复)。
使用方法:
UNTimeIntervalNotificationTrigger *triggerOne = [UNTimeIntervalNotificationTrigger triggerWithTimeInterval:5 repeats:NO];
解释:上面的方法是指5秒钟之后执行。repeats这个属性,如果需要为重复执行的,则TimeInterval必须大于60s,否则会报`* Terminating app due to uncaught exception 'NSInternalInconsistencyException', reason: 'time interval must be at least 60 if repeating'`的错误!**
- 3.UNCalendarNotificationTrigger(本地通知) 一定日期之后,重复或者不重复推送通知 例如,你每天8点推送一个通知,只需要dateComponents为8。如果你想每天8点都推送这个通知,只要repeats为YES就可以了。
// 周一早上 8:00 上班
NSDateComponents *components = [[NSDateComponents alloc] init];
// 注意,weekday是从周日开始的,如果想设置为从周一开始,大家可以自己想想~
components.weekday = 2;
components.hour = 8;
UNCalendarNotificationTrigger *trigger = [UNCalendarNotificationTrigger triggerWithDateMatchingComponents:components repeats:YES];- 4.UNLocationNotificationTrigger (本地通知)地理位置的一种通知,使用这个通知,你需要导入
#import<CoreLocation/CoreLocation.h>这个系统类库。示例代码如下:
//1、如果用户进入或者走出某个区域会调用下面两个方法
- (void)locationManager:(CLLocationManager *)manager
    didEnterRegion:(CLRegion *)region
- (void)locationManager:(CLLocationManager *)manager
    didExitRegion:(CLRegion *)region代理方法反馈相关信息

//2、一到某个经纬度就通知,判断包含某一点么
// 不建议使用!!!!!!CLRegion *region = [[CLRegion alloc] init];// 不建议使用!!!!!!


CLCircularRegion *circlarRegin = [[CLCircularRegion alloc] init];
[circlarRegin containsCoordinate:(CLLocationCoordinate2D)];

UNLocationNotificationTrigger *trigger4 = [UNLocationNotificationTrigger triggerWithRegion:circlarRegin repeats:NO];
注意,这里建议使用CLCircularRegion这个继承自CLRegion的类,因为我看到苹果已经飞起了CLRegion里面是否包含这一点的方法,并且推荐我们使用CLCircularRegion这个类型
原文链接:http://www.jianshu.com/p/f5337e8f336d
著作权归作者所有,转载请联系作者获得授权,并标注“简书作者”。
