1、图像的代数运算与应用
0、常用的常数矩阵及类型说明
为了后续说明图像与常数运算,这里先讲解下常用的基础矩阵。首先看一个示例,其说明了如何构建三个指定大小的常用矩阵,全0阵,全1阵和对角阵。
这里需要说明的使,Size里可以为src.cols和src.rows来标定图像。其中CV_8UC1指8位无符号单通道,常用类型有:
CV_8UC1// 8位无符号单通道
CV_8UC3// 8位无符号3通道
CV_8UC4
CV_32FC1// 32位浮点型单通道
CV_32FC3// 32位浮点型3通道
CV_32FC4
#include "stdafx.h"
#include<opencv2/opencv.hpp>
#include<iostream>
using namespace cv;
using namespace std;

void main() {
	Mat mz = Mat::zeros(Size(5, 5), CV_8UC1); // 全零矩阵
	Mat mo = Mat::ones(Size(5, 5), CV_8UC1); // 全1矩阵
	Mat me = Mat::eye(Size(5, 5), CV_32FC1); // 对角线为1的对角矩阵
	cout << "mz = " << endl << mz << endl << endl;
	cout << "mo = " << endl << mo << endl << endl;
	cout << "me = " << endl << me << endl << endl;
}
运行结果如下: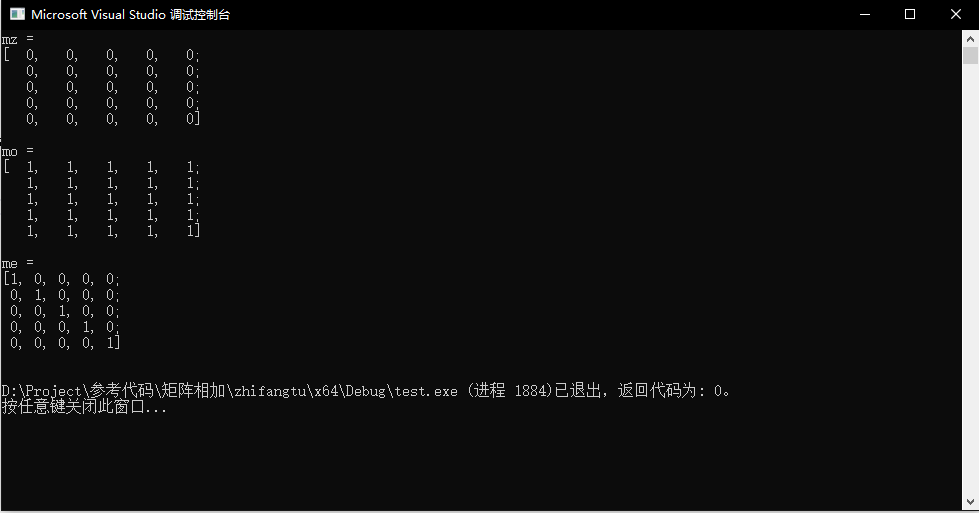
1、图像相加
上节已经讲到,图像是矩阵形式存在于内存中的,图像与图像相加意味着矩阵的相加,两个矩阵对应元素相加,故图像大小与类型必须保持一致;图像与常数像加,是为图像矩阵中的每个元素与该常数相加。
示例:需要注意两幅图片尺寸不同,需要用resize将尺寸转换为一致。同时,OpenCV基于图像相加还提供了一种图像线性混合叠加的方法addWeighted。
#include "stdafx.h"
#include<opencv2/opencv.hpp>
#include<iostream>
using namespace cv;
using namespace std;
void main() {
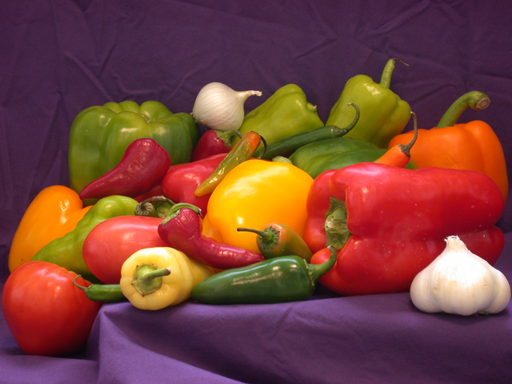
Mat img1 = imread("peppers.png");
Mat img2 = imread("pears.png");
Mat mo= Mat::ones(Size(img2.cols,img2.rows), CV_8UC3);//RGB图所以是3通道整型
Mat dst, dst1,dst2;//存储结果
imshow("img1", img1);
imshow("img2", img2);
resize(img1, img1, Size(img2.cols, img2.rows));//调整图片大小,使其与图2大小一致
//dst = img1 + img2;//这两个加法效果相同
add(img1, img2, dst);//注意:这两个加法要求被加的图片尺寸必须一致
//dst1=img1+100;
add(img1, 100*mo, dst1);//图1+100
addWeighted(img1, 0.5, img2, 0.5, 0, dst2);//按权重相加,下一行dst输出参数为正常参数的一半;
imshow("dst", dst);
imshow("dst1", dst1);
imshow("dst2", dst2);
waitKey(0);
}
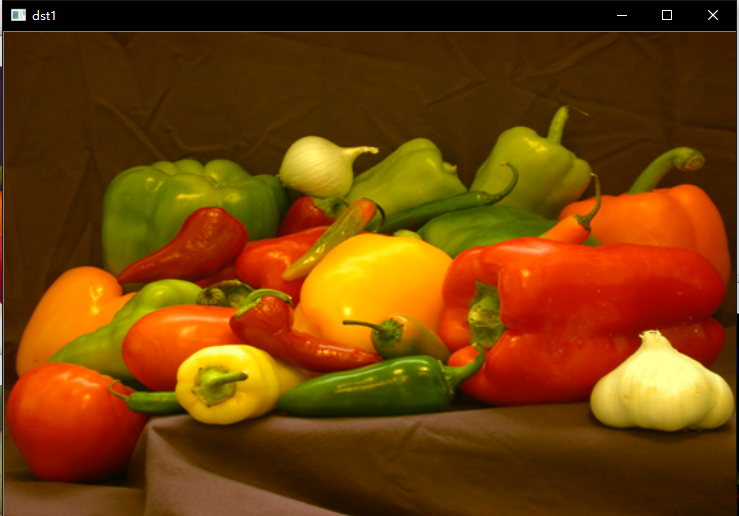
原图及效果图如下所示:


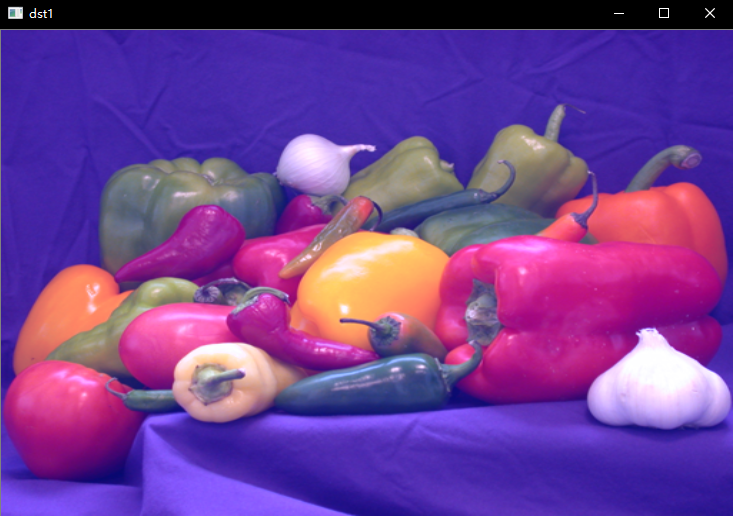
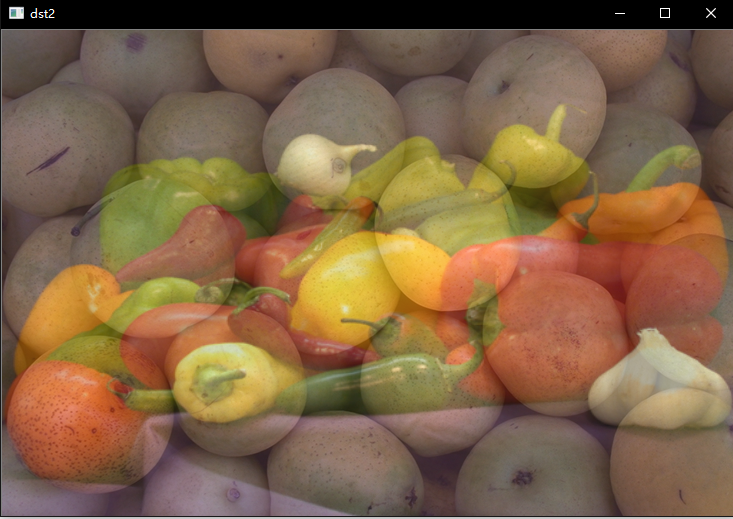
从图中可以看出图1+常数后,图像整体变亮,图1与图2相加后,整体亮度变大,叠加效果明显。
2、图像相减
与图像相加原理一样,图像相减即为两幅图像对应位置的像素作差,若差值小于0,则该位置像素默认为0.
#include "stdafx.h"
#include<opencv2/opencv.hpp>
#include<iostream>
using namespace cv;
using namespace std;

void main() {
	Mat img1 = imread("peppers.png");
	Mat img2 = imread("pears.png");
	Mat  mo= Mat::ones(Size(img2.cols,img2.rows), CV_8UC3);//RGB图所以是3通道整型
	Mat dst, dst1,dst2;//存储结果
	imshow("img1", img1);
	imshow("img2", img2);
	resize(img1, img1, Size(img2.cols, img2.rows));//调整图片大小,使其与图2大小一致
	//dst = img1 - img2;//这两个加法效果相同
	subtract(img1, img2, dst);//注意:这两个加法要求被加的图片尺寸必须一致
        //dst1=img1-100;
	subtract(img1, 100*mo, dst1);//图1+100
	addWeighted(img1, 0.5, img2, -0.5, 0, dst2);//按权重相减,下一行dst输出参数为正常参数的一半;
	imshow("dst", dst);
	imshow("dst1", dst1);
	imshow("dst2", dst2);
	waitKey(0);
}
运行结果如下:
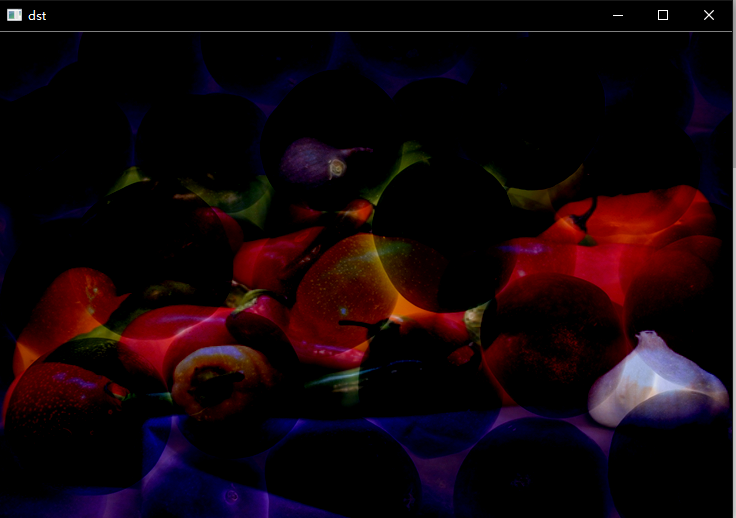

可以看出减去一个常数值后整体亮度减小,而两图相减后,整体变暗,相减效果明显。
可以看出,图像加减可以调节图像亮度。
3、图像相乘
图像相乘,原理同矩阵相加,相同大小的图像矩阵对应元素乘积作为新的像素值。
#include "stdafx.h"
#include<opencv2/opencv.hpp>
#include<iostream>
using namespace cv;
using namespace std;

void main() {
	Mat img1 = imread("rice.png");
	Mat img2 = imread("saturn.png");
	Mat  mo= Mat::ones(Size(img2.cols,img2.rows), CV_8UC1);//灰图所以是1通道整型
	Mat dst, dst1,dst2;//存储结果
	cvtColor(img1, img1, CV_RGB2GRAY);//虽然是灰度图,但是是按RGB方法读入的,所以还需要转换下格式为灰度图
	imshow("img1", img1);
	cvtColor(img2, img2, CV_RGB2GRAY);
	imshow("img2", img2);
	resize(img1, img1, Size(img2.cols, img2.rows));//调整图片大小,使其与图2大小一致
	//dst = img1 * 2;//这两个乘法效果相同
	multiply(img1, 2*mo, dst1);
	multiply(img1, img2, dst1);//注意:这两个加法要求被加的图片尺寸必须一致
	imshow("dst", dst);
    imshow("dst1", dst1);

	waitKey(0);
}
原图及效果如下:
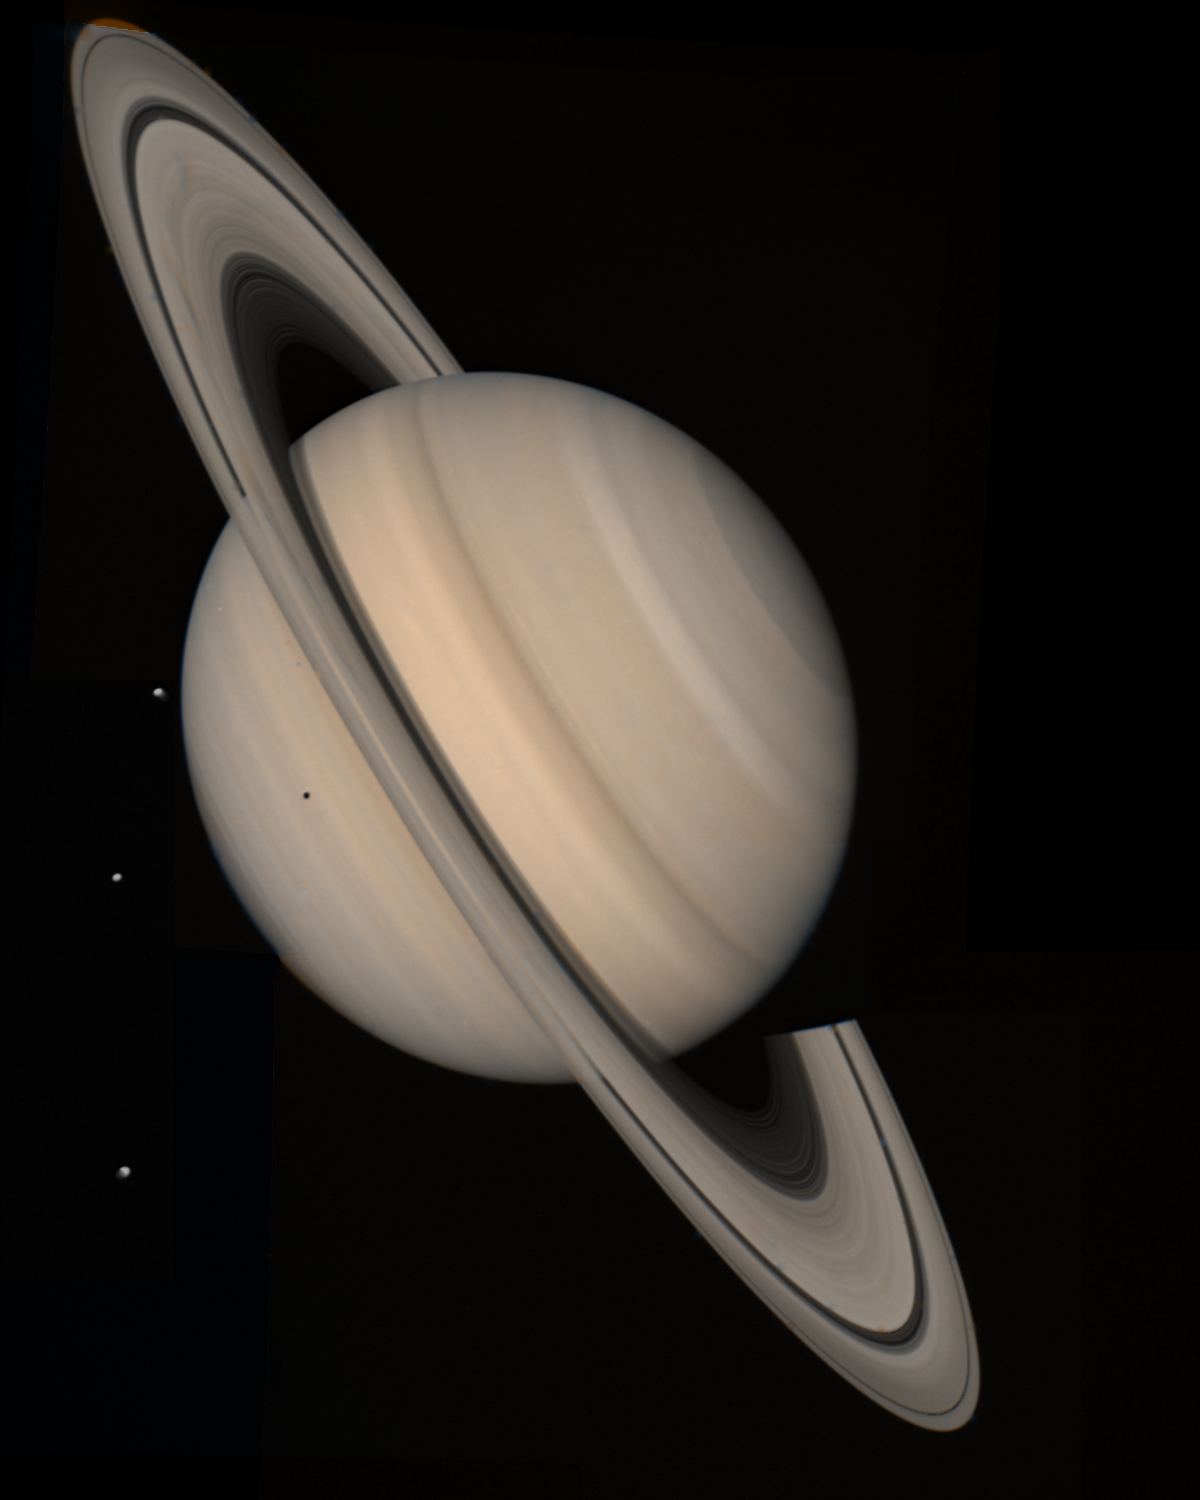
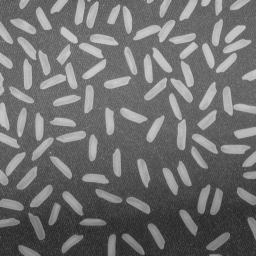
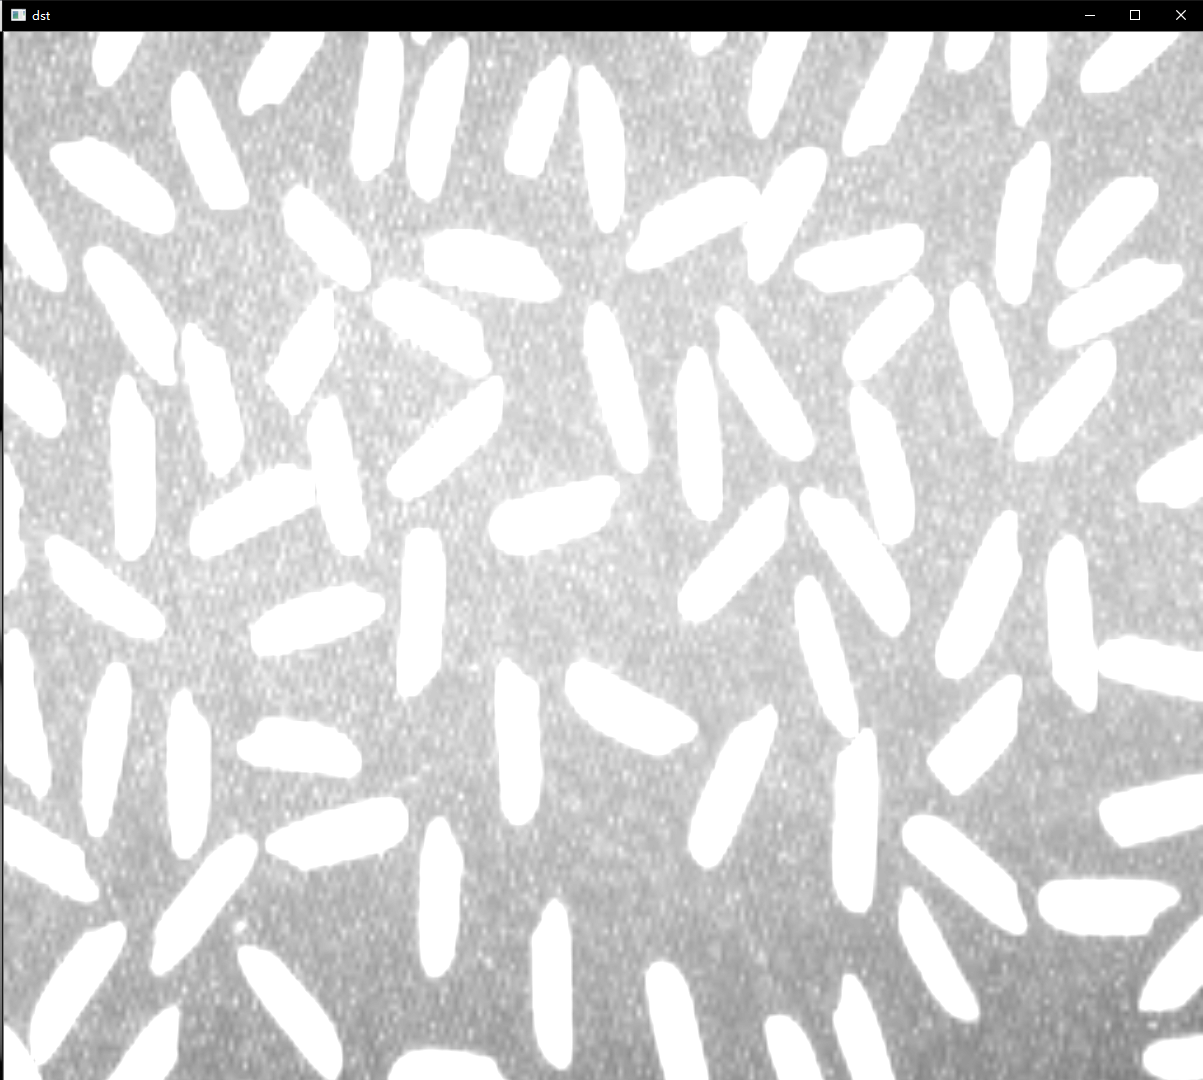

结果可以按出,图1与图2灰度值较高的区域相乘后,像素米线得到提升。因为图1周边部分像素值低,且乘值小,故乘积后结果依然很小,结果呈现黑色。
4、图像相除
同理,对两幅图像进行图像相除
#include "stdafx.h"
#include<opencv2/opencv.hpp>
#include<iostream>
using namespace cv;
using namespace std;

void main() {
	Mat img1 = imread("rice.png");
	Mat img2 = imread("saturn.png");
	Mat  mo= Mat::ones(Size(img2.cols,img2.rows), CV_8UC1);//灰图所以是1通道整型
	Mat dst, dst1,dst2;//存储结果
	cvtColor(img1, img1, CV_RGB2GRAY);//虽然是灰度图,但是是按RGB方法读入的,所以还需要转换下格式为灰度图
	imshow("img1", img1);
	cvtColor(img2, img2, CV_RGB2GRAY);
	imshow("img2", img2);
	resize(img1, img1, Size(img2.cols, img2.rows));//调整图片大小,使其与图2大小一致
	//dst = img1/2;//这两个乘法效果相同
	divide(img1, 2*mo, dst);
	divide(img1, img2, dst1);//注意:这两个加法要求被加的图片尺寸必须一致
	imshow("dst", dst);
        imshow("dst1", dst1);

	waitKey(0);
}
结果如下:
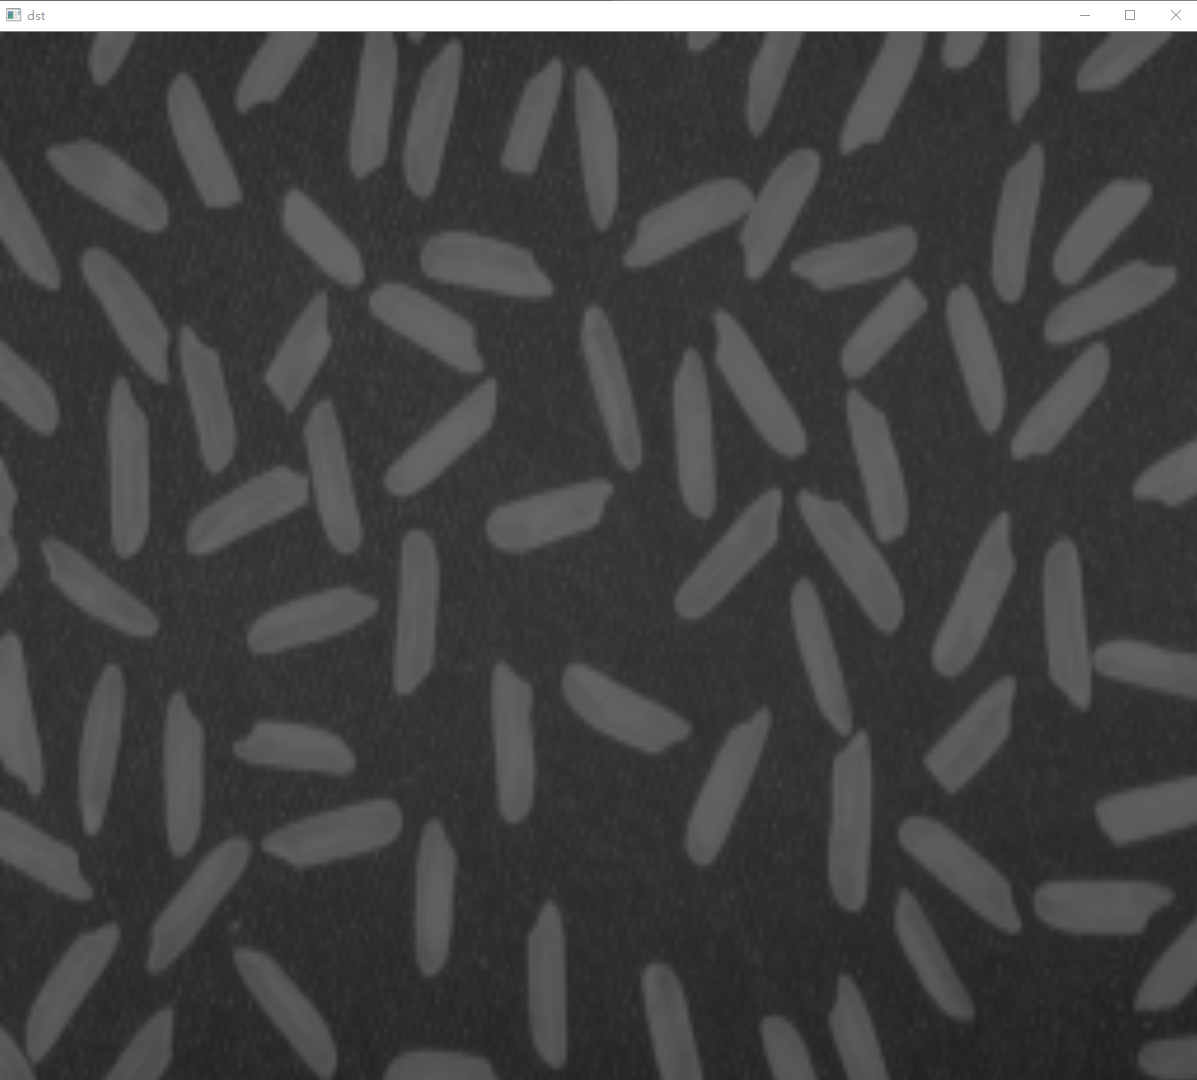

可以看出,图像乘除可以调节图像对比度。
前面只对加减乘除进行了标识,有时候我们还会需要用到一些其他的操作,这里将常用的运算操作列举出来如下所示:
void add(InputArray src1, InputArray src2, OutputArray dst,InputArray mask=noArray(), int dtype=-1);//dst = src1 + src2
void subtract(InputArray src1, InputArray src2, OutputArray dst,InputArray mask=noArray(), int dtype=-1);//dst = src1 - src2
void multiply(InputArray src1, InputArray src2,OutputArray dst, double scale=1, int dtype=-1);//dst = scale*src1*src2
void divide(InputArray src1, InputArray src2, OutputArray dst,double scale=1, int dtype=-1);//dst = scale*src1/src2
void divide(double scale, InputArray src2,OutputArray dst, int dtype=-1);//dst = scale/src2
void scaleAdd(InputArray src1, double alpha, InputArray src2, OutputArray dst);//dst = alpha*src1 + src2
void addWeighted(InputArray src1, double alpha, InputArray src2,double beta, double gamma, OutputArray dst, int dtype=-1);//dst = alpha*src1 + beta*src2 + gamma
void sqrt(InputArray src, OutputArray dst);//计算每个矩阵元素的平方根
void pow(InputArray src, double power, OutputArray dst);//src的power次幂
void exp(InputArray src, OutputArray dst);//dst = e**src(**表示指数的意思)
void log(InputArray src, OutputArray dst);//dst = log(abs(src))
2、图像的逻辑运算
0、常用的图形说明
opencv提供了很多绘图函数,这些函数基本上包含了我们需要用到的常用图形,可以供我们在实际应用中进行图像的截取,目标的标注等。下面是一些包含常用图形的示例:
#include "stdafx.h"
#include <stdio.h>
#include <vector>
#include <cv.h>
#include <highgui.h>
#include <opencv2/opencv.hpp>

using namespace cv;
using namespace std;

int main()
{
	//创建一张白色大小为800x800的图片,所有绘图多在这图上实现
	Mat matSrc(800, 800, CV_8UC3, Scalar(255, 255, 255));
	Mat matClone = matSrc.clone();

	//画普通直线
	line(matSrc, Point(100, 50), Point(600, 50), Scalar(0, 0, 255), 1, LINE_8, 0);

	//画带箭头直线
	arrowedLine(matSrc, Point(100, 100), Point(600, 100), Scalar(0, 0, 255), 1, LINE_8, 0, 0.1);

	//画矩形
	rectangle(matSrc, Rect(100, 150, 500, 50), Scalar(0, 255, 0), 1, LINE_8, 0);

	//画圆
	circle(matSrc, Point(300, 300), 100, Scalar(0, 255, 0), 1, LINE_8, 0);

	//画椭圆
	ellipse(matSrc, Point(400, 400), Size(100, 60), -45, 0, 360, Scalar(0, 255, 0), 1, LINE_8, 0);

	//填充多边形
	Point pts[5];
	pts[0] = Point(500, 500);
	pts[1] = Point(700, 500);
	pts[2] = Point(750, 750);
	pts[3] = Point(450, 750);
	pts[4] = Point(500, 500);
	fillConvexPoly(matSrc, pts, 5, Scalar(0, 255, 0), LINE_8, 0);

	//画轮廓点
	vector<vector<Point> > vContours;
	vector<Vec4i> hierarchy;
	Mat matGray;
	cvtColor(matSrc, matGray, CV_BGR2GRAY);
	Mat matBinary(matSrc.rows, matSrc.cols, CV_8UC1);
	threshold(matGray, matBinary, 200, 255, THRESH_BINARY);
	findContours(matBinary, vContours, hierarchy, RETR_LIST, CHAIN_APPROX_NONE, Point(0, 0));
	drawContours(matClone, vContours, -1, Scalar(255, 0, 255));

	//显示文字
	putText(matSrc, string("opencv is open source"), Point(50, 650), 0, 1, Scalar(0, 128, 255), 1);

	//显示图像
	namedWindow("draw");
	namedWindow("Contours");
	imshow("draw", matSrc);
	imshow("Contours", matClone);
	cvWaitKey();

	return 0;
}
程序运行结果如下:
 总结如下:
总结如下:
void line(InputOutputArray img, Point pt1, Point pt2, const Scalar& color, int thickness = 1, int lineType = LINE_8, int shift = 0);//直线
void arrowedLine(InputOutputArray img, Point pt1, Point pt2, const Scalar& color, int thickness = 1, int line_type = 8, int shift = 0, double tipLength = 0.1);//带箭头的直线
void rectangle(CV_IN_OUT Mat& img, Rect rec, const Scalar& color, int thickness = 1, int lineType = LINE_8, int shift = 0);//矩形
void circle(InputOutputArray img, Point center, int radius, const Scalar& color, int thickness = 1, int lineType = LINE_8, int shift = 0);//圆
void ellipse(InputOutputArray img, Point center, Size axes, double angle, double startAngle, double endAngle,const Scalar& color, int thickness = 1, int lineType = LINE_8, int shift = 0);//椭圆
void fillConvexPoly(Mat& img, const Point* pts, int npts, const Scalar& color, int lineType = LINE_8, int shift = 0);//填充多边形
void drawContours(InputOutputArray image, InputArrayOfArrays contours, int contourIdx, const Scalar& color, int thickness = 1, int lineType = LINE_8, InputArray hierarchy = noArray(), int maxLevel = INT_MAX, Point offset = Point());//画轮廓点
void putText(Mat& img, const string& text, Point org, int fontFace, double fontScale, Scalar color, int thickness = 1, int lineType = 8, bool bottomLeftOrigin = false);//显示字体
详细参数说明请看opencv基础(5)——画图操作line()/arrowedLine()/rectangle()/circle()/fillConvexPoly()/drawContours()/putText()
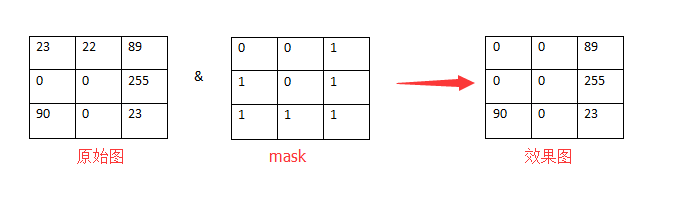
1、常用的逻辑运算说明
图像的逻辑运算即为图像矩阵之间的逻辑运算,包含图像之间的逻辑与,逻辑或逻辑非,逻辑异或等操作。图像的逻辑运算是针对二值图像进行的,因为只有二值图像的像素才具有逻辑0和1。
void bitwise_and(InputArray src1, InputArray src2,OutputArray dst, InputArray mask=noArray());//dst = src1 & src2
void bitwise_or(InputArray src1, InputArray src2,OutputArray dst, InputArray mask=noArray());//dst = src1 | src2
void bitwise_xor(InputArray src1, InputArray src2,OutputArray dst, InputArray mask=noArray());//dst = src1 ^ src2
void bitwise_not(InputArray src, OutputArray dst,InputArray mask=noArray());//dst = ~src
下面是一个相关示例:
#include "stdafx.h"
#include<opencv2/opencv.hpp>
#include<iostream>
using namespace cv;
using namespace std;
void main() {
Mat img1 = imread("circles.png");
Mat img2 = imread("coins.png");
Mat binary1, binary2;//存储结果
cvtColor(img1, img1, CV_RGB2GRAY);//虽然是灰度图,但是是按RGB方法读入的,所以还需要转换下格式为灰度图
imshow("img1", img1);
cvtColor(img2, img2, CV_RGB2GRAY);
imshow("img2", img2);
resize(img1, img1, Size(img2.cols, img2.rows));//调整图片大小,使其与图2大小一致
//dst = img1 * 2;//这两个乘法效果相同
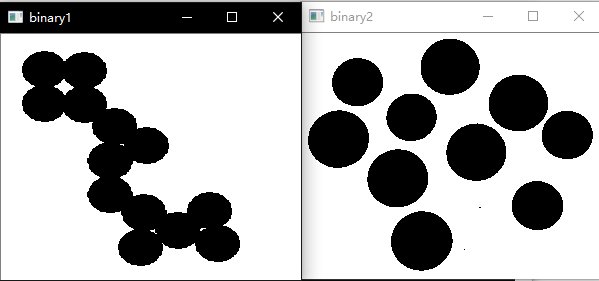
threshold(img1, binary1, 66, 255, THRESH_BINARY_INV);//全局二值化
threshold(img2, binary2, 80, 255, THRESH_BINARY_INV);//全局二值化
Mat yu,huo,fei,yi_huo;
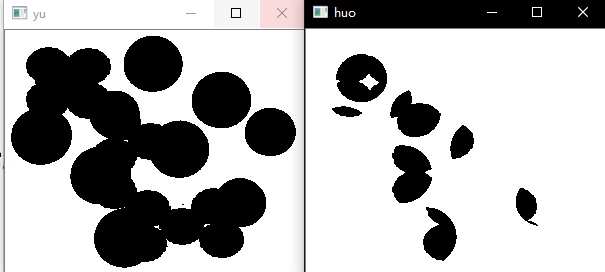
bitwise_and(binary1, binary2, yu);
bitwise_or(binary1, binary2, huo);
bitwise_not(binary1, fei);
bitwise_xor(binary1, binary2, yi_huo);
imshow("binary1", binary1);
imshow("binary2", binary2);
imshow("yu", yu);//与的结果
imshow("huo", huo);//与的结果
imshow("fei", fei);//与的结果
imshow("yi_huo", yi_huo);//与的结果
waitKey(0);
}
原图及先相关逻辑运算的结果如下所示:

2、常用的逻辑运算应用——Mask掩膜
数字图像处理中的掩膜的概念是借鉴于PCB制版的过程,在半导体制造中,许多芯片工艺步骤采用光刻技术,用于这些步骤的图形“底片”称为掩膜(也称作“掩模”),其作用是:在硅片上选定的区域中对一个不透明的图形模板遮盖,继而下面的腐蚀或扩散将只影响选定的区域以外的区域。
图像掩膜与其类似,用选定的图像、图形或物体,对处理的图像(全部或局部)进行遮挡,来控制图像处理的区域或处理过程。
数字图像处理中,掩模为二维矩阵数组,有时也用多值图像,图像掩模主要用于:
①提取感兴趣区,用预先制作的感兴趣区掩模与待处理图像相乘,得到感兴趣区图像,感兴趣区内图像值保持不变,而区外图像值都为0。
②屏蔽作用,用掩模对图像上某些区域作屏蔽,使其不参加处理或不参加处理参数的计算,或仅对屏蔽区作处理或统计。
③结构特征提取,用相似性变量或图像匹配方法检测和提取图像中与掩模相似的结构特征。
④特殊形状图像的制作。
值得注意的是,在所有图像基本运算的操作函数中,凡是带有掩膜(mask)的处理函数,其掩膜都参与运算(输入图像运算完之后再与掩膜图像或矩阵运算)。
下面是一个掩膜提取相关区域的运算示例:
#include "stdafx.h"
#include "opencv2/highgui/highgui.hpp"
#include "opencv2/imgproc/imgproc.hpp"
#include <iostream>
#include <stdio.h>

using namespace std;
using namespace cv;

int main()
{
	Mat image, mask;
	Rect r1(100, 100, 250, 300);
	Mat img1, img2, img3, img4;
	image = imread("111.jpg");
	mask = Mat::zeros(image.size(), CV_8UC1);
	mask(r1).setTo(255);
	img1 = image(r1);
	image.copyTo(img2, mask);

	image.copyTo(img3);
	img3.setTo(0, mask);


	imshow("Image sequence", image);
	imshow("img1", img1);
	imshow("img2", img2);
	imshow("img3", img3);
	imshow("mask", mask);

	waitKey();
	return 0;
}
原图及运行结果如下:

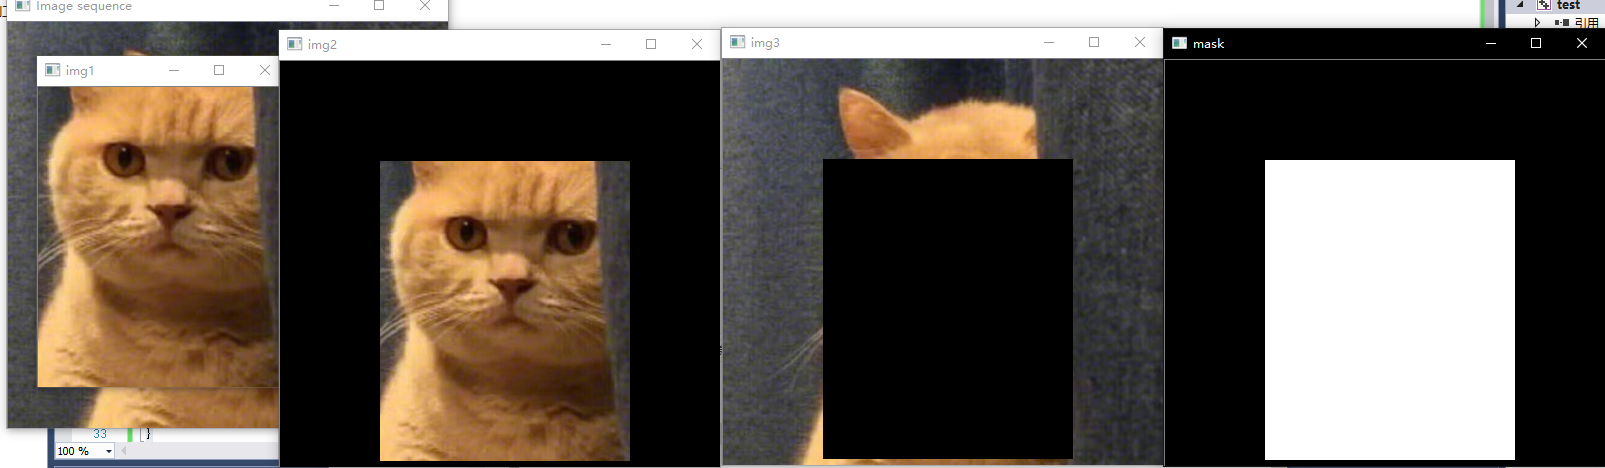
可以看出,掩膜mask对原图进行了一个指定区域的截取,应用这个方法可以来提取机器视觉中感兴趣的部分。其运算原理如下