Haproxy负载均衡
所需软件参见docker仓库: https://hub.docker.com/_/haproxy
方案:
1.先自己打包一个
Dockerfile:
FROM haproxy:1.7

MAINTAINER silly <http://github.com/hunterhug>

COPY haproxy.cfg /usr/local/etc/haproxy/haproxy.cfg
docker build -t dhaproxy -f Dockerfile .
2.跑起haproxy
docker run -it --rm --name my-haproxy dhaproxy -f /usr/local/etc/haproxy/haproxy.cfg
haproxy.cfg如下:
#---------------------------------------------------------------------
# Global settings
#---------------------------------------------------------------------
global
    log    127.0.0.1 local2          ###[err warning info debug]
    #chroot  /usr/local/haproxy-1.7.3
    pidfile  /var/run/haproxy.pid   ###haproxy的pid存放路径,启动进程的用户必须有权限访问此文件
    maxconn  4000                   ###最大连接数,默认4000
    daemon                          ###创建1个进程进入deamon模式运行。此参数要求将运行模式设置为"daemon"

#---------------------------------------------------------------------
# common defaults that all the 'listen' and 'backend' sections will
# use if not designated in their block
#---------------------------------------------------------------------
defaults
    #mode   tcp            ###默认的模式,tcp是4层,http是7层,health只会返回OK 若是混合模式则 mode 不需要设置
    log    global           ###采用全局定义的日志
    option  dontlognull     ###不记录健康检查的日志信息
    option  httpclose       ###每次请求完毕后主动关闭http通道
    option  httplog         ###日志类别http日志格式 混合模式 此处还需要加上 tcplog
    #option  forwardfor      ###如果后端服务器需要获得客户端真实ip需要配置的参数,可以从Http Header中获得客户端ip
    option  redispatch      ###serverId对应的服务器挂掉后,强制定向到其他健康的服务器
    timeout connect 10s   #default 10 second timeout if a backend is not found
    timeout client 10s   ###客户端连接超时
    timeout server 10s   ###服务器连接超时
    maxconn     60000       ###最大连接数
    retries     3           ###3次连接失败就认为服务不可用,也可以通过后面设置

########统计页面配置########
listen admin_stats
    # 监听端口
    bind 0.0.0.0:8089
    # 启用状态监控
    stats enable
    mode http
    log global
    # 统计页面URL
    stats uri /stats
    # 统计页面密码框上提示文本
    stats realm Haproxy Statistics
    # 统计页面用户名和密码设置
    stats auth admin:admin
    # 隐藏统计页面上HAProxy的版本信息
    #stats hide-version
    #当通过认证才可管理
    stats admin if TRUE
    #统计页面自动刷新时间
    stats refresh 30s

########GRPC配置#################
listen lb
bind 0.0.0.0:40882
mode tcp
option tcplog
log global
maxconn 3000
balance leastconn
server l-40883 0.0.0.0:40883  weight 1 rise 2 fall 3
server l-40884 0.0.0.0:40884  weight 1 rise 2 fall 3
server l-40885 0.0.0.0:40885  weight 1 rise 2 fall 3
3.启动端口为40883-40885一模一样的服务,然后请求使用Haproxy的监听40882端口,会自动负载均衡.
4.如果要重启gRPC服务,只需一个个替换,因为我们的服务都是docker启动的,所以重启较简单.这样又实现了灰度发布.
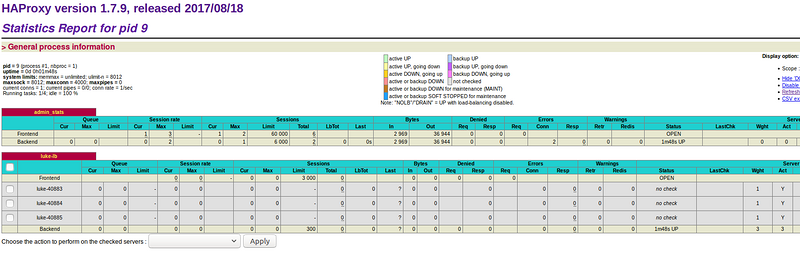
打开http://127.0.0.1:8089/stats,帐号密码:admin,我们可以看到服务情况:
感谢朋友们,因为查了很多资料,都要实现代码, 查看Nginx了文档后,发现现在支持gRPC还不是很好,最后发现TCP支持,Haproxy做得很好.