一:安装
   1. npm install croppie || cnpm install croppie
   2. npm install @types/croppie
二:引入
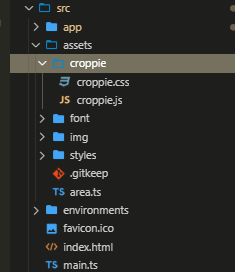
- 在croppie官网,引入croppie.js和croppie.css文件.
2.放到静态资源下(例: 下图).

3.在index.html中引入croppie.css(讲道理在angular.json 中配置一下应该就可以了,但是项目着急,我又是菜鸟.没去研究)
<link rel="stylesheet" href="./assets/croppie/croppie.css">
4.引入croppie
import * as Cropper from 'croppie';
5.按照官网的步骤,实现就可以了
三: 源码
html部分
<div class="actions">
    <button class="file-btn">
        <span> {{cropedSrc? '修改' : '上传'}}图片</span>
        <input type="file" id="upload" value="选择图片文件" accept="image/gif, image/jpeg,, image/png, image/jpg" />
    </button>
    <div id="result" *ngIf="cropedSrc">
        <img style="max- 200px;max-height: 200px;" [src]="cropedSrc">
        <div class="delete-img">
            <i (click)="redImg()" style="cursor: pointer;" nz-icon nzType="eye" nzTheme="outline"></i>
            <i (click)="resetImg()" style="cursor: pointer;margin-left: 10px;" nz-icon nzType="delete" nzTheme="outline"></i>
        </div>
    </div>
</div>

<nz-modal [(nzVisible)]="isVisible" nzTitle="图片裁剪" nzWidth="600" (nzOnCancel)="handleCancel()" (nzOnOk)="handleOk()">
    <div class="crop">
        <div id="upload-demo"></div>
        <div style="display: flex;justify-content: space-between;">
            <button nz-button nzType="default" (click)="rotateLeft()">左旋</button>
            <button nz-button nzType="default" (click)="rotateRight()">右旋</button>
        </div>
    </div>
</nz-modal>

<nz-modal [(nzVisible)]="checkVisible" nzTitle="图片查看" nzWidth="600" (nzOnCancel)="handleCheckCancel()" (nzOnOk)="handleCheckOk()">
    <div class="check-box">
        <img *ngIf="imgShow" [src]="imgShow">
    </div>
</nz-modal>
css部分
.actions button,
.actions a.btn {
    background-color: #F79F42;
    color: white;
    border-radius: 3px;
    border: 1px solid rgba(255, 255, 255, 0.5);
    font-size: 14px;
    cursor: pointer;
    text-decoration: none;
    text-shadow: none;
}

.actions button:focus {
    outline: 0;
}

#upload{
    cursor: pointer;
}

.actions .file-btn {
    position: relative;
     84px;
    height: 36px;
    border-radius: 2px;
    font-size: 14px;
    cursor: pointer;
}

.actions .file-btn input[type="file"] {
    position: absolute;
    top: 0;
    left: 0;
     100%;
    height: 100%;
    opacity: 0;
    cursor: pointer;
}

.actions {
    padding: 5px 0;
}

.actions button {
    margin-right: 5px;
}

#result{
    margin-top: 20px;
    border: 1px solid #eeeeee;
    box-sizing: border-box;
    padding: 10px;
    background: #eee;
    border-radius: 4px;
    position: relative;
}

.crop{
     100%;
    padding-top: 20px;
}

*{
    box-sizing: border-box;
}

#result:hover .delete-img {
    background-color: rgba(0, 0, 0, 0.5);
    color: #fff;
    font-size: 20px;
    opacity: 1;
    transition: all ease 0.2s;
}

.delete-img{
    position: absolute;
    display: flex;
    justify-content: center;
    align-items: center;
    top: 0;
    left: 0;
     100%;
    height: 100%;
    opacity: 0;
}

.check-box{
    display: flex;
    justify-content: center;

    img{
         100%;
    }
}
ts部分
import { Component, OnInit, ElementRef, Output, Input, EventEmitter, SimpleChanges, OnChanges } from '@angular/core';
import { environment } from '@env/environment';
import * as Cropper from 'croppie';
import { NzMessageService } from 'ng-zorro-antd';
import { filter } from 'rxjs/operators';
import { HttpRequest, HttpClient, HttpResponse } from '@angular/common/http';

@Component({
    selector: 'app-image-croppie',
    templateUrl: './image-croppie.component.html',
    styleUrls: ['./image-croppie.component.less']
})
export class ImageCroppieComponent implements OnInit, OnChanges {
    @Output() urlChange = new EventEmitter<any>();
    @Input() urlByDetail: any;

    uploadElement: any;
    croppie: any;
    isVisible = false;
    cropedSrc: any;
    uploadUrl: string;
    tempFile: any;
    checkVisible = false;
    imgSrc: any;
    imgShow: string;

    constructor(private el: ElementRef, private http: HttpClient, private message: NzMessageService, ) {
        this.cropedSrc = null;
        this.imgShow = null;
    }

    redImg() {
        this.imgShow = `${environment.baseUrl.bs}/company/SysObjectStorage/read?fileId=${this.imgSrc}`;
        this.checkVisible = true;
    }

    resetImg() {
        this.imgShow = null;
        this.cropedSrc = null;
        this.urlChange.emit('');
    }

    handleCheckCancel() {
        this.checkVisible = false;
    }

    handleCheckOk() {
        this.checkVisible = false;
    }

    removeAndDestory() {
        this.croppie.destroy();
        this.uploadElement.removeEventListener('change', this.onFileUpload);
        const inputValue: any = document.getElementById('upload');
        inputValue.value = null;
    }

    handleCancel() {
        this.isVisible = false;
        this.removeAndDestory();
    }

    handleOk() {
        this.getCroppieImage();
        this.isVisible = false;
        this.removeAndDestory();
    }

    initCroppie(url) {
        this.croppie = new Cropper(document.getElementById('upload-demo'), {
            viewport: {  200, height: 200, },
            boundary: {  400, height: 300 },
            enableOrientation: true,
            showZoomer: true,
        });
        this.croppie.bind({ url, zoom: 0 });
    }

    initFileUpload() {
        this.uploadElement = document.getElementById('upload');
        console.log(this.uploadElement);

        this.uploadElement.addEventListener('change', this.onFileUpload.bind(this));
    }

    onFileUpload() {
        this.isVisible = true;
        if (this.uploadElement.files && this.uploadElement.files.length > 0) {
            const file = this.uploadElement.files[0];
            const reader = new FileReader();
            this.tempFile = file;
            reader.readAsDataURL(file);
            reader.onload = ((event: any) => {
                this.initCroppie(event.target.result);
                this.uploadUrl = event.target.result;
                this.croppie.bind({ url: event.target.result, orientation: 4 });
            });
        }
    }

    rotateLeft() {
        this.croppie.rotate(90);
    }

    rotateRight() {
        this.croppie.rotate(-90);
    }

    getCroppieImage() {
        this.croppie.result({ size: {  400, height: 400 } }, { type: 'rawcanvas' }).then(res => {
            // 得到二进制流图片,转化为blob格式传给后台
            const arr = res.split(',');
            const mime = arr[0].match(/:(.*?);/)[1];
            const bstr = atob(arr[1]);
            let n = bstr.length;
            const u8arr = new Uint8Array(n);
            while (n--) {
                u8arr[n] = bstr.charCodeAt(n);
            }
            const imgFile: any = new Blob([u8arr], {
                type: mime,
            });

            imgFile.name = this.tempFile.name;
            this.popupResults({ src: res });
            this.handleUpload({ file: imgFile });
            // yourCroppieReference.result('canvas','original','png',1) 低质量图片旋转之后裁剪可能出现白边
        });
    }

    popupResults(result) {
        if (result.src) {
            this.cropedSrc = result.src;
        }
    }

    handleUpload = (item) => {
        const formData = new FormData();
        formData.append('file', item.file, item.file.name);
        const host = environment.baseUrl.bs + 'company/SysObjectStorage/upload';
        this.postData(item, host, formData);
    }

    postData(item, host, formData) {
        const req = new HttpRequest('POST', host, formData, { reportProgress: true });
        this.http.request(req).pipe(filter(e => e instanceof HttpResponse)).subscribe((event: any) => {
            this.message.success('上传成功');
            this.imgSrc = event.body.value;
            this.urlChange.emit(this.imgSrc);
        }, (err) => {
            console.log('upload fail');
        });
    }

    ngOnInit() {
        this.initFileUpload();
    }

    ngOnChanges(changes: SimpleChanges): void {
        if (changes.urlByDetail !== undefined) {
            this.cropedSrc = changes.urlByDetail.currentValue;
            this.imgSrc = changes.urlByDetail.currentValue.substr(changes.urlByDetail.currentValue.indexOf('=') + 1);
        }
    }
}
备注: 因为此项目多出用到改功能,所以当组件封装起来.
angular新手,不喜勿喷..