Spring boot 将很多东西都集成在一起了,搭建maven项目的时候只需要引入很少的依赖就可以实现项目的搭建。
1.搭建maven项目结构
2.引入Spring boot 依赖 直接去官网找就可以了,还有例子说明
3.pom.xml 导入依赖包,最开始用的1.5.10的版本不知道为啥main方法启动的时候tomcat无法启动,后来换了版本就可以了
<dependencies>
        <dependency>
            <groupId>org.springframework.boot</groupId>
            <artifactId>spring-boot-starter-web</artifactId>
            <version>1.5.7.RELEASE</version>
        </dependency>
    </dependencies>
4.main方法启动Spring boot 启动类始用 @SpringBootApplication 注解
package di.bao;

import org.springframework.boot.SpringApplication;
import org.springframework.boot.autoconfigure.SpringBootApplication;

@SpringBootApplication
public class FirstAPP {

    public static void main(String[] args) {
        SpringApplication.run(FirstAPP.class, args);

    }

}
5.tomcat启动之后就可以直接访问了,直接访问8080端口会出现错误页面,编写一个controller,始用@Controller 注解,访问8080/nihao,页面出现方法返回值。
package di.bao;

import org.springframework.stereotype.Controller;
import org.springframework.web.bind.annotation.GetMapping;
import org.springframework.web.bind.annotation.ResponseBody;

@Controller
public class NiController {
    @GetMapping("/nihai")
    @ResponseBody
    public String hello() {
        return "shi jie ni hao!";
    }
}
6.rest接口,返回josn 格式字符串 :创建一个类,编写controller,访问http://localhost:8080/student/1 ,页面:{"name":"zhangsan","id":1}
package di.bao;

public class Student {

    private String  name;
    private int id;

    public Student() {

    }
    public String getName() {
        return name;
    }
    public void setName(String name) {
        this.name = name;
    }
    public int getId() {
        return id;
    }
    public void setId(int id) {
        this.id = id;
    }


}
package di.bao;

import org.springframework.http.MediaType;
import org.springframework.stereotype.Controller;
import org.springframework.web.bind.annotation.PathVariable;
import org.springframework.web.bind.annotation.RequestMapping;
import org.springframework.web.bind.annotation.RequestMethod;
import org.springframework.web.bind.annotation.ResponseBody;
@Controller
public class JosnController {
    /**
     * value 路径   method 访问方法  produces 产出什么
     * @param id
     * @return
     */
    @RequestMapping(value = "/student/{id}", method = RequestMethod.GET,
        produces = MediaType.APPLICATION_JSON_VALUE)
    @ResponseBody
    public Student hello(@PathVariable int id) {
        Student student = new Student();
        student.setId(id);;
        student.setName("zhangsan");
        return student;
    }
}
7.spring boot启动方式:
1.main方法启动
2.mvn intall编译成jar包后 java -jar xxxx.jar启动
3.项目目录下执行mvn spring-boot:run
注意:再次使用main方法启动的时候一定要先将上一次启动的先关闭,否则会出现端口占用出现java.net.BindException: Address already in use: bind 异常。
命令行:netstat -ano|findstr "8080"

命令行:输入tasklist 查看11000是哪个进程

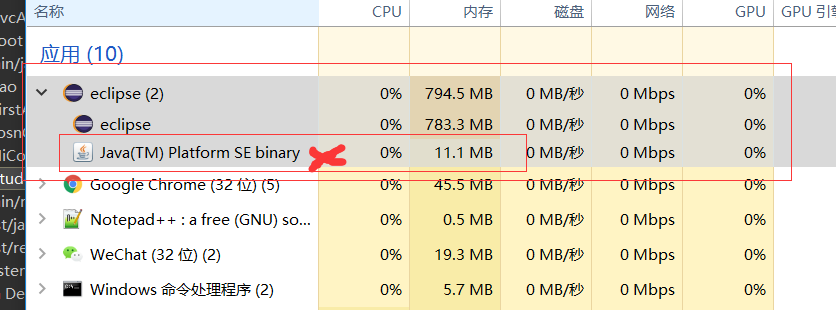
win7的话直接在任务管理器里面把占用端口的程序关掉就可以了。
由于系统换了win10,win10的任务管理器有点不一样,找了半天也没找到这个进程,索性把java相关的 都关掉了,结果还是没用,
后来发现在应用 eclipse下面还有一个java有关的,关掉那个就可以正常重启了