Quickstart
We're going to create a simple API to allow admin users to view and edit the users and groups in the system.
我们将建立一个简单的API例子,只有超级用户admin才能查看和编辑系统的用户和用户组信息。
Project setup
Create a new Django project named tutorial, then start a new app called quickstart.
建立一个名为tutorial的新的Django工程,然后在该工程中创建一个名为 quickstat 的新app。
# Set up a new project
django-admin.py startproject tutorial
cd tutorial

# Create a virtualenv to isolate our package dependencies locally
virtualenv env
source env/bin/activate  # On Windows use `envScriptsactivate`# Install Django and Django REST framework into the virtualenv
pip install django
pip install djangorestframework

# Create a new app
python manage.py startapp quickstart
Next you'll need to get a database set up and synced. If you just want to use SQLite for now, then you'll want to edit your tutorial/settings.py module to include something like this:
接下来需要设置并同步数据库。如果仅仅使用SQLite,需要像下面那样去编辑文件 tutorial/settings.py:
DATABASES ={'default':{'ENGINE':'django.db.backends.sqlite3','NAME':'database.sql','USER':'','PASSWORD':'','HOST':'','PORT':''}}
The run syncdb like so:
同步数据库:
python manage.py syncdb
Once you've set up a database and got everything synced and ready to go, open up the app's directory and we'll get coding...
一旦设置同步好数据库,我们就可以在app的目录下面编码了。
Serializers
序列化器
First up we're going to define some serializers in quickstart/serializers.py that we'll use for our data representations.
首先定义一些序列化器用来呈现我们的数据,编辑文件 quickstart/serializer.py如下:
from django.contrib.auth.models importUser,Groupfrom rest_framework import serializers


class UserSerializer(serializers.HyperlinkedModelSerializer):
  classMeta:
        model =User
        fields =('url','username','email','groups')
class GroupSerializer(serializers.HyperlinkedModelSerializer):
  classMeta:
        model =Group
        fields =('url','name')
Notice that we're using hyperlinked relations in this case, with HyperlinkedModelSerializer. You can also use primary key and various other relationships, but hyperlinking is good RESTful design.
注意这里我们使用的是超级链接关系 HyperlinkedModelSerializer。你也可以使用主键和其他关系,但是超级链接是非常 RESTful 的设计。
Views
视图
Right, we'd better write some views then. Open quickstart/views.py and get typing.
在 quickstart/views.py 中编写视图函数。
from django.contrib.auth.models importUser,Groupfrom rest_framework import viewsets
from quickstart.serializers importUserSerializer,GroupSerializer

class UserViewSet(viewsets.ModelViewSet):

  """
    API endpoint that allows users to be viewed or edited.
    """
    queryset =User.objects.all()
    serializer_class =UserSerializer

class GroupViewSet(viewsets.ModelViewSet):

  """
    API endpoint that allows groups to be viewed or edited.
    """
    queryset =Group.objects.all()
    serializer_class =GroupSerializer
Rather than write multiple views we're grouping together all the common behavior into classes called ViewSets.
比起写多个视图函数,我们宁愿写一个,把所有的行为写到一个 ViewSets 的类中,这样更加有组织,更加简明。
Notice that our viewset classes here are a little different from those in the frontpage example, as they include queryset and serializer_class attributes, instead of a model attribute.
注意,这里的 ViewSet 类跟之前的 frontpage example 有点不一样,这里的ViewSet 类中包含 queryset 和 serializer_class 属性,在frontpage example 中是一个model属性。
For trivial cases you can simply set a model attribute on the ViewSet class and the serializer and queryset will be automatically generated for you. Setting the queryset and/or serializer_class attributes gives you more explicit control of the API behaviour, and is the recommended style for most applications.
在一些简单的 ViewSet 类中,你可以简单地设置一个model属性, queryset 和 serializer_class 属性会自动地产生。设置queryset 和(或者) serializer_class 属性可以显示地控制API的行为,这也是大多数应用所推崇的方式。
URLs
URL 配置
Okay, now let's wire up the API URLs. On to tutorial/urls.py...
现在配置 API 的URLs,在 tutorial/urls.py 中添加如下代码:
from django.conf.urls import patterns, url, include
from rest_framework import routers
from quickstart import views

router = routers.DefaultRouter()
router.register(r'users', views.UserViewSet)
router.register(r'groups', views.GroupViewSet)

# Wire up our API using automatic URL routing.使用自动 URL 调度
# Additionally, we include login URLs for the browseable API. 另外,为可浏览 API 包含登录 URLs

urlpatterns = patterns('',
    url(r'^', include(router.urls)),
    url(r'^api-auth/', include('rest_framework.urls', namespace='rest_framework')))
Because we're using viewsets instead of views, we can automatically generate the URL conf for our API, by simply registering the viewsets with a router class.
Again, if we need more control over the API URLs we can simply drop down to using regular class based views, and writing the URL conf explicitly.
Finally, we're including default login and logout views for use with the browsable API. That's optional, but useful if your API requires authentication and you want to use the browsable API.
由于我们使用 ViewSet 类 而不是视图函数, 通过一个 router 类注册 ViewSet 类就可以为 API 自动产生 URL 的配置。
如果我们需要更多地控制 API URL,我们可以放弃这种方式,而是显示地编写 URL 配置。
最后,我们为可浏览的 API包含默认的登录和登出视图, 这是可选的, 但是如果 API 需要认证,就得这样做。
Settings
We'd also like to set a few global settings. We'd like to turn on pagination, and we want our API to only be accessible to admin users. The settings module will be in tutorial/settings.py
我们必须配置一些全局设置,开启分页机制和配置API的访问权限,此处只有超级用户 admin 可以使用API。在 tutorial/settings.py 设置如下:
INSTALLED_APPS =(...'rest_framework',)

REST_FRAMEWORK ={'DEFAULT_PERMISSION_CLASSES':('rest_framework.permissions.IsAdminUser',),'PAGINATE_BY':10}
好了,做完了。
Testing our API
测试 API
We're now ready to test the API we've built. Let's fire up the server from the command line.
在工程的根目录中开启服务:
python ./manage.py runserver
We can now access our API, both from the command-line, using tools like curl...
使用 curl 工具访问 API:
curl -H 'Accept: application/json; indent=4'-u admin:password http://127.0.0.1:8000/users/

{
    "count":2,
    "next": null,"
    previous": null,"
    results":
  [
      {"email":"admin@example.com","groups":[],"url":"http://127.0.0.1:8000/users/1/","username":"admin"},
      {"email":"tom@example.com","groups":[],"url":"http://127.0.0.1:8000/users/2/","username":"tom"}
    ]
}
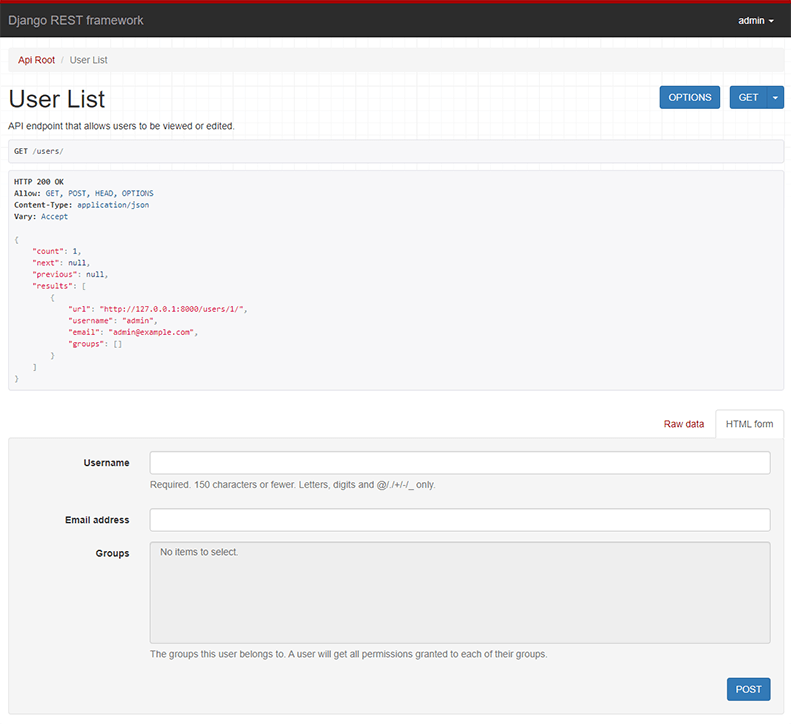
Or directly through the browser...
或者直接在浏览器中查看:
http://127.0.0.1:8000/users/
If you want to get a more in depth understanding of how REST framework fits together head on over to the tutorial, or start browsing the API guide.
如果你想进一步理解 REST 框架,访问the tutorial 或者 API guide。