C#知识点:
1.sendtoback()和bringtofront()
如下的代码:
 button2.Dock = DockStyle.Top;
 button1.SendToBack();
 button1.Dock = DockStyle.Top;
 button3.Dock = DockStyle.Bottom;
运行后,3个button的顺序始终为:
button1
button2
button3
如果代码改为:
 button2.Dock = DockStyle.Top;
 button1.Dock = DockStyle.Top;
 button3.Dock = DockStyle.Bottom;

运行后,3个button的顺序始终为:
button2
button1
button3

SendToBack() 将控件移到 Z 顺序的后面。
BringToFront()将控件移到 Z 顺序的前面。
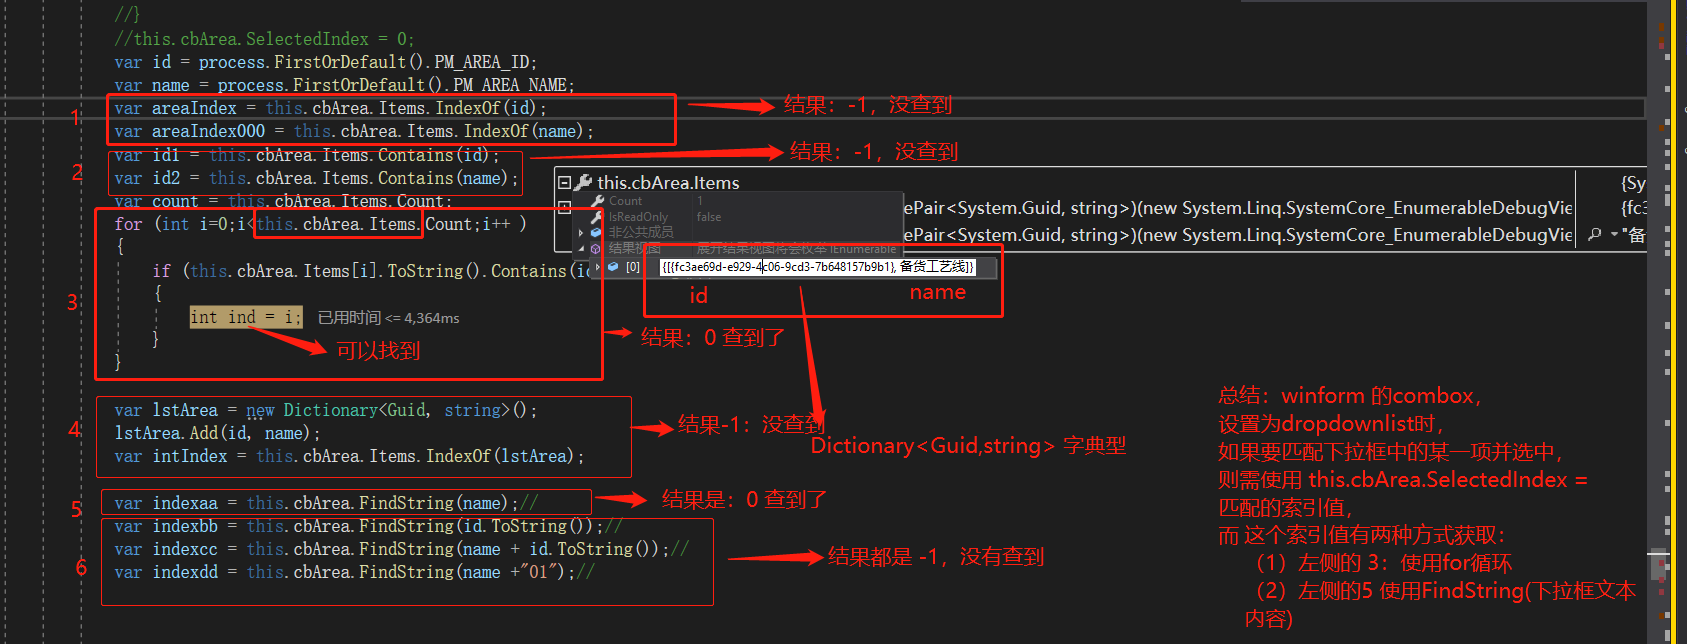
2.ComBox下拉框匹配某一项并选中
附winform示例代码:
public partial class Form1 : Form
{
    public Form1()
    {
        InitializeComponent();
    }

    private void button1_Click(object sender, EventArgs e)
    {
        string searchText = textBox1.Text;
        int index = comboBox1.FindString(searchText);
        if (index < 0)
        {
            MessageBox.Show("Not Found");
            return;
        }
        Listitem searchItem = comboBox1.Items[index] as Listitem;
        MessageBox.Show(searchItem.ToString());
    }

    private void Form1_Load(object sender, EventArgs e)
    {
        List<Listitem> data = new List<Listitem>();
        for (int i = 0; i < 10; i++)
            data.Add(new Listitem { name = string.Format("COM{0:D}", i + 1), com = i + 1 });
        comboBox1.DataSource = data;
        comboBox1.DisplayMember = "name";
        comboBox1.ValueMember = "com";
    }
}

class Listitem
{
    public string name { get; set; }
    public int com { get; set; }
    public override string ToString()
    {
        return name;
    }
}
3.C# 中 pictureBox.Image的获得图片路径的三种方法
1.绝对路径:
this.pictureBox.Image=Image.FromFile("C:\test.jpg");

2.相对路径:
Application.StartupPath;
可以得到程序根目录
this.pictureBox.Image=Image.FromFile(Application.StartupPath "\test.jpg");

3.获得网络图片的路径

string url="http://img.zcool.cn/community/01635d571ed29832f875a3994c7836.png@900w_1l_2o_100sh.jpg";
this.pictureBox.Image= Image.FromStream(System.Net.WebRequest.Create(url).GetResponse().GetResponseStream());
4.C#利用Picturebox控件显示图片
借鉴看看:https://blog.csdn.net/liyuqian199695/article/details/54098938/
5.c# 生成下部带文字的二维码
public class QrCodeUtil
    {

        /*qrcode 使用方法
        1.引用【右击】->管理NuGet程序包->搜索‘qrcode’ ->安装 QrCode.net
        2.引入下列命名空间
            using Gma.QrCodeNet.Encoding;
            using Gma.QrCodeNet.Encoding.Windows.Render;
            using System.Drawing.Imaging;
            using System.IO;
            using System.Drawing;

        */

        //目前只支持英文  content-需生成二位的字符串    fileName-文件绝对位置及文件名(png文件)
        public static void createQrCode(String content, String fileName)
        {
            QrEncoder qrEncoder = new QrEncoder(ErrorCorrectionLevel.M);
            QrCode qrCode = qrEncoder.Encode(content);

            GraphicsRenderer render = new GraphicsRenderer(new FixedModuleSize(20, QuietZoneModules.Two), Brushes.Black, Brushes.White);
            using (FileStream stream = new FileStream(fileName, FileMode.Create))
            {
                render.WriteToStream(qrCode.Matrix, ImageFormat.Png, stream);
                stream.Close();
            }

            addText(content, fileName);
        }

        private static void addText(String name, String fileName)
        {
            Font font = new Font("GB2312", 14, FontStyle.Regular);//设置字体,大小,粗细
            SolidBrush sbrush = new SolidBrush(Color.Black);//设置颜色

            try
            {
                Bitmap im = new Bitmap(fileName);
                Bitmap bmp = new Bitmap(300, 340); //定义图片大小
                Graphics g = Graphics.FromImage(bmp);
                g.Clear(Color.White);
                g.DrawString(name, font, sbrush, new PointF((Int32)(bmp.Width - name.Length * 10.8) / 2, bmp.Height - 40));

                // 合并位图
                g.DrawImage(im, new Rectangle(0, 0, 300, 300));
                im.Dispose();

                bmp.Save(fileName, ImageFormat.Png);
                g.Dispose();
                bmp.Dispose();
            }
            catch
            {

            }

        }
    }
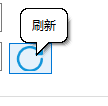
6.为按钮添加提示信息
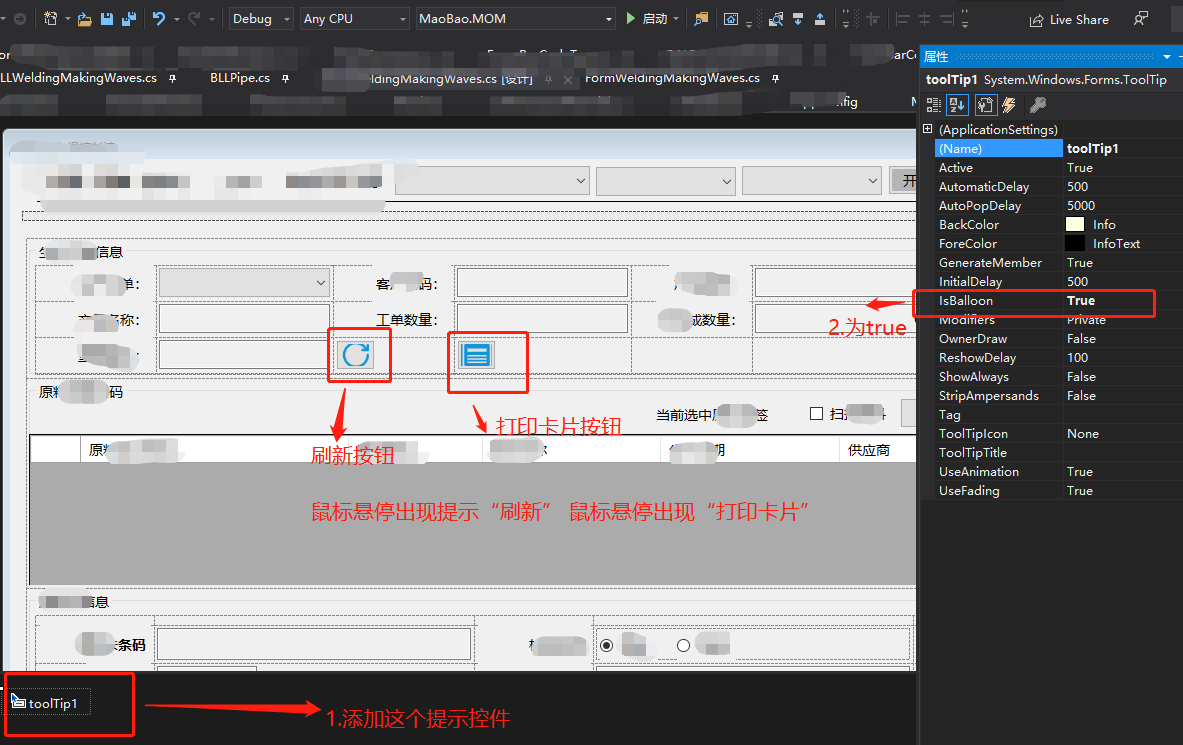

效果图:
附录:这个链接上面讲了3种添加方式,供参考:https://blog.csdn.net/wu_pan123/article/details/77479016
* 1
在界面设计中添加toolTip控件toolTip1,设置toolTip1的属性中IsBalloon为true,设置按钮button1的属性中toolTip1的值为“测试”
* 2
在界面设计中添加toolTip控件toolTip1,在程序设计中加入
            toolTip1.IsBalloon = true;
            toolTip1.SetToolTip(this.button1 , "测试");
* 3
7.datagridview清空数据
C# DataGridView控件绑定数据后清空数据
在清除DataGridview的数据时:
1.DataSource为NULL(DataGridView.DataSource= null;)这样会将DataGridView的列也删掉。

2.使用Datatable.Clear()方法请空控件数据(此方法不会清除设计时写好的列名)

DataTable table=(DataTable)DataGridView.Source;

Table.Clear();

DataGridView.Source=Table

3.使用循环进行清空

while(this.datagridview1.rows.count!=0)
{

this.DataGridView.Rows.RemoveAt(0);
}
8.datagridview遍历
- 方法1
你可以通过设PrimaryKey来实现.
把字段3设为PrimaryKey.这样如果输入有重复的就回报错
例:
DataTable m_dtValue = new DataTable();
            DataColumn column = new DataColumn();
            column.DataType = System.Type.GetType("System.String");
            column.ColumnName = "A";
            m_dtValue.Columns.Add(column);
            m_dtValue.Columns.Add("B");
            m_dtValue.Columns.Add("C");
            m_dtValue.Columns.Add("D");
            DataColumn[] keys = new DataColumn[1];
            keys[0] = column;

            m_dtValue.PrimaryKey = keys;
然后dgvSubCategoryInfo与m_dtValue绑定就可以了
- 方法2
foreach (DataGridViewRow v in dataGridView1.Rows)
            {
                if (v.Cells[0].Value != null)
                {
                    var count = 0;
                    foreach (DataGridViewRow v2 in dataGridView1.Rows)
                    {
                        if (v2.Cells[0].Value != null)
                        {
                            if (v.Cells[0].Value.ToString().Equals(v2.Cells[0].Value.ToString()))
                                count++;
                        }
                    }
                    if (count > 1)
                    {
                        MessageBox.Show("第1列有重复,重复的内容是:【" + v.Cells[0].Value + "】");
                        return;
                    }
                }
            }
- 方法3
 private void dataGridView1_CellValueChanged(object sender, DataGridViewCellEventArgs e)
        {
            int count = this.dataGridView1.Rows.Count;

            if (count > 1 && dataGridView1.CurrentCell.RowIndex>0)
            {

                if (this.dataGridView1.CurrentCell.ColumnIndex == 1)
                {
                    for (int i = 0; i <this .dataGridView1.CurrentCell .RowIndex ; i++)
                    {
                        if (this.dataGridView1.Rows[i].Cells[1].Value.ToString() == this.dataGridView1.Rows [this .dataGridView1 .CurrentCell .RowIndex ].Cells [1].Value .ToString ())
                        {
                            MessageBox.Show("此值重复了!!!","提示");
                            break;
                        }
                    }
                }
            }
        }
9.datagridview显示行号
- 方法1:针对datagridview中没有序号这一列

 /// <summary>
        /// 显示行号
        /// </summary>
        /// <param name="sender"></param>
        /// <param name="e"></param>
        private void dgvMaterial_RowPostPaint(object sender, DataGridViewRowPostPaintEventArgs e)
        {
            #region 方法1 无序号列名
            Rectangle rectangle = new Rectangle(e.RowBounds.Location.X,
            e.RowBounds.Location.Y,
            dgvMaterial.RowHeadersWidth - 4,
            e.RowBounds.Height);
            TextRenderer.DrawText(e.Graphics, (e.RowIndex + 1).ToString(),
            dgvMaterial.RowHeadersDefaultCellStyle.Font,
            rectangle,
            dgvMaterial.RowHeadersDefaultCellStyle.ForeColor,
            TextFormatFlags.VerticalCenter | TextFormatFlags.Right);
            #endregion

            #region 2.已经有"序号"列名
            //foreach (DataGridViewRow row in dgvMaterial.Rows)
            //{
            //    row.Cells[1].Value = row.Index + 1;//序号列
            //}
            #endregion
        }
- 方法2:针对datagridview中有序号这一列

10.父窗体上面弹出子窗体及父子窗体传值
本次示例效果如下:
Form1为父窗体(包含textBox1、button1)
Form2为子窗体(包含textBox2、button2)

父窗体给子窗体传值
==================
1.点击Form1的button1 打开Form2
  父窗体给子窗体传值 可以调用重载子窗体的构造函数 直接传入相关数值

    public partial class Form1 : Form
    {
        public Form1()
        {
            InitializeComponent();
        }

        private void button1_Click(object sender, EventArgs e)
        {
            Form2 frm2 = new Form2(this.textBox1.Text);
            frm2.Show();
        }
    }

    public partial class Form2 : Form
    {
        public Form2()
        {
            InitializeComponent();
        }

        public Form2(string strTextBox1Text)
        {
            InitializeComponent();
            this.textBox2.Text = strTextBox1Text;
        }
    }

2.点击Form1的button1 打开Form2
  并调用子窗体Form2的公开属性或方法 将Form1的textBox1的值设置给Form2的textBox2

    public partial class Form1 : Form
    {
        public Form1()
        {
            InitializeComponent();
        }

        private void button1_Click(object sender, EventArgs e)
        {
            Form2 frm2 = new Form2();
            frm2.TextBox2Text = this.textBox1.Text;
            frm2.Show();
        }
    }

    public partial class Form2 : Form
    {
        public Form2()
        {
            InitializeComponent();
        }

        public string TextBox2Text
        {
            set { this.textBox2.Text = value; }
            get { return this.textBox2.Text; }
        }
    }

3.点击Form1的button1 打开Form2
  在Form2_Load调用父窗体Form1的公开属性或方法 将Form1的textBox1的值设置给Form2的textBox2

    public partial class Form1 : Form
    {
        public Form1()
        {
            InitializeComponent();
        }

        public string TextBox1Text
        {
            set { this.textBox1.Text = value; }
            get { return this.textBox1.Text;  }
        }

        private void button1_Click(object sender, EventArgs e)
        {
            Form2 frm2 = new Form2();
            frm2.Show(this);//或 frm2.ShowDialog(this);

            ////或者
            //Form2 frm2 = new Form2();
            //frm2.Owner = this;
            //frm2.Show();//或 frm2.ShowDialog();
        }
    }
    public partial class Form2 : Form
    {
        public Form2()
        {
            InitializeComponent();
        }

        private void Form2_Load(object sender, EventArgs e)
        {
            Form1 frm1 = (Form1)this.Owner;
            this.textBox2.Text = frm1.TextBox1Text;
        }
    }

子窗体给父窗体传值
==================
4.点击Form1的button1 打开Form2
  再点击Form2的button2
    在button2_Click事件中 通过this.Owner将Form2的textBox2的值设置给Form1的textBox1
    并关闭Form2

    public partial class Form1 : Form
    {
        public Form1()
        {
            InitializeComponent();
        }

        private void button1_Click(object sender, EventArgs e)
        {
            Form2 frm2 = new Form2();
            frm2.Show(this);//或 frm2.ShowDialog(this);

            ////或者
            //Form2 frm2 = new Form2();
            //frm2.Owner = this;
            //frm2.Show();//或 frm2.ShowDialog();
        }
    }

    public partial class Form2 : Form
    {
        public Form2()
        {
            InitializeComponent();
        }

        private void button2_Click(object sender, EventArgs e)
        {
            Form1 frm1 = (Form1)this.Owner;
     //注意 如果textBox1是放在panel1中的 则先找panel1 再找textBox1
            ((TextBox)frm1.Controls["textBox1"]).Text = this.textBox2.Text;
            this.Close();
        }
    }

5.点击Form1的button1 打开Form2
  再点击Form2的button2
    在button2_Click事件中 通过this.Owner及调用父窗体Form1的公开属性或方法
                          将Form2的textBox2的值设置给Form1的textBox1
    并关闭Form2

    public partial class Form1 : Form
    {
        public Form1()
        {
            InitializeComponent();
        }

        public string TextBox1Text
        {
            set { this.textBox1.Text = value; }
            get { return this.textBox1.Text;  }
        }

        private void button1_Click(object sender, EventArgs e)
        {
            Form2 frm2 = new Form2();
            frm2.Show(this);//或 frm2.ShowDialog(this);

            ////或者
            //Form2 frm2 = new Form2();
            //frm2.Owner = this;
            //frm2.Show();//或 frm2.ShowDialog();
        }
    }

    public partial class Form2 : Form
    {
        public Form2()
        {
            InitializeComponent();
        }

        private void button2_Click(object sender, EventArgs e)
        {
           #region 弹出子窗体,且子窗体在父窗体上(先设置父窗体的属性:IsMdiContainer 为True)
            //subForm subForm0 = new subForm();
            //subForm0.MdiParent = this;
            //subForm0.Show();
            #endregion

            #region  弹出子窗体,且子窗体可以不在父窗体上(这种设置父窗体的属性:IsMdiContainer 为True)
            subForm subForm = new subForm();
            subForm.Show(this);
            #endregion
        }
    }
11.【Winform-自定义控件】自定义Tab Control 带关闭符号(X)的标签页
https://www.cnblogs.com/Sukie-s-home/p/6520683.html
12.C# Winform控件动态删除
转自:https://www.cnblogs.com/kris-wang/p/12208192.html
在实现控件动态删除过程中只能删除一半,具体代码如下:

foreach (var control in from ctls in controlUtility.GetControls(panel1)
    where ctls.Name.StartsWith("BtnTable")
    select ctls)
{
    panel1.Controls.Remove(control);
    control.Dispose();
}

然后就到StackOverflow和CSDN查询,最后找到了下面的方法
就是先将所有控件取出暂存在一个List里面然后再一一遍历删除

 var controls = from ctls in controlUtility.GetControls(panel1)
    where ctls.Name.StartsWith("BtnTable")
    select ctls;

foreach (var control in controls.ToList())
{
    panel1.Controls.Remove(control);
    control.Dispose();
}