说明
Ansible是一个python编写模型驱动的配置管理器,支持多节点发布、远程任务执行。默认使用 SSH 进行远程连接。无需在被管理节点上安装附加软件,可使用各种编程语言进行扩展。本文基于ansible 2.3.2.0版本
架构
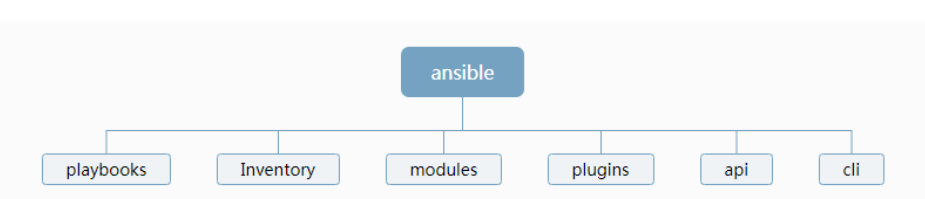
工作原理
使用Ansible或Ansible-playbooks时,在服务器终端输入Ansible的Ad-Hoc命令集或palybook后,Ansible会遵循预先编排的规则将Playbooks逐条拆解为Play,再将paly组织成Ansible可识别的任务(Task),随后调用任务涉及的所有模块(modules)和插件(plugins),根据Inventory中定义的主机列表通过SSH将任务集以临时文件或命令的形式传输到远程客户端执行并返回执行结果,如果是临时文件,则执行完毕后自动删除。
配置文件
ansible配置文件为ansible.cfg,一般在/etc/ansible/目录下,默认的获取顺序为
1. ANSIBLE_CONFIG (一个环境变量)
2. ansible.cfg (位于当前目录中)
3. ansible.cfg (位于家目录中)
4. /etc/ansible/ansible.cfg
简易配置
hostfile    = /etc/ansible/hosts   //hosts文件的位置
 library      = /usr/share/ansible //ansible默认搜寻模块的位置
 pattern     = *  //如果没有提供hosts节点,这是playbook要通信的默认主机组.默认值是对所有主机通信
 remote_tmp  = $HOME/.ansible/tmp   //Ansible通过远程传输模块到远程主机,然后远程执行,执行后在清理现场.在有些场景下,你也许想使用默认路径希望像更换补丁一样使用
 forks   = 5    //在与主机通信时的默认并行进程数 ,默认是5d
 poll_interval  = 15  //当具体的poll interval 没有定义时,多少时间回查一下这些任务的状态, 默认值是5秒
 sudo_user  = root   //sudo使用的默认用户 ,默认是root
 #ask_sudo_pass = True   //用来控制Ansible playbook 在执行sudo之前是否询问sudo密码.默认为no
 #ask_pass    = True    //控制Ansible playbook 是否会自动默认弹出密码
 transport   = smart   //通信机制.默认 值为’smart’。如果本地系统支持 ControlPersist技术的话,将会使用(基于OpenSSH)‘ssh’,如果不支持将使用‘paramiko’.其他传输选项‘local’,‘chroot’,’jail’等等
 #remote_port  = 22    //远程SSH端口。 默认是22
 module_lang   = C   //模块和系统之间通信的计算机语言,默认是C语言
 #host_key_checking = False    //检查主机密钥
 timeout = 10    //SSH超时时间
 #log_path = /var/log/ansible.log     //日志文件存放路径
 #module_name = command     //ansible命令执行默认的模块
 #private_key_file = /path/to/file     //私钥文件存储位置
除以上参数外,ssh连接相关的参数(如host_key_checking)也在该文件中修改。详细配置信息可查看官方示例
ansible常用命令
ansible
ansible是指令核心部分,其主要用于执行ad-hoc命令,即单条命令。默认后面需要跟主机和选项部分,默认不指定模块时,使用的是command模块。
选项说明
option 说明
|
-v |
详细信息输出 |
|
-i |
指定inventory的目录,缺省会使用/etc/ansible/hosts |
|
-f |
fork的进程个数,默认是5 |
|
–private-key=xxx |
指定ssh连接用的文件 |
|
-m |
指定module |
|
–module-name |
–module-name 指定module名称 |
|
–module-path |
–module-path 指定module的path 默认是/usr/share/ansible |
|
-a |
指定module的参数 |
|
-k |
提示输入password |
|
-K |
提示输入sudo密码 与–sudo一起使用 |
|
-T |
设定连接超时时长 |
|
-B |
设定后台运行并设定超时时长 |
|
-c |
设定连接类型 有ssh或者local等。 |
|
-b |
su的方式,可以指定用户 |
|
-C |
only for check |
|
-t |
将输出结果以主机名的形式保存在指定目录, -t /tmp |
实例
ansible test -m ping
ansible-doc
该指令用于查看模块信息,常用参数有两个-l 和 -s
ansible-doc -l # 列出所有已安装的模块
ansible-doc -s command # 查看具体某模块的用法,这里如查看command模块
ansible-galaxy
ansible-galaxy 指令用于方便的从https://galaxy.ansible.com/ 站点下载第三方扩展模块,我们可以形象的理解其类似于centos下的yum、python下的pip或easy_install
ansible-galaxy install aeriscloud.docker
downloading role ‘docker’, owned by aeriscloud
downloading role from https://github.com/AerisCloud/ansible-docker/archive/v1.0.0.tar.gz
extracting aeriscloud.docker to /etc/ansible/roles/aeriscloud.docker
aeriscloud.docker was installed successfully
ansible-lint
ansible-lint是对playbook的语法进行检查的一个工具。用法是ansible-lint playbook.yml 。
ansible-playbook
该指令是使用最多的指令,其通过读取playbook 文件后,执行相应的动作,详见ansible-playbook部分
ansible-pull
该指令使用需要谈到ansible的另一种模式–pull 模式,适用于大规模机器场景
ansible-vault
ansible-vault主要应用于配置文件中含有敏感信息,主要对于playbooks里比如涉及到配置密码或其他变量时,这种playbook文件在执行时,需要加上 –ask-vault-pass参数,需要输入密码后才能正常执行
Inventory和变量说明
Inventory
Ansible 可同时操作属于一个组的多台主机,组和主机之间的关系通过 inventory 文件配置. 默认的文件路径为 /etc/ansible/hosts
hosts文件示例
[webservers]
foo.example.com
bar.example.com

[dbservers]
one.example.com
two.example.com
three.example.com
主机变量
[atlanta]
host1 http_port=80 maxRequestsPerChild=808
host2 http_port=303 maxRequestsPerChild=909
组变量
[atlanta]
host1
host2

[atlanta:vars]
ntp_server=ntp.atlanta.example.com
proxy=proxy.atlanta.example.com
常用主机变量
ansible_user # ssh用户
ansible_ssh_pass # 密码
ansible_port # ssh端口
ansible_become # true or false,是否切换用户
ansible_become_method # 切换用户使用的方法,如sudo、su
ansible_become_user # 要切换的用户
ansible_become_pass # 切换用户是需要的密码
全局变量
ansible全局变量在group_vars/all文件中,在该文件中设置的变量,在任何地方都可以使用
示例:
listen_port: "80"
# 可使用列表或字典
packages_base:
  - MySQL-server-5.6.21-1.el6.x86_64.rpm
  - MySQL-client-5.6.21-1.el6.x86_64.rpm
mysql_databases:
    - name: 'test1'
    - name: 'test2'
其它常用内置变量
role_path # role的路径
playbooks
编排定义Ansible任务集的配置文件,由Ansible顺序依次执行,通常是json格式的YML文件。示例:
- hosts: 'test'
  roles:
      - nginx
roles
ansible的roles用于层次性、结构化地组织palybook。roles能够根据层次型结构自动装载变量文件、tasks及handlers等。要使用roles只需要playbook中使用include指令
roles组成
└── nginx  \角色名称
    ├── default  \为当前角色设定默认变量时使用此目录,应当包含一个main.yml文件;
    ├── files  \存放有copy或script等模块调用的文件
    ├── handlers \此目录总应当包含一个main.yml文件,用于定义各角色用到的各handler
    ├── meta \应当包含一个main.yml,用于定义角色的特殊设定及其依赖关系;1.3及以后版本支持
    ├── tasks \至少包含一个名为main.yml的文件,定义了此角色的任务列表,可使用include指令
    ├── templates \template模块会自动在此目录中寻找Jinja2模板文件
    └── vars  \应当包含一个main.yml文件,用于定义此角色用到的变量
示例
nginx/
├── default
├── files
│   └── nginx.conf.bak
├── handlers
│   └── main.yml
├── meta
├── tasks
│   ├── config.yml
│   ├── install.yml
│   ├── main.yml
│   └── stop.yml
├── templates
│   └── nginx.conf.j2
└── vars
    └── main.yml
nginx.yml
- hosts: test
  gather_facts: no
  roles:
    - nginx
main.yml
- include: install.yml
- include: config.yml
- include: stop.yml
循环
- hosts: test
  tasks:
    - name: create file
      file: dest=/tmp/{{ item }} state=touch
      with_items:
        - 1.txt
        - 2.txt

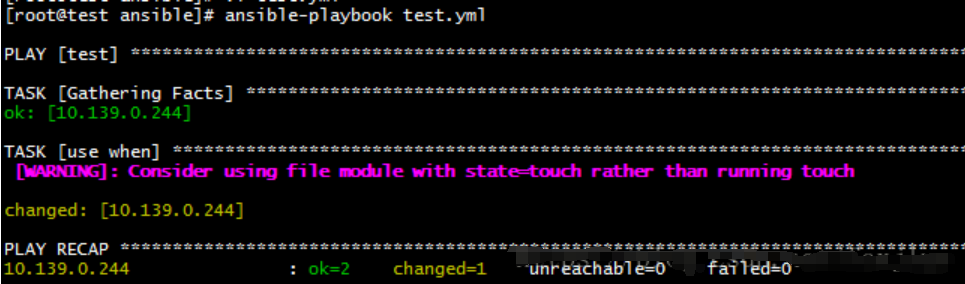
判断
- hosts: test
  gather_facts: yes
  tasks:
    - name: use when
      shell: touch /tmp/when.txt
      when:  ansible_distribution == "CentOS"
handlers
handlers 的目的是在执行完成 tasks 之后,还需要进行其他的操作时,使用 handlers。只有在 tasks 执行成功之后,handlers 才会生效
- hosts: test
  tasks:
    - name: test copy
      copy: src=/tmp/1.txt dest=/root/1.txt
      notify: test handlers
  handlers:
    - name: test handlers
      shell: echo "handles" >> /root/1.txt

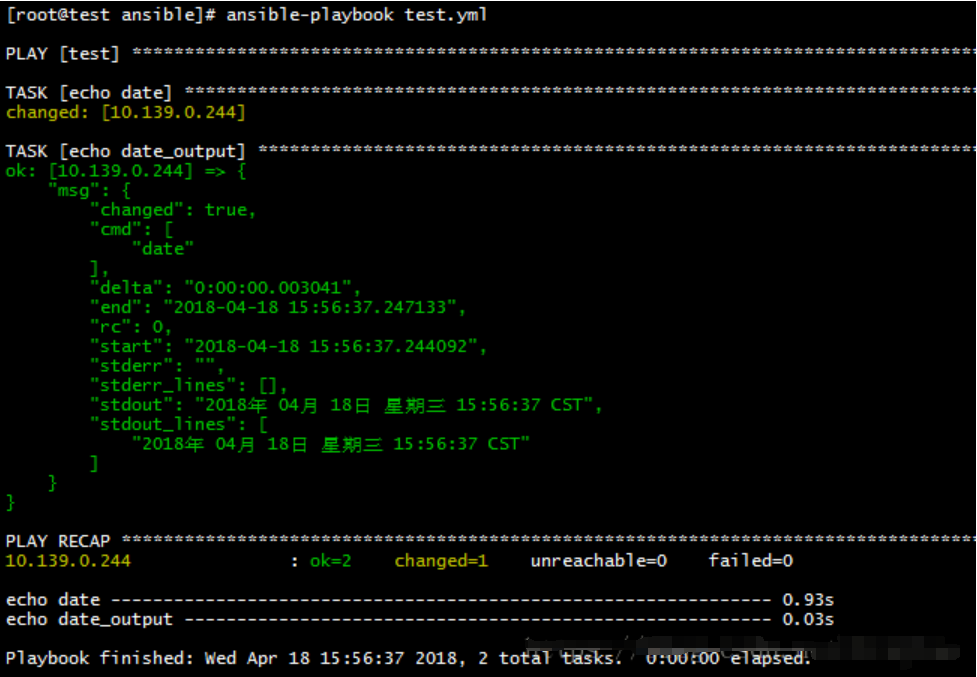
register
可以将一个任务的输出注册为变量,在后面的任务中使用
- hosts: test
  gather_facts: no
  tasks:
    - name: echo date
      command: date
      register: date_output

    - name: echo date_output
      debug: msg="{{ date_output }}"
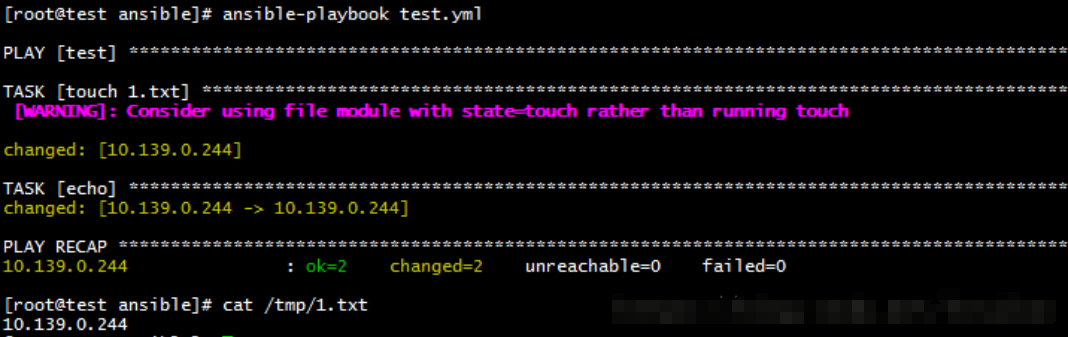
delegate_to
如果需要在不是该组的主机执行命令,可以通过该命令委托任务到其它机器上执行
- hosts: test
  gather_facts: no
  tasks:
- name: touch 1.txt
  shell: touch /tmp/1.txt
  ignore_errors: yes # 忽视错误,即如果该任务出现错误,则跳过该任务,继续执行下面的任务。默认为no,出现错误时停止运行

- name: echo
  shell: 'echo "10.139.0.244" >> /tmp/1.txt'
  delegate_to: 10.139.0.244
Check模式
通过 –check 参数来运行 ansible-playbook 时,将不会对远程的系统作出任何修改。
选择性执行 task– Tag(标签)
可以只执行特定部分的配置而无需要运行整个playbook
- hosts: test
  gather_facts: no
  tasks:
    - name: touch tag1.txt
      shell: touch /tmp/tag1.txt
      tags: tag1

    - name: touch tag2.txt
      shell: touch /tmp/tag2.txt
      tags: tag2
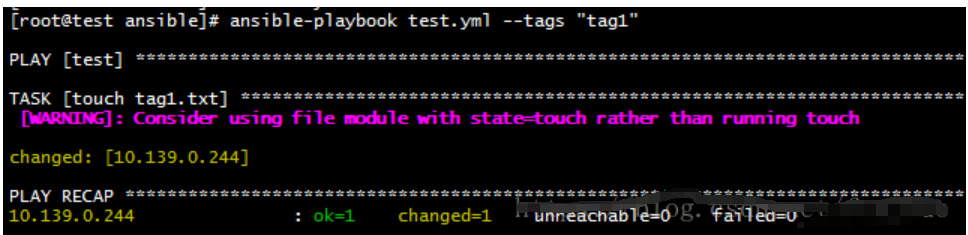
roles中使用:
roles:
  - { role: webserver, port: 5000, tags: [ 'web', 'foo' ] }
常用模块
注意:需要安装sshpass和libselinux-python用于执行命令和操作文件
shell
远程执行命令
#ad-hoc
ansible test -m shell -a 'hostname'

#playbooks
- hosts: "test"
  gather_facts: no
  tasks:
    - name: shell
      shell: "hostname"
      register: result
    - name: debug
      debug: var=result.stdout verbosity=0
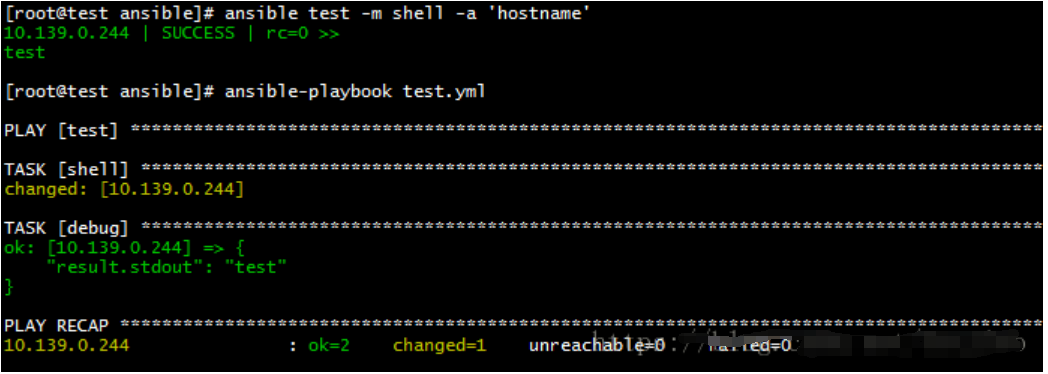
注意:playbooks中执行命令,不会输出命令执行结果。如果需要查看执行结果,需要将执行结果注册为变量,通过debug模块输出
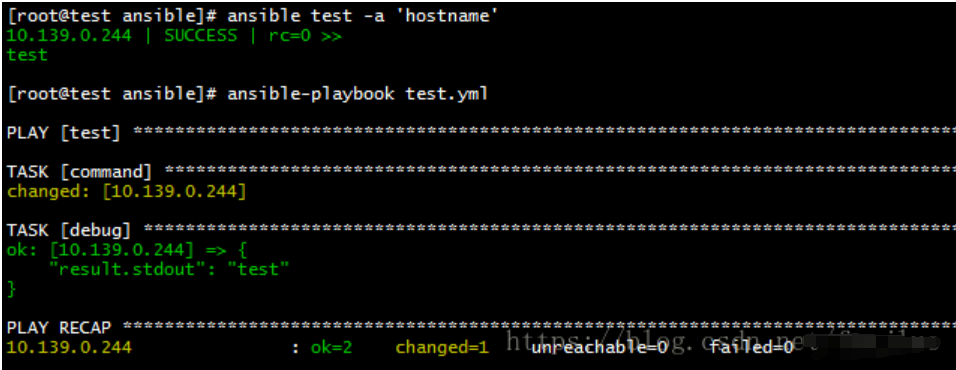
command
command模块是ansible默认执行模块,与shell模块的区别是不支持 shell 变量和管道
#ad-hoc
ansible test -a 'hostname'

#playbooks
- hosts: "test"
  gather_facts: no
  tasks:
    - name: command
      command: "hostname"
      register: result
    - name: debug
      debug: var=result.stdout verbosity=0
raw
远程执行命令
#ad-hoc
ansible test -m raw -a 'hostname'

#playbooks
- hosts: "test"
  gather_facts: no
  tasks:
    - name: raw
      raw: "hostname"
      register: result
    - name: debug
      debug: var=result.stdout verbosity=0
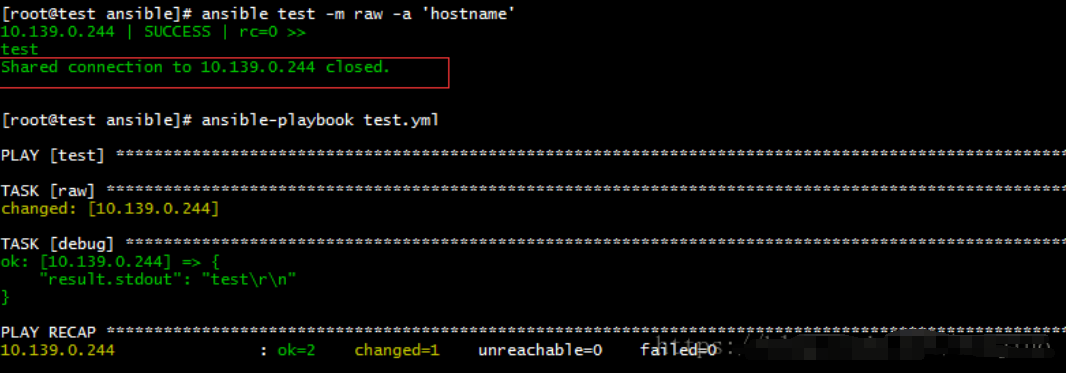
shell、command、raw模块的区别
command一般用于执行简单的命令,不支持shell变量和管道。shell可以执行复杂的命令和目标主机上的脚本文件,和在目标主机上直接使用shell类似。raw和shell类似,并且可以用于Windows服务器。raw和shell、command的另一个区别是:在默认开启ssh日志时,raw会输出ssh连接出现的错误,而shell、command不会
copy
实现主控端向目标主机拷贝文件,类似于scp的功能
#ad-hoc
ansible test -m copy -a "src=/etc/hosts dest=/tmp/hosts"

#playbooks
- hosts: "test"
  gather_facts: no
  tasks:
    - name: copy
      copy: src=/etc/hosts dest=/tmp/hosts

注意:文件没有变化时(md5没有改变),ansible将不会进行文件复制操作
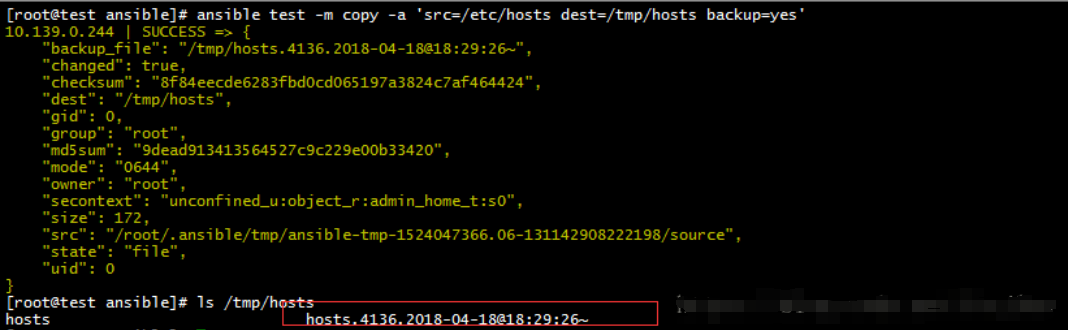
可以加backup参数用于备份文件
ansible test -m copy -a 'src=/etc/hosts dest=/tmp/hosts backup=yes'
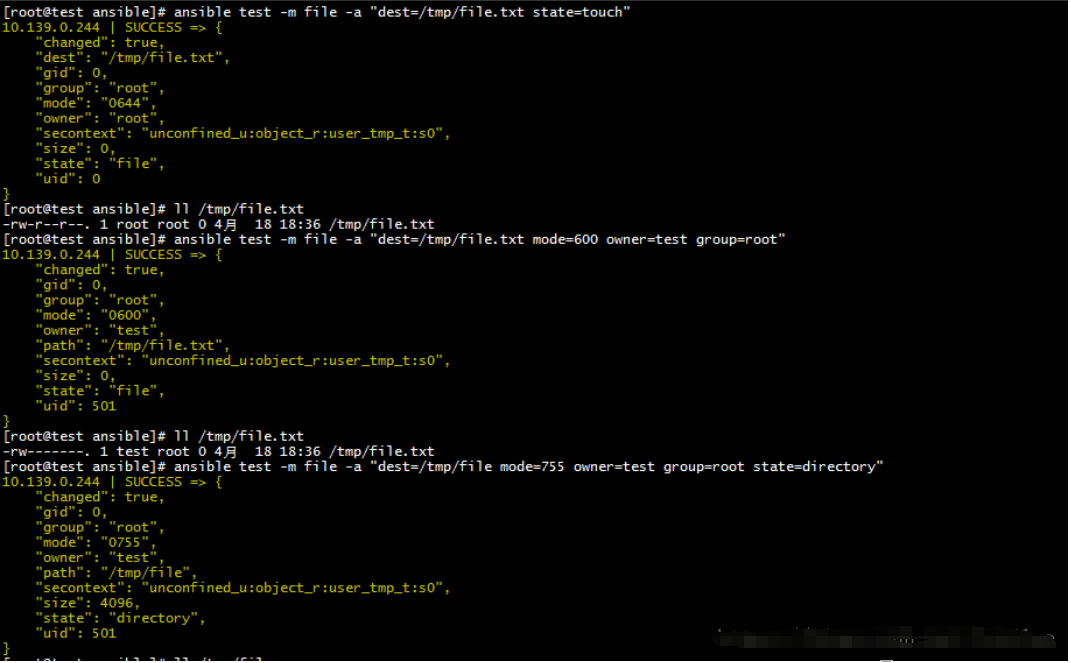
file
用于操作文件,如果创建、删除、修改文件所属人和权限、创建软硬链接
创建文件
ansible test -m file -a "dest=/tmp/file.txt state=touch"
更改文件的用户及权限
ansible test -m file -a "dest=/tmp/file.txt mode=600 owner=test group=root"
创建目录
ansible test -m file -a "dest=/tmp/file mode=755 owner=test group=root state=directory"
删除文件或者目录
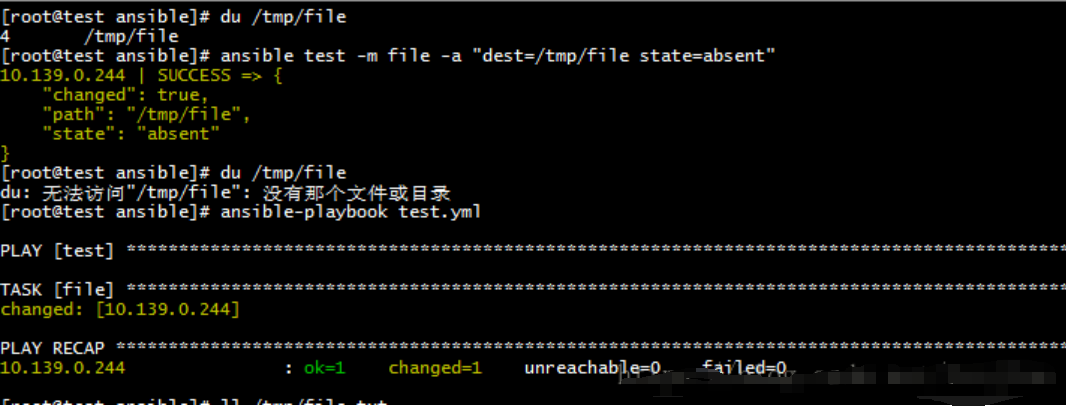
ansible test -m file -a "dest=/tmp/file state=absent"
#playbooks
- hosts: "test"
gather_facts: no
tasks:
- name: file
file: dest=/tmp/file.txt state=touch
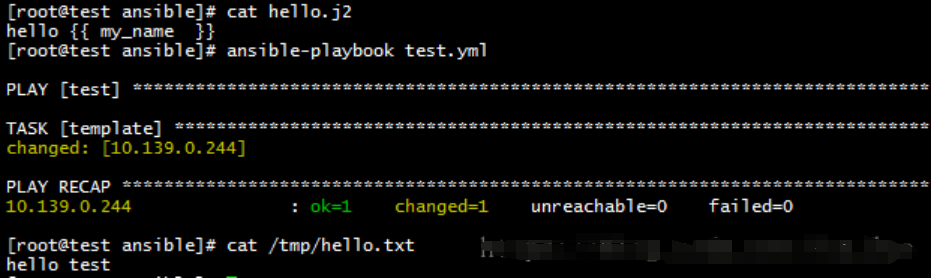
template
template使用了Jinjia2格式作为文件模板,进行文档内变量的替换的模块,它的每次使用都会被ansible标记为changed状态。
- hosts: "test"
  gather_facts: no
  vars:
    my_name: test
  tasks:
    - name: template
      template: src=hello.j2 dest=/tmp/hello.txt
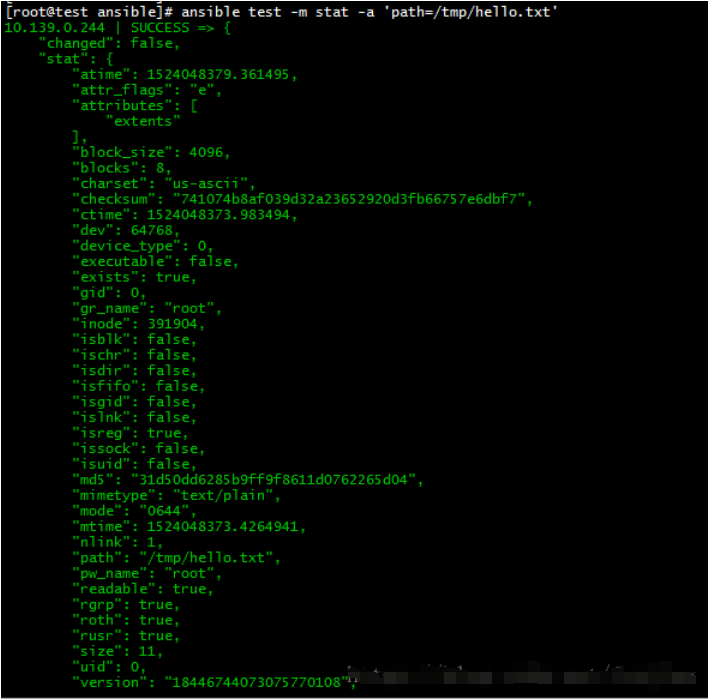
stat
获取远程文件状态信息,包含atime、ctime、mtime、md5、uid、gid等
ansible test -m stat -a 'path=/tmp/hello.txt'
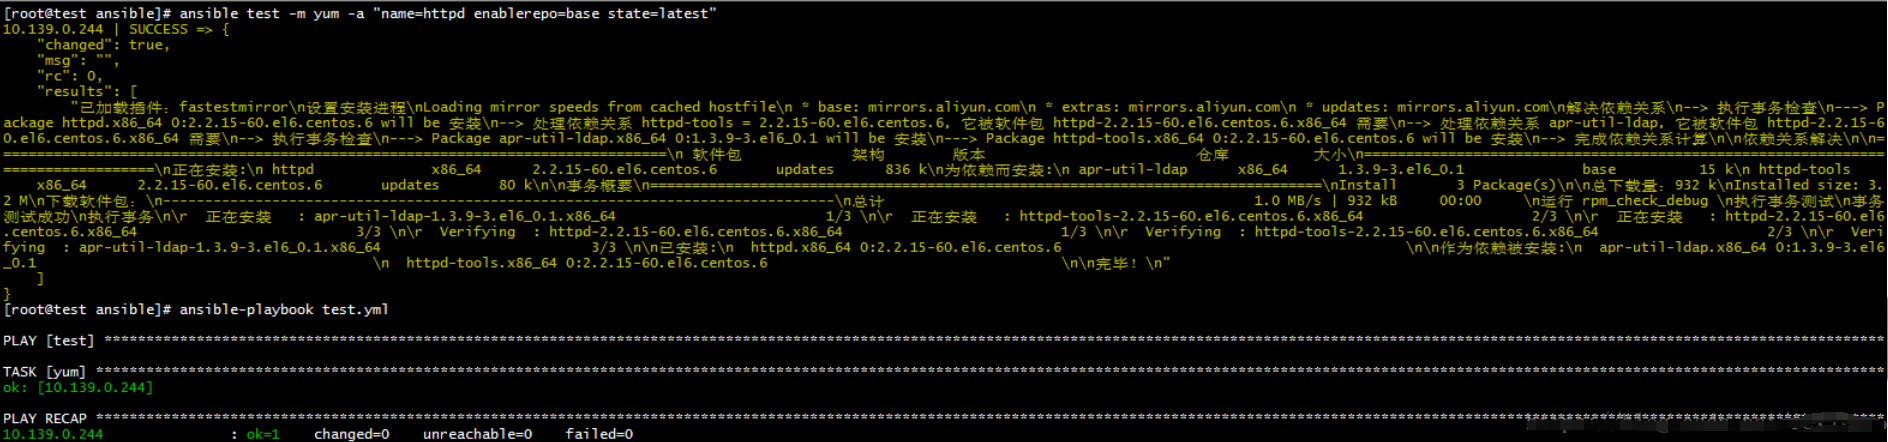
yum
管理软件
安装
ansible test -m yum -a "name=httpd enablerepo=base state=latest"

- hosts: "test"
  gather_facts: no
  tasks:
    - name: yum
      yum: name=httpd enablerepo=base state=latest

卸载
ansible test -m yum -a "name=httpd state=absent"
user
创建、删除用户
创建
ansible test -m user -a "name=test password= $6$YyF5qLN8$edF1l.d/xcd9kv4ZQD/VVq5g2Uavlwoo/l.W4YVIQgsNghN4CbJKSEdZ5ihxztkYJ.bZV2PCP6MnGOioSLqUK."
删除
ansible test -m user -a "name=test state=absent"
service
管理服务
启动
ansible test -m service -a "name=httpd state=started"
重启
ansible test -m service -a "name=httpd state=restarted"
停止
ansible test -m service -a "name=httpd state=stopped"
cron
管理定时任务
创建
ansible test -m cron -a 'name="job" minute=*/3 hour=* day=* month=* weekday=* job="/usr/sbin/ntpdate time4.aliyun.com"'
删除
ansible test -m cron -a 'name="job" minute=*/3 hour=* day=* month=* weekday=* job="/usr/sbin/ntpdate time4.aliyun.com" state=absent'

group
管理用户组
ansible test -m group -a 'gid=2017 name=grouptest'
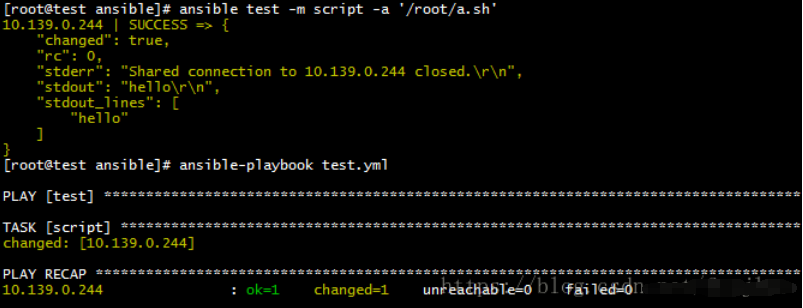
script
远程执行脚本,脚本文件在控制节点上
ansible test -m script -a '/root/a.sh'

- hosts: "test"
  gather_facts: no
  tasks:
    - name: script
      script: "/root/a.sh"
get_url
下载,可使用代理
ansible test -m get_url -a "url=http://www.baidu.com dest=/tmp"
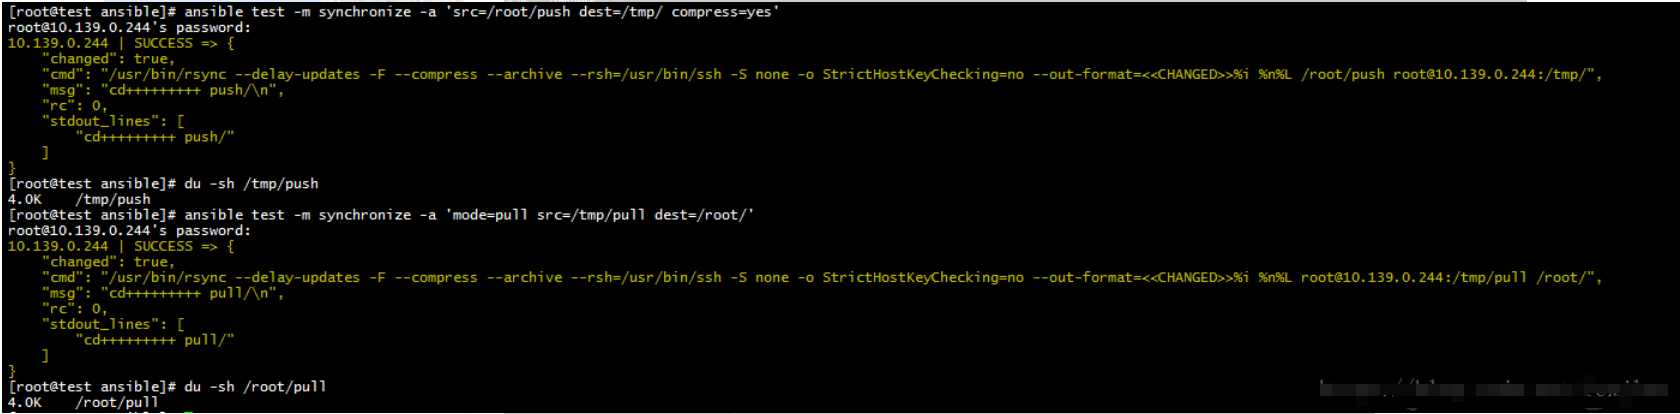
synchronize
同步控制节点和目标节点
将主控方目录推送到指定节点目录下
ansible test -m synchronize -a 'src=/root/push dest=/tmp/ compress=yes'
# delete=yes 使两边的内容一样(即以推送方为主)
# compress=yes 开启压缩,默认为开启
# –exclude=.Git 忽略同步.git结尾的文件
将指定节点的目录拉取到控制结点下
ansible test -m synchronize -a 'mode=pull src=/tmp/pull dest=/root/'
fetch
复制远程文件,传输至本机
ansible test -m fetch -a 'src=/tmp/fetch.txt dest=/root/ backup=yes'

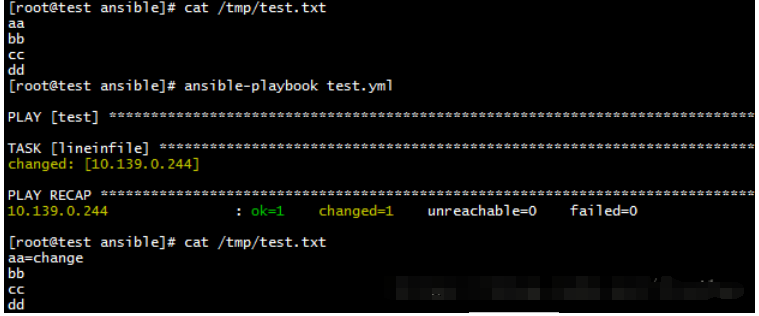
lineinfile
修改文件内容
- hosts: "test"
  gather_facts: no
  tasks:
    - name: lineinfile
      lineinfile: dest=/tmp/test.txt regexp='^aa' line='aa=change'
删除某一行
- hosts: "test"
  gather_facts: no
  tasks:
    - name: lineinfile
      lineinfile: dest=/tmp/test.txt regexp='^aa' state=absent

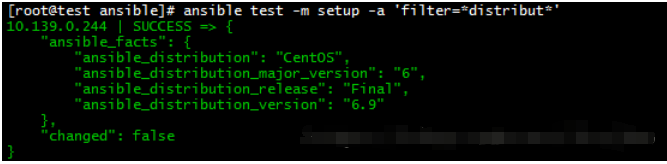
setup
获取目标主机的信息,如内存大小、操作系统等
ansible test -m setup -a 'filter=*distribut*'
playbooks中,gather_fact为yes时,将默认执行setup操作
api
ansible 2.0版本后,api的使用有较大的变化。以下提供两个示例。
1. ad-hoc,直接执行命令
# coding=utf-8
from collections import namedtuple
from ansible.parsing.dataloader import DataLoader
from ansible.vars import VariableManager
from ansible.inventory import Inventory
from ansible.playbook.play import Play
from ansible.executor.task_queue_manager import TaskQueueManager
from ansible.plugins.callback import CallbackBase
from tempfile import NamedTemporaryFile
import os

# 用于处理执行结果的回调
class ResultsCollector(CallbackBase):
    def __init__(self, *args, **kwargs):
        super(ResultsCollector, self).__init__(*args, **kwargs)
        self.host_ok = {}
        self.host_unreachable = {}
        self.host_failed = {}

    def v2_runner_on_unreachable(self, result):
        self.host_unreachable[result._host.get_name()] = result

    def v2_runner_on_ok(self, result, *args, **kwargs):
        self.host_ok[result._host.get_name()] = result

    def v2_runner_on_failed(self, result, *args, **kwargs):
        self.host_failed[result._host.get_name()] = result


class MyRunner(object):
    """
    This is a General object for parallel execute modules.
    """

    def __init__(self, ):

        self.results_raw = {}

    def run(self, host_list, module_name, module_args=None, username=None, password=None, connection='ssh', forks=1,
            timeout=5,gather_facts='no'):
        """
        run module from andible ad-hoc.
        module_name: ansible module_name
        module_args: ansible module args
        """
        self.results_raw = {'contacted': {}, 'failed': {}, 'unreachable': {}}
        Options = namedtuple('Options', ['connection', 'module_path', 'forks', 'timeout', 'remote_user',
                                         'ask_pass', 'private_key_file', 'ssh_common_args', 'ssh_extra_args',
                                         'sftp_extra_args',
                                         'scp_extra_args', 'become', 'become_method', 'become_user', 'ask_value_pass',
                                         'verbosity', 'check'])
        # 通过NamedTemporaryFile创建一个临时文件,作为hosts
        hosts_file = NamedTemporaryFile(delete=False)
        hoststr = '[%s]
' % module_name
        for i in host_list:
            hoststr += i + '
'
        hosts_file.write(hoststr)
        hosts_file.close()
        # initialize needed objects
        variable_manager = VariableManager()
        # 通过  variable_manager 增加额外的变量
        # variable_manager.extra_vars = {'ansible_winrm_server_cert_validation': 'ignore'}
        loader = DataLoader()
        options = Options(connection=connection, module_path='/usr/share/ansible', forks=forks, timeout=timeout,
                          remote_user=username, ask_pass=False, private_key_file=None, ssh_common_args=None,
                          ssh_extra_args=None,
                          sftp_extra_args=None, scp_extra_args=None, become=None, become_method=None,
                          become_user=None, ask_value_pass=True, verbosity=None, check=False)

        passwords = dict(conn_pass=password)

        # create inventory and pass to var manager
        inventory = Inventory(loader=loader, variable_manager=variable_manager, host_list=hosts_file.name)
        variable_manager.set_inventory(inventory)

        # create play with tasks

        if module_args is None:
            tasks = [dict(action=dict(module=module_name))]
        else:
            tasks = [dict(action=dict(module=module_name, args=module_args))]
        play_source = dict(
            name="Ansible Play",
            hosts=module_name,
            gather_facts=gather_facts,
            tasks=tasks
        )
        play = Play().load(play_source, variable_manager=variable_manager, loader=loader)

        # actually run it
        tqm = None
        callback = ResultsCollector()
        try:
            tqm = TaskQueueManager(
                inventory=inventory,
                variable_manager=variable_manager,
                loader=loader,
                options=options,
                passwords=passwords,
            )
            tqm._stdout_callback = callback
            result = tqm.run(play)
        finally:
            if tqm is not None:
                tqm.cleanup()
                os.remove(hosts_file.name)
        # 获取执行结果
        try:
            for host, result in callback.host_ok.items():
                self.results_raw['contacted'][host] = result._result

            for host, result in callback.host_failed.items():
                self.results_raw['failed'][host] = result._result['msg']

            for host, result in callback.host_unreachable.items():
                self.results_raw['unreachable'][host] = result._result['msg']
        except Exception as e:
            print(str(e))

        return self.results_raw

if __name__ == '__main__':
    runner = MyRunner()
    result = runner.run(
    host_list=[''],
    module_name='setup',
    username='root',
    password='your_password'
    )
2.playbooks,用于执行playbooks
# coding=utf-8
import logging
from ansible.parsing.dataloader import DataLoader
from ansible.vars import VariableManager
from ansible.inventory import Inventory
from ansible.executor.playbook_executor import PlaybookExecutor
from ansible.plugins.callback import CallbackBase


class ResultsCollector(CallbackBase):
    def __init__(self, *args, **kwargs):
        super(ResultsCollector, self).__init__(*args, **kwargs)
        self.hosts = []
        self.task_result = {}

    def v2_runner_on_ok(self, result, *args, **kwargs):
        hostname = result._host.get_name()
        logging.info("%s %s" % (hostname, "ok"))

    def v2_runner_on_skipped(self, result, *args, **kwargs):
        hostname = result._host.get_name()
        logging.info("%s %s" % (hostname, "skipped"))

    def v2_runner_on_failed(self, result, *args, **kwargs):
        hostname = result._host.get_name()
        logging.error("%s %s %s" % (hostname, "failed", result._result['msg']))

    def v2_runner_on_unreachable(self, result, *args, **kwargs):
        hostname = result._host.get_name()
        logging.error("%s %s %s" % (hostname, "unreachable", result._result['msg']))

    def v2_playbook_on_task_start(self, task, is_conditional):
        logging.info("play task %s" % (task.get_name()))

    def v2_playbook_on_stats(self, stats):
        for host in self.hosts:
            self.task_result[host.get_name()] = stats.summarize(host.get_name())


class Options(object):
    def __init__(self):
        self.connection = "ssh"
        self.forks = 1
        self.check = False
        self.remote_user = 'root'
        self.tags = dict()
        self.skip_tags = dict()

    def __getattr__(self, name):
        return None


def deploy(host_list, playbook,passwd=None,mirror=False):
    passwd = passwd
    loader = DataLoader()  # 用来加载解析yaml文件或JSON内容,并且支持vault的解密
    variable_manager = VariableManager()  # 管理变量的类,包括主机,组,扩展等变量,之前版本是在 inventory 中的
    inventory = Inventory(loader=loader, variable_manager=variable_manager, host_list=host_list)
    # variable_manager.set_inventory(inventory)  # 根据 inventory 加载对应变量
    playbooks = [playbook]
    options = Options()

    pb = PlaybookExecutor(playbooks=playbooks, inventory=inventory,
                          variable_manager=variable_manager, loader=loader,
                          options=options, passwords=passwd)

    callback = ResultsCollector()
    # 通过mirror参数控制是否将执行结果返回到回调中
    if not mirror:
        callback.hosts = inventory.get_hosts()
        pb._tqm._stdout_callback = callback

    result_no_callback = pb.run()

    if not mirror:
        return callback.task_result
    else:
        return result_no_callback

if __name__ == '__main__':
    result = deploy('/etc/ansible/hosts','test.yml')
    print(result)
其它
性能优化
检测工具
ansible-profile插件可以显示ansible-playbook 执行每一个任务所花费的时间,地址:https://github.com/jlafon/ansible-profile
安装:
cd /etc/ansible
mkdir callback_plugins
cd callback_plugins
wget https://raw.githubusercontent.com/jlafon/ansible-profile/master/callback_plugins/profile_tasks.py
优化配置
1. 关闭 gathering facts
2. SSH PIPElinING。SSH pipelining 是一个加速 Ansible 执行速度的简单方法。ssh pipelining 默认是关闭,之所以默认关闭是为了兼容不同的 sudo 配置,主要是 requiretty 选项。如果不使用 sudo,建议开启。打开此选项可以减少 ansible 执行没有传输时 ssh 在被控机器上执行任务的连接数。不过,如果使用 sudo,必须关闭 requiretty 选项。修改 /etc/ansible/ansible.cfg 文件可以开启
pipelining。pipelining修改为True
3. ControlPersist。ControlPersist 特性需要高版本的 SSH 才支持,CentOS 6 默认是不支持的,如果需要使用,需要自行升级 openssh。ControlPersist 即持久化 socket,一次验证,多次通信。ControlPersist 设置的办法
 cat ~/.ssh/config
 Host *
 Compression yes
 ServerAliveInterval 60
 ServerAliveCountMax 5
 ControlMaster auto
 ControlPath ~/.ssh/sockets/%r@%h-%p
 ControlPersist 4h
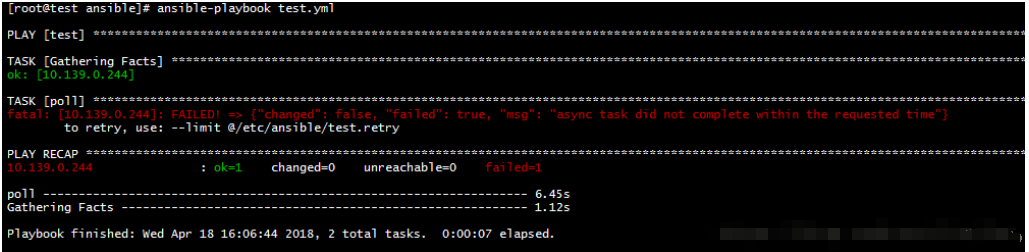
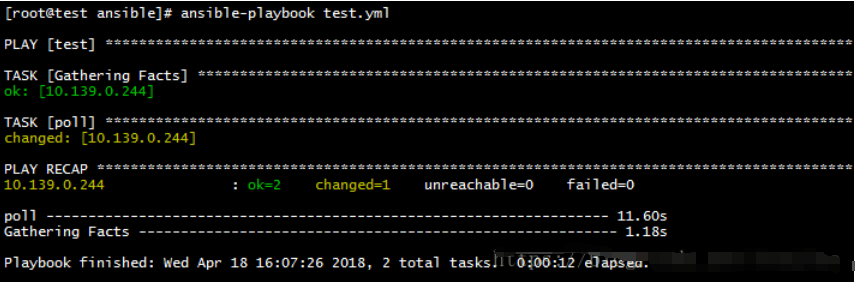
并行执行
使用async和poll可以并行运行一个任务. async触发ansible并行运作任务,是ansible等待运行这个任务的最大超时值;poll为检查这个任务是否完成的频率时间。poll为0时,不等待任务执行完毕直接结束
- hosts: test
  gather_facts: yes
  tasks:
    - name: poll
      shell: sleep 10
      async: 4
      poll: 2
- hosts: test
  gather_facts: yes
  tasks:
    - name: poll
      shell: sleep 10
      async: 40
      poll: 2
Windows
ansible不能部署在Windows服务器上用于控制主机,但可以操作Windows主机。
ansible操作Windows主机的依赖:
1. Windows系统版本为windows server 2008 r2以上(windows server 2012最佳)
2. powershell版本3.0以上
3. 开启WINRM服务,并设置powershell执行选项。可用此脚本开启
4. 详细信息可见官方文档
hosts示例,需要增加ansible_connection=winrm和ansible_winrm_server_cert_validation参数
[windows]
windows_host ansible_user=Administrator ansible_ssh_pass=your_pass ansible_connection=winrm ansible_winrm_server_cert_validation=ignore
一些在Linux上使用的模块,无法在Windows上使用,Windows可使用的模块可参考官方文档