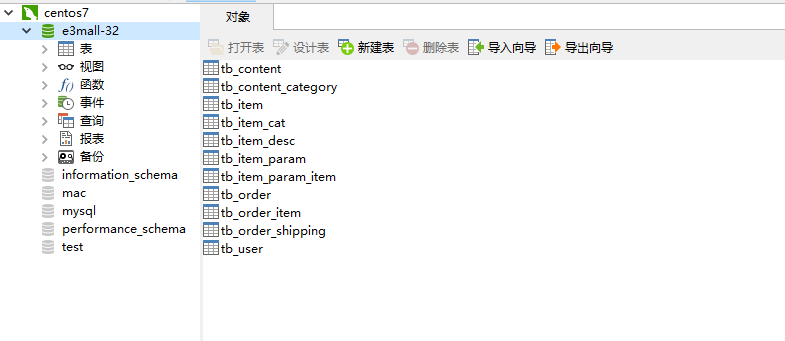
一. 创建数据库和表

二. 逆向生成接口类和映射文件
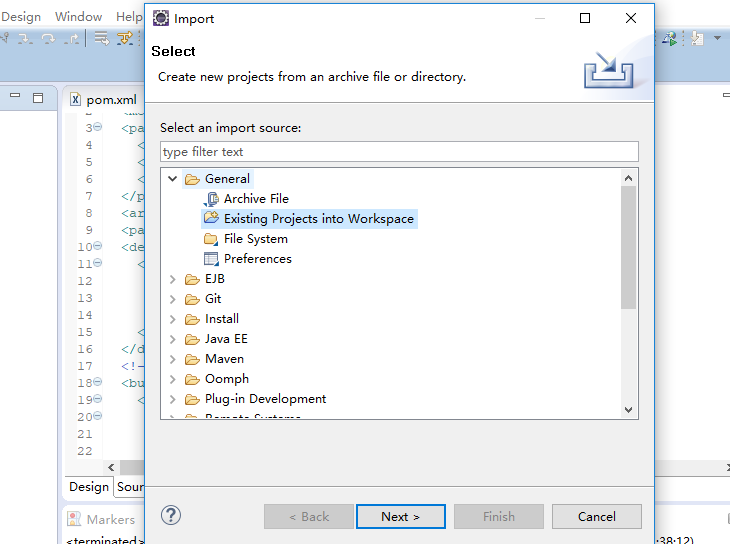
1、在工作空间导入generatorSqlmapCustom逆向工程

2、修改generatorConfig.xml配置:
<?xml version="1.0" encoding="UTF-8"?>
<!DOCTYPE generatorConfiguration
  PUBLIC "-//mybatis.org//DTD MyBatis Generator Configuration 1.0//EN"
  "http://mybatis.org/dtd/mybatis-generator-config_1_0.dtd">

<generatorConfiguration>
    <context id="testTables" targetRuntime="MyBatis3">
        <commentGenerator>
            <!-- 是否去除自动生成的注释 true:是 : false:否 -->
            <property name="suppressAllComments" value="true" />
        </commentGenerator>
        <!--数据库连接的信息:驱动类、连接地址、用户名、密码 -->
        <jdbcConnection driverClass="com.mysql.jdbc.Driver"
            connectionURL="jdbc:mysql://192.168.159.130:3306/e3mall-32" userId="root"
            password="root1">
        </jdbcConnection>
        <!-- 默认false,把JDBC DECIMAL 和 NUMERIC 类型解析为 Integer,为 true时把JDBC DECIMAL 和
            NUMERIC 类型解析为java.math.BigDecimal -->
        <javaTypeResolver>
            <property name="forceBigDecimals" value="false" />
        </javaTypeResolver>

        <!-- targetProject:生成PO类的位置 -->
        <javaModelGenerator targetPackage="cn.e3mall.pojo"
            targetProject=".src">
            <!-- enableSubPackages:是否让schema作为包的后缀 -->
            <property name="enableSubPackages" value="false" />
            <!-- 从数据库返回的值被清理前后的空格 -->
            <property name="trimStrings" value="true" />
        </javaModelGenerator>
        <!-- targetProject:mapper映射文件生成的位置 -->
        <sqlMapGenerator targetPackage="cn.e3mall.mapper"
            targetProject=".src">
            <!-- enableSubPackages:是否让schema作为包的后缀 -->
            <property name="enableSubPackages" value="false" />
        </sqlMapGenerator>
        <!-- targetPackage:mapper接口生成的位置 -->
        <javaClientGenerator type="XMLMAPPER"
            targetPackage="cn.e3mall.mapper"
            targetProject=".src">
            <!-- enableSubPackages:是否让schema作为包的后缀 -->
            <property name="enableSubPackages" value="false" />
        </javaClientGenerator>
        <!-- 指定数据库表 -->
        <table schema="" tableName="tb_content"></table>
        <table schema="" tableName="tb_content_category"></table>
        <table schema="" tableName="tb_item"></table>
        <table schema="" tableName="tb_item_cat"></table>
        <table schema="" tableName="tb_item_desc"></table>
        <table schema="" tableName="tb_item_param"></table>
        <table schema="" tableName="tb_item_param_item"></table>
        <table schema="" tableName="tb_order"></table>
        <table schema="" tableName="tb_order_item"></table>
        <table schema="" tableName="tb_order_shipping"></table>
        <table schema="" tableName="tb_user"></table>

    </context>
</generatorConfiguration>
3、运行逆向工程main方法并刷新工程下src目录,将生成的mapper和pojo分别粘贴至e3-manage-dao和e3-manage-pojo里
注意:建议将mapper映射文件和接口分别放入resource和java目录中,若将二者都放入java里,需要在e3-manager-dao工程的pom里配置:
<!-- 如果不添加此节点mybatis的mapper.xml文件都会被漏掉。 -->

     <build>
          <resources>
            <resource>
                <directory>src/main/java</directory>
                <includes>
                    <include>**/*.properties</include>
                    <include>**/*.xml</include>
                </includes>
                <filtering>false</filtering>
            </resource>
        </resources>
     </build>
三. 整合Dao(先把该导入的约束导入到workspace,整合配置文件统一放到e3manager-web的resource目录)
1、创建SqlMapConfig.xml(只需要一个文件头):
<?xml version="1.0" encoding="UTF-8" ?>
<!DOCTYPE configuration
          PUBLIC "-//mybatis.org//DTD Config 3.0//EN"
          "http://mybatis.org/dtd/mybatis-3-config.dtd">
<configuration>

</configuration>
2、Spring整合Mybatis,创建applicationContext-dao.xml:
<?xml version="1.0" encoding="UTF-8"?>
<beans xmlns="http://www.springframework.org/schema/beans"
     xmlns:context="http://www.springframework.org/schema/context" xmlns:p="http://www.springframework.org/schema/p"
     xmlns:aop="http://www.springframework.org/schema/aop" xmlns:tx="http://www.springframework.org/schema/tx"
     xmlns:xsi="http://www.w3.org/2001/XMLSchema-instance"
     xsi:schemaLocation="http://www.springframework.org/schema/beans http://www.springframework.org/schema/beans/spring-beans-4.2.xsd
     http://www.springframework.org/schema/context http://www.springframework.org/schema/context/spring-context-4.2.xsd
     http://www.springframework.org/schema/aop http://www.springframework.org/schema/aop/spring-aop-4.2.xsd
   http://www.springframework.org/schema/tx
   http://www.springframework.org/schema/tx/spring-tx-4.2.xsd
     http://www.springframework.org/schema/util http://www.springframework.org/schema/util/spring-util-4.2.xsd">
     <!-- 数据库连接池 -->
     <!-- 加载配置文件 -->
     <context:property-placeholder location="classpath:conf/db.properties" />
     <!-- 数据库连接池 -->
     <bean id="dataSource" class="com.alibaba.druid.pool.DruidDataSource"
          destroy-method="close">
          <property name="url" value="${jdbc.url}" />
          <property name="username" value="${jdbc.username}" />
          <property name="password" value="${jdbc.password}" />
          <property name="driverClassName" value="${jdbc.driver}" />
          <property name="maxActive" value="10" />
          <property name="minIdle" value="5" />
     </bean>
     <!-- 让spring管理sqlsessionfactory使用mybatis和spring整合包中的 -->
     <bean id="sqlSessionFactory" class="org.mybatis.spring.SqlSessionFactoryBean">
          <!-- 数据库连接池 -->
          <property name="dataSource" ref="dataSource" />
          <!-- 加载mybatis的全局配置文件 -->
          <property name="configLocation" value="classpath:mybatis/SqlMapConfig.xml" />
     </bean>

  <!-- 将mapper接口注册到spring容器 -->
     <bean class="org.mybatis.spring.mapper.MapperScannerConfigurer">
          <property name="basePackage" value="cn.e3mall.mapper" />
     </bean>
</beans>
3、创建db.properties:
jdbc.driver=com.mysql.jdbc.Driver
jdbc.url=jdbc:mysql://localhost:3306/e3mall?characterEncoding=utf-8
jdbc.username=root
jdbc.password=root1
四. 整合Service
1、配置包扫描器,创建applicationContext-service.xml:
<?xml version="1.0" encoding="UTF-8"?>
<beans xmlns="http://www.springframework.org/schema/beans"
     xmlns:context="http://www.springframework.org/schema/context" xmlns:p="http://www.springframework.org/schema/p"
     xmlns:aop="http://www.springframework.org/schema/aop" xmlns:tx="http://www.springframework.org/schema/tx"
     xmlns:xsi="http://www.w3.org/2001/XMLSchema-instance"
     xsi:schemaLocation="http://www.springframework.org/schema/beans http://www.springframework.org/schema/beans/spring-beans-4.2.xsd
     http://www.springframework.org/schema/context http://www.springframework.org/schema/context/spring-context-4.2.xsd
     http://www.springframework.org/schema/aop http://www.springframework.org/schema/aop/spring-aop-4.2.xsd http://www.springframework.org/schema/tx http://www.springframework.org/schema/tx/spring-tx-4.2.xsd
     http://www.springframework.org/schema/util http://www.springframework.org/schema/util/spring-util-4.2.xsd">

     <context:component-scan base-package="cn.e3mall.service"/>
</beans>
2、管理事务,创建applicationContext-trans.xml:
<beans xmlns="http://www.springframework.org/schema/beans"
     xmlns:context="http://www.springframework.org/schema/context" xmlns:p="http://www.springframework.org/schema/p"
     xmlns:aop="http://www.springframework.org/schema/aop" xmlns:tx="http://www.springframework.org/schema/tx"
     xmlns:xsi="http://www.w3.org/2001/XMLSchema-instance"
     xsi:schemaLocation="http://www.springframework.org/schema/beans http://www.springframework.org/schema/beans/spring-beans-4.2.xsd
     http://www.springframework.org/schema/context http://www.springframework.org/schema/context/spring-context-4.2.xsd
     http://www.springframework.org/schema/aop http://www.springframework.org/schema/aop/spring-aop-4.2.xsd http://www.springframework.org/schema/tx http://www.springframework.org/schema/tx/spring-tx-4.2.xsd
     http://www.springframework.org/schema/util http://www.springframework.org/schema/util/spring-util-4.2.xsd">
     <!-- 事务管理器 -->
     <bean id="transactionManager"
          class="org.springframework.jdbc.datasource.DataSourceTransactionManager">
          <!-- 数据源 -->
          <property name="dataSource" ref="dataSource" />
     </bean>
     <!-- 通知 -->
     <tx:advice id="txAdvice" transaction-manager="transactionManager">
          <tx:attributes>
               <!-- 传播行为 -->
               <tx:method name="save*" propagation="REQUIRED" />
               <tx:method name="insert*" propagation="REQUIRED" />
               <tx:method name="add*" propagation="REQUIRED" />
               <tx:method name="create*" propagation="REQUIRED" />
               <tx:method name="delete*" propagation="REQUIRED" />
               <tx:method name="update*" propagation="REQUIRED" />
               <tx:method name="find*" propagation="SUPPORTS" read-only="true" />
               <tx:method name="select*" propagation="SUPPORTS" read-only="true" />
               <tx:method name="get*" propagation="SUPPORTS" read-only="true" />
          </tx:attributes>
     </tx:advice>
     <!-- 切面 -->
     <aop:config>
          <aop:advisor advice-ref="txAdvice"
               pointcut="execution(* cn.e3mall.service..*.*(..))" />
     </aop:config>
</beans>
五. 整合表现层
1、创建springmvc.xml:
<?xml version="1.0" encoding="UTF-8"?>
<beans xmlns="http://www.springframework.org/schema/beans"
     xmlns:xsi="http://www.w3.org/2001/XMLSchema-instance" xmlns:p="http://www.springframework.org/schema/p"
     xmlns:context="http://www.springframework.org/schema/context"
     xmlns:mvc="http://www.springframework.org/schema/mvc"
     xsi:schemaLocation="http://www.springframework.org/schema/beans http://www.springframework.org/schema/beans/spring-beans-4.2.xsd
        http://www.springframework.org/schema/mvc http://www.springframework.org/schema/mvc/spring-mvc-4.2.xsd
        http://www.springframework.org/schema/context http://www.springframework.org/schema/context/spring-context-4.2.xsd">
   <!-- 配扫描带有Controller注解的类 -->
     <context:component-scan base-package="cn.e3mall.controller" />
  <!-- 配置处理器映射器和处理器适配器 -->
     <mvc:annotation-driven />
     <bean
          class="org.springframework.web.servlet.view.InternalResourceViewResolver">
          <property name="prefix" value="/WEB-INF/jsp/" />
          <property name="suffix" value=".jsp" />
     </bean>
</beans>
2、配置web.xml:
<?xml version="1.0" encoding="UTF-8"?>
<web-app xmlns:xsi="http://www.w3.org/2001/XMLSchema-instance"
     xmlns="http://java.sun.com/xml/ns/javaee"
     xsi:schemaLocation="http://java.sun.com/xml/ns/javaee http://java.sun.com/xml/ns/javaee/web-app_2_5.xsd"
     id="WebApp_ID" version="2.5">
     <display-name>e3-manager</display-name>
     <welcome-file-list>
          <welcome-file>index.jsp</welcome-file>
     </welcome-file-list>

     <!-- 加载spring容器 -->
     <context-param>
          <param-name>contextConfigLocation</param-name>
          <param-value>classpath:spring/applicationContext-*.xml</param-value>
     </context-param>
     <listener>
          <listener-class>org.springframework.web.context.ContextLoaderListener</listener-class>
     </listener>

     <!-- 解决post乱码 -->
     <filter>
          <filter-name>CharacterEncodingFilter</filter-name>
          <filter-class>org.springframework.web.filter.CharacterEncodingFilter</filter-class>
          <init-param>
               <param-name>encoding</param-name>
               <param-value>utf-8</param-value>
          </init-param>
     </filter>
     <filter-mapping>
          <filter-name>CharacterEncodingFilter</filter-name>
          <url-pattern>/*</url-pattern>
     </filter-mapping>

     <!-- springmvc的前端控制器 -->
     <servlet>
          <servlet-name>e3-manager</servlet-name>
          <servlet-class>org.springframework.web.servlet.DispatcherServlet</servlet-class>
          <!-- contextConfigLocation不是必须的, 如果不配置contextConfigLocation, springmvc的配置文件默认在:WEB-INF/servlet的name+"-servlet.xml" -->
          <init-param>
               <param-name>contextConfigLocation</param-name>
               <param-value>classpath:spring/springmvc.xml</param-value>
          </init-param>
          <load-on-startup>1</load-on-startup>
     </servlet>
     <servlet-mapping>
          <servlet-name>e3-manager</servlet-name>
          <url-pattern>/</url-pattern>
     </servlet-mapping>
</web-app>
六. 整合测试
1、商品管理Service实现类:
@Service
publicclass ItemServiceImpl implements ItemService {
     @Autowired
     private TbItemMapper itemMapper;
     @Override
     public TbItem getItemById(longid) {
          TbItem item = itemMapper.selectByPrimaryKey(id);
          returnitem;
     }
}
2、商品管理Controller:
@Controller
publicclass ItemController {
     @Autowired
     private ItemService itemService;

     @RequestMapping("/item/{itemId}")
     @ResponseBody
     private TbItem getItemById(@PathVariable Long itemId) {
          TbItem tbItem = itemService.getItemById(itemId);
          returntbItem;
     }
}
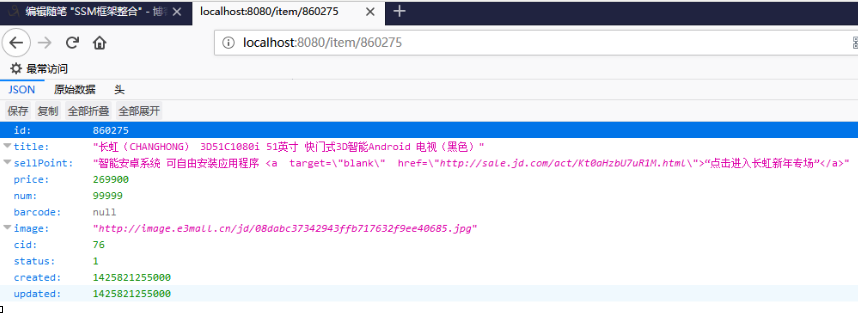
3、访问http://localhost:8080/item/860275,得到响应:

测试成功!