CXF 简介
Apache CXF = Celtix + XFire,Apache CXF 的前身叫 Apache CeltiXfire,现在已经正式更名为 Apache CXF 了,以下简称为 CXF。CXF 继承了 Celtix 和 XFire 两大开源项目的精华,提供了对 JAX-WS 全面的支持,并且提供了多种 Binding 、DataBinding、Transport 以及各种 Format 的支持,并且可以根据实际项目的需要,采用代码优先(Code First)或者 WSDL 优先(WSDL First)来轻松地实现 Web Services 的发布和使用。目前它仍只是 Apache 的一个孵化项目。
Apache CXF 是一个开源的 Services 框架,CXF 帮助您利用 Frontend 编程 API 来构建和开发 Services ,像 JAX-WS 。这些 Services 可以支持多种协议,比如:SOAP、XML/HTTP、RESTful HTTP 或者 CORBA ,并且可以在多种传输协议上运行,比如:HTTP、JMS 或者 JBI,CXF 大大简化了 Services 的创建,同时它继承了 XFire 传统,一样可以天然地和 Spring 进行无缝集成。
服务端开发
第一步;创建动态web工程,项目名service_test
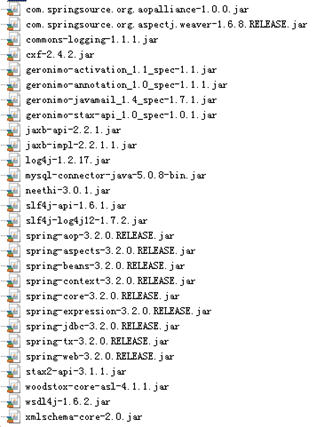
第二步:导入CXF相关jar包
第三步:在web.xml中配置CXF框架提供的一个Servlet(使服务能被访问到,init-param:访问此servlet时加载类路径下的cxf.xml文件)
<!-- 配置CXF框架提供的Servlet -->
  <servlet>
       <servlet-name>cxf</servlet-name>
       <servlet-class>org.apache.cxf.transport.servlet.CXFServlet</servlet-class>
       <!-- 通过初始化参数指定CXF框架的配置文件位置 -->
       <init-param>
                 <param-name>config-location</param-name>
                 <param-value>classpath:cxf.xml</param-value>
       </init-param>
</servlet>
  <servlet-mapping>
       <servlet-name>cxf</servlet-name>
       <url-pattern>/service/*</url-pattern>
  </servlet-mapping>
第四步:在类路径下提供cxf.xml(就是一个spring核心配置文件)
<?xml version="1.0" encoding="UTF-8"?>
<beans xmlns="http://www.springframework.org/schema/beans"
xmlns:xsi="http://www.w3.org/2001/XMLSchema-instance"
xmlns:jaxws="http://cxf.apache.org/jaxws"
xmlns:soap="http://cxf.apache.org/bindings/soap"
xsi:schemaLocation="http://www.springframework.org/schema/beans
                                               http://www.springframework.org/schema/beans/spring-beans.xsd
                                               http://cxf.apache.org/bindings/soap
                                               http://cxf.apache.org/schemas/configuration/soap.xsd
                                               http://cxf.apache.org/jaxws
                                               http://cxf.apache.org/schemas/jaxws.xsd">
         <!-- 引入CXF Bean定义如下,早期的版本中使用 -->
         <import resource="classpath:META-INF/cxf/cxf.xml" />
         <import resource="classpath:META-INF/cxf/cxf-extension-soap.xml" />
         <import resource="classpath:META-INF/cxf/cxf-servlet.xml" />
</beans>
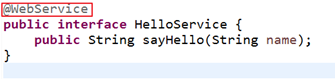
第五步:开发一个接口和实现类(WebService注解要打在接口上)

第六步:在cxf.xml中注册实现类到spring容器中
<bean id="helloService" class="com.cnblogs.service.HelloServiceImpl"/>
<jaxws:server id="myService" address="/cxfService">
  <jaxws:serviceBean>
    <ref bean="helloService"/>
  </jaxws:serviceBean>
</jaxws:server>
客户端调用
准备:运行上述服务端项目
第一步:创建一个java或动态web项目
第二步:使用wsimport或wsdl2java生成本地代码,只需要接口文件
wsimport -s . http:192.168.191.1:8080/service_test/service/myService?wsdl -p com.cnblogs.client  或
wsdl2java -d . -p com.cnblogs.client http:192.168.191.1:8080/service_test/service/myService?wsdl
第三步:将接口文件复制到项目中(包含包结构)
第四步:提供spring配置文件(cxf.xml),注册客户端代理对象
<jaxws:client id="myClient" serviceClass="com.cnblogs.client.HelloService" address="http://192.168.191.1:8080/service_test/service/cxfService"/>
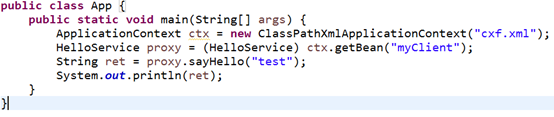
第五步:测试调用