• 【Unity Shaders】法线纹理(Normal Mapping)的实现细节


    http://blog.csdn.net/candycat1992/article/details/41605257

    写在前面


    写这篇的目的是为了总结我长期以来的混乱。虽然题目是“法线纹理的实现细节”,但其实我想讲的是如何在shader中编程正确使用法线进行光照计算。这里面最让人头大的就是各种矩阵运算和坐标系之间的转换,很容易因为坐标系错误而造成光照结果的错误。


    我们将要讨论以下几个问题

    1. 为什么法线纹理通常都是偏蓝色的?

    2. 在Unity里,法线纹理是需要把“Texture Type”设置成“Normal Map”才能正确显示,为什么?

    3. 把“Texture Type”设置成“Normal Map”后,有一个复选框是“Create from grayscale”,这个是做什么用的?

    4. 为什么在Unity Shaders里,对法线纹理的采样要使用UnpackNormal函数?直接采样不行么?

    当然,法线纹理映射是要在shaders中实现的。为此,我们讨论以下几种情况
    1. 在Surface Shader中,使用模型自带的法线如何计算光照;

    2. 在Surface Shader中,使用法线纹理如何计算光照;

    3. 在Vertex & Fragment Shader中,使用模型自带的法线如何计算光照;

    4. 在Vertex & Fragment Shader中,使用法线纹理如何计算光照;


    要先说明的是,这篇文章有点长,有点绕,希望大家能耐心看完。我们先从最简单的地方开始。


    Surface Shader中的法线


    在Surface Shader中,无论是使用模型自带的法线或者使用法线纹理都是一件比较方便的事。原因是Unity封装了很多矩阵操作。我们会在这一节回答关于法线纹理的那几个问题。


    使用模型自带的法线


    法线实际上就是在光照模型中使用的,也就是Surface Shader的Lighting<Name>函数。Unity最常见的两种光照函数参数列表如下:


    1. half4 Lighting<Name> (SurfaceOutput s, half3 lightDir, half atten); This is used in forward rendering path for light models that are not view direction dependent (e.g. diffuse).

      用于不依赖视角的光照模型计算,例如漫反射。

    2. half4 Lighting<Name> (SurfaceOutput s, half3 lightDir, half3 viewDir, half atten); This is used in forward rendering path for light models that are view direction dependent.

      用于依赖视角的光照模型的计算,例如高光反射。

    而想要访问法线的话就是使用SurfaceOutput中的的o.Normal即可。需要注意的是,这些方便都是建立在Unity在背后为我们把normal、lightDir、viewDir转换到了同一坐标系下的基础上。这个坐标系一般是指World Space


    使用法线纹理


    如果使用法线纹理的话,就需要我们在进入光照函数之前修改SurfaceOutput中的的o.Normal。我们会在void surf (Input INinout SurfaceOutput o函数里完成这件事。一般,代码都长下面这个样子:

    [csharp] view plain copy
     print?在CODE上查看代码片派生到我的代码片
    1. void surf (Input IN, inout SurfaceOutput o)   
    2. {  
    3.     //Get the normal data out of the normal map textures  
    4.     //using the UnpackNormal() function.  
    5.     float3 normal = UnpackNormal(tex2D(_NormalTex, IN.uv_NormalTex));  
    6.                   
    7.     //Apply the new normals to the lighting model  
    8.     o.Normal = normal;  
    9. }  

    代码很简单。修改了法线后就可以按照上一节中的方法进行光照模型的计算。看起来和第一种方法好像一样,只是更改了o.Normal。但其实,Unity在背后做了很多。虽然我们使用了同样的Lighting<Name>函数,但其中normal、lightDir、viewDir所在的坐标系已经被Unity转换过了。这次,它们使用的坐标系是Tangent Space。如果你不知道它,没关系我们马上就会讲这个坐标系的细节。


    但你有没有想过为什么要使用UnpackNormal这个函数。这就牵扯到我们的第一个问题:为什么法线纹理通常都是偏蓝色的?它里面到底是存储的什么呢?你会说,当然是法线啦!那么它的所在坐标系是什么呢?是World Space?Object Space?还是View Space?


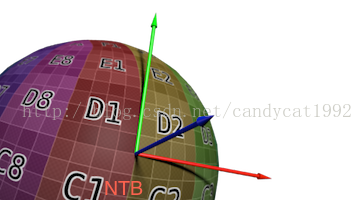
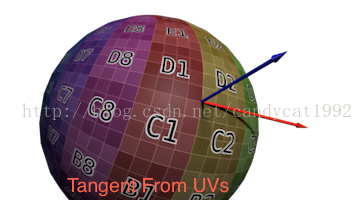
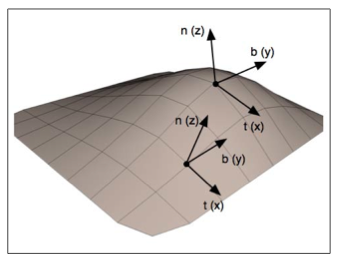
    实际上,我们通常见到的这种偏蓝色的法线纹理中,存储的是在Tangent Space中的顶点法线方向。那么,问题又来了,什么是Tangent Space(有时也叫object local coordinate system)?看到新名词不要怕,坐标系嘛,无非就是原点+三个坐标轴决定的一个相对空间嘛,我们只要搞清楚原点和三个坐标轴是什么就可以了。在Tangent Space中,坐标原点就是顶点的位置,其中z轴是该顶点本身的法线方向(N)。这样,另外两个坐标轴就是和该点相切的两条切线。这样的切线本来有无数条,但模型一般会给定该顶点的一个tangent,这个tangent方向一般是使用和纹理坐标方向相同的那条tangent(T)。而另一个坐标轴的方向(B)就可以通过normal和tangent的叉乘得到。上述过程可以如下图所示(来源:http://www.opengl-tutorial.org/intermediate-tutorials/tutorial-13-normal-mapping/):
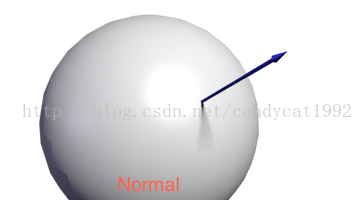
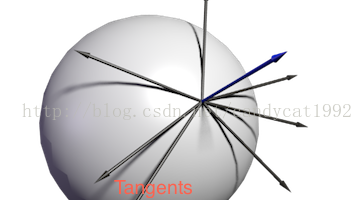
    我们用一幅图(来源:《OpenGL 4 Sharding Language Cookbook》)来说明这样的关系:


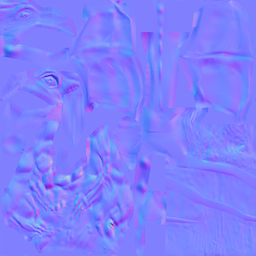
    也就是说,通常我们所见的法线纹理还是基于原法线信息构建的坐标系来构建出来的。那种偏蓝色的法线纹理其实就是存储了在每个顶点各自的Tangent Space中,法线的扰动方向。也就是说,如果一个顶点的法线方向不变,那么在它的Tangent Space中,新的normal值就是z轴方向,也就是说值为(0, 0, 1)。但这并不是法线纹理中存储的最终值,因为一个向量每个维度的取值范围在(-1, 1),而纹理每个通道的值范围在(0, 1),因此我们需要做一个映射,即pixel = (normal + 1) / 2。这样,之前的法线值(0, 0, 1)实际上对应了法线纹理中RGB的值为(0.5, 0.5, 1),而这个颜色也就是法线纹理中那大片的蓝色。这些蓝色实际上说明顶点的大部分法线是和模型本身法线一样的,不需要改变。总结一下就是,法线纹理的RGB通道存储了在每个顶点各自的Tangent Space中的法线方向的映射值。


    我们现在来解决第四个问题:为什么在Unity Shaders里,对法线纹理的采样要使用UnpackNormal函数。我们先来看,在用OpenGL这种基本的着色语言时,我们是怎么做的。它的代码一般长成下面这样:

    [csharp] view plain copy
     print?在CODE上查看代码片派生到我的代码片
    1. // Lookup the normal from the normal map  
    2. vec4 normal = texture( NormalMapTex, TexCoord );  
    3. normal.xyz = normal.xyz * 2 - 1;  

    上述代码很简单,就是将法线纹理中的颜色值重新映射回正确的法线方向值。如果我们要在Unity中完成这样的功能,可以这样做:

    [csharp] view plain copy
     print?在CODE上查看代码片派生到我的代码片
    1. <span style="white-space:pre">  </span>// Set "Texture Type" to "Texture"  
    2. <span style="white-space:pre">  </span>fixed4 normal = tex2D(_Bump, i.uv);  
    3. <span style="white-space:pre">  </span>norm.xyz = norm.xyz * 2 - 1  

    注意,这里并没有把法线纹理的“Texture Type”设置成“Normal Map”。上述方法是可以得到正确的法线方向的。


    Unity为了某些原因把上述过程进行了封装,也就是说上述代码在Unity里可以这么做:把法线纹理的“Texture Type”设置成“Normal Map”,在代码中使用UnpackNormal函数得到法线方向。这其中的原因,我猜想一方面是为了方便它对不同平台做优化和调整,一方面是为了解析不同格式的法线纹理。


    我们现在可以来回答第一个问题:为什么需要把法线纹理的“Texture Type”设置成“Normal Map”才能正确显示。这样的设置可以让Unity根据不同平台对纹理进行压缩,通过UnpackNormal函数对法线纹理进行正确的采样,即“将把颜色通道变成一个适合于实时法向映射的格式”。我们首先来看UnpackNormal函数的内部实现(在UnityCG.cginc里):

    [csharp] view plain copy
     print?在CODE上查看代码片派生到我的代码片
    1. inline fixed3 UnpackNormalDXT5nm (fixed4 packednormal)  
    2. {  
    3.     fixed3 normal;  
    4.     normal.xy = packednormal.wy * 2 - 1;  
    5. #if defined(SHADER_API_FLASH)  
    6.     // Flash does not have efficient saturate(), and dot() seems to require an extra register.  
    7.     normal.z = sqrt(1 - normal.x*normal.x - normal.y * normal.y);  
    8. #else  
    9.     normal.z = sqrt(1 - saturate(dot(normal.xy, normal.xy)));  
    10. #endif  
    11.     return normal;  
    12. }  
    13.   
    14. inline fixed3 UnpackNormal(fixed4 packednormal)  
    15. {  
    16. #if (defined(SHADER_API_GLES) || defined(SHADER_API_GLES3)) && defined(SHADER_API_MOBILE)  
    17.     return packednormal.xyz * 2 - 1;  
    18. #else  
    19.     return UnpackNormalDXT5nm(packednormal);  
    20. #endif  
    21. }  

    从代码我们可以推导出,对于移动平台上,Unity没有更改法线纹理的存储格式,仍然是RGB通道对应了XYZ方向。对于其他平台上,则使用了另一个函数UnpackNormalDXT5nm。为什么要这样差别对待呢?实际上是因为对法线纹理的压缩。按我们之前的处理方式,法线纹理被当成一个和普通纹理无异的图,但其实,它只有两个通道是真正必不可少的,因为第三个通道的值可以用另外两个推导出来(法线是单位向量)。显然,Unity采用的压缩方式是DXT5nm。这种压缩方式的原理我就不讲了(其实我也不是很懂。有兴趣的可以看这篇),但从通道的存储上,它的特点是,原先存储在R通道的值会被转移到A通道上,G通道保留,而RB通道会使用某种颜色填充(相当于被舍弃了)。因此UnpackNormalDXT5nm函数中,真正法线的xy值对应了压缩纹理的wy值,而z值是通过xy值推导出来的。


    也就是说,如果我们把“Texture Type”设置成“Normal Map”,调用UnpackNormal相当于进行了下面的操作(不考虑其他平台):

    [csharp] view plain copy
     print?在CODE上查看代码片派生到我的代码片
    1. // Set "Texture Type" to "Normal Map"  
    2.         fixed3 norm = UnpackNormal(tex2D(_Bump, i.uv));  
    3. // The above line is equal to this  
    4. fixed4 normal = tex2D(_Bump, i.uv);  
    5. fixed3 norm;  
    6. norm.xy = normal.wy * 2 - 1;  
    7. norm.z = sqrt(1 - saturate(dot(norm.xy, norm.xy)));  


    最后,我们来看下第三个问题:把“Texture Type”设置成“Normal Map”后,有一个复选框是“Create from grayscale”,这个是做什么用的。这要从法线纹理的种类说起。我们上述提到的法线纹理,也称“Tangent-Space Normal Map”。还有一种法线纹理是从“Grayscale Height Map”中生成的。后面这种纹理本身记录的是相对高度,是一张灰度图,白色表示相对更高,黑色表示相对更低。而法线纹理可以通过对这张图进行图像滤波来实现。使用方法可见官网,算法可见论坛讨论


    为什么要使用Tangent Space


    这个问题一开始让我很困扰。第一次接触Tangent Space会让人觉得比较难理解,而模型原始的法线其实是定义在Object Space中的,那为什么法线纹理就不能直接存储在Object Space中的新法线信息呢?实际上,这对应了两种法线纹理——Object-Space Normal MapTangent-Space Normal Map。它们分别对应了下面两种样子的纹理(来源:http://www.surlybird.com/tutorials/TangentSpace/):
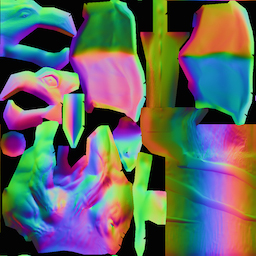


    从视觉上来说,Object-Space Normal Map五颜六色,原因是它是基于Object Space存储的,方向各异。如果我们把模型本身自带的法线映射到一张纹理上,就是一张Object-Space Normal Map;而Tangent-Space Normal Map如我们前面所说,是偏蓝色的。原因是它基于每个顶点的Tangent Space,很多顶点法线只是在原法线的基础上略微有些偏移而已。


    总体来说,Object-Space Normal Map更符合我们人类的直观认识,而且法线纹理本身也很直观,容易调整,因为不同的颜色就代表了不同的颜色。那么问题来了,为什么要使用这么“蹩脚”的Tangent Space来存储法线纹理里(起码大部分都是)?而且Unity里是仅支持Tangent-Space Normal Map的法线纹理的。


    实际上,法线本身存储在哪个坐标系中都是可以的,例如存储在World Space、或者Object Space、或者Tangent Space中。但问题是,我们并不是单纯的想要得到法线,后续的光照计算才是我们的目的。而选择哪个坐标系意味着我们需要把其他信息(例如viewDir和lightDir)转换到相应的坐标系中。而网上关于这两种法线纹理(World Space使用的比较少,暂时忽略)的选择各种各样,有些观点我也觉得无法理解。有的人讲应该只用Tangent Space,有的讲Object Space更快更好,有的人认为Object Space不可以用于可变形的物体,而另一些人说可以(我也认为使用哪种坐标系都可以在游戏里得到正确的效果,只要通过合适的坐标系转换)。下面是总结的我比较认同的优缺点。

    • 使用Object-Space的优点

      • 实现简单,更加直观。我们甚至都不需要模型原始的normal和tangent等信息,也就是说计算更少。生成它也非常简单,而如要要生成Tangent-Space Normal Map的话,由于它的tangent是和UV方向相同,因此想要效果比较好的Normal Map的话要求UV Map也是连续的。

      • 在UV缝合处和尖锐的边角部分,可见的突变(缝隙)较少,可以提供平滑的边界。这是因为Object-Space Normal Map存储的是同一坐标系下的法线信息,因此在边界处通过插值得到的法线可以平缓变换。而Tangent-Space Normal Map中的法线信息则依靠UV的方向和三角化结果,可能在边缘处或尖锐的部分会造成更多可见的缝合迹象。

    • 使用Tangent-Space的优点

      • 自由度很高。Object-Space Normal Map记录的是绝对法线信息,仅可用于创建它时的那个模型,而应用到其他模型上效果就完全错误了。而Tangent-Space Normal Map记录的是相对法线信息,这意味着,即便把该纹理应用到一个完全不同的网格上,也可以得到一个合理的结果。

      • 可进行UV动画。比如,我们可以移动一个纹理的UV坐标来实现一个凹凸移动的效果,但使用Object-Space Normal Map会得到完全错误的结果。原因同上。这种UV动画在水或者火山熔岩这种类型的物体会会用到。

      • 可以重用Normal Map。比如,一个砖块,我们可以仅使用一张Normal Map就可以用到所有的六个面上。

      • 可压缩。由于Tangent-Space Normal Map中法线的Z方向总是正方向的,因此我们可以仅存储XY方向,而推导得到Z方向。而Object-Space Normal Map由于每个方向都是完全可能的,因此必须存储三个方向的值,不可压缩。

    Tangent Space的前两个优点足以让很多人放弃Object Space而选择它了。下面的链接里有更深入地讨论(不保证观点的正确性):

    看了这么多,总结一下为什么Tangent-Space会这么流行。“It never fails!”从上面的优点列表可以看出,Tangent-Space在很多情况下都优于Object-Space,而且可以节省很多美术人员的工作。


    当然,也不是说Object-Space Normal Map完全没有用处,一些人就喜欢用Object-Space Normal Map也是可以的~


    说了半天,不管使用哪个坐标系,都面临着一个选择,就是最后光照计算使用的坐标系究竟是哪个。对于Tangent-Space Normal Map,我们一般就是在Tangent Space里计算的,也就是说,我们需要把viewDir、lightDir在Vertex Shader中转换到Tangent Space中,然后在Fragment Shader对法线纹理采样后,直接进行光照计算。而对于Object-Space Normal Map,我们可以有多种选择,即可以选择最终在Object-Space下,也可以在World Space或者View Space下。而这些计算,我们会在下一节里面讲到具体实现的方法。


    Vertex & Fragment Shader中的Normal Map


    如果要自己编码实现法线映射的目的,最主要的就是要考虑最终将光照计算转换到哪个坐标系中:Model Space,World Space,View Space还是Tangent Space。通常(注意是通常!),如果使用模型自带的法线时,我们一般把所有信息转换到World Space中。这样最大的好处就是一切都很直观,符合我们的一般认识。而如果是使用法线纹理,一般是转换到Tangent Space中。这样做的原因有一定性能的考虑,因为真正的法线信息只有到了Fragment Shader阶段才会从纹理中采样得到,如果我们不使用Tangent Space,就需要逐像素处理每个法线信息,而相反,如果使用Tangent Space,我们就只需要在Vertex Shader中对光照方向等信息进行逐顶点处理。而逐顶点总是比逐像素的处理效率更优


    需要转换的信息主要包含了下面几种:

    • 法线(如果使用自带法线的话)

    • 光源方向。如果是使用平行光(例如ForwardBase中使用的光照),那么不需要把光源方向作为顶点信息从Vertex Shader中传递给Fragment Shader;如果是使用点光源这类光源,我们需要逐顶点处理光源方向,把以每个顶点为出发点的光源信息存储在v2f中,传递给Fragment Shader。

    • 视角方向。如果我们的Shader需要计算和视角方向有关的光照计算(如高光)时,就需要把视角方向在Vertex Shader中处理后传递给Fragment Shader。

    理解了上述内容后,我们来具体看如果编码实现。为了充分说明,下面的示例中都使用了传统的ADS模型(ambient+diffuse+specular),以用到上述所有需要转换的信息。


    使用模型自带的法线(Unity 4.x)


    使用自带法线计算的话,那么我们需要在vert函数中把顶点法线、光照方向、视角方向全部转换到World Space中(当前其他坐标系也可以),而在frag函数中计算光照模型。


    Vertex Shader如下:

    [csharp] view plain copy
     print?在CODE上查看代码片派生到我的代码片
    1.             v2f vert(a2v v) {  
    2.                 v2f o;  
    3.                   
    4.                 //Transform the vertex to projection space  
    5.                 o.pos = mul(UNITY_MATRIX_MVP, v.vertex);  
    6.                 //Get the UV coordinates  
    7.                 o.uv = TRANSFORM_TEX (v.texcoord, _MainTex);   
    8.                 // If the model matrix is orthogonal (no scaling)  
    9.                 // We can use _Object2World;  
    10. //              o.worldNormal = mul((float3x3)_Object2World, SCALED_NORMAL);  
    11.                 // Or if the matrix is orthogonal  
    12.                 // We can use transpose instead of the inverse  
    13.                 o.worldNormal = mul(SCALED_NORMAL, (float3x3)_World2Object);  
    14.                   
    15.                 o.lightDir = mul((float3x3)_Object2World, ObjSpaceLightDir(v.vertex));  
    16.                 o.viewDir = mul((float3x3)_Object2World, ObjSpaceViewDir(v.vertex));  
    17.                   
    18.                 // pass lighting information to pixel shader  
    19.                 TRANSFER_VERTEX_TO_FRAGMENT(o);  
    20.                 return o;  
    21.             }  

    上述代码把转换到World Space中的各个信息存储在worldNormal、lightDir和viewDir中。


    对lightDir和viewDir的转换都是只需要把当前顶点对应的光照方向和视角方向乘以_Object2World即可。ObjSpaceLightDirObjSpaceViewDir函数是UnityCG.cginc中Unity提供的辅助函数,它们可以在ForwardBase和ForwardAdd Pass中根据顶点位置计算相应变量在Object Space中的方向。类似的函数有WorldSpaceLightDirWorldSpaceViewDir函数,不同的是它们是转换到World Space中。需要注意的是,这些函数并没有进行向量标准化,也就是不保证向量的模为1,因此我们需要在后面自己标准化。更多内置函数和变量可以参见官网。还有一种计算World Space中光照方向的方法是使用_WorldSpaceLightPos0,但这个变量其实官方文档中没有给出说明(起码目前没有,我记得以前是有的,但现在好像修改了),我的想法是官方希望我们使用之前提到的几种函数计算,而不推荐使用_WorldSpaceLightPos0_WorldSpaceLightPos0只适用Forward Pass中的平行光部分,而之前的函数是可以支持各种情况的。


    还有一点需要说明,就是对法线的转换。可以看出,我们没有直接像处理光照方向一样,把顶点法线乘以_Object2World。这是因为法线的要求与顶点平面垂直所致,而正确的转换方法可以参见这篇博客。而结论就是:对法线的转换需要使用矩阵的逆转置矩阵。回到我们的代码上,我们希望把法线从Object Space转换到World Space,那么就需要使用_Object2World的逆转置矩阵。但Unity并没有提供这个矩阵(Unity只提供了MV矩阵的逆转置矩阵,也就是说可以把法线从Object Space中转换到View Space中,详情可见官网),但庆幸的是,在Unity里自己计算得到这个矩阵是很简单的。我们可以首先得到_Object2World逆矩阵_World2Object。反置矩阵我们可以自己手动反置,也可以像代码中的做法一样,调换mul函数中法线和矩阵的位置,这样就可以实现反转后相乘的目的:

    [csharp] view plain copy
     print?在CODE上查看代码片派生到我的代码片
    1. // Or if the matrix is orthogonal  
    2. // We can use transpose instead of the inverse  
    3. o.worldNormal = mul(SCALED_NORMAL, (float3x3)_World2Object);  

    这行代码上方还注释了一行代码,这行代码直接使用了_Object2World对法线进行转换。怎么能这样!但其实这种做法就是Unity的做法,当你编写Surface Shader时,Unity 4.x在背后就是这样转换的。Untiy 4.x之所以会采用这种方法,是因为它已经利用CPU把非统一缩放的模型都消灭掉了,因此我们不需要在shader中再担心非统一缩放的问题。但如果我们在Unity 5.x中继续使用它的话,这种方法在某些情况下是对的,在某些情况是在错误的。就如注释中写到的一样,如果我们的Model Matrix是正交的(orthogonal),那么就可以直接使用_Object2World。这是因为正交矩阵的逆矩阵是它本身的反置矩阵,这样再进行一次反置后得到的就是它本身了。那么什么时候矩阵是正交的呢?如果我们没有做均匀的放缩的话,Model Matrix就是正交的;反之则不是。也就是说,如果我们对模型进行了不均匀的放缩(例如X方向放大2倍,Y方向放大4倍,Z方向放大5倍),那么直接使用_Object2World转换法线会产生一些错误。


    剩下的fragment函数就是简单的光照计算:

    [csharp] view plain copy
     print?在CODE上查看代码片派生到我的代码片
    1. float4 frag(v2f i) : COLOR {  
    2.     fixed3 texColor = tex2D(_MainTex, i.uv);      
    3.       
    4.     //Based on the ambient light  
    5.     fixed3 ambi = UNITY_LIGHTMODEL_AMBIENT.xyz;  
    6.   
    7.     //Work out this distance of the light  
    8.     fixed atten = LIGHT_ATTENUATION(i);  
    9.     //Angle to the light  
    10.     fixed3 diff = _LightColor0.rgb * saturate (dot (normalize(i.worldNormal),  normalize(i.lightDir))) * 2;   
    11.       
    12.      fixed3 refl = reflect(-i.lightDir, i.worldNormal);  
    13.     fixed3 spec = _LightColor0.rgb * pow(saturate(dot(normalize(refl), normalize(i.viewDir))), _Specular) * _Gloss;   
    14.        
    15.      //Product the final color  
    16.     fixed4 fragColor;  
    17.     fragColor.rgb = float3((ambi + (diff + spec) * atten) * texColor);  
    18.     fragColor.a = 1.0f;  
    19.       
    20.     return fragColor;  
    21. }  

    这里面需要说明的有两点。一个是之前所说的,对worldNormal、lightDir、viewDir这些进行标准化,实际上,在Surface Shader中我们为了严谨也应该在使用前首先标准化它们。还有一个就是关于光源衰减的计算,也就是其中atten变量的计算。之前在卡通风格的文章中提到过,这里再统一说明一下。计算光源衰减主要是为了模拟光照的平缓变化(例如点光源的边缘)以及阴影效果。atten会包含该fragment距离光源的远近,越接近0表示距离越远(如果被遮挡,这个值就为0)。Unity提供了比较方便的方法(方便是建立在你会用的基础上。)来计算这个衰减,它需要一些必须步骤(在我终于弄懂了步骤之后发现原来有一篇文章原来是讲这个的。):

    • 在Pass开头使用#pragma multi_compile_指令

    • 包含相应的辅助文件AutoLight.cginc和UnityCG.cginc

    • 在v2f结构体中添加LIGHTING_COORDS,来让Unity进行一些Lighting Shadow Texture的计算

    • 在Vertex函数的最后使用TRANSFER_VERTEX_TO_FRAGMENT

    • 在Fragment函数中使用LIGHT_ATTENUATION来计算衰减和阴影

    最后,全部代码如下:
    [csharp] view plain copy
     print?在CODE上查看代码片派生到我的代码片
    1. Shader "OpenGL Cookbook/UsingDefaultNormal" {  
    2.     Properties {  
    3.         _MainTex ("Base (RGB)", 2D) = "white" {}  
    4.         _Specular ("Specular", Range(1.0, 500.0)) = 250.0  
    5.         _Gloss ("Gloss", Range(0.0, 1.0)) = 0.2  
    6.     }  
    7.     SubShader {  
    8.         Tags { "RenderType"="Opaque" }  
    9.         LOD 200  
    10.           
    11.         Pass {  
    12.             Tags { "LightMode" = "ForwardBase" }  
    13.               
    14.             CGPROGRAM  
    15.              
    16.             #pragma multi_compile_fwdbase  
    17.              
    18.             #pragma vertex vert  
    19.             #pragma fragment frag  
    20.              
    21.             #include "UnityCG.cginc"  
    22.             #include "Lighting.cginc"  
    23.             #include "AutoLight.cginc"  
    24.               
    25.             sampler2D _MainTex;  
    26.             float _Specular;  
    27.             float _Gloss;  
    28.               
    29.             float4 _MainTex_ST;  
    30.               
    31.             struct a2v {  
    32.                 float4 vertex : POSITION;  
    33.                 fixed3 normal : NORMAL;  
    34.                 fixed4 texcoord : TEXCOORD0;  
    35.             };  
    36.               
    37.             struct v2f {  
    38.                 float4 pos : POSITION;  
    39.                 float2 uv : TEXCOORD0;  
    40.                 float3 worldNormal : TEXCOORD1;  
    41.                 float3 lightDir : TEXCOORD2;  
    42.                 float3 viewDir : TEXCOORD3;  
    43.                 LIGHTING_COORDS(4,5)  
    44.             };  
    45.               
    46.             v2f vert(a2v v) {  
    47.                 v2f o;  
    48.                   
    49.                 //Transform the vertex to projection space  
    50.                 o.pos = mul(UNITY_MATRIX_MVP, v.vertex);  
    51.                 //Get the UV coordinates  
    52.                 o.uv = TRANSFORM_TEX (v.texcoord, _MainTex);   
    53.                 // If the model matrix is orthogonal (no scaling)  
    54.                 // We can use _Object2World;  
    55. //              o.worldNormal = mul((float3x3)_Object2World, SCALED_NORMAL);  
    56.                 // Or if the matrix is orthogonal  
    57.                 // We can use transpose instead of the inverse  
    58.                 o.worldNormal = mul(SCALED_NORMAL, (float3x3)_World2Object);  
    59.                   
    60.                 o.lightDir = mul((float3x3)_Object2World, ObjSpaceLightDir(v.vertex));  
    61.                 o.viewDir = mul((float3x3)_Object2World, ObjSpaceViewDir(v.vertex));  
    62.                   
    63.                 // pass lighting information to pixel shader  
    64.                 TRANSFER_VERTEX_TO_FRAGMENT(o);  
    65.                 return o;  
    66.             }  
    67.               
    68.             float4 frag(v2f i) : COLOR {  
    69.                 fixed3 texColor = tex2D(_MainTex, i.uv);      
    70.                   
    71.                 //Based on the ambient light  
    72.                 fixed3 ambi = UNITY_LIGHTMODEL_AMBIENT.xyz;  
    73.   
    74.                 //Work out this distance of the light  
    75.                 fixed atten = LIGHT_ATTENUATION(i);  
    76.                 //Angle to the light  
    77.                 fixed3 diff = _LightColor0.rgb * saturate (dot (normalize(i.worldNormal),  normalize(i.lightDir))) * 2;   
    78.                   
    79.                  fixed3 refl = reflect(-i.lightDir, i.worldNormal);  
    80.                 fixed3 spec = _LightColor0.rgb * pow(saturate(dot(normalize(refl), normalize(i.viewDir))), _Specular) * _Gloss;   
    81.                    
    82.                  //Product the final color  
    83.                 fixed4 fragColor;  
    84.                 fragColor.rgb = float3((ambi + (diff + spec) * atten) * texColor);  
    85.                 fragColor.a = 1.0f;  
    86.                   
    87.                 return fragColor;  
    88.             }  
    89.               
    90.             ENDCG  
    91.         }  
    92.     }   
    93.     FallBack "Diffuse"  
    94. }  

    效果如下(模型来源:《OpenGL 》):


    如果需要进行反射等光照效果,只需要在frag函数中计算World Space中的反射方向,并对环境纹理进行采样即可:

    [csharp] view plain copy
     print?在CODE上查看代码片派生到我的代码片
    1. Shader "OpenGL Cookbook/UsingDefaultNormal" {  
    2.     Properties {  
    3.         _MainTex ("Base (RGB)", 2D) = "white" {}  
    4.         _Specular ("Specular", Range(1.0, 500.0)) = 250.0  
    5.         _Gloss ("Gloss", Range(0.0, 1.0)) = 0.2  
    6.         _Cubemap ("Cubemap", CUBE) = ""{}  
    7.         _ReflAmount ("Reflection Amount", Range(0,1)) = 0.5  
    8.     }  
    9.     SubShader {  
    10.         Tags { "RenderType"="Opaque" }  
    11.         LOD 200  
    12.           
    13.         Pass {  
    14.             Tags { "LightMode" = "ForwardBase" }  
    15.               
    16.             CGPROGRAM  
    17.              
    18.             #pragma multi_compile_fwdbase  
    19.              
    20.             #pragma vertex vert  
    21.             #pragma fragment frag  
    22.              
    23.             #include "UnityCG.cginc"  
    24.             #include "Lighting.cginc"  
    25.             #include "AutoLight.cginc"  
    26.               
    27.             sampler2D _MainTex;  
    28.             float _Specular;  
    29.             float _Gloss;  
    30.             samplerCUBE _Cubemap;  
    31.             float _ReflAmount;  
    32.               
    33.             float4 _MainTex_ST;  
    34.               
    35.             struct a2v {  
    36.                 float4 vertex : POSITION;  
    37.                 fixed3 normal : NORMAL;  
    38.                 fixed4 texcoord : TEXCOORD0;  
    39.             };  
    40.               
    41.             struct v2f {  
    42.                 float4 pos : POSITION;  
    43.                 float2 uv : TEXCOORD0;  
    44.                 float3 worldNormal : TEXCOORD1;  
    45.                 float3 lightDir : TEXCOORD2;  
    46.                 float3 viewDir : TEXCOORD3;  
    47.                 LIGHTING_COORDS(4,5)  
    48.             };  
    49.               
    50.             v2f vert(a2v v) {  
    51.                 v2f o;  
    52.                   
    53.                 //Transform the vertex to projection space  
    54.                 o.pos = mul(UNITY_MATRIX_MVP, v.vertex);  
    55.                 //Get the UV coordinates  
    56.                 o.uv = TRANSFORM_TEX (v.texcoord, _MainTex);   
    57.                 // If the model matrix is orthogonal (no scaling)  
    58.                 // We can use _Object2World;  
    59. //              o.worldNormal = mul((float3x3)_Object2World, SCALED_NORMAL);  
    60.                 // Or if the matrix is orthogonal  
    61.                 // We can use transpose instead of the inverse  
    62.                 o.worldNormal = mul(SCALED_NORMAL, (float3x3)_World2Object);  
    63.                   
    64.                 o.lightDir = mul((float3x3)_Object2World, ObjSpaceLightDir(v.vertex));  
    65.                 o.viewDir = mul((float3x3)_Object2World, ObjSpaceViewDir(v.vertex));  
    66.                   
    67.                 // pass lighting information to pixel shader  
    68.                 TRANSFER_VERTEX_TO_FRAGMENT(o);  
    69.                 return o;  
    70.             }  
    71.               
    72.             float4 frag(v2f i) : COLOR {  
    73.                 fixed3 texColor = tex2D(_MainTex, i.uv);      
    74.                   
    75.                 //Based on the ambient light  
    76.                 fixed3 ambi = UNITY_LIGHTMODEL_AMBIENT.xyz;  
    77.   
    78.                 //Work out this distance of the light  
    79.                 fixed atten = LIGHT_ATTENUATION(i);  
    80.                 //Angle to the light  
    81.                 fixed3 diff = _LightColor0.rgb * saturate (dot (normalize(i.worldNormal),  normalize(i.lightDir))) * 2;   
    82.                   
    83.                 fixed3 lightRefl = reflect(-i.lightDir, i.worldNormal);  
    84.                 fixed3 spec = _LightColor0.rgb * pow(saturate(dot(normalize(lightRefl), normalize(i.viewDir))), _Specular) * _Gloss;   
    85.                   
    86.                 fixed3 worldRefl = reflect(-i.viewDir, i.worldNormal);  
    87.                 fixed3 reflCol = texCUBE(_Cubemap, worldRefl).rgb * _ReflAmount;  
    88.                    
    89.                  //Product the final color  
    90.                 fixed4 fragColor;  
    91.                 fragColor.rgb = float3((ambi + (diff + spec) * atten) * texColor) + reflCol;  
    92.                 fragColor.a = 1.0f;  
    93.                   
    94.                 return fragColor;  
    95.             }  
    96.               
    97.             ENDCG  
    98.         }  
    99.     }   
    100.     FallBack "Diffuse"  
    101. }  


    使用法线纹理(Unity 4.x)


    如果能看到这里说明你很有耐心啊。。。呜呼,这是最后的部分了。如果需要使用法线纹理来采样法线信息,最大的问题同样是坐标系的转换。我们之前说过,一般的做法是把所有信息转换到Tangent Space中,我们现在就来看如何转换。


    我们先来看代码:

    [csharp] view plain copy
     print?在CODE上查看代码片派生到我的代码片
    1. v2f vert(a2v v) {  
    2.     v2f o;  
    3.                   
    4.     o.pos = mul(UNITY_MATRIX_MVP, v.vertex);  
    5.       
    6.     o.uv = TRANSFORM_TEX (v.texcoord, _MainTex);  
    7.       
    8.     //Create a rotation matrix for tangent space  
    9.     TANGENT_SPACE_ROTATION;  
    10.     o.lightDir = mul(rotation, ObjSpaceLightDir(v.vertex));  
    11.     o.viewDir = mul(rotation, ObjSpaceViewDir(v.vertex));  
    12.       
    13.     // pass lighting information to pixel shader  
    14.             TRANSFER_VERTEX_TO_FRAGMENT(o);  
    15.     return o;  
    16. }  

    Vertex函数大体上没有变,只是在计算lightDir和viewDir的公式上做了调整。我们使用了一个新的矩阵rotation来和Object Space下的光照方向和视角方向做乘法。rotation是由TANGENT_SPACE_ROTATION语句得到的变换矩阵,它负责把信息从Object Space转换到Tangent Space中。那么这个矩阵是如何计算得到的呢?我们可以来看下源码(在UnityCG.cginc中):

    [csharp] view plain copy
     print?在CODE上查看代码片派生到我的代码片
    1. // Declares 3x3 matrix 'rotation', filled with tangent space basis  
    2. #define TANGENT_SPACE_ROTATION   
    3.     float3 binormal = cross( v.normal, v.tangent.xyz ) * v.tangent.w;   
    4.     float3x3 rotation = float3x3( v.tangent.xyz, binormal, v.normal )  

    可以看出rotation就是由三个向量构建出了的矩阵,而这三个向量分别对应了Object Space中的tangent、binormal和normal的方向,这三个方向对应了Tangent Space中的三个坐标轴的方向。这里有一点点难懂。但其实就是一个坐标变换,如果我们想得到从坐标系A转换到坐标系B的一个变换矩阵,我们只需用A中B的三个坐标轴的方向、按X、Y、Z轴的顺序构建一个矩阵即可(这里需要注意是行向量还是列向量,例如OpenGL使用的是列向量)。


    Fragment Shader里就是进行简单的纹理采样,然后就和之前的光照计算一样。


    整体代码如下:

    [csharp] view plain copy
     print?在CODE上查看代码片派生到我的代码片
    1. Shader "OpenGL Cookbook/UsingNormalMaps" {  
    2.     Properties {  
    3.         _MainTex ("Base (RGB)", 2D) = "white" {}  
    4.         _Bump ("Bump", 2D) = "bump" {}  
    5.         _Specular ("Specular", Range(1.0, 500.0)) = 250.0  
    6.         _Gloss ("Gloss", Range(0.0, 1.0)) = 0.2  
    7.     }  
    8.     SubShader {  
    9.         Tags { "RenderType"="Opaque" }  
    10.         LOD 200  
    11.           
    12.         Pass {  
    13.             Tags { "LightMode" = "ForwardBase" }  
    14.               
    15.             CGPROGRAM  
    16.              
    17.             #pragma vertex vert  
    18.             #pragma fragment frag  
    19.              
    20.             #pragma multi_compile_fwdbase  
    21.               
    22.             #include "UnityCG.cginc"  
    23.             #include "Lighting.cginc"  
    24.             #include "AutoLight.cginc"  
    25.               
    26.             sampler2D _MainTex;  
    27.             sampler2D _Bump;  
    28.             float _Specular;  
    29.             float _Gloss;  
    30.   
    31.             float4 _MainTex_ST;  
    32.               
    33.             struct a2v {  
    34.                 float4 vertex : POSITION;  
    35.                 fixed3 normal : NORMAL;  
    36.                 fixed4 texcoord : TEXCOORD0;  
    37.                 fixed4 tangent : TANGENT;  
    38.             };  
    39.               
    40.             struct v2f {  
    41.                 float4 pos : POSITION;  
    42.                 fixed2 uv : TEXCOORD0;  
    43.                 fixed3 lightDir: TEXCOORD1;  
    44.                 fixed3 viewDir : TEXCOORD2;  
    45.                 LIGHTING_COORDS(3,4)  
    46.             };  
    47.               
    48.             v2f vert(a2v v) {  
    49.                 v2f o;  
    50.                               
    51.                 o.pos = mul(UNITY_MATRIX_MVP, v.vertex);  
    52.                   
    53.                 o.uv = TRANSFORM_TEX (v.texcoord, _MainTex);  
    54.                   
    55.                 //Create a rotation matrix for tangent space  
    56.                 TANGENT_SPACE_ROTATION;  
    57.                 o.lightDir = mul(rotation, ObjSpaceLightDir(v.vertex));  
    58.                 o.viewDir = mul(rotation, ObjSpaceViewDir(v.vertex));  
    59.                   
    60.                 // pass lighting information to pixel shader  
    61.                 TRANSFER_VERTEX_TO_FRAGMENT(o);  
    62.                 return o;  
    63.             }  
    64.               
    65.             fixed4 frag(v2f i) : COLOR {  
    66.                 fixed4 texColor = tex2D(_MainTex, i.uv);  
    67.                 fixed3 norm = UnpackNormal(tex2D(_Bump, i.uv));  
    68.                   
    69.                 fixed atten = LIGHT_ATTENUATION(i);  
    70.                   
    71.                 fixed3 ambi = UNITY_LIGHTMODEL_AMBIENT.xyz;  
    72.                   
    73.                 fixed3 diff = _LightColor0.rgb * saturate (dot (normalize(norm),  normalize(i.lightDir))) * 2;  
    74.                   
    75.                 fixed3 refl = reflect(-i.lightDir, norm);  
    76.                 fixed3 spec = _LightColor0.rgb * pow(saturate(dot(normalize(refl), normalize(i.viewDir))), _Specular) * _Gloss;  
    77.                   
    78.                 fixed4 fragColor;  
    79.                 fragColor.rgb = float3((ambi + (diff + spec) * atten) * texColor);  
    80.                 fragColor.a = 1.0f;  
    81.                   
    82.                 return fragColor;  
    83.             }  
    84.               
    85.             ENDCG  
    86.         }  
    87.     }   
    88.     FallBack "Diffuse"  
    89. }  

    最后效果如下:


    如果需要进行反射等光照效果,会麻烦一点。核心思想是在frag函数中把新的法线方向转换到World Space中,再计算出视角的反射方向,从而对环境纹理进行采样。我们首先需要在v2f中存储从该顶点的Tangent Space转换到World Space的转换矩阵,以及该顶点对应的视角方向。然后在frag函数中,利用转换矩阵先把法线转换到World Space中,再对视角方向去对称方向,最后进行采样:

    [csharp] view plain copy
     print?在CODE上查看代码片派生到我的代码片
    1. Shader "OpenGL Cookbook/UsingNormalMaps" {  
    2.     Properties {  
    3.         _MainTex ("Base (RGB)", 2D) = "white" {}  
    4.         _Bump ("Bump", 2D) = "bump" {}  
    5.         _Specular ("Specular", Range(1.0, 500.0)) = 250.0  
    6.         _Gloss ("Gloss", Range(0.0, 1.0)) = 0.2  
    7.         _Cubemap ("Cubemap", CUBE) = ""{}  
    8.         _ReflAmount ("Reflection Amount", Range(0,1)) = 0.5  
    9.     }  
    10.     SubShader {  
    11.         Tags { "RenderType"="Opaque" }  
    12.         LOD 200  
    13.           
    14.         Pass {  
    15.             Tags { "LightMode" = "ForwardBase" }  
    16.               
    17.             CGPROGRAM  
    18.              
    19.             #pragma vertex vert  
    20.             #pragma fragment frag  
    21.              
    22.             #pragma multi_compile_fwdbase  
    23.               
    24.             #include "UnityCG.cginc"  
    25.             #include "Lighting.cginc"  
    26.             #include "AutoLight.cginc"  
    27.               
    28.             sampler2D _MainTex;  
    29.             sampler2D _Bump;  
    30.             float _Specular;  
    31.             float _Gloss;  
    32.             samplerCUBE _Cubemap;  
    33.             float _ReflAmount;  
    34.   
    35.             float4 _MainTex_ST;  
    36.               
    37.             struct a2v {  
    38.                 float4 vertex : POSITION;  
    39.                 fixed3 normal : NORMAL;  
    40.                 fixed4 texcoord : TEXCOORD0;  
    41.                 fixed4 tangent : TANGENT;  
    42.             };  
    43.               
    44.             struct v2f {  
    45.                 float4 pos : POSITION;  
    46.                 fixed2 uv : TEXCOORD0;  
    47.                 fixed3 lightDir: TEXCOORD1;  
    48.                 fixed3 viewDir : TEXCOORD2;  
    49.                 fixed4 TtoW0 : TEXCOORD3;  
    50.                 fixed4 TtoW1 : TEXCOORD4;  
    51.                 fixed4 TtoW2 : TEXCOORD5;  
    52.                 LIGHTING_COORDS(6,7)  
    53.             };  
    54.               
    55.             v2f vert(a2v v) {  
    56.                 v2f o;  
    57.                               
    58.                 o.pos = mul(UNITY_MATRIX_MVP, v.vertex);  
    59.                   
    60.                 o.uv = TRANSFORM_TEX (v.texcoord, _MainTex);  
    61.                   
    62.                 //Create a rotation matrix for tangent space  
    63.                 TANGENT_SPACE_ROTATION;  
    64.                 o.lightDir = mul(rotation, ObjSpaceLightDir(v.vertex));  
    65.                 o.viewDir = mul(rotation, ObjSpaceViewDir(v.vertex));  
    66.                   
    67.                 float3 worldView = mul ((float3x3)_Object2World, -ObjSpaceViewDir(v.vertex));  
    68.                 o.TtoW0 = float4(mul(rotation, _Object2World[0].xyz), worldView.x) * unity_Scale.w;  
    69.                 o.TtoW1 = float4(mul(rotation, _Object2World[1].xyz), worldView.y) * unity_Scale.w;  
    70.                 o.TtoW2 = float4(mul(rotation, _Object2World[2].xyz), worldView.z) * unity_Scale.w;  
    71.                   
    72.                 // pass lighting information to pixel shader  
    73.                 TRANSFER_VERTEX_TO_FRAGMENT(o);  
    74.                 return o;  
    75.             }  
    76.               
    77.             fixed4 frag(v2f i) : COLOR {  
    78.                 fixed4 texColor = tex2D(_MainTex, i.uv);  
    79.                 fixed3 norm = UnpackNormal(tex2D(_Bump, i.uv));  
    80.                   
    81.                 fixed atten = LIGHT_ATTENUATION(i);  
    82.                   
    83.                 fixed3 ambi = UNITY_LIGHTMODEL_AMBIENT.xyz;  
    84.                   
    85.                 fixed3 diff = _LightColor0.rgb * saturate (dot (normalize(norm),  normalize(i.lightDir))) * 2;  
    86.                   
    87.                 fixed3 lightRefl = reflect(-i.lightDir, norm);  
    88.                 fixed3 spec = _LightColor0.rgb * pow(saturate(dot(normalize(lightRefl), normalize(i.viewDir))), _Specular) * _Gloss;  
    89.                   
    90.                 fixed3 worldView = fixed3(i.TtoW0.w, i.TtoW1.w, i.TtoW2.w);  
    91.                 fixed3 worldRefl = reflect (worldView, half3(dot(i.TtoW0, norm), dot(i.TtoW1, norm), dot(i.TtoW2, norm)));  
    92.                 fixed3 reflCol = texCUBE(_Cubemap, worldRefl).rgb * _ReflAmount;  
    93.                   
    94.                 fixed4 fragColor;  
    95.                 fragColor.rgb = float3((ambi + (diff + spec) * atten) * texColor) + reflCol;  
    96.                 fragColor.a = 1.0f;  
    97.                   
    98.                 return fragColor;  
    99.             }  
    100.               
    101.             ENDCG  
    102.         }  
    103.     }   
    104.     FallBack "Diffuse"  
    105. }  

    我对上面的代码中对法线变换的部分解释一下。这里没有考虑非统一缩放的问题,直接使用了从切线空间到世界空间的变换矩阵来对法线变换,原因可以参见下面一节的更新内容。上面的代码直接使用了:

    1. float3 worldView = mul ((float3x3)_Object2World, -ObjSpaceViewDir(v.vertex));    
    2. o.TtoW0 = float4(mul(rotation, _Object2World[0].xyz), worldView.x) * unity_Scale.w;    
    3. o.TtoW1 = float4(mul(rotation, _Object2World[1].xyz), worldView.y) * unity_Scale.w;    
    4. o.TtoW2 = float4(mul(rotation, _Object2World[2].xyz), worldView.z) * unity_Scale.w;   

    o.TtoW0、o.TtoW1和o.TtoW2中实际上分别存储的是切线空间中世界空间的三个坐标轴的矢量方向,然后在frag函数中,再把它们按行排列来和切线空间中的法线进行列乘来得到世界空间中的法线方向。我们之所以可以这样做,简单来说是因为在Unity 4.x中Unity在背后为非统一缩放的模型创建了一个新的只包含统一缩放的模型。但是,如果我们使用的是Unity 5.x的话这种前提就不存在了,直接上面的代码会有问题。正确的做法请参考下面一节。


    2015.09.15更新——Unity 5.x中的实现


    今天打算更新下这篇文章。本来一直懒得更新,后来发现这篇文章看的人越来越多了,觉得还是要严谨点比较好。


    这篇写的时候用的版本是Unity 4.6.x,但当时对Unity的内部实现有一点没有搞清楚,就是在Unity 5.0以前,实际上如果我们对一个模型A进行了非统一缩放,Unity内部会重新在内存中创建一个新的模型B,模型B的大小和缩放后的A是一样的,但是它的缩放系数是统一缩放,我们可以通过unity_Scale.w来得到这个统一缩放系数。换句话说,在Unity 5.0以前,实际上我们在shader中根本不需要考虑模型的非统一缩放问题,因为在shader阶段非统一缩放根本就不存在了!


    不得不说,Unity这个背后的小动作真的是很奇葩。。。我认为正是这个原因,导致在Unity 4.x中内置shader的对法线的转换都大胆地直接使用了_Object2World来把法线转换到世界空间下,天真的我竟然还以为是他们不在意。Too young!!!因此,在Unity 4.x中,完全可以不考虑非统一缩放对法线变换的影响,我们可以直接使用原变换矩阵即可,不需要再使用原变换矩阵的逆转置矩阵来变换法线。评论里有一位仁兄指出了这个问题。的确,在上面最后一个例子里,我在v2f中存储从该顶点的Tangent Space转换到World Space的转换矩阵,然后在frag函数中,利用转换矩阵先把法线转换到World Space中。这里,我直接使用的就是从Tangent Space到World Space的变换矩阵来变换法线的,没有考虑逆转置矩阵,因此这位仁兄看不懂是正常的。。。


    在这里我给出官方的更新说明(详情请见:http://docs.unity3d.com/Manual/UpgradeGuide5-Shaders.html):


    “unity_Scale” shader variable has been removed  

    The “unity_Scale” shader property has been removed. In 4.x unity_Scale.w was the 1 / uniform Scale of the transform, Unity 4.x only rendered non-scaled or uniformly scaled models. Other scales were performed on the CPU, which was very expensive & had an unexpected memory overhead.  In Unity 5.0 all this is done on the GPU by simply passing matrices with non-uniform scale to the shaders. Thus unity_Scale has been removed because it can not represent the full scale. In most cases where “unity_Scale” was used we recommend instead transforming to world space first. In the case of transforming normals, you always have to use normalize on the transformed normal now. In some cases this leads to slightly more expensive code in the vertex shader.


    也就是说,unity_Scale在Unity 5.x中已经被抛弃了,Unity也不会在CPU里再处理非统一缩放模型。带来的问题就是,我们需要自行处理非统一缩放问题,并要在必要时进行归一化操作了。


    那么,说了这么多,正确的方法是什么呢?在Unity 5.x中,如果我们需要把法线从模型空间变换到世界空间中,可以直接使用内置函数UnityObjectToWorldNormal,例如:

    1. fixed3 worldNormal = UnityObjectToWorldNormal(v.normal)  

    它的实现可以在UnityCG.cginc里找到:

    1. // Transforms normal from object to world space  
    2. inline float3 UnityObjectToWorldNormal( in float3 norm )  
    3. {  
    4.     // Multiply by transposed inverse matrix, actually using transpose() generates badly optimized code  
    5.     return normalize(_World2Object[0].xyz * norm.x + _World2Object[1].xyz * norm.y + _World2Object[2].xyz * norm.z);  
    6. }  

    其实就是和下面的代码是等价的:

    1. o.worldNormal = normalize(mul(v.normal, (float3x3)_World2Object));  

    如果是使用了法线纹理和反射,我们需要法线从切线空间变换到世界空间。代码如下:

    1. Shader "OpenGL Cookbook/UsingNormalMaps (Unity 5.x)" {  
    2.     Properties {  
    3.         _MainTex ("Base (RGB)", 2D) = "white" {}  
    4.         _Bump ("Bump", 2D) = "bump" {}  
    5.         _Specular ("Specular", Range(1.0, 500.0)) = 250.0  
    6.         _Gloss ("Gloss", Range(0.0, 1.0)) = 0.2  
    7.         _Cubemap ("Cubemap", CUBE) = ""{}  
    8.         _ReflAmount ("Reflection Amount", Range(0,1)) = 0.5  
    9.     }  
    10.     SubShader {  
    11.         Tags { "RenderType"="Opaque" }  
    12.         LOD 200  
    13.           
    14.         Pass {  
    15.             Tags { "LightMode" = "ForwardBase" }  
    16.               
    17.             CGPROGRAM  
    18.               
    19.             #pragma vertex vert  
    20.             #pragma fragment frag  
    21.               
    22.             #pragma multi_compile_fwdbase  
    23.                
    24.             #include "UnityCG.cginc"  
    25.             #include "Lighting.cginc"  
    26.             #include "AutoLight.cginc"  
    27.               
    28.             sampler2D _MainTex;  
    29.             sampler2D _Bump;  
    30.             float _Specular;  
    31.             float _Gloss;  
    32.             samplerCUBE _Cubemap;  
    33.             float _ReflAmount;  
    34.   
    35.             float4 _MainTex_ST;  
    36.               
    37.             struct a2v {  
    38.                 float4 vertex : POSITION;  
    39.                 fixed3 normal : NORMAL;  
    40.                 fixed4 texcoord : TEXCOORD0;  
    41.                 fixed4 tangent : TANGENT;  
    42.             };  
    43.               
    44.             struct v2f {  
    45.                 float4 pos : POSITION;  
    46.                 fixed2 uv : TEXCOORD0;  
    47.                 fixed3 lightDir: TEXCOORD1;  
    48.                 fixed4 TtoW0 : TEXCOORD2;  
    49.                 fixed4 TtoW1 : TEXCOORD3;  
    50.                 fixed4 TtoW2 : TEXCOORD4;  
    51.                 LIGHTING_COORDS(5, 6)  
    52.             };  
    53.               
    54.             v2f vert(a2v v) {  
    55.                 v2f o;  
    56.                               
    57.                 o.pos = mul(UNITY_MATRIX_MVP, v.vertex);  
    58.                   
    59.                 o.uv = TRANSFORM_TEX (v.texcoord, _MainTex);  
    60.                   
    61.                 //Create a rotation matrix for tangent space  
    62.                 TANGENT_SPACE_ROTATION;  
    63.                 o.lightDir = mul(rotation, ObjSpaceLightDir(v.vertex));  
    64.                   
    65.                 float3 worldPos = mul(_Object2World, v.vertex).xyz;  
    66.                 fixed3 worldNormal = UnityObjectToWorldNormal(v.normal);  
    67.                 fixed3 worldTangent = UnityObjectToWorldDir(v.tangent.xyz);  
    68.                 fixed3 worldBinormal = cross(worldNormal, worldTangent) * v.tangent.w;  
    69.                 // Case 1: The codes used by built-in shaders  
    70.                 o.TtoW0 = float4(worldTangent.x, worldBinormal.x, worldNormal.x, worldPos.x);  
    71.                 o.TtoW1 = float4(worldTangent.y, worldBinormal.y, worldNormal.y, worldPos.y);  
    72.                 o.TtoW2 = float4(worldTangent.z, worldBinormal.z, worldNormal.z, worldPos.z);  
    73.     
    74.                 // Case 2: The codes which I think are correct   
    75.                 float3x3 WtoT = mul(rotation, (float3x3)_World2Object);  
    76.                 o.TtoW0 = float4(WtoT[0].xyz, worldPos.x);  
    77.                 o.TtoW1 = float4(WtoT[1].xyz, worldPos.y);  
    78.                 o.TtoW2 = float4(WtoT[2].xyz, worldPos.z);  
    79.                   
    80.                 // pass lighting information to pixel shader  
    81.                 TRANSFER_VERTEX_TO_FRAGMENT(o);  
    82.                 return o;  
    83.             }  
    84.               
    85.             fixed4 frag(v2f i) : COLOR {  
    86.                 fixed4 texColor = tex2D(_MainTex, i.uv);  
    87.                 fixed3 norm = UnpackNormal(tex2D(_Bump, i.uv));  
    88.                 float3 worldPos = float3(i.TtoW0.w, i.TtoW1.w, i.TtoW2.w);  
    89.                 fixed3 worldViewDir = normalize(UnityWorldSpaceViewDir(worldPos));  
    90.                 fixed3 lightDir = normalize(UnityWorldSpaceLightDir(worldPos));  
    91.                 // Case 1  
    92.                 half3 worldNormal = normalize(half3(dot(i.TtoW0.xyz, norm), dot(i.TtoW1.xyz, norm), dot(i.TtoW2.xyz, norm)));  
    93.                 // Case 2  
    94.                 worldNormal = normalize(mul(norm, float3x3(i.TtoW0.xyz, i.TtoW1.xyz, i.TtoW2.xyz)));  
    95.                   
    96.                 fixed atten = LIGHT_ATTENUATION(i);  
    97.                   
    98.                 fixed3 ambi = UNITY_LIGHTMODEL_AMBIENT.xyz;  
    99.                   
    100.                 fixed3 diff = _LightColor0.rgb * saturate (dot (normalize(worldNormal),  normalize(lightDir)));  
    101.                                   
    102.                 fixed3 lightRefl = reflect(-lightDir, worldNormal);  
    103.                 fixed3 spec = _LightColor0.rgb * pow(saturate(dot(normalize(lightRefl), normalize(worldViewDir))), _Specular) * _Gloss;  
    104.                   
    105.                 fixed3 worldView = fixed3(i.TtoW0.w, i.TtoW1.w, i.TtoW2.w);  
    106.                 fixed3 worldRefl = reflect (-worldViewDir, worldNormal);  
    107.                 fixed3 reflCol = texCUBE(_Cubemap, worldRefl).rgb * _ReflAmount;  
    108.                   
    109.                 fixed4 fragColor;  
    110.                 fragColor.rgb = float3((ambi + (diff + spec) * atten) * texColor) + reflCol;  
    111.                 fragColor.a = 1.0f;  
    112.                   
    113.                 return fragColor;  
    114.             }  
    115.               
    116.             ENDCG  
    117.         }  
    118.     }   
    119.     FallBack "Diffuse"  
    120. }  


    我感到很怪异的是,Unity 5.x中仍然使用了从切线空间到世界空间的变换矩阵来变换法线方向,而不是使用了逆转置矩阵。在上面的代码里,我给出了Unity 5.x中自带的shader使用的变换矩阵(对应Case 1),和我认为正确的逆转置矩阵(对应Case 2),两者在模型是统一缩放时得到的效果是完全一样的,只是在非统一缩放时有略微不同。


    写在最后


    这篇文章,有点长,有点枯燥,有点复杂,但是非常基础,了解这些很重要。我也真的花了一些时间才弄清楚这些,希望看到的人可以好好看看。渲染的东西很碎,很杂,需要积累,路途漫漫啊~


    参考链接:

    http://forum.unity3d.com/threads/_object2world-or-unity_matrix_it_mv.112446/
  • 相关阅读:
    springboot 入门
    json-lib 的 maven dependency 引入及Jar包下载
    DataGridView 使用技巧精华
    SqlServer无备份下误删数据恢复
    Reflector 已经out了,试试ILSpy
    C# 反射,动态编译
    windows8和windows server2012不联网安装.net 3.5(包括2.0和3.0)
    如何附加被分离的质疑数据库? [转]
    easyui validatebox 验证类型
    所见即所得:七大无需编程的DIY开发工具
  • 原文地址:https://www.cnblogs.com/nafio/p/9137325.html
Copyright © 2020-2023  润新知