@
OAuth2.0系列博客:
- OAuth2.0系列之基本概念和运作流程(一)
- OAuth2.0系列之授权码模式实践教程(二)
- OAuth2.0系列之简化模式实践教程(三)
- OAuth2.0系列之密码模式实践教程(四)
- OAuth2.0系列之客户端模式实践教程(五)
- OAuth2.0系列之集成JWT实现单点登录
1、授权码模式简介
1.1 前言简介
在上一篇文章中我们学习了OAuth2的一些基本概念,对OAuth2有了基本的认识,接着学习OAuth2.0授权模式中的授权码模式
ps:OAuth2.0的授权模式可以分为:
- 授权码模式(authorization code)
- 简化模式(implicit)
- 密码模式(resource owner password credentials)
- 客户端模式(client credentials)
授权码(authorization code)方式,指的是第三方应用先申请一个授权码,然后再用该码获取令牌。授权码模式功能最完整、使用最广泛、流程最严密的授权模式
1.2 授权流程图
官网图片:
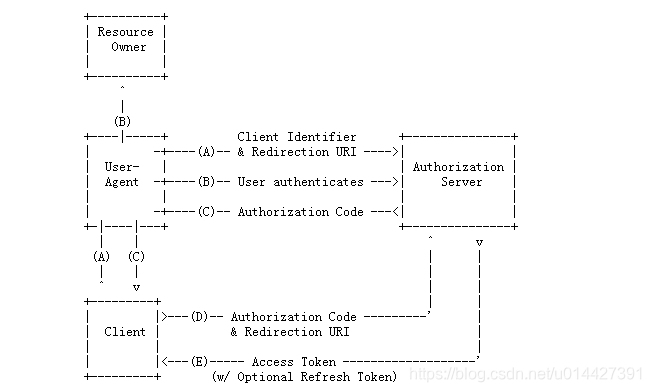
- (A):客户端携带client_id、redirect_uri,中间通过代理者访问授权服务器,如果已经登录过会直接返回redirect_uri,没有登录过就跳转到登录页面
- (B)授权服务器对客户端进行身份验证(通过用户代理,让用户输入用户名和密码)
- (C)授权通过,会重定向到redirect_uri并携带授权码code作为uri参数
- (D)客户端携带授权码访问授权服务器
- (E)验证授权码通过,返回acceptToken
从调接口方面,简单来说:
-
第一步:获取code:
eg:oauthServer+"/oauth/authorize?client_id="+clientId+"&response_type=code&redirect_uri="+redirectUrl+"&scope=all"
如果没有登录,则会跳转到统一身份认证登录页面。如果用户登录了,调用接口后,会重定向到redirect_uri,授权码会作为它的参数 -
第二步:获取access_token
eg:oauthServer+"/oauth/token?code="+code+"&grant_type=authorization_code&client_secret="+clientSecret+"&redirect_uri="+redirectUri+"&client_id="+clientId
{
    "access_token": "eyJhbGciOiJIUzI1NiIsInR5cCI6IkpXVCJ9.eyJleHAiOjE1ODk1MzQ5NzMsInVzZXJfbmFtZSI6Im5pY2t5IiwiYXV0aG9yaXRpZXMiOlsiUk9MRV9hZG1pbiJdLCJqdGkiOiJmMjM0M2Q0NC1hODViLTQyOGYtOWE1ZS1iNTE4NTAwNTM5ODgiLCJjbGllbnRfaWQiOiJvYSIsInNjb3BlIjpbImFsbCJdfQ.LWkN2gC2dBrGTn5uSPzfdW6yRj7jhlX87EE8scY02hI",
    "token_type": "bearer",
    "expires_in": 59,
    "scope": "all",
    "user_name": "nicky",
    "jti": "f2343d44-a85b-428f-9a5e-b51850053988"
}
- 第三步:访问系统资源,此时统一认证服务会根据该认证客户端权限信息判断,决定是否返回信息。
访问:http://localhost:8084/api/userinfo?access_token=${accept_token}
2、例子实践
2.1 实验环境准备
- IntelliJ IDEA
- Maven3.+版本
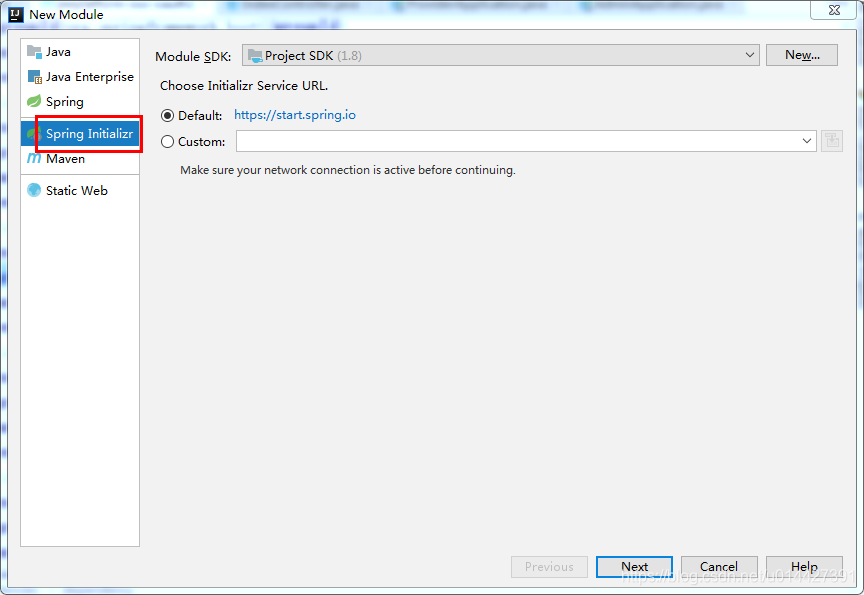
新建SpringBoot Initializer项目,可以命名authorization_code

主要是想引入:
 <dependency>
            <groupId>org.springframework.boot</groupId>
            <artifactId>spring-boot-starter-web</artifactId>
        </dependency>
 <!-- Spring Cloud Oauth2-->
        <dependency>
            <groupId>org.springframework.cloud</groupId>
            <artifactId>spring-cloud-starter-oauth2</artifactId>
        </dependency>
        <!-- Spring Cloud Security-->
        <dependency>
            <groupId>org.springframework.cloud</groupId>
            <artifactId>spring-cloud-starter-security</artifactId>
        </dependency>
2.2 OAuth2.0角色
前面的学习,我们知道了OAuth2.0主要包括如下角色,下面通过代码例子加深对理论的理解
- 资源所有者(Resource Owner)
- 用户代理(User Agent)
- 客户端(Client)
- 授权服务器(Authorization Server)
- 资源服务器(Resource Server)
生产环境、资源服务器和授权服务器一般是分开的,不过学习的可以放在一起
定义资源服务器,用注解@EnableResourceServer;
定义授权服务器,用注解@EnableAuthorizationServer;
2.3 OAuth2.0配置类
package com.example.springboot.authorizationcode.config;

import org.springframework.beans.factory.annotation.Autowired;
import org.springframework.context.annotation.Bean;
import org.springframework.context.annotation.Configuration;
import org.springframework.security.authentication.AuthenticationManager;import org.springframework.security.oauth2.config.annotation.configurers.ClientDetailsServiceConfigurer;
import org.springframework.security.oauth2.config.annotation.web.configuration.AuthorizationServerConfigurerAdapter;
import org.springframework.security.oauth2.config.annotation.web.configuration.EnableAuthorizationServer;
import org.springframework.security.oauth2.config.annotation.web.configurers.AuthorizationServerEndpointsConfigurer;
import org.springframework.security.oauth2.config.annotation.web.configurers.AuthorizationServerSecurityConfigurer;
import org.springframework.security.oauth2.provider.token.TokenStore;
import org.springframework.security.oauth2.provider.token.store.InMemoryTokenStore;


/**
 * <pre>
 *     OAuth2.0配置类
 * </pre>
 *
 * <pre>
 * @author mazq
 * 修改记录
 *    修改后版本:     修改人:  修改日期: 2020/06/11 11:00  修改内容:
 * </pre>
 */
@Configuration
//开启授权服务
@EnableAuthorizationServer
public class OAuth2Config extends AuthorizationServerConfigurerAdapter {

    @Autowired
    private AuthenticationManager authenticationManager;

    private static final String CLIENT_ID = "cms";
    private static final String SECRET_CHAR_SEQUENCE = "{noop}secret";
    private static final String SCOPE_READ = "read";
    private static final String SCOPE_WRITE = "write";
    private static final String TRUST = "trust";
    private static final String USER ="user";
    private static final String ALL = "all";
    private static final int ACCESS_TOKEN_VALIDITY_SECONDS = 2*60;
    private static final int FREFRESH_TOKEN_VALIDITY_SECONDS = 2*60;
    // 密码模式授权模式
    private static final String GRANT_TYPE_PASSWORD = "password";
    //授权码模式
    private static final String AUTHORIZATION_CODE = "authorization_code";
    //refresh token模式
    private static final String REFRESH_TOKEN = "refresh_token";
    //简化授权模式
    private static final String IMPLICIT = "implicit";
    //指定哪些资源是需要授权验证的
    private static final String RESOURCE_ID = "resource_id";

    @Override
    public void configure(ClientDetailsServiceConfigurer clients) throws Exception {
        clients
                // 使用内存存储
                .inMemory()
                //标记客户端id
                .withClient(CLIENT_ID)
                //客户端安全码
                .secret(SECRET_CHAR_SEQUENCE)
                //为true 直接自动授权成功返回code
                .autoApprove(true)
                .redirectUris("http://127.0.0.1:8084/cms/login") //重定向uri
                //允许授权范围
                .scopes(ALL)
                //token 时间秒
                .accessTokenValiditySeconds(ACCESS_TOKEN_VALIDITY_SECONDS)
                //刷新token 时间 秒
                .refreshTokenValiditySeconds(FREFRESH_TOKEN_VALIDITY_SECONDS)
                //允许授权类型
                .authorizedGrantTypes(AUTHORIZATION_CODE );
    }

    @Override
    public void configure(AuthorizationServerEndpointsConfigurer endpoints) throws Exception {
        // 使用内存保存生成的token
        endpoints.authenticationManager(authenticationManager).tokenStore(memoryTokenStore());
    }

    /**
     * 认证服务器的安全配置
     *
     * @param security
     * @throws Exception
     */
    @Override
    public void configure(AuthorizationServerSecurityConfigurer security) throws Exception {
        security
                //.realm(RESOURCE_ID)
                // 开启/oauth/token_key验证端口认证权限访问
                .tokenKeyAccess("isAuthenticated()")
                //  开启/oauth/check_token验证端口认证权限访问
                .checkTokenAccess("isAuthenticated()")
                //允许表单认证
                .allowFormAuthenticationForClients();
    }

    @Bean
    public TokenStore memoryTokenStore() {
        // 最基本的InMemoryTokenStore生成token
        return new InMemoryTokenStore();
    }

}
2.4 Security配置类
为了测试,可以进行简单的SpringSecurity
package com.example.springboot.authorizationcode.config;


import org.springframework.context.annotation.Bean;
import org.springframework.context.annotation.Configuration;
import org.springframework.core.annotation.Order;
import org.springframework.security.authentication.AuthenticationManager;
import org.springframework.security.config.annotation.authentication.builders.AuthenticationManagerBuilder;
import org.springframework.security.config.annotation.web.builders.HttpSecurity;
import org.springframework.security.config.annotation.web.builders.WebSecurity;
import org.springframework.security.config.annotation.web.configuration.EnableWebSecurity;
import org.springframework.security.config.annotation.web.configuration.WebSecurityConfigurerAdapter;

/**
 * <pre>
 *  SpringSecurity配置类
 * </pre>
 *
 * <pre>
 * @author mazq
 * 修改记录
 *    修改后版本:     修改人:  修改日期: 2020/06/11 11:23  修改内容:
 * </pre>
 */
@Configuration
@EnableWebSecurity
@Order(1)
public class SecurityConfig extends WebSecurityConfigurerAdapter {

    @Bean
    @Override
    public AuthenticationManager authenticationManagerBean() throws Exception {
        return super.authenticationManagerBean();
    }

    @Override
    protected void configure(AuthenticationManagerBuilder auth) throws Exception {    //auth.inMemoryAuthentication()
        auth.inMemoryAuthentication()
                .withUser("nicky")
                .password("{noop}123")
                .roles("admin");
    }

    @Override
    public void configure(WebSecurity web) throws Exception {
        //解决静态资源被拦截的问题
        web.ignoring().antMatchers("/asserts/**");
        web.ignoring().antMatchers("/favicon.ico");
    }

    @Override
    protected void configure(HttpSecurity http) throws Exception {
        http   // 配置登录页并允许访问
                .formLogin().permitAll()
                // 配置Basic登录
                //.and().httpBasic()
                // 配置登出页面
                .and().logout().logoutUrl("/logout").logoutSuccessUrl("/")
                .and().authorizeRequests().antMatchers("/oauth/**", "/login/**", "/logout/**").permitAll()
                // 其余所有请求全部需要鉴权认证
                .anyRequest().authenticated()
                // 关闭跨域保护;
                .and().csrf().disable();
    }

}
2.5 功能简单测试
访问授权链接,在浏览器访问就可以,授权码模式response_type参数传code:
http://localhost:8888/oauth/authorize?client_id=cms&client_secret=secret&response_type=code
因为没登录,所以会返回SpringSecurity的默认登录页面,具体代码是 http .formLogin().permitAll();,如果要弹窗登录的,可以配置http.httpBasic();,这种配置是没有登录页面的,自定义登录页面可以这样配置http.formLogin().loginPage("/login").permitAll()
如图,输入SpringSecurity配置的静态账号密码:nicky/123

登录成功,返回redirect_uri,拿到授权码
http://127.0.0.1:8084/cms/login?code=lA4EAJ
拿到授权码code去获取token

token:
{
    "access_token": "dcb626c2-e514-4a8c-8df1-90fe5b5baabf",
    "token_type": "bearer",
    "expires_in": 119,
    "scope": "all"
}
注意配置一下请求头的授权参数,username即client_id,password即client_secret

代码方式请求,可以进行如下封装,即进行base64加密
HttpHeaders headers = new HttpHeaders();
        byte[] key = (clientId+":"+clientSecret).getBytes();
        String authKey = new String(Base64.encodeBase64(key));
        LOG.info("Authorization:{}","Basic "+authKey);
        headers.add("Authorization","Basic "+authKey);
例子代码下载:code download