SpringBoot系列之集成Mybatis教程
环境准备:IDEA + maven
本博客通过例子的方式,介绍Springboot集成Mybatis的两种方法,一种是通过注解实现,一种是通过xml的方式
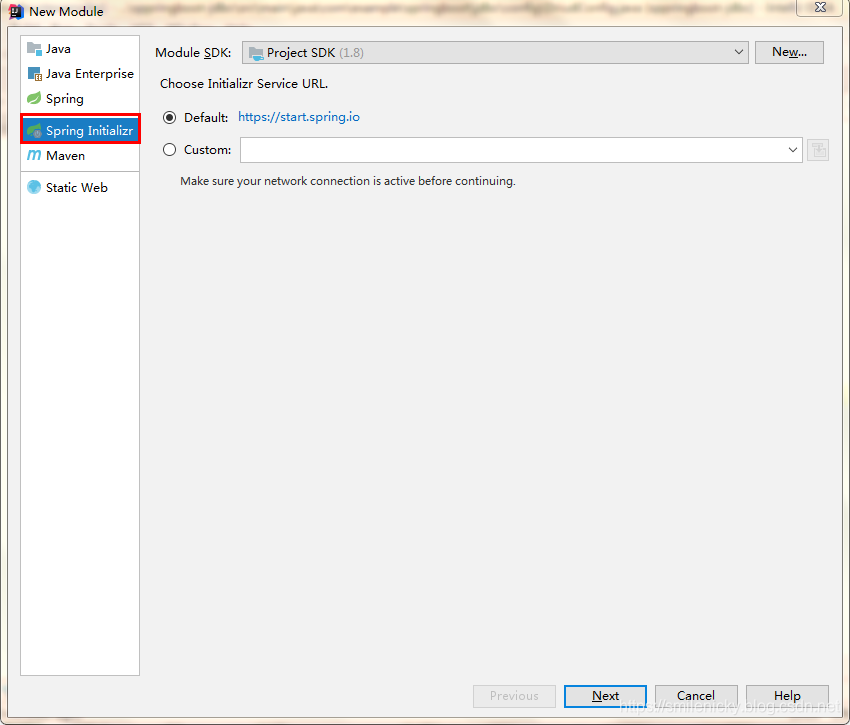
进行实验,要先创建一个Initializer工程,如图:

打包方式选择jar即可,因为Springboot使用了嵌入式的Servlet容器,直接运行jar即可,即使是web工程也支持

选择必要的jar,Mybatis、数据库驱动是必要的

新建项目后,会自动加上如下配置,,如果你的mysql服务器是5.7版本的,建议指定mysql-connector-java版本,Druid也需要自己加上,pom配置参考:
<properties>
		<java.version>1.8</java.version>
		<druid.version>1.1.2</druid.version>
	</properties>

	<dependencies>
		<dependency>
			<groupId>org.springframework.boot</groupId>
			<artifactId>spring-boot-starter-web</artifactId>
		</dependency>
		<dependency>
			<groupId>org.mybatis.spring.boot</groupId>
			<artifactId>mybatis-spring-boot-starter</artifactId>
			<version>2.1.1</version>
		</dependency>

		<dependency>
			<groupId>mysql</groupId>
			<artifactId>mysql-connector-java</artifactId>
			<version>5.1.27</version>
			<scope>runtime</scope>
		</dependency>

		<dependency>
			<groupId>com.alibaba</groupId>
			<artifactId>druid</artifactId>
			<version>${druid.version}</version>
		</dependency>

		<dependency>
			<groupId>org.springframework.boot</groupId>
			<artifactId>spring-boot-starter-test</artifactId>
			<scope>test</scope>
			<exclusions>
				<exclusion>
					<groupId>org.junit.vintage</groupId>
					<artifactId>junit-vintage-engine</artifactId>
				</exclusion>
			</exclusions>
		</dependency>
	</dependencies>
mybatis-spring-boot-starter是Springboot的场景启动器,默认集成了如下jar

新建数据库和数据表:
CREATE DATABASE /*!32312 IF NOT EXISTS*/`springboot` /*!40100 DEFAULT CHARACTER SET utf8 */;

USE `springboot`;

/*Table structure for table `sys_user` */

DROP TABLE IF EXISTS `sys_user`;

CREATE TABLE `sys_user` (
  `userId` int(10) NOT NULL,
  `username` varchar(20) NOT NULL,
  `sex` char(10) DEFAULT NULL,
  `password` varchar(10) DEFAULT NULL,
  PRIMARY KEY (`userId`),
  UNIQUE KEY `idx_username` (`username`)
) ENGINE=InnoDB DEFAULT CHARSET=utf8;

/*Data for the table `sys_user` */

insert  into `sys_user`(`userId`,`username`,`sex`,`password`) values (1,'admin','man','11');
新建一个bean类,代码:
import java.io.Serializable;

public class User implements Serializable{
    private String userId;
    private String username;
    private String sex;
    private String password;

    public String getUserId() {
        return userId;
    }

    public void setUserId(String userId) {
        this.userId = userId;
    }

    public String getUsername() {
        return username;
    }

    public void setUsername(String username) {
        this.username = username;
    }

    public String getSex() {
        return sex;
    }

    public void setSex(String sex) {
        this.sex = sex;
    }

    public String getPassword() {
        return password;
    }

    public void setPassword(String password) {
        this.password = password;
    }
}
当然还要配置数据库JDBC和连接池,具体参考我的博客:SpringBoot系列之集成Druid配置数据源监控
- 注解方式
对于mybatis注解方式,使用很容易,新建一个Mapper接口即可:
import com.example.springboot.mybatis.bean.User;
import org.apache.ibatis.annotations.*;

public interface UserMapper {
    @Select("select * from sys_user where userId=#{userId}")
    public User getUserById(Integer userId);

    @Delete("delete from sys_user where userId=#{userId}")
    public int deleteUserById(Integer userId);

    @Options(useGeneratedKeys = true,keyProperty = "userId")
    @Insert("insert into sys_user(username,sex,password) values(#{username},#{sex},#{password})")
    public int insertUser(User user);

    @Update("update sys_user set username=#{username} where userId=#{userId}")
    public int updateUser(User user);
}
@Mapper注解,可以不用加在每一个Mapper上,所以,我们再新建一个Mybatis的配置类,对于是否支持事务,是否支持驼峰命名和大小写自动转换都可以加上
import org.mybatis.spring.annotation.MapperScan;
import org.mybatis.spring.boot.autoconfigure.ConfigurationCustomizer;
import org.springframework.context.annotation.Bean;
import org.springframework.context.annotation.Configuration;
import org.springframework.transaction.annotation.EnableTransactionManagement;

/**
 * <pre>
 * Mybatis配置类
 * </pre>
 *
 * @author nicky
 * <pre>
 * 修改记录
 *    修改后版本:     修改人:  修改日期: 2019年12月15日  修改内容:
 * </pre>
 */
@Configuration
//开启支持事务管理
@EnableTransactionManagement
// Mapper接口扫描,加上这个就不需要每一个Mapper接口都加@Mapper注解
@MapperScan(basePackages = {"com.example.springboot.mybatis.mapper"})
public class MybatisConfig {

	//配置支持驼峰命名和大小写自动转换
    @Bean
    public ConfigurationCustomizer configurationCustomizer(){
        return new ConfigurationCustomizer(){
            @Override
            public void customize(org.apache.ibatis.session.Configuration configuration) {
                configuration.setMapUnderscoreToCamelCase(true);
            }
        };
    }
}
为了方便,就不写Service类了,直接写个Controller类进行测试,接口符合RestFul规范
import com.example.springboot.mybatis.bean.User;
import com.example.springboot.mybatis.mapper.UserMapper;
import org.springframework.beans.factory.annotation.Autowired;
import org.springframework.web.bind.annotation.GetMapping;
import org.springframework.web.bind.annotation.PathVariable;
import org.springframework.web.bind.annotation.PostMapping;
import org.springframework.web.bind.annotation.RestController;

/**
 * <pre>
 *  接口测试类
 * </pre>
 *
 * @author nicky
 * <pre>
 * 修改记录
 *    修改后版本:     修改人:  修改日期: 2019年12月15日  修改内容:
 * </pre>
 */
@RestController
public class UserController {

    @Autowired
    UserMapper userMapper;
    @GetMapping("/user/{userId}")
    public User getUser(@PathVariable("userId") Integer userId){
        return userMapper.getUserById(userId);
    }

    @PostMapping("/user")
    public User insertDept(User user){
        userMapper.insertUser(user);
        return user;
    }
}
有Post请求,所以只能使用Postman测试,浏览器不能测试Post接口

- xml配置方式
在application.yml加上如下配置,注意mybatis配置不属于spring的,所以不要使用缩进,yaml不熟悉的,可以参考我的博客:SpringBoot系列之YAML配置用法学习笔记
mybatis:
    # 指定全局配置文件位置
    config-location: classpath:mybatis/mybatis-config.xml
    # 指定sql映射文件位置
    mapper-locations: classpath:mybatis/mapper/*.xml
mybatis-config.xml:
<?xml version="1.0" encoding="UTF-8" ?>
<!DOCTYPE configuration
        PUBLIC "-//mybatis.org//DTD Config 3.0//EN"
        "http://mybatis.org/dtd/mybatis-3-config.dtd">
<configuration>

    <settings>
        <setting name="mapUnderscoreToCamelCase" value="true"/>
    </settings>
</configuration>
mybatis/mapper/UserMapper.xml:
<?xml version="1.0" encoding="UTF-8" ?>
<!DOCTYPE mapper
        PUBLIC "-//mybatis.org//DTD Mapper 3.0//EN"
        "http://mybatis.org/dtd/mybatis-3-mapper.dtd">
<mapper namespace="com.example.springboot.mybatis.mapper.SysUserMapper">

    <select id="getApiUserById" resultType="com.example.springboot.mybatis.bean.User">
        SELECT * FROM sys_user WHERE userId=#{id}
    </select>

    <insert id="insertApiUser">
        INSERT INTO sys_user(username,sex,password) VALUES(#{username},#{sex},#{password})
    </insert>
</mapper>
SysUserMapper.java接口代码:
package com.example.springboot.mybatis.mapper;

import com.example.springboot.mybatis.bean.User;
import org.apache.ibatis.annotations.Param;

//@Mapper
public interface SysUserMapper {

    User getApiUserById(@Param("id") Integer id);

    void insertApiUser(User user);
}
简单测试一下接口:
import com.example.springboot.mybatis.bean.User;
import com.example.springboot.mybatis.mapper.SysUserMapper;
import org.springframework.beans.factory.annotation.Autowired;
import org.springframework.web.bind.annotation.GetMapping;
import org.springframework.web.bind.annotation.PathVariable;
import org.springframework.web.bind.annotation.RestController;

/**
 * <pre>
 *  测试接口,就不写Service类
 * </pre>
 *
 * @author nicky
 * <pre>
 * 修改记录
 *    修改后版本:     修改人:  修改日期: 2019年12月15日  修改内容:
 * </pre>
 */
@RestController
public class UserController {

    @Autowired
    SysUserMapper userDao;


    /**
     * xml方式获取用户信息
     * @param id
     * @return
     */
    @GetMapping("/api/user/{id}")
    public User getUserById(@PathVariable("id") Integer id){
        return userDao.getApiUserById(id);
    }

}
Postman工具测试:

代码例子下载:github下载链接