统一配置中心
为什么需要统一配置中心?
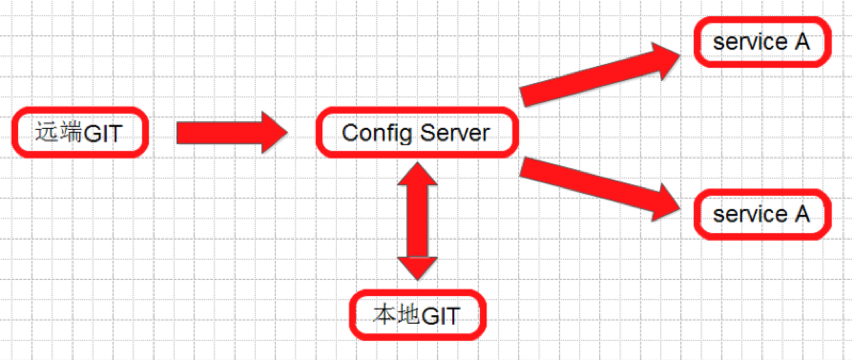
统一配置中心顾名思义,就是将配置统一管理,配置统一管理的好处是在日后大规模集群部署服务应用时相同的服务配置一致,日后再修改配置只需要统一修改全部同步,不需要一个一个服务手动维护
统一配置中心的架构图:

服务者消费者集群,路由集群Zuul的配置文件可以全部交由config管理,Eureka Server配置是绝对不行的,因为Config配置中心也是作为一个Client服务注册到Eureka Server的,先有Server。
1.配置中心服务器的开发
1.添加依赖
      <dependency>
            <groupId>org.springframework.cloud</groupId>
            <artifactId>spring-cloud-config-server</artifactId>
        </dependency>
2.添加注解支持@EnableConfigServer
@EnableEurekaClient
@EnableConfigServer
@SpringBootApplication
public class EurekaApplication {
	public static void main(String[] args) {
		SpringApplication.run(EurekaApplication.class, args);
	}
}
3.在远程的仓库创建配置文件(yml,properties,yaml)
在这里我对两个服务者的配置文件进行管理
规则说明:加入你在github仓库添加了一个名为product.properties的配置文件,并且开启了配置中心服务器(假设端口为9999),使用浏览器测试访问:http://localhost:8766/product.properties 是访问不到任何内容的,访问http://localhost:8766/product-xxxxx.properties(xxx随便写)是可以访问到的,这是Config配置中心的规则,下面会说到,另一方面配置文件合并规则,在学习springboot时我们可以将配置文件拆分:主配置文件 application.yml存放公共配置 测试环境:testapp.yml 生产环境:product.yml 使用时根据情况主配置引入不同的副配置文件,这里Config配置中心规则与springboot是相似的。
如下仓库文件:

[product.properties]
eureka.client.service-url.defaultZone=http://peer:8761/eureka,http://peer1:8765/eureka
spring.application.name=eureka-provider
[product-8763.properties]
server.port=8763
[product-8764.properties]
server.port=8764
访问: http://localhost:9999/product-xxxxx.properties 得到公共配置文件
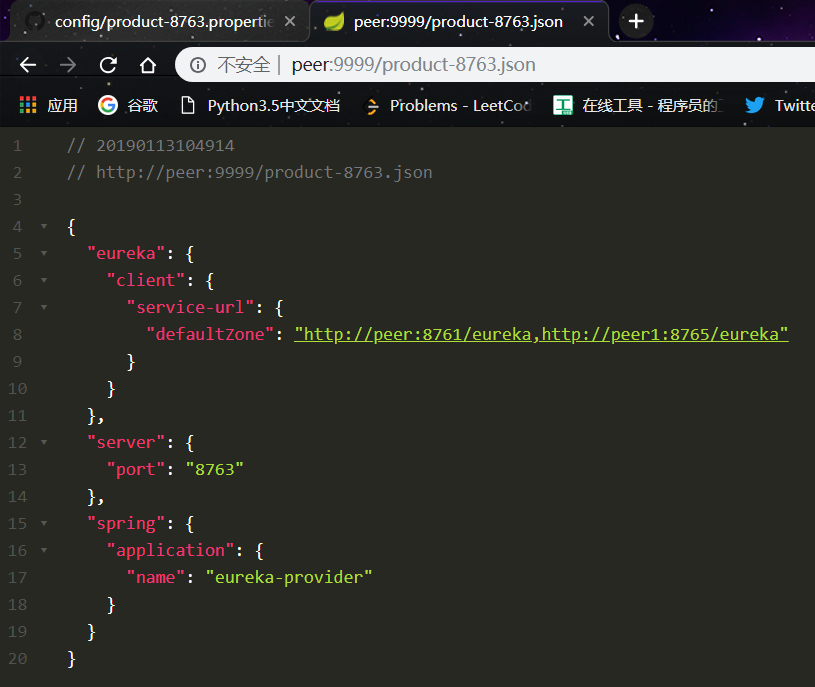
访问: http://localhost:9999/product-8763.properties 公共配置与8763私有配置的合并
访问: http://localhost:9999/product-8764.properties 公共配置与8764私有配置的合并
.properties后缀是可以修改为yml,yaml,json 以对应的格式返回在浏览器上。
4.配置相关的配置文件
#注册到注册中心
eureka.client.service-url.defaultZone=http://localhost:8761/eureka
#默认端口号 8888
server.port=9999
# 实例名
spring.application.name=config
#配置git的远程仓库   https 暂时不支持ssh
spring.cloud.config.server.git.uri=https:xxxxxxx
5.启动配置中心服务
http://localhost:9999/order-a.yml
http://localhost:9999/order-a.yaml
http://localhost:9999/order-a.properties
http://localhost:9999/order-a.json
以上四种访问方式都可以

{name}/{profiles:.[^-].}
{name}-{profiles}.json
{label}/{name}-{profiles}.yml
{name}/{profiles}/{label:.*}
{label}/{name}-{profiles}.properties
{label}/{name}-{profiles}.json
{name}/{profile}/{label}/**
{name}/{profile}/{label}/**
说明:
label: 分支名称 默认是master分支
name:文件的服务的名称(自定义的名称)
profiles:不同环境
2.配置中心客户端使用
凡是交由配置中心管理的Client,想要获取配置文件需要添加以下依赖
1.导入相关依赖
<dependency>
    <groupId>org.springframework.cloud</groupId>
    <artifactId>spring-cloud-config-client</artifactId>
</dependency>
2.添加配置
#开启配置中心
spring.cloud.config.enabled=true
#找到配置中心实例
spring.cloud.config.discovery.service-id=CONFIG
#指定名字
spring.cloud.config.name=product
#指定环境 8763或8764 由客户端的不同而改变
spring.cloud.config.profile=8763
#指定分支
spring.cloud.config.label=master
#指定配置中心的uri
spring.cloud.config.uri=http://localhost:9999
注意:spring.cloud.config.uri=xxx必须指定Config配置中心的地址,如果不指定默认则从8888端口fetch配置是不成功的,除非你的配置中心端口就是8888。
3.注意将配置文件名修改为 bootstrap.yml 表示从云端获取配置文件
