安装环境并运行一个简单例子
1. 安装python
官网地址:https://www.python.org/downloads/
- 不要用python2.7,请毫不犹豫的选择python3。
- 安装时,记得勾选上"Add Python to Path" 选项。
- 安装后,在命令窗口中,输入"python -v", 检查是否python3安装成功,版本是否正确。
2. 安装selenium
pip install selenium
如果安装出现超时的情况,可以换上其它源。
pip install selenium-i http://pypi.douban.com/simple/ --trusted-host pypi.douban.com
安装后, 执行'pip list'命令, 列出所有安装了的包.
pip list
3. webdriver(chrome为例)
下载与你的chrome对应版本的chrome driver。 (下载地址: https://npm.taobao.org/mirrors/chromedriver/)
每个版本的文件夹中,带有一个note文件,可以用来查看适用的chrome版本。
4. 运行一个简单的例子
demo.py
#coding=utf-8
from selenium import webdriver
chrome_driver = 'C:UsersLAppDataLocalGoogleChromeApplicationchromedriver.exe' #chrome_driver 存放位置
driver = webdriver.Chrome(executable_path=chrome_driver)
driver.get("https://www.baidu.com/")
driver.find_element(By.ID, "kw").send_keys("demo")
driver.find_element(By.ID, "su").click()
driver.quit()
执行脚本:
python demo.py
如果没有配置webdriver的环境变量而导致selenium找不到driver报错。也可通过在代码中设置webdriver的位置,来解决这个问题。
使用Selenium IDE录制脚本
用Selenium IDE插件,即使不会selenium语句也可以快速写好脚本。
步骤:
- 在chrome中安装selenium IDE插件
- 录制脚本
- 将脚本导出为python格式
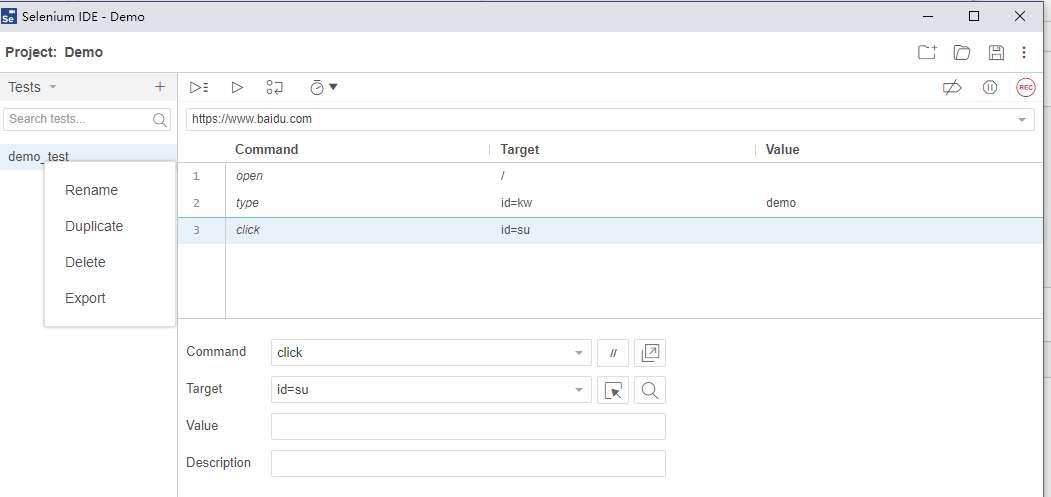
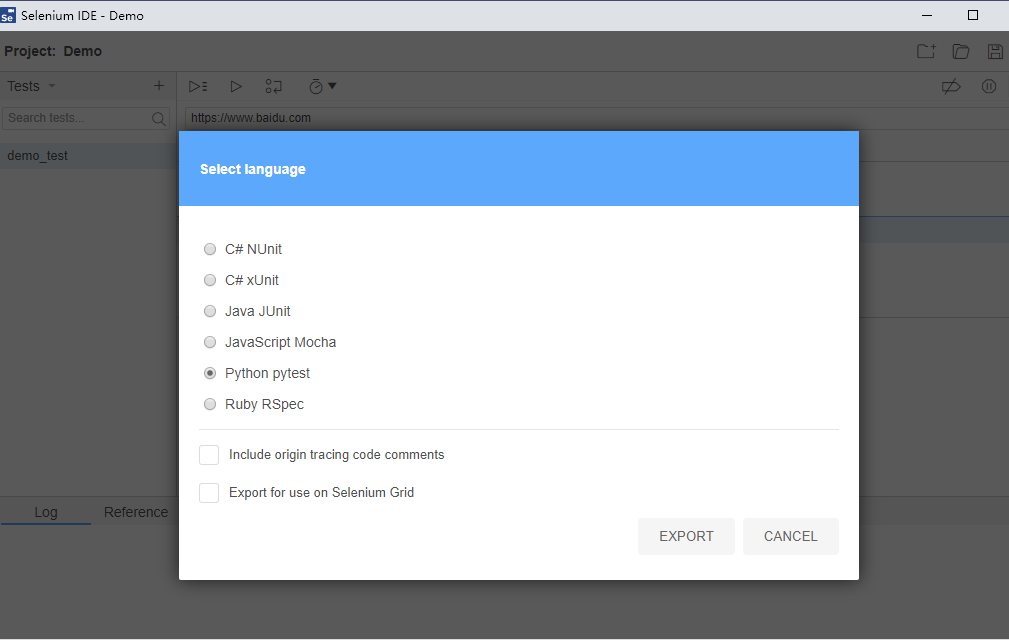
- 导出后打开文件:
# Generated by Selenium IDE
import pytest
import time
import json
from selenium import webdriver
from selenium.webdriver.common.by import By
from selenium.webdriver.common.action_chains import ActionChains
from selenium.webdriver.support import expected_conditions
from selenium.webdriver.support.wait import WebDriverWait
from selenium.webdriver.common.keys import Keys
from selenium.webdriver.common.desired_capabilities import DesiredCapabilities

class TestDemotest():
  def setup_method(self, method):
    self.driver = webdriver.Chrome()
    self.vars = {}

  def teardown_method(self, method):
    self.driver.quit()

  def test_demotest(self):
    # Test name: demo_test
    # Step # | name | target | value | comment
    # 1 | open | / |  |
    self.driver.get("https://www.baidu.com/")
    # 2 | type | id=kw | demo |
    self.driver.find_element(By.ID, "kw").send_keys("demo")
    # 3 | click | id=su |  |
    self.driver.find_element(By.ID, "su").click()
使用pytest并生成报告
在使用selenium IDE导出的文件中,可以看到使用了pytest包。它是 python 的第三方单元测试框架。
安装pytest
pip install pytest -i http://pypi.douban.com/simple/ --trusted-host pypi.douban.com
安装pytest-html
pip install -U pytest-html -i http://pypi.douban.com/simple/ --trusted-host pypi.douban.com
运行脚本并生成报告
pytest demo.py --html=test_report.html
进阶:读取excel,作为测试用例的数据
安装xlrd插件
pip install xlrd -i http://pypi.douban.com/simple/ --trusted-host pypi.douban.com
读取excel
ExcelHandler.py
import xlrd
from settings import conf

class ExcelHandler(object):
    def get_excel_data(self):
        # 获取到book对象
        book = xlrd.open_workbook(conf.TEST_CASE_PATH)
        # 获取sheet对象
        sheet = book.sheet_by_index(0)
        rows, cols = sheet.nrows, sheet.ncols
        l = []
        title = sheet.row_values(0)
        title.insert(0, 'i')
        for i in range(1, rows):
            values = sheet.row_values(i)
            values.insert(0, i)
            l.append(dict(zip(title, values)))
        return l
demo.py
增加 @pytest.mark.parametrize,使测试用例参数化
from uti.ExcelHandler import ExcelHandler
...
    @pytest.mark.parametrize('case', ExcelHandler().get_excel_data)
    def test_demotest(self):
      print(case['T1'])
...
当excel中包含了n条的记录,则测试用例执行n次
进阶:分布式运行测试用例
加入一个测试用例执行时间为10秒,那么如果excel中包含了60条记录,那么就要执行10分钟。
但是如果有10个进程同时执行这60个测试用例,那么执行时间就可以大大缩短。
所以这里引入了分布式运行用例插件pytest-xdist
安装
pip install pytest-xdist
执行
pytest -n 10 demo.py --html=test_report.html
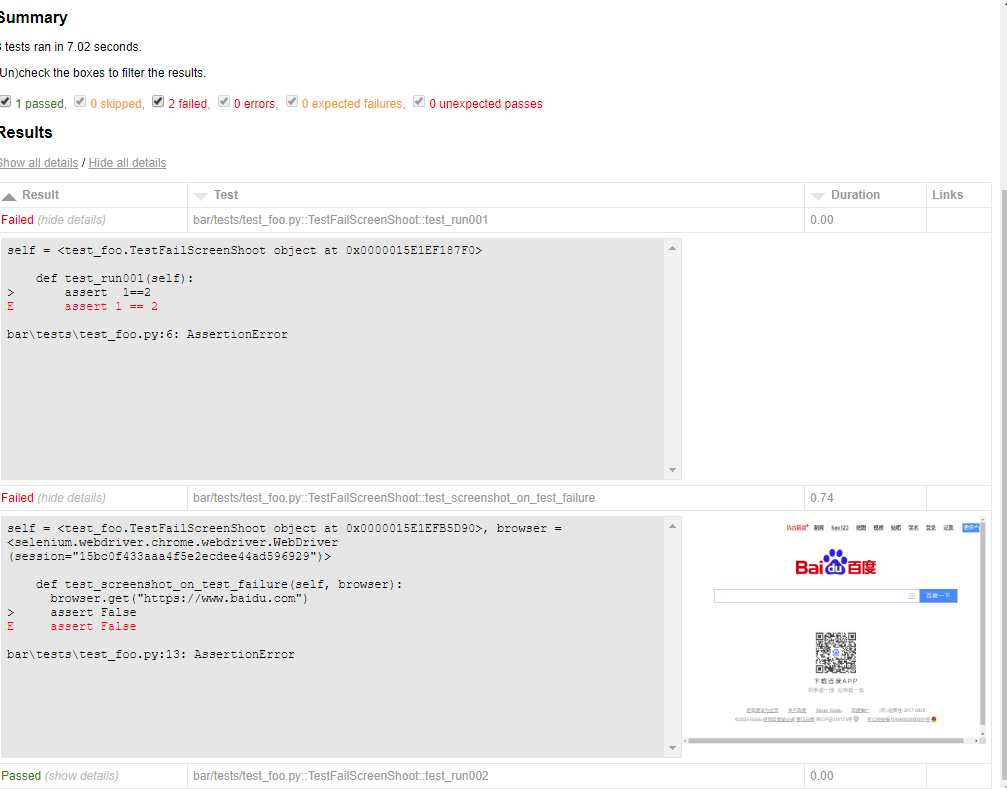
进阶:报告中给错误用例截图,并且显示截图
- 在项目的根目录下创建conftest.py和__init__.py
- conftest.py
# coding=utf-8
import pytest
import time
import json
import os
from selenium import webdriver
from selenium.webdriver.chrome.options import Options

driver = None

@pytest.mark.hookwrapper
def pytest_runtest_makereport(item):
    pytest_html = item.config.pluginmanager.getplugin('html')
    outcome = yield
    report = outcome.get_result()
    extra = getattr(report, 'extra', [])

    if report.when == 'call' or report.when == "setup":
        xfail = hasattr(report, 'wasxfail')
        if (report.skipped and xfail) or (report.failed and not xfail):
            dirpng = r'./report/png/'
            file_name = dirpng + report.nodeid.replace("::", "_") + ".png"
            file_path = os.path.split(file_name)[0] + '/'
            if os.path.exists(file_path) and os.path.isdir(file_path):
                pass
            else:
                os.makedirs(file_path)
            file_name_in_report = r'./png/'+ report.nodeid.replace("::", "_")+".png"
            _capture_screenshot(file_name)
            if file_name:
                html = '<div><img src="%s" alt="screenshot" style="304px;height:228px;" '
                       'onclick="window.open(this.src)" align="right"/></div>' % file_name_in_report
                extra.append(pytest_html.extras.html(html))
        report.extra = extra


def _capture_screenshot(name):
    driver.get_screenshot_as_file(name)

@pytest.fixture(scope='session', autouse=True)
def browser():
    global driver
    if driver is None:
      chrome_driver = r'C:UsersLAppDataLocalGoogleChromeApplicationchromedriver.exe' #chrome_driver 存放位置
      chrome_options = Options()
      chrome_options.add_argument('headless')
      driver = webdriver.Chrome(executable_path=chrome_driver, options=chrome_options)
    return driver
- 执行 pytest --html=report/report.html
- 在报告中,执行失败的测试用例的右侧将显示截图
Q&A
- 如果手动中止测试,是否会生成报告
可以。报告中会生成已经执行好的测试用例的结果。
- 如何重新执行失败的用例?
pytest --lf demo.py --html=test_report_fail.html
- 当使用pytest执行时,如何显示打印信息在控制台上?
加上-s参数。pytest -s demo.py --html=test_report.html
参考: pytest -- 捕获标准输出和标准错误输出
- 当采用xdist并发运行后,即使加了-s,打印信息又不再显示了
在代码中加入sys.stdout = sys.stderr. 这样执行后虽然控制台中显示了,但是report中,打印信息又不再显示
可以考虑在将print换成logging插件打印出log.
- 上面生成的报告,css是独立的,分享报告的时候样式会丢失,为了更好的分享发邮件展示报告,可以把css样式合并到html里
pytest --html=report.html --self-contained-html