一、nginx限速
在生产环境中,为了保护WEB服务器的安全,我们都会对用户的访问做出一些限制,保证服务器的安全及资源的合理分配。
限流(rate limiting)是NGINX众多特性中最有用的,也是经常容易被误解和错误配置的,特性之一访问请求限速。该特性可以限制某个用户在一个给定时间段内能够产生的HTTP请求数。请求可以简单到就是一个对于主页的GET请求或者一个登陆表格的POST请求。用于安全目的上,比如减慢暴力密码破解攻击。通过限制进来的请求速率,并且(结合日志)标记出目标URLs来帮助防范DDoS攻击。一般地说,限流是用在保护上游应用服务器不被在同一时刻的大量用户请求湮没
限速说的很笼统,其实限速分为很多种限速方法:
1)下载速度限速
2)单位时间内请求数限制
3)基于客户端的并发连接限速
nginx限速模块
Nginx官方版本限制IP的连接和并发分别有两个模块:
limit_req_zone 用来限制单位时间内的请求数,即速率限制,采用的漏桶算法 "leaky bucket"。
limit_req_conn 用来限制同一时间连接数,即并发限制。
二、应用场景
下载限速:限制现在速度及并发连接数,应用在下载服务器中,保护带宽及服务器的IO资源。
请求限速:限制单位时间内用户访问请求,防止恶意攻击,保护服务器及资源安全。
三、限速原理
网络传输中常用两个的流量控制算法:漏桶算法和令牌桶算法。Nginx按请求速率限速模块使用的是漏桶算法
漏桶算法(leaky bucket)
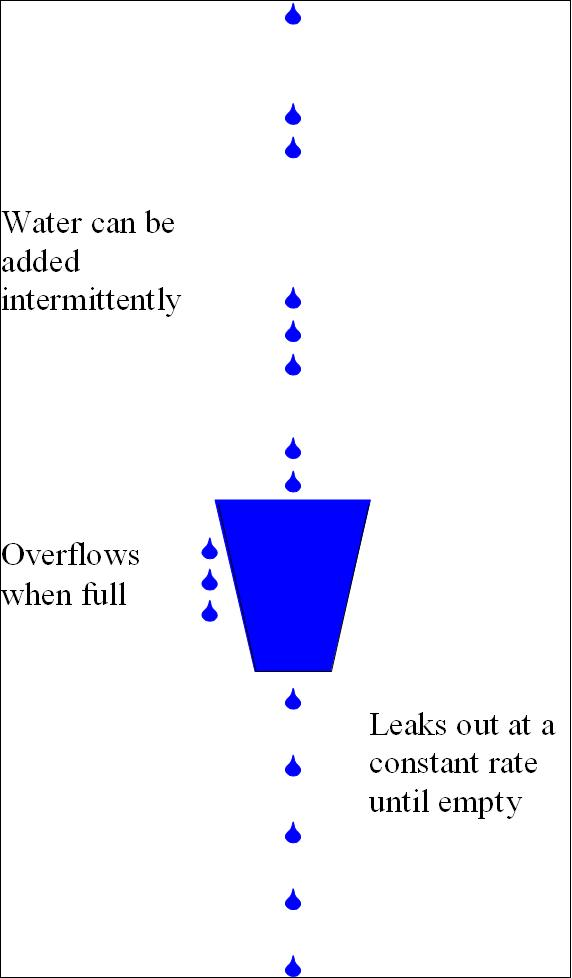
漏桶算法(leaky bucket)算法思想如图所示:

一个形象的解释是:
-
水(请求)从上方倒入水桶,从水桶下方流出(被处理);
-
来不及流出的水存在水桶中(缓冲),以固定速率流出;
-
水桶满后水溢出(丢弃)。
这个算法的核心是:缓存请求、匀速处理、多余的请求直接丢弃。
令牌桶算法(token bucket)

算法思想是:
-
令牌以固定速率产生,并缓存到令牌桶中;
-
令牌桶放满时,多余的令牌被丢弃;
-
请求要消耗等比例的令牌才能被处理;
-
令牌不够时,请求被缓存。
相比漏桶算法,令牌桶算法不同之处在于它不但有一只“桶”,还有个队列,这个桶是用来存放令牌的,队列才是用来存放请求的。
从作用上来说,漏桶和令牌桶算法最明显的区别就是是否允许突发流量(burst)的处理,漏桶算法能够强行限制数据的实时传输(处理)速率,对突发流量不做额外处理;而令牌桶算法能够在限制数据的平均传输速率的同时允许某种程度的突发传输。
Nginx按请求速率限速模块使用的是漏桶算法,即能够强行保证请求的实时处理速度不会超过设置的阈值。
四、限速实现
nginx限速可以通过 ngx_http_limit_conn_module 和 ngx_http_limit_req_module 模块来实现限速的功能。
(一)限制并发数ngx_http_limit_conn_module
这个模块可以设置每个定义的变量(比如客户端ip)的并发连接数,比如:某个客户端ip在同一时间内的连接数不能超过某个值。
语法:
定义限制链接区域
(nginx 1.18以后用 limit_conn_zone 取代了 limit_conn)
|
1
2
3
|
Syntax: limit_conn_zone key zone=name:size;Default: —Context: http |
设置连接数限制
|
1
2
3
|
Syntax: limit_conn zone number;Default: —Context: http, server, location |
示例:
|
1
2
3
4
5
6
7
8
9
10
11
12
13
14
15
16
17
|
http{ ... # 根据客户端ip进行限制,区域名称为perip,总容量为10m limit_conn_zone $binary_remote_addr zone=perip:10m; limit_conn_zone $server_name zone=perserver:10m; ... server { ... ... # 使用perip区域名称(zone name),同一时间并发数不得超过10 limit_conn perip 10; limit_conn perserver 100; ... }} |
分析:
limit_conn perip 10 定义针对perip这个zone,并发连接为10个。在这需要注意一下,这个10指的是单个IP的并发最多为10个。
(二)速度限制limit_rate、limit_rate_after
limit_rate语法
|
1
2
3
4
|
Syntax: limit_rate rate;Default: limit_rate 0;Context: http, server, location, if in location |
limit_rate_after语法,在下载完成x文件大小时开始限速
|
1
2
3
4
5
|
Syntax: limit_rate_after size;Default: limit_rate_after 0;Context: http, server, location, if in locationThis directive appeared in version 0.8.0. |
示例
|
1
2
3
4
5
6
7
8
9
10
11
12
13
14
15
|
http{ ... # 根据客户端ip进行限制,区域名称为perip,总容量为10m limit_conn_zone $binary_remote_addr zone=perip:10m; limit_conn_zone $server_name zone=perserver:10m; ... server { ... limit_rate_after 512k; limit_rate 150k; ... }} |
分析:说明:limit_rate_after定义当一个文件下载到指定大小(本例中为512k)之后开始限速; limit_rate 定义下载速度为150k/s。
注意:这两个参数针对每个请求限速,意思表示每个连接的传输速度不能超过 150k。
(三)ngx_http_limit_req_module
1、limit_req_zone、limit_req:
limit_req_zone语法
|
1
2
3
|
Syntax: limit_req_zone key zone=name:size rate=rate [sync];Default: —Context: http |
示例
limit_req_zone $binary_remote_addr zone=one:10m rate=1r/s;
分析:在 http 配置段中定义限制的参照标准和状态缓存区大小。比如上面的配置就是定义了使用客户端的 IP 作为参照依据,并使用一个 10M 大小的状态缓存区。结尾的 rate=1r/s 表示针对每个 IP 的请求每秒只接受一次。NAME 是自定义的缓存区名称,可以随意命名,比如 per_ip 或 one 等。在 server 配置段中会用到。10M 的状态缓存空间够不够用呢?官方给出的答案是 1M 的缓存空间可以在 32 位的系统中服务 3.2 万 IP 地址,在 64 位的系统中可以服务 1.6 万 IP 地址,所以需要自己看情况调整。如果状态缓存耗光,后面所有的请求都会收到 503(Service Temporarily Unavailable) 错误。
limit_req语法
|
1
2
3
|
Syntax: limit_req zone=name [burst=number] [nodelay | delay=number];Default: —Context: http, server, location |
示例
|
1
2
3
4
5
6
|
limit_req_zone $binary_remote_addr zone=one:10m rate=1r/s;server { location /search/ { limit_req zone=one burst=5; } |
分析:
第一段配置
limit_req_zone $binary_remote_addr zone=one:10m rate=1r/s;
第一个参数:$binary_remote_addr 表示通过remote_addr这个标识来做限制,“binary_”的目的是缩写内存占用量,是限制同一客户端ip地址 第二个参数:zone=one:10m表示生成一个大小为10M,名字为one的内存区域,用来存储访问的频次信息 第三个参数:rate=1r/s表示允许相同标识的客户端的访问频次,这里限制的是每秒1次,还可以有比如30r/m的
第二段配置
limit_req zone=one burst=5;
第一个参数:zone=one 设置使用哪个配置区域来做限制,与上面limit_req_zone 里的name对应 第二个参数:burst=5,重点说明一下这个配置,burst爆发的意思,如果单个 IP 有每秒有超过 1 个请求限制的时候,设置一个大小为5的缓冲区当有大量请求(爆发)过来时,5是最多接受5个超出的配额。超过了访问频次限制的请求可以先放到这个缓冲区内 第三个参数:nodelay,如果设置,超过访问频次而且缓冲区也满了的时候就会直接返回503,如果没有设置,则所有请求会等待排队
限制平均每秒不超过一个请求,同时允许超过频率限制的请求数不多于5个。
如果不希望超过的请求被延迟,可以用nodelay参数,如:
limit_req zone=one burst=5 nodelay;
应用示例
示例1
需求:基于IP对下载速率做限制, 限制每秒处理1次请求,对突发超过5个以后的请求放入缓存区,
过程:
在 /usr/local/nginx/html 目录下创建目录,写入index.html文件
|
1
2
3
4
5
6
7
|
[root@localhost nginx]# mkdir html/abc[root@localhost nginx]# ls html/50x.html abc index.html[root@localhost nginx]# echo hello word! >html/abc/index.html[root@localhost nginx]# cat html/abc/index.html hello word![root@localhost nginx]# |
配置虚拟主机
修改 /usr/local/nginx 目录下的 nginx.conf 配置文件:
|
1
2
3
4
5
6
7
8
9
10
11
12
13
14
15
16
17
|
...http{... limit_req_zone $binary_remote_addr zone=one:10m rate=1r/s; server { listen 80; location /abc { limit_req zone=one burst=5 nodelay; } } } |
重启nginx,测试效果
|
1
2
3
4
5
6
7
8
9
10
11
12
13
14
15
16
17
18
19
|
[root@localhost nginx]# killall -s HUP nginx[root@localhost nginx]# elinks http://192.168.199.228/abc --dump hello word![root@localhost nginx]# elinks http://192.168.199.228/abc --dump hello word![root@localhost nginx]# elinks http://192.168.199.228/abc --dump hello word![root@localhost nginx]# elinks http://192.168.199.228/abc --dump hello word![root@localhost nginx]# elinks http://192.168.199.228/abc --dump hello word![root@localhost nginx]# elinks http://192.168.199.228/abc --dump 503 Service Temporarily Unavailable -------------------------------------------------------------------------- nginx/1.15.5[root@localhost nginx]# |
示例2
需求:基于IP做连接限制, 限制同一IP并发为1 下载速度为限制为100K
过程:
VM1 的ip192.168.199.228
在 /usr/local/nginx/html 目录下创建目录,生成300m大文件做测试用
|
1
2
3
4
5
6
7
8
9
|
[root@localhost nginx]# ls html/abcindex.html[root@localhost nginx]# dd if=/dev/zero of=html/abc/bigfile bs=1M count=300300+0 records in300+0 records out314572800 bytes (315 MB) copied, 3.21417 s, 97.9 MB/s[root@localhost nginx]# ls html/abcbigfile index.html |
未做任何限制的情况下,在另外一台vm2192.168.199.229下载上面生成的大文件
|
1
2
3
4
5
6
7
8
9
10
11
12
13
14
15
|
[root@localhost ~]# cd /tmp[root@localhost tmp]# lsks-script-LAqqiN vmware-root yum.log[root@localhost tmp]# wget http://192.168.199.228/abc/bigfile--2019-10-16 17:28:57-- http://192.168.199.228/abc/bigfile正在连接 192.168.199.228:80... 已连接。已发出 HTTP 请求,正在等待回应... 200 OK长度:314572800 (300M) [application/octet-stream]正在保存至: “bigfile”100%[====================================>] 314,572,800 53.2MB/s 用时 5.3s 2019-10-16 17:29:03 (56.3 MB/s) - 已保存 “bigfile” [314572800/314572800])[root@localhost tmp]# |
可以看到速度还是很快的
限制方式一,用limit_rate做限制
|
1
2
3
4
5
6
7
|
server { location /abc { limit_rate 100k;#通过这个限制单个连接数的带宽 } } |
效果
|
1
2
3
4
5
6
7
8
|
[root@localhost tmp]# wget http://192.168.199.228/abc/bigfile--2019-10-16 17:34:48-- http://192.168.199.228/abc/bigfile正在连接 192.168.199.228:80... 已连接。已发出 HTTP 请求,正在等待回应... 200 OK长度:314572800 (300M) [application/octet-stream]正在保存至: “bigfile.2” 1% [ ] 5,120,000 99.7KB/s 剩余 50m 25s |
可以看到速度就被限制住了
方式二:在限制单个链接速度的同时,为了防止开大量链接分段下载,然后进行合并文件的情况提速,对并发的链接也做限制
|
1
2
3
4
5
6
7
8
9
10
11
|
http { limit_conn_zone $binary_remote_addr zone=addr:10m; ... server { ... location /download/ { limit_conn addr 1; #通过这个限制链接数,单个ip最多的可连接数 limit_rate 100k; } }} |
效果,如果单个ip超过了最多可连接数则返回503
|
1
2
3
4
5
6
7
|
[root@localhost tmp]# wget http://192.168.199.228/abc/bigfile--2019-10-16 17:51:27-- http://192.168.199.228/abc/bigfile正在连接 192.168.199.228:80... 已连接。已发出 HTTP 请求,正在等待回应... 503 Service Temporarily Unavailable2019-10-16 17:51:27 错误 503:Service Temporarily Unavailable。[root@localhost tmp]# |
方式三,也可以针对某个文件下载到固定的大小后再进行限速
|
1
2
3
4
5
6
7
8
9
10
11
12
|
http { limit_conn_zone $binary_remote_addr zone=addr:10m; ... server { ... location /download/ { limit_conn addr 1; #通过这个限制链接数,单个ip最多的可连接数 limit_rate 100k; limit_rate_after 200M; } }} |
这样下载文件时,就会对这个文件的前200m不限速,200m之后的开始限速。
总结一下:
-
要想实现限速,单个连接带宽限制是必须的。
-
在生产环境中,建议不要使用连接数限制
-
单个连接的带宽限制不易过低