1.线性布局的属性
1.android:orientation : vertical 垂直 horizontal:水平
2.android:layout_margin="20dp" 相对于左边控件的距离
3.android:padding="20dp" 局内控件相对于边界的距离
4.android:layout_weight 1.对于单个控件 设置为1,可以填充剩余部分
2.对于多个控件,设置比例,可以获得相对格局
<TextView
        android:layout_width="0dp"
        android:layout_height="wrap_content"
        android:text="慕课"
        android:background="#ff0000"
        android:layout_weight="1"
        android:textSize="28sp"
        android:layout_gravity="bottom"/>

    <TextView
        android:layout_width="0dp"
        android:layout_height="wrap_content"
        android:text="慕课"
        android:background="#00ff00"
        android:layout_weight="2"
        android:textSize="28sp"
        android:layout_gravity="center"/>

    <TextView
        android:layout_width="0dp"
        android:layout_height="wrap_content"
        android:text="慕课"
        android:background="#0000ff"
        android:layout_weight="2"
        android:textSize="28sp"/>
5. android:layout_gravity = "center_vertical" 设置居中的方式为垂直居中
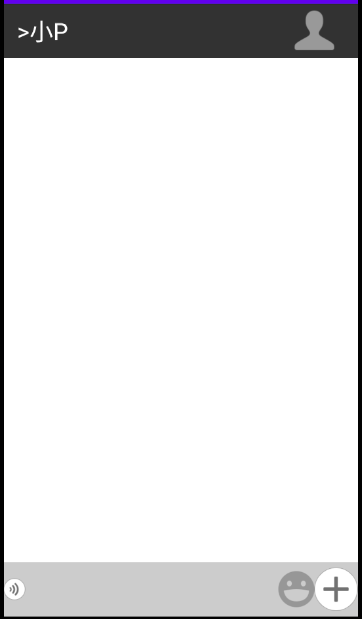
下面使用一个对话页面为例
功能说明
在一个大的垂直线性布局中设置了三个小线性的布局
第一个线性布局 为水平线性布局 height 等于60dp paddingLeft 组内边距等于15dp
1.组件1为TextView,位置为垂直居中
2.组件2为TextView, 位置为垂直居中,weight等于1用于铺满剩余位置
3.组件3为ImageView,位置为垂直居中
第二个线性布局 weight等于1用于铺满中间的剩余位置
第三个线性布局 height等于60dp
1.组件1为ImageView,位置为垂直居中
2.组件2为TextView, 位置为垂直居中,weight等于1用于铺满剩余位置
3.组件3为ImageView,位置为垂直居中
4.组件4为ImageView,位置为垂直居中
<?xml version="1.0" encoding="utf-8"?>
<LinearLayout xmlns:android="http://schemas.android.com/apk/res/android"
    android:orientation="vertical" android:layout_width="match_parent"
    android:layout_height="match_parent">

    <LinearLayout
        android:layout_width="match_parent"
        android:layout_height="60dp"
        android:orientation="horizontal"
        android:background="#333333"
        android:paddingLeft="15dp"> <!--设置paddingLeft距离组件内边距为15-->
        <TextView
            android:layout_width="wrap_content"
            android:layout_height="wrap_content"
            android:text=">"
            android:textColor="#ffffff"
            android:textSize="26sp"
            android:layout_gravity="center_vertical" />

        <TextView
            android:layout_width="0dp"
            android:layout_height="wrap_content"
            android:text="小P"
            android:textColor="#ffffff"
            android:textSize="26sp"
            android:layout_gravity="center_vertical"
            android:layout_weight="1"/>  <!--设置weight等于1用于填充-->

        <ImageView
            android:layout_width="wrap_content"
            android:layout_height="wrap_content"
            android:src="@mipmap/menu_logout_icon" />
    </LinearLayout>
    <!--空白部分填充-->
    <LinearLayout
        android:layout_width="match_parent"
        android:layout_height="match_parent"
        android:layout_weight="1"
        android:orientation="horizontal"></LinearLayout>

    <LinearLayout
        android:layout_width="match_parent"
        android:layout_height="60dp"
        android:orientation="horizontal"
        android:background="#cccccc" >

        <ImageView
            android:layout_width="wrap_content"
            android:layout_height="wrap_content"
            android:src="@mipmap/chatting_setmode_voice_btn_normal"
            android:layout_gravity="center_vertical"/>

        <TextView
            android:layout_width="0dp"
            android:layout_height="wrap_content"
            android:layout_weight="1" />  <!--设置weight等于1用于填充-->

        <ImageView
            android:layout_width="wrap_content"
            android:layout_height="wrap_content"
            android:src="@mipmap/sns_shoot_emotion_icon_normal"
            android:layout_gravity="center_vertical"/>

        <ImageView
            android:layout_width="wrap_content"
            android:layout_height="wrap_content"
            android:src="@mipmap/type_select_btn_nor"
            android:layout_gravity="center_vertical"/>

    </LinearLayout>


</LinearLayout>
最终的对话界面
