1 HttpClient入门实例
1.1发送get请求
|
1
2
3
4
5
6
7
8
9
10
11
12
13
14
15
16
17
18
19
20
21
22
23
24
|
/** * HttpClient发送get请求 * @param url 请求地址 * @return * @throws IOException */public static String httpGet(String url) throws IOException { String result = ""; //创建HttpClient对象 HttpClient httpClient = HttpClients.createDefault(); HttpGet httpGet = new HttpGet(url); //发送get请求 HttpResponse response = httpClient.execute(httpGet); /**请求发送成功,并得到响应**/ if (response.getStatusLine().getStatusCode() == HttpStatus.SC_OK) { /**读取服务器返回过来的json字符串数据**/ result = EntityUtils.toString(response.getEntity()); System.out.println(result); return result; } return result;} |
1.2 发送post请求(带参数)
|
1
2
3
4
5
6
7
8
9
10
11
12
13
14
15
16
17
18
19
20
21
22
23
24
25
26
27
28
29
30
31
32
33
34
35
36
37
38
|
/** * HttpClient发送post请求 * @param url 请求地址 * @param jsonParam 请求参数(json串或者xml串) * @param type 参数类型 * @return * @throws IOException */public static String httpPost(String url, String jsonParam, String type) throws IOException { String result = ""; //创建HttpClient对象 HttpClient httpClient = HttpClients.createDefault(); HttpPost httpPost = new HttpPost(url); if (jsonParam != null) { //解决中文乱码问题 StringEntity entity = new StringEntity(jsonParam, "utf-8"); entity.setContentEncoding("UTF-8"); if (type.equals("json")) { entity.setContentType("application/json"); } if (type.equals("xml")) { entity.setContentType("application/xml"); } httpPost.setEntity(entity); } //发送post请求 HttpResponse response = httpClient.execute(httpPost); /**请求发送成功,并得到响应**/ if (response.getStatusLine().getStatusCode() == HttpStatus.SC_OK) { /**读取服务器返回过来的json字符串数据**/ result = EntityUtils.toString(response.getEntity()); System.out.print(result); return new String(result.getBytes("ISO-8859-1"), "UTF-8"); } return result;} |
2 HttpURLConnection入门实例
一,HttpURLconnection的介绍
在Android开发中网络请求是最常用的操作之一, Android SDK中对HTTP(超文本传输协议)也提供了很好的支持,这里包括两种接口:
1、标准Java接口(java.NET) —-HttpURLConnection,可以实现简单的基于URL请求、响应功能;
2、Apache接口(org.appache.http)—-HttpClient,使用起来更方面更强大。
但在android API23的SDK中Google将HttpClient移除了。Google建议使用httpURLconnection进行网络访问操作。
HttpURLconnection是基于http协议的,支持get,post,put,delete等各种请求方式,最常用的就是get和post,下面针对这两种请求方式进行讲解。
二,get请求的使用方法
HttpURLconnection是同步的请求,所以必须放在子线程中。使用示例如下
|
1
2
3
4
5
6
7
8
9
10
11
12
13
14
15
16
17
18
19
20
21
22
23
24
25
26
27
|
new Thread(new Runnable() { @Override public void run() { try { String url = "https://www.baidu.com/"; URL url = new URL(url); //得到connection对象。 HttpURLConnection connection = (HttpURLConnection) url.openConnection(); //设置请求方式 connection.setRequestMethod("GET"); //连接 connection.connect(); //得到响应码 int responseCode = connection.getResponseCode(); if(responseCode == HttpURLConnection.HTTP_OK){ //得到响应流 InputStream inputStream = connection.getInputStream(); //将响应流转换成字符串 String result = is2String(inputStream);//将流转换为字符串。 Log.d("kwwl","result============="+result); } } catch (Exception e) { e.printStackTrace(); } }}).start();<br><br> |
其中文章提到的is2String(inputStream)读取响应结果,可参考如下写法
public String is2String(InputStream inputStream){
// 得到响应流
InputStream is = connection.getInputStream();
// 将响应流转换成字符串
byte[] buffer = new byte[1024];
ByteArrayOutputStream baos = new ByteArrayOutputStream();
for (int len = 0; (len = is.read(buffer)) > 0;) {
baos.write(buffer, 0, len);
}
String result = new String(baos.toByteArray(), "utf-8");
System.out.println(result);
return result ;
}
get请求的使用方法如上。如果需要传递参数,则直接把参数拼接到url后面,其他完全相同,如下:
|
1
|
String url = "https://www.baidu.com/?userName=zhangsan&password=123456"; |
注意点:
1,url与参数之间用?隔开。
2,键值对中键与值用=连接。
3,两个键值对之间用&连接。
分析:
1, 使用connection.setRequestMethod(“GET”);设置请求方式。
2, 使用connection.connect();连接网络。请求行,请求头的设置必须放在网络连接前。
3, connection.getInputStream()只是得到一个流对象,并不是数据,不过我们可以从流中读出数据,从流中读取数据的操作必须放在子线程。
4, connection.getInputStream()得到一个流对象,从这个流对象中只能读取一次数据,第二次读取时将会得到空数据。
三,post请求的使用方法
1,post的基本用法如下:
|
1
2
3
4
5
6
7
8
9
10
11
12
13
14
15
16
17
18
19
20
21
22
23
|
new Thread(new Runnable() { @Override public void run() { try { URL url = new URL(getUrl); HttpURLConnection connection = (HttpURLConnection) url.openConnection(); connection.setRequestMethod("POST");//设置请求方式为POST connection.setDoOutput(true);//允许写出 connection.setDoInput(true);//允许读入 connection.setUseCaches(false);//不使用缓存 connection.connect();//连接 int responseCode = connection.getResponseCode(); if(responseCode == HttpURLConnection.HTTP_OK){ InputStream inputStream = connection.getInputStream(); String result = is2String(inputStream);//将流转换为字符串。 Log.d("kwwl","result============="+result); } } catch (Exception e) { e.printStackTrace(); } }}).start(); |
注:post请求与get请求有很多相似,只是在连接之前多了一些设置,两者可以对比学习使用
2,使用post请求传递键值对参数
|
1
2
3
4
5
6
7
8
9
10
11
12
13
14
15
16
17
18
19
20
21
22
23
24
25
26
27
28
29
|
new Thread(new Runnable() { @Override public void run() { try { URL url = new URL(getUrl); HttpURLConnection connection = (HttpURLConnection) url.openConnection(); connection.setRequestMethod("POST"); connection.setDoOutput(true); connection.setDoInput(true); connection.setUseCaches(false); connection.connect(); String body = "userName=zhangsan&password=123456"; BufferedWriter writer = new BufferedWriter(new OutputStreamWriter(connection.getOutputStream(), "UTF-8")); writer.write(body); writer.close(); int responseCode = connection.getResponseCode(); if(responseCode == HttpURLConnection.HTTP_OK){ InputStream inputStream = connection.getInputStream(); String result = is2String(inputStream);//将流转换为字符串。 Log.d("kwwl","result============="+result); } } catch (Exception e) { e.printStackTrace(); } }}).start(); |
分析:
1,post方式传递参数的本质是:从连接中得到一个输出流,通过输出流把数据写到服务器。
2,数据的拼接采用键值对格式,键与值之间用=连接。每个键值对之间用&连接。
3,使用post请求传递json格式参数
post请求也可以传递json格式的参数,使用示例如下:
|
1
2
3
4
5
6
7
8
9
10
11
12
13
14
15
16
17
18
19
20
21
22
23
24
25
26
27
28
29
30
|
new Thread(new Runnable() { @Override public void run() { try { URL url = new URL(getUrl); HttpURLConnection connection = (HttpURLConnection) url.openConnection(); connection.setRequestMethod("POST"); connection.setDoOutput(true); connection.setDoInput(true); connection.setUseCaches(false); connection.setRequestProperty("Content-Type", "application/json;charset=utf-8");//设置参数类型是json格式 connection.connect(); String body = "{userName:zhangsan,password:123456}"; BufferedWriter writer = new BufferedWriter(new OutputStreamWriter(connection.getOutputStream(), "UTF-8")); writer.write(body); writer.close(); int responseCode = connection.getResponseCode(); if(responseCode == HttpURLConnection.HTTP_OK){ InputStream inputStream = connection.getInputStream(); String result = is2String(inputStream);//将流转换为字符串。 Log.d("kwwl","result============="+result); } } catch (Exception e) { e.printStackTrace(); } }}).start(); |
传递json格式的参数与传递键值对参数不同点有两个:
1,传递json格式数据时需要在请求头中设置参数类型是json格式。
2,body是json格式的字符串。
四,设置请求头
Get请求与post请求都可以设置请求头,设置请求头的方式也是相同的。为了节约篇幅,重复的代码不再列出,核心代码如下:
|
1
2
3
4
|
connection.setRequestMethod("POST");connection.setRequestProperty("version", "1.2.3");//设置请求头connection.setRequestProperty("token", token);//设置请求头connection.connect(); |
注意:
1,请求头必须在connection.connect();代码前设置。
2,可以设置多个请求头参数。
五,上传文件
在post请求传递参数时知道,可以从连接中得到一个输出流,输出流可以像服务器写数据。同理,可以使用这个输出流将文件写到服务器。代码如下:
|
1
2
3
4
5
6
7
8
9
10
11
12
13
14
15
16
17
18
19
20
21
22
23
24
25
26
27
28
29
30
|
try { URL url = new URL(getUrl); HttpURLConnection connection = (HttpURLConnection) url.openConnection(); connection.setRequestMethod("POST"); connection.setDoOutput(true); connection.setDoInput(true); connection.setUseCaches(false); connection.setRequestProperty("Content-Type", "file/*");//设置数据类型 connection.connect(); OutputStream outputStream = connection.getOutputStream(); FileInputStream fileInputStream = new FileInputStream("file");//把文件封装成一个流 int length = -1; byte[] bytes = new byte[1024]; while ((length = fileInputStream.read(bytes)) != -1){ outputStream.write(bytes,0,length);//写的具体操作 } fileInputStream.close(); outputStream.close(); int responseCode = connection.getResponseCode(); if(responseCode == HttpURLConnection.HTTP_OK){ InputStream inputStream = connection.getInputStream(); String result = is2String(inputStream);//将流转换为字符串。 Log.d("kwwl","result============="+result); }} catch (Exception e) { e.printStackTrace();} |
注:
1,上传文件使用的是post请求方式。
2,使用的原理类似于post请求中上传参数。
六,同时上传参数和文件
在实际应用时,上传文件的同时也常常需要上传键值对参数。比如在微信中发朋友圈时,不仅有图片,还有有文字。此时就需要同时上传参数和文件。
在httpURLconnection中并没有提供直接上传参数和文件的API,需要我们自己去探索。我们知道在Web页面上传参数和文件很简单,只需要在form标签写上contentype=”multipart/form-data”即可,剩余工作便都交给浏览器去完成数据收集并发送Http请求。但是如果没有页面的话要怎么上传文件呢?
由于脱离了浏览器的环境,我们就要自己去完成数据的封装并发送。首先我们来看web页面上传参数和文件是什么样子的?
我们写一个web表单,上传两个键值对参数和一个文件。使用抓包工具抓取的数据结果如下:
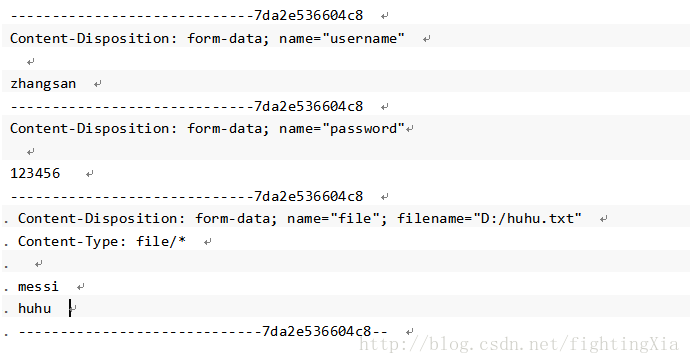
经过分析可知,上传到服务器的数据除了键值对数据和文件数据外,还有其他字符串,使用这些这些字符串来拼接一定的格式。
那么我们只要模拟这个数据,并写入到Http请求中便能实现同时传递参数和文件。
代码如下:
|
1
2
3
4
5
6
7
8
9
10
11
12
13
14
15
16
17
18
19
20
21
22
23
24
25
26
27
28
29
30
31
32
33
34
35
36
37
38
39
40
41
42
43
44
45
46
47
48
49
50
51
52
53
54
55
56
57
58
59
60
61
62
63
64
65
66
67
68
69
70
71
72
73
74
75
76
77
78
79
80
81
82
83
84
85
86
87
88
89
90
91
92
93
94
95
96
|
try { String BOUNDARY = java.util.UUID.randomUUID().toString(); String TWO_HYPHENS = "--"; String LINE_END = "
"; URL url = new URL(URLContant.CHAT_ROOM_SUBJECT_IMAGE); HttpURLConnection connection = (HttpURLConnection) url.openConnection(); connection.setRequestMethod("POST"); connection.setDoOutput(true); connection.setDoInput(true); connection.setUseCaches(false); //设置请求头 connection.setRequestProperty("Connection", "Keep-Alive"); connection.setRequestProperty("Charset", "UTF-8"); connection.setRequestProperty("Content-Type","multipart/form-data; BOUNDARY=" + BOUNDARY); connection.setRequestProperty("Authorization","Bearer "+UserInfoConfigure.authToken); connection.connect(); DataOutputStream outputStream = new DataOutputStream(connection.getOutputStream()); StringBuffer strBufparam = new StringBuffer(); //封装键值对数据一 strBufparam.append(TWO_HYPHENS); strBufparam.append(BOUNDARY); strBufparam.append(LINE_END); strBufparam.append("Content-Disposition: form-data; name="" + "groupId" + """); strBufparam.append(LINE_END); strBufparam.append("Content-Type: " + "text/plain" ); strBufparam.append(LINE_END); strBufparam.append("Content-Lenght: "+(""+groupId).length()); strBufparam.append(LINE_END); strBufparam.append(LINE_END); strBufparam.append(""+groupId); strBufparam.append(LINE_END); //封装键值对数据二 strBufparam.append(TWO_HYPHENS); strBufparam.append(BOUNDARY); strBufparam.append(LINE_END); strBufparam.append("Content-Disposition: form-data; name="" + "title" + """); strBufparam.append(LINE_END); strBufparam.append("Content-Type: " + "text/plain" ); strBufparam.append(LINE_END); strBufparam.append("Content-Lenght: "+"kwwl".length()); strBufparam.append(LINE_END); strBufparam.append(LINE_END); strBufparam.append("kwwl"); strBufparam.append(LINE_END); //拼接完成后,一块写入 outputStream.write(strBufparam.toString().getBytes()); //拼接文件的参数 StringBuffer strBufFile = new StringBuffer(); strBufFile.append(LINE_END); strBufFile.append(TWO_HYPHENS); strBufFile.append(BOUNDARY); strBufFile.append(LINE_END); strBufFile.append("Content-Disposition: form-data; name="" + "image" + ""; filename="" + file.getName() + """); strBufFile.append(LINE_END); strBufFile.append("Content-Type: " + "image/*" ); strBufFile.append(LINE_END); strBufFile.append("Content-Lenght: "+file.length()); strBufFile.append(LINE_END); strBufFile.append(LINE_END); outputStream.write(strBufFile.toString().getBytes()); //写入文件 FileInputStream fileInputStream = new FileInputStream(file); byte[] buffer = new byte[1024*2]; int length = -1; while ((length = fileInputStream.read(buffer)) != -1){ outputStream.write(buffer,0,length); } outputStream.flush(); fileInputStream.close(); //写入标记结束位 byte[] endData = (LINE_END + TWO_HYPHENS + BOUNDARY + TWO_HYPHENS + LINE_END).getBytes();//写结束标记位 outputStream.write(endData); outputStream.flush(); //得到响应 int responseCode = connection.getResponseCode(); if(responseCode == HttpURLConnection.HTTP_OK){ InputStream inputStream = connection.getInputStream(); String result = is2String(inputStream);//将流转换为字符串。 Log.d("kwwl","result============="+result); }} catch (Exception e) { e.printStackTrace();} |
注:http最早出现时就是为了浏览器与服务器之间的数据传输,所以有固定的协议,协议规范了一定的数据格式,所以在浏览器中传递数据时会自动按照一定的格式封装。在android中不能自动封装,所以这些操作需要手动操作。
七,下载文件
从服务器下载文件是比较简单的操作,只要得到输入流,就可以从流中读出数据。使用示例如下:
|
1
2
3
4
5
6
7
8
9
10
11
12
13
14
15
16
17
18
19
20
21
22
23
24
25
26
|
try { String urlPath = "https://www.baidu.com/"; URL url = new URL(urlPath); HttpURLConnection connection = (HttpURLConnection) url.openConnection(); connection.setRequestMethod("GET"); connection.connect(); int responseCode = connection.getResponseCode(); if(responseCode == HttpURLConnection.HTTP_OK){ InputStream inputStream = connection.getInputStream(); File dir = new File("fileDir"); if (!dir.exists()){ dir.mkdirs(); } File file = new File(dir, "fileName");//根据目录和文件名得到file对象 FileOutputStream fos = new FileOutputStream(file); byte[] buf = new byte[1024*8]; int len = -1; while ((len = inputStream.read(buf)) != -1){ fos.write(buf, 0, len); } fos.flush(); } } catch (Exception e) { e.printStackTrace(); } |
八,对httpURLconnection的封装
经过上面的学习可知,httpURLconnection的使用非常麻烦,每次访问网络都需要写大量的代码,尤其在同时上传参数和文件时更加繁琐,一不小心就容易出现错误。而且httpURLconnection请求是同步的,使用时必须开启子线程,修改UI时需要跳转到UI线程。等等导致不得不对httpURLconnection封装后再使用。Google也提供了网络请求封装类volley,熟悉volley的小伙伴都知道,volley在操作文件时性能并不好,而且没有提供同时上传参数和文件的方法。所以我们必须自己封装一套httpURLconnection的工具类。
我个人研究httpURLconnection的用法后封装了一套httpURLconnection的工具类,叫UrlHttpUtils。这套UrlHttpUtils最大的优点是简单和便于使用,这是我项目中实际用的网络请求工具类,完全可以说拿来即用。而且代码简单,可供学习使用。
UrlHttpUtils在github上的地址是:https://github.com/guozhengXia/UrlHttpUtils
封装的功能有:
* 一般的get请求
* 一般的post请求
* 上传单个文件(包含进度)
* 上传list集合文件
* 上传map集合文件
* 文件下载(包含进度)
* 图片下载(实现了图片的压缩)
3 .OkHttpClient入门实例
OkHttp3的基本用法
这篇文章说下OkHttp的基本用法,是最新的OkHttp3,如果你曾经在网上搜索OkHttp怎么使用发现有些类没有了可能是因为人家说的是OkHttp2。
首先说下OkHttp3是Java和Android都能用,Android还有一个著名网络库叫Volley,那个只有Android能用。
3.1导入包
自己到入jar包,别漏了okio:
|
1
2
|
okhttp-3.3.0.jarokio-1.8.0.jar |
maven方式:
|
1
2
3
4
5
|
<dependency> <groupId>com.squareup.okhttp3</groupId> <artifactId>okhttp</artifactId> <version>3.3.0</version></dependency> |
gradle方式:
|
1
|
compile 'com.squareup.okhttp3:okhttp:3.3.0' |
3.2 Get请求
|
1
2
3
4
5
6
7
8
9
10
11
12
13
14
15
16
17
18
19
20
|
String url = "https://www.baidu.com/";OkHttpClient okHttpClient = new OkHttpClient();Request request = new Request.Builder() .url(url) .build();Call call = okHttpClient.newCall(request);try { Response response = call.execute(); System.out.println(response.body().string());} catch (IOException e) { e.printStackTrace();}如果你需要在request的的header添加参数。例如Cookie,User-Agent什么的,就是Request request = new Request.Builder() .url(url) .header("键", "值") .header("键", "值") ... .build(); |
response的body有很多种输出方法,string()只是其中之一,注意是string()不是toString()。如果是下载文件就是response.body().bytes()。
另外可以根据response.code()获取返回的状态码。
3.3 Post请求
|
1
2
3
4
5
6
7
8
9
10
11
12
13
14
15
16
17
18
19
20
21
|
String url = "https://www.baidu.com/";OkHttpClient okHttpClient = new OkHttpClient();RequestBody body = new FormBody.Builder() .add("键", "值") .add("键", "值") ... .build();Request request = new Request.Builder() .url(url) .post(body) .build();Call call = okHttpClient.newCall(request);try { Response response = call.execute(); System.out.println(response.body().string());} catch (IOException e) { e.printStackTrace();} |
post请求创建request和get是一样的,只是post请求需要提交一个表单,就是RequestBody。表单的格式有好多种,普通的表单是:
|
1
2
3
4
5
|
RequestBody body = new FormBody.Builder() .add("键", "值") .add("键", "值") ... .build();<em id="__mceDel" style=" font-family: "PingFang SC", "Helvetica Neue", Helvetica, Arial, sans-serif; font-size: 14px"> </em> |
RequestBody的数据格式都要指定Content-Type,常见的有三种:
-
1 application/x-www-form-urlencoded 数据是个普通表单
2 multipart/form-data 数据里有文件
3 application/json 数据是个json
但是好像以上的普通表单并没有指定Content-Type,这是因为FormBody继承了RequestBody,它已经指定了数据类型为application/x-www-form-urlencoded。
private static final MediaType CONTENT_TYPE = MediaType.parse("application/x-www-form-urlencoded");
再看看数据为其它类型的RequestBody的创建方式。
如果表单是个json:
MediaType JSON = MediaType.parse("application/json; charset=utf-8");
RequestBody body = RequestBody.create(JSON, "你的json");
如果数据包含文件:
RequestBody requestBody = new MultipartBody.Builder()
    .setType(MultipartBody.FORM)
    .addFormDataPart("file", file.getName(), RequestBody.create(MediaType.parse("image/png"), file))
    .build();
上面的MultipartBody也是继承了RequestBody,看下源码可知它适用于这五种Content-Type:
public static final MediaType MIXED = MediaType.parse("multipart/mixed");
public static final MediaType ALTERNATIVE = MediaType.parse("multipart/alternative");
public static final MediaType DIGEST = MediaType.parse("multipart/digest");
public static final MediaType PARALLEL = MediaType.parse("multipart/parallel");
public static final MediaType FORM = MediaType.parse("multipart/form-data");
另外如果你上传一个文件不是一张图片,但是MediaType.parse("image/png")里的"image/png"不知道该填什么,可以参考下这个页面。
3.4 同步与异步
从上文已经能知道call.execute()就是在执行http请求了,但是这是个同步操作,是在主线程运行的。如果你在android的UI线程直接执行这句话就出异常了。
OkHttp也帮我们实现了异步,写法是:

String url = "https://www.baidu.com/";
OkHttpClient okHttpClient = new OkHttpClient();
Request request = new Request.Builder()
        .url(url)
        .build();
Call call = okHttpClient.newCall(request);
call.enqueue(new Callback() {
    @Override
    public void onFailure(Call call, IOException e) {
        e.printStackTrace();
    }

    @Override
    public void onResponse(Call call, Response response) throws IOException {
        System.out.println("我是异步线程,线程Id为:" + Thread.currentThread().getId());
    }
});
for (int i = 0; i < 10; i++) {
    System.out.println("我是主线程,线程Id为:" + Thread.currentThread().getId());
    try {
        Thread.currentThread().sleep(100);
    } catch (InterruptedException e) {
        e.printStackTrace();
    }
}
执行结果是:
我是主线程,线程Id为:1
我是主线程,线程Id为:1
我是主线程,线程Id为:1
我是异步线程,线程Id为:11
我是主线程,线程Id为:1
我是主线程,线程Id为:1
我是主线程,线程Id为:1
我是主线程,线程Id为:1
我是主线程,线程Id为:1
我是主线程,线程Id为:1
我是主线程,线程Id为:1
显然onFailure()和onResponse()分别是在请求失败和成功时会调用的方法。这里有个要注意的地方,onFailure()和onResponse()是在异步线程里执行的,所以如果你在Android把更新UI的操作写在这两个方法里面是会报错的,这个时候可以用runOnUiThread这个方法。
自动管理Cookie
Request经常都要携带Cookie,上面说过request创建时可以通过header设置参数,Cookie也是参数之一。就像下面这样:
Request request = new Request.Builder()
    .url(url)
    .header("Cookie", "xxx")
    .build();
然后可以从返回的response里得到新的Cookie,你可能得想办法把Cookie保存起来。
但是OkHttp可以不用我们管理Cookie,自动携带,保存和更新Cookie。
方法是在创建OkHttpClient设置管理Cookie的CookieJar:
private final HashMap<String, List<Cookie>> cookieStore = new HashMap<>();
OkHttpClient okHttpClient = new OkHttpClient.Builder()
    .cookieJar(new CookieJar() {
        @Override
        public void saveFromResponse(HttpUrl httpUrl, List<Cookie> list) {
            cookieStore.put(httpUrl.host(), list);
        }

        @Override
        public List<Cookie> loadForRequest(HttpUrl httpUrl) {
            List<Cookie> cookies = cookieStore.get(httpUrl.host());
            return cookies != null ? cookies : new ArrayList<Cookie>();
        }
    })
    .build();
这样以后发送Request都不用管Cookie这个参数也不用去response获取新Cookie什么的了。还能通过cookieStore获取当前保存的Cookie。
最后,new OkHttpClient()只是一种快速创建OkHttpClient的方式,更标准的是使用OkHttpClient.Builder()。后者可以设置一堆参数,例如超时时间什么的。