每次建立ssm项目的时候都需要自己去创建一堆文件,这里介绍两个方法来节省我们的时间
一、用文件流的方式来根据pojo来自动生成dao层、service层的代码
模板中都是最常用的增删改查的方法,不是固定的格式的用[名字]替换,比如[className]为类名,[idao]为接口名;
dao层接口:
package com.dao;
import com.pojo.[className];
import java.util.List;
public interface [idao] {
    List<[className]> list([className] [objectName]);
    int add([className] [objectName]);
    [className] getById(Integer id);
    int update([className] [objectName]);
    int del(int id);
    int batchdel(Integer[] ids);
}
service接口:
package com.service;
import com.pojo.[className];
import java.util.List;
public interface [iservice] {
    List<[className]> list([className] [objectName]);
    int add([className] [objectName]);
    Timi getById(Integer id);
    int update([className] [objectName]);
    int del(int id);
    int batchdel(Integer[] ids);
}
service实现类:
package com.service.impl;

import com.dao.[idao];
import com.pojo.[className];
import com.service.[iservice];
import org.springframework.stereotype.Service;

import javax.annotation.Resource;
import java.util.List;
@Service
public class [serviceimpl] implements [iservice] {

    @Resource
    [idao] [objectName]Dao;
    @Override
    public List<[className]> list([className] [objectName]) {
        return [objectName]Dao.list([objectName]);
    }

    @Override
    public int add([className] [objectName]) {
        return [objectName]Dao.add([objectName]);
    }

    @Override
    public [className] getById(Integer id) {
        return [objectName]Dao.getById(id);
    }

    @Override
    public int update([className] [objectName]) {
        return [objectName]Dao.update([objectName]);
    }

    @Override
    public int del(int id) {
        return [objectName]Dao.del(id);
    }

    @Override
    public int batchdel(Integer[] ids) {
        return [objectName]Dao.batchdel(ids);
    }
}
mapper:
<?xml version="1.0" encoding="UTF-8" ?>
<!DOCTYPE mapper PUBLIC "-//mybatis.org//DTD Mapper 3.0//EN"
        "http://mybatis.org/dtd/mybatis-3-mapper.dtd">
<mapper namespace="com.dao.[idao]">

    <sql id="basequery">
        select [select] from [tablename]
    </sql>

    <select id="list" resultType="[className]" parameterType="[className]">
        <include refid="basequery"></include>
        <where>

        </where>
    </select>

    <insert id="add" parameterType="[className]" >
        insert into [tablename]([insertlist]) values([insertpro])
    </insert>

    <select id="getById" resultType="[className]" parameterType="java.lang.Integer">
        <include refid="basequery"></include>
        where id = #{id}
    </select>

    <update id="update" parameterType="[className]">
        update [tablename]
            set
            [setlist]
            where id = #{id}
    </update>

    <delete id="del" parameterType="java.lang.Integer">
        delete from [tablename] where id=#{id}
    </delete>

    <delete id="batchdel"  >
        delete from [tablename] where id in
        <foreach collection="array" item="item" separator="," open="(" close=")">
            #{item}
        </foreach>
    </delete>

</mapper>
1、首先搭建出基本的ssm框架(见之前的博客)
2、写一个测试类,用来生成文件,代码如下
public class MyTest {

    //根据pojo和目录生成相关名字
    //分别是基础路径、类的名字、对象名、dao接口完全限定名等,user.dir是项目路径
    static String basepath=System.getProperty("user.dir")+"/src/main/java/com/";
    static String className = "Timi";
    static String objectName =className.substring(0,1).toLowerCase()+className.substring(1);
    static String idao=className+"Dao";
    static String iservice =className+"Service";
    static String serviceimpl=iservice+"Impl";
    static String mapperpath=System.getProperty("user.dir")+"/src/main/resources/";

    //通过主函数来创建四个文件
    public static void main(String[] args) throws IOException, ClassNotFoundException {
        createidao();
        createiservice();
        createserviceimpl();
        createmapper();
    }

    //创建dao接口
    public static void createidao() throws IOException {
        File file=new File(basepath+"dao/"+idao+".java");
        if(file.exists()){
            System.out.println("dao接口文件已存在");
        }
        else{
            file.createNewFile();
            System.out.println("dao接口创建完成");
            //读取模板转字符串
            File temp =new File(basepath+"/template/daotemplate.tmp");
            String str= FileUtils.readFileToString(temp);
            //替换关键字并写入正确的路径
            String code=str.replaceAll("\[className]",className)
                    .replaceAll("\[objectName]",objectName)
                    .replaceAll("\[idao]",idao);
            FileUtils.writeStringToFile(file,code);
        }
    }

    //创建service接口,原理和idao一样
    public static void createiservice() throws IOException {
        File file=new File(basepath+"service/"+iservice+".java");
        if(file.exists()){
            System.out.println("service接口文件已存在");
        }
        else{
            file.createNewFile();
            System.out.println("service接口创建完成");
            File temp =new File(basepath+"/template/servicetemplate.tmp");
            String str= FileUtils.readFileToString(temp);
            String code=str.replaceAll("\[className]",className)
                    .replaceAll("\[objectName]",objectName)
                    .replaceAll("\[iservice]",iservice);
            FileUtils.writeStringToFile(file,code);
        }
    }

    public static void createserviceimpl() throws IOException {
        File file=new File(basepath+"service/impl/"+serviceimpl+".java");
        if(file.exists()){
            System.out.println("service实现类文件已存在");
        }
        else{
            file.createNewFile();
            System.out.println("service实现类创建完成");
            File temp =new File(basepath+"/template/serviceimpltemplate.tmp");
            String str= FileUtils.readFileToString(temp);
            String code=str.replaceAll("\[className]",className)
                    .replaceAll("\[objectName]",objectName)
                    .replaceAll("\[iservice]",iservice)
                    .replaceAll("\[serviceimpl]",serviceimpl)
                    .replaceAll("\[idao]",idao);

            FileUtils.writeStringToFile(file,code);
        }
    }

    //逻辑比较复杂就是mapper文件的自动生成
    public static void createmapper() throws IOException, ClassNotFoundException {
        File file=new File(mapperpath+"com/dao/"+idao+".xml");
        if(file.exists()){
            System.out.println("mapper文件已存在");
        }
        else{
            file.createNewFile();
            System.out.println("mapper文件创建完成");
            File temp =new File(basepath+"/template/mapper.tmp");
            String str= FileUtils.readFileToString(temp);
            Class clz=null;
            String tablename="";
            //创建四个list分别存放查、增加的数据库字段、增加的属性字段和修改的字段
            List<String> select=new ArrayList<String>();
            List<String> insertlist=new ArrayList<String>();
            List<String> insertpro=new ArrayList<String>();
            List<String> setlist=new ArrayList<String>();
            try{
                //通过反射获取类的对象
                clz=Class.forName("com.pojo."+className);
                //先判断对象是否有注解,来防止数据库名和对象名不一致
                if(clz.isAnnotationPresent(tab.class)){
                    tablename= ((tab) clz.getAnnotation(tab.class)).value();
                }
                else{
                    tablename=objectName;
                }
                Field[] field=clz.getDeclaredFields();
                //遍历属性名防止字段和属性不一致,如果不一直就用别名,比如数据库为user_id,属性为userId
                for(Field fe:field){
                    String in="";
                    String se="";
                    if(fe.isAnnotationPresent(colume.class)){
                        colume clu=fe.getAnnotation(colume.class);
                        se=clu.value()+" as "+fe.getName();
                        in=clu.value();
                    }
                    else{
                        se=fe.getName();
                        in=fe.getName();
                    }
                    select.add(se);
                    if(!fe.isAnnotationPresent(id.class)){
                        insertlist.add(in);
                        insertpro.add("#{"+fe.getName()+"}");
                        setlist.add(in+"=#{"+fe.getName()+"}");
                    }
                }

            }catch(ClassNotFoundException e){
                e.printStackTrace();
            }
            //sql语句和关键词替换
            String code=str.replaceAll("\[idao]",idao)
                   .replaceAll("\[select]",select.toString().replaceAll("\[","").replaceAll("\]",""))
                    .replaceAll("\[tablename]",tablename)
                    .replaceAll("\[insertlist]",insertlist.toString().replaceAll("\[","").replaceAll("\]",""))
                    .replaceAll("\[insertpro]",insertpro.toString().replaceAll("\[","").replaceAll("\]",""))
                    .replaceAll("\[setlist]",setlist.toString().replaceAll("\[","").replaceAll("\]",""))
                    .replaceAll("\[className]",className);
             FileUtils.writeStringToFile(file,code);
        }
    }
}
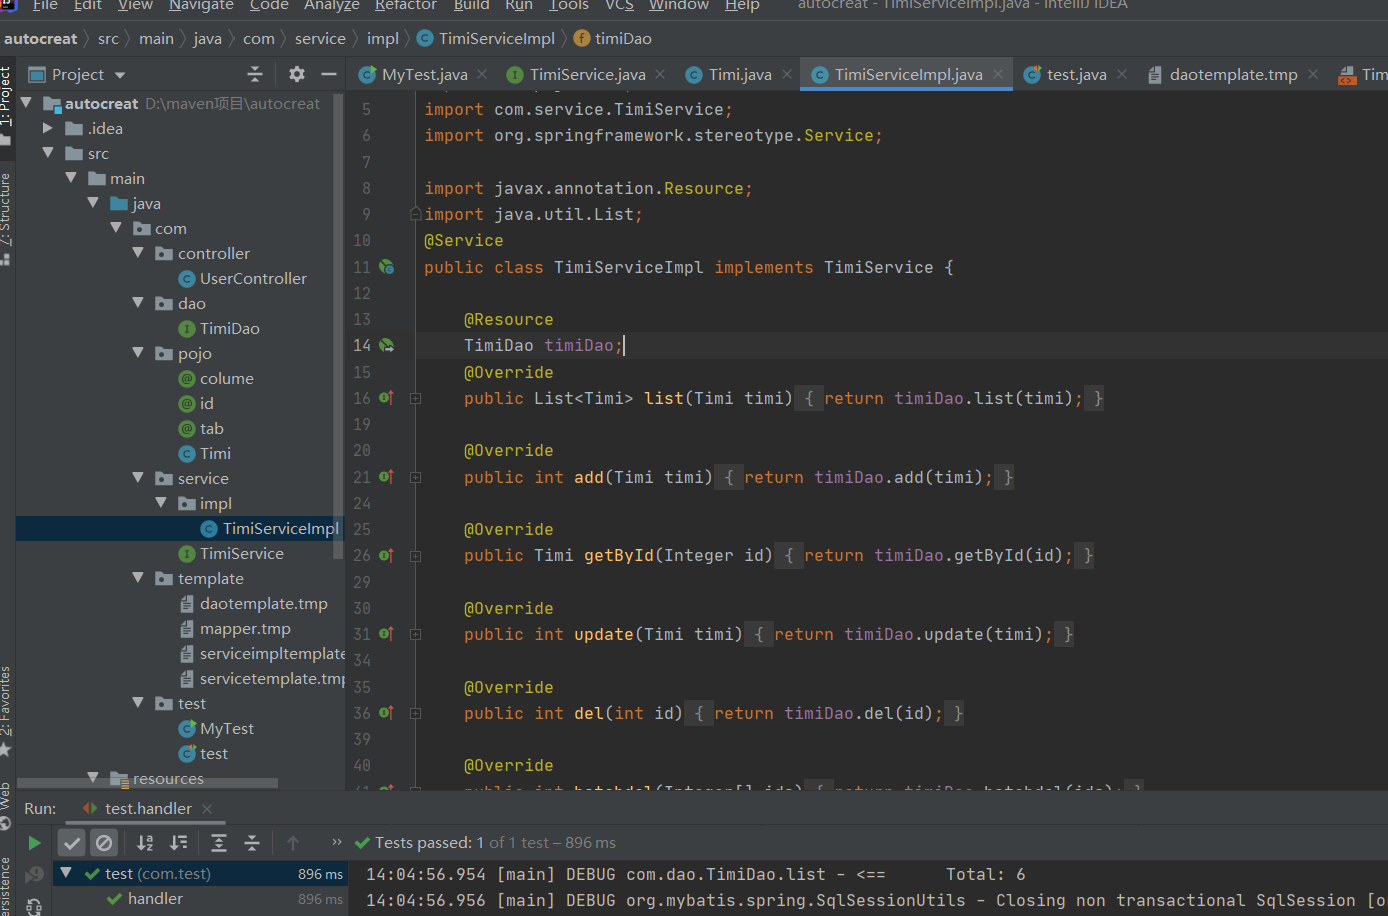
生成后的文件代码如图:


创建完就可以在controller中直接用了。
二、web代码生成器
mybatis-plus
1、首先导入必要的包
  <dependency>
            <groupId>com.baomidou</groupId>
            <artifactId>mybatis-plus-boot-starter</artifactId>
            <version>3.2.0</version>
</dependency>
<!-- 代码生成器-->
<dependency>
            <groupId>com.baomidou</groupId>
            <artifactId>mybatis-plus-generator</artifactId>
            <version>3.2.0</version>
</dependency>
<!-- freemarker 模板引擎 代码生成器依赖-->
<dependency>
            <groupId>org.freemarker</groupId>
            <artifactId>freemarker</artifactId>
            <version>2.3.30</version>
</dependency>
2、然后创建测试类,导入必要的包,使用代码生成器模板执行即可
public class AutoCodeplus {
    public static void main(String[] args) {
        // 代码生成器
        AutoGenerator mpg = new AutoGenerator();

        // 全局配置
        GlobalConfig gc = new GlobalConfig();
        String projectPath = System.getProperty("user.dir") ;
        // 子项目名称,分布式才会用
       // String projectName = "modelName";

        gc.setOutputDir(projectPath + "/src/main/java");
        gc.setAuthor("jshand");
        gc.setOpen(false);
        // gc.setSwagger2(true); 实体属性 Swagger2 注解
        mpg.setGlobalConfig(gc);

        // 数据源配置
        DataSourceConfig dsc = new DataSourceConfig();
//修改成自己的
        dsc.setUrl("jdbc:mysql://**********?useUnicode=true&useSSL=false&characterEncoding=utf8");
        // dsc.setSchemaName("public");
        dsc.setDriverName("com.mysql.jdbc.Driver");
        dsc.setUsername("root");
        dsc.setPassword("123456");
        mpg.setDataSource(dsc);

        // 包配置
        PackageConfig pc = new PackageConfig();
        pc.setParent("包名");
        pc.setEntity("pojo");
        pc.setService("service");
        pc.setMapper("mapper");
        pc.setServiceImpl("service.impl");
        pc.setController("controller");

  // 分布式用下面的配置,还要设置一个pojo的名字
   /*     Map<String, String> pathInfo = new HashMap<>();
        pathInfo.put("entity_path", projectPath + projectName + "/src/main/java/com/neucourse/pojo");
        pathInfo.put("mapper_path", projectPath + projectName + "/src/main/java/com/neucourse/mapper");
        pathInfo.put("service_path", projectPath + projectName + "/src/main/java/com/neucourse/service");
        pathInfo.put("service_impl_path", projectPath + projectName + "/src/main/java/com/neucourse/service/impl");
        pathInfo.put("controller_path", projectPath + projectName + "/src/main/java/com/neucourse/controller");
        pc.setPathInfo(pathInfo);
*/        mpg.setPackageInfo(pc);

        // 自定义配置
        InjectionConfig cfg = new InjectionConfig() {
            @Override
            public void initMap() {

            }
        };

        // 如果模板引擎是 freemarker
        String templatePath = "/templates/mapper.xml.ftl";
        // 如果模板引擎是 velocity
        // String templatePath = "/templates/mapper.xml.vm";

        // 自定义输出配置
        List<FileOutConfig> focList = new ArrayList<>();
        // 自定义配置会被优先输出
        focList.add(new FileOutConfig(templatePath) {
            @Override
            public String outputFile(TableInfo tableInfo) {
                // 自定义输出文件名 , 如果你 Entity 设置了前后缀、此处注意 xml 的名称会跟着发生变化!!
                return projectPath  + "/src/main/resources/com/neuedu/mapper"
                        + "/" + tableInfo.getEntityName() + "Mapper" + StringPool.DOT_XML;
            }
        });
        /*
        cfg.setFileCreate(new IFileCreate() {
            @Override
            public boolean isCreate(ConfigBuilder configBuilder, FileType fileType, String filePath) {
                // 判断自定义文件夹是否需要创建
                checkDir("调用默认方法创建的目录");
                return false;
            }
        });
        */
        cfg.setFileOutConfigList(focList);
        mpg.setCfg(cfg);

        // 配置模板
        TemplateConfig templateConfig = new TemplateConfig();

        // 配置自定义输出模板
        //指定自定义模板路径,注意不要带上.ftl/.vm, 会根据使用的模板引擎自动识别
        // templateConfig.setEntity("templates/entity2.java");
        // templateConfig.setService();
        // templateConfig.setController();

        templateConfig.setXml(null);
        mpg.setTemplate(templateConfig);

        // 策略配置
        StrategyConfig strategy = new StrategyConfig();
        strategy.setNaming(NamingStrategy.underline_to_camel);
        strategy.setColumnNaming(NamingStrategy.underline_to_camel);
         strategy.setSuperEntityClass("com.neuedu.util.BasePojo");
        strategy.setEntityLombokModel(true);
        strategy.setRestControllerStyle(true);
        // 公共父类
        //strategy.setSuperControllerClass("你自己的父类控制器,没有就不用设置!");
        // 写于父类中的公共字段
        strategy.setSuperEntityColumns("id");
//是否生成单个表,不填默认所有表
        strategy.setInclude("表名,可以不填");
        strategy.setControllerMappingHyphenStyle(true);
        strategy.setTablePrefix(pc.getModuleName() + "_");
        mpg.setStrategy(strategy);
        mpg.setTemplateEngine(new FreemarkerTemplateEngine());
        mpg.execute();
    }
}
3、还可以用第一种方法直接生成基本的增删改查批量删除的controller,这就要自己稍微改进一下。