先直接上代码,展示多线程的实现方式。
第一种:实现Runnabel接口。


 1 package com.ceshi.sm;
 2
 3 public class RunnableDemo {
 4
 5     public static void main(String[] args) {
 6         MyRunnable myRunnable = new MyRunnable();
 7         Thread t = new Thread(myRunnable);
 8         t.start();
 9         System.out.println(Thread.currentThread().getName()); //打印线程的名称
10     }
11
12
13 }
14
15
16 class MyRunnable implements Runnable{
17
18     //实现Runnale接口,重写run方法
19     @Override
20     public void run() {
21         System.out.println(Thread.currentThread().getName());
22     }
23
24 }
第二种:继承Thread类
 1 package com.ceshi.sm;
 2
 3 public class ThreadDemo {
 4
 5     public static void main(String[] args) {
 6         Thread t = new MyThread();
 7         t.start();
 8         System.out.println(Thread.currentThread().getName()); //打印线程的名称
 9     }
10
11
12 }
13
14
15 class MyThread extends Thread{
16
17     //实现Runnale接口,重写run方法
18     @Override
19     public void run() {
20         System.out.println(Thread.currentThread().getName());
21     }
22
23 }
第三种:实现Callable接口,通过FutureTask 实现类的支持来实现。
 1 package com.ceshi.sm;
 2
 3 import java.util.concurrent.Callable;
 4 import java.util.concurrent.ExecutionException;
 5 import java.util.concurrent.FutureTask;
 6
 7
 8 public class CallableDemo{
 9
10     public static void main(String[] args) {
11         MyCallable myCallable = new MyCallable();
12         //将myCallable对象作为myCallable的构造函数的参数传入
13         FutureTask<Integer> result = new FutureTask<Integer>(myCallable);
14
15         Thread t = new Thread(result);
16         t.start();
17         System.out.println(Thread.currentThread().getName());
18         try {
19             Integer sum = result.get();
20             System.out.println(sum);
21
22         } catch (InterruptedException | ExecutionException e) {
23             // TODO Auto-generated catch block
24             e.printStackTrace();
25         }
26
27      }
28
29 }
30
31 //实现Callable<>接口,重写call方法
32 class MyCallable implements Callable<Integer> {
33
34     @Override
35     public Integer call() throws Exception {
36         System.out.println(Thread.currentThread().getName());
37         int sum = 0;
38         for(int i = 0; i < 100000; i++){
39             sum += i;
40         }
41         return Integer.valueOf(sum);
42     }
43 }
前面两种形式大家都比较熟悉,我们来看一下第三种实现形式。
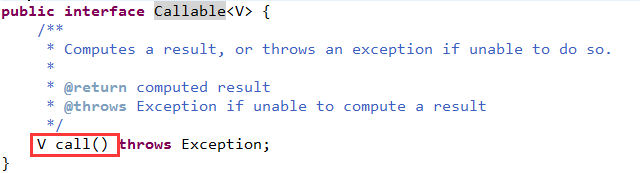
Callable接口的代码比较简单,与Runnable相似,只是方法名和返回值类型不同而已。所以,我们来看一下FutureTask类。
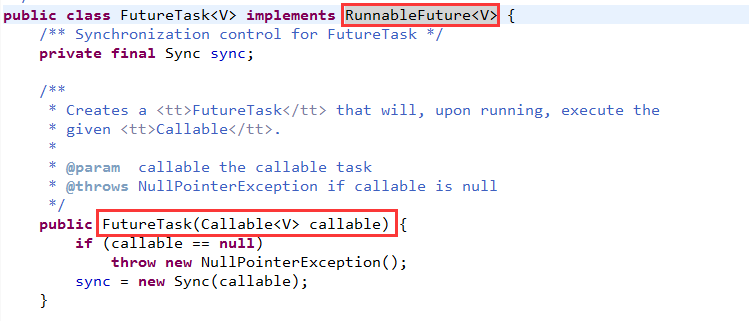
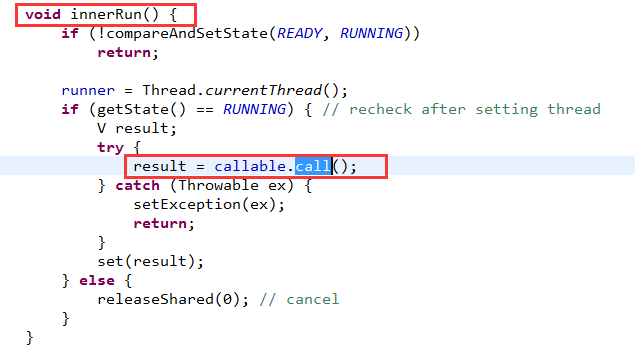
我们可以看出,获得Callable对象后,作为参数创建了匿名内部类sync对象。

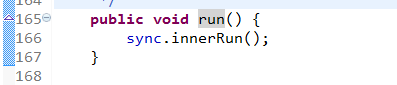
由于RunnableFuture接口继承自Runnable接口。所以,FutureTask类要重写run方法,在run方法中最终调用了call方法。