项目开发过程中,在完成iOS项目——项目开发环境搭建之后,我们首先需要考虑的就是我们的项目的整体框架与导航架构设计,然后在这个基础上考虑功能模块的完成。
一 导航架构设计
一款App的导航架构设计应该是符合人们的操作惯性和方便操作的特点,也应该在交互上更加合理和人性化。根据项目功能和定位不同,不同的App的导航设计应该采用不同的技术框架,目前比较常见的导航框架主要有标签式、列表式、矩阵式三大类,如下图,具体每一类的特点及详情可以参见:再谈App导航设计。
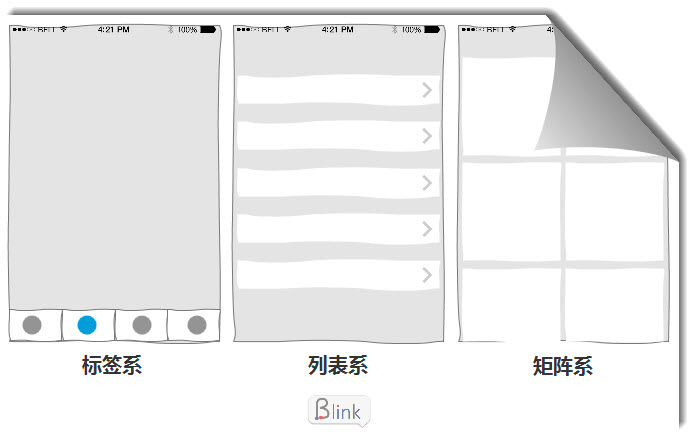
目前资讯新闻类的移动端项目的主流App框架基本都是标签式的,这种类型的导航设计技术上基本上都是通过TabBar + NavigationController框架进行搭建完成,大家经常使用到的微博、今日头条等都是采用TabBar + NavigationController这样的框架。TabBar + NavigationController就是在应该TabBar上添加itemBar,每一个itemBar都是一个独立的模块,并且每一个itemBar都对应一个NavigationController。因为每一个itemBar的导航器都不一样,所以应该是先有TabBar 再有NavigationController。
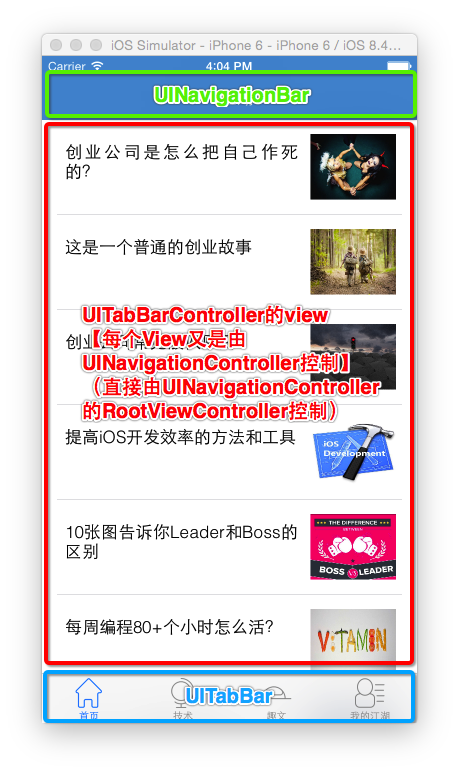
我们的项目也属于资讯类,所以我们的项目的框架也是采用TabBar + NavigationController进行搭建。今天我们的主要任务就是搭建我们TabBar,如果采用系统自带的UITabBarController(官网文档戳这里),在使用过程有一下几点需要注意:
- 每一个barItem都必须对应一个ViewController,可以是一般的ViewController,也可以是UINavigationController
- barItem对应的ViewController或UINavigationController的frame如果自定义设置了,注意不要遮挡最下面的TabBar条
- barItem的顺序与添加到UITabBarController的顺序保持一致
- 当添加的barItem个数 <= 5个时,均匀分布在最下面的bar条上,如上图所示的4个
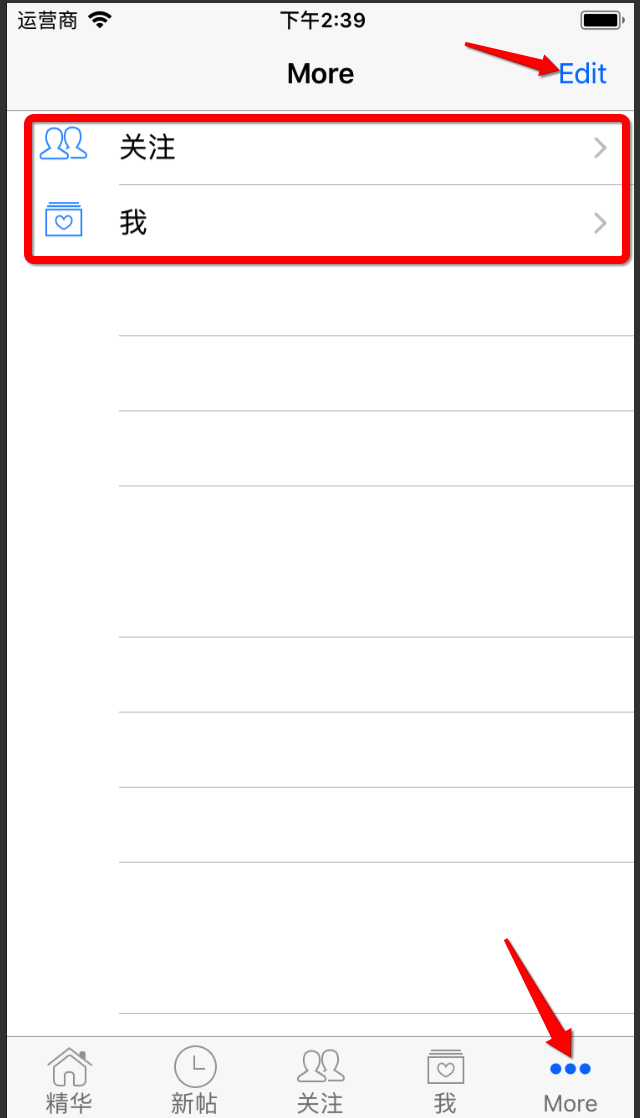
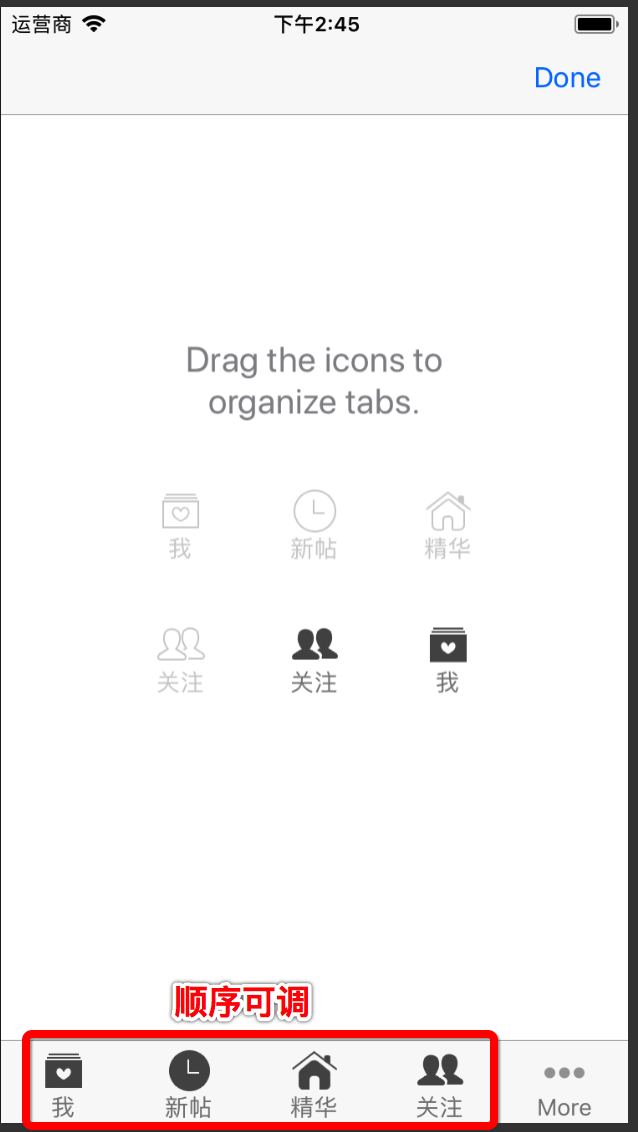
- 当添加的barItem个数 > 5个时,会只显示前四个添加的barItem,然后加上一个【more】,点击【more】弹出一个列表可选,并且列表的右上角有一个【edit】按钮,点击之后可以调整barItem的显示顺序,如下图所示,所以TabBar + NavigationController框架下的barItem个数最好不要超过5个,否则用户体验不是很好
- 添加itemBar对应的ViewController的方法有两种:一是使用UITabBarController的 setViewControllers: 方法设置;二是用UIViewController的 addChildViewController: 方法添加子视图,也可以实现添加到tabBar的功能,但是这种方法对于barItem个数 > 5的时候,只会显示前五个,剩下的不会出现时出来,也没有【more】按钮可以选择。
示例代码如下,自定义一个TabBarController继承自UITabBarController,然后重写其 viewDidLoad 方法添加子视图和标签:
@implementation XMGTabBarController

- (void)viewDidLoad {
    [super viewDidLoad];

    //添加4个item bar
    UITableViewController *vc0 = [[UITableViewController alloc] init];
    vc0.view.backgroundColor = [UIColor redColor];
    vc0.tabBarItem.title = @"精华";
    vc0.tabBarItem.image = [UIImage imageNamed:@"tabBar_essence_icon"];
    vc0.tabBarItem.selectedImage = [UIImage imageNamed:@"tabBar_essence_click_icon"];
    [self addChildViewController:vc0];

    UIViewController *vc1 = [[UIViewController alloc] init];
    vc1.view.backgroundColor = [UIColor blueColor];
    vc1.tabBarItem.title = @"新帖";
    vc1.tabBarItem.image = [UIImage imageNamed:@"tabBar_new_icon"];
    vc1.tabBarItem.selectedImage = [UIImage imageNamed:@"tabBar_new_click_icon"];
    [self addChildViewController:vc1];

    UITableViewController *vc2 = [[UITableViewController alloc] init];
    vc2.view.backgroundColor = [UIColor greenColor];
    vc2.tabBarItem.title = @"关注";
    vc2.tabBarItem.image = [UIImage imageNamed:@"tabBar_friendTrends_icon"];
    vc2.tabBarItem.selectedImage = [UIImage imageNamed:@"tabBar_friendTrends_click_icon"];
    [self addChildViewController:vc2];

    UIViewController *vc3 = [[UIViewController alloc] init];
    vc3.view.backgroundColor = [UIColor grayColor];
    vc3.tabBarItem.title = @"我";
    vc3.tabBarItem.image = [UIImage imageNamed:@"tabBar_me_icon"];
    vc3.tabBarItem.selectedImage = [UIImage imageNamed:@"tabBar_me_click_icon"];
    [self addChildViewController:vc3];

     //下面的方法也是可以的,推荐使用下面的方法
//    [self addChildViewController:@[vc0,vc1,vc2,vc3]];

}
二 开发过程中注意代码重构
在开发过程中,我们最好不要重复写相同的代码,因此,在开发过程中,我们需要对我们的代码进行重构和简化,主要原则是尽量保持一个方法实现一个功能,然后尽量不写重复的代码,精简逻辑。在我们前面添tabBar item的代码中就存在大量重复性的代码,所以我们需要对其进行重构,将重复性的代码进行抽取,将不同的内容设置成参数进行自定义设置,重构后的逻辑如下:
@implementation XMGTabBarController

- (void)viewDidLoad {
    [super viewDidLoad];

    /**** 添加子控制器 ****/
    [self setupOneChildViewController:[[UITableViewController alloc] init] title:@"精华" image:@"tabBar_essence_icon" selectedImage:@"tabBar_essence_click_icon"];
    [self setupOneChildViewController:[[UITableViewController alloc] init] title:@"新帖" image:@"tabBar_new_icon" selectedImage:@"tabBar_new_click_icon"];
    [self setupOneChildViewController:[[UIViewController alloc] init] title:@"关注" image:@"tabBar_friendTrends_icon" selectedImage:@"tabBar_friendTrends_click_icon"];
    [self setupOneChildViewController:[[UITableViewController alloc] init] title:@"我" image:@"tabBar_me_icon" selectedImage:@"tabBar_me_click_icon"];
}

/**
 *  初始化一个子控制器
 *
 *  @param vc            子控制器
 *  @param title         标题
 *  @param image         图标
 *  @param selectedImage 选中的图标
 */
- (void)setupOneChildViewController:(UIViewController *)vc title:(NSString *)title image:(NSString *)image selectedImage:(NSString *)selectedImage
{
    vc.view.backgroundColor = [UIColor redColor];
    vc.tabBarItem.title = title;
    vc.tabBarItem.image = [UIImage imageNamed:image];
    vc.tabBarItem.selectedImage = [UIImage imageNamed:selectedImage];
    [self addChildViewController:vc];
}

@end
三 UITabBarItem设置
在iOS开发过程中,系统自带的空间有时候会将有些图片显示出来时自动渲染成蓝色,例如自带的TabBarItem在选中时的图片,还有设置UIButtonTypeSystem样式时按钮的图片,这时候系统都会自动渲染成蓝色。
vc.tabBarItem.selectedImage = image;

UIButton *btn = [UIButton buttonWithType:UIButtonTypeSystem];
[btn setImage:image forState:UIControlStateNormal];
3.1 image的渲染问题
我们在开发过程中有时候并不需要这种渲染,只希望开发的App按我们设定的图片进行显示就好了,这是我们就需要对图片进行禁止渲染的设定和操作。有两种解决方案:
- 再次产生一张不会进行渲染的图片
// 加载图片
UIImage *tempImage = [UIImage imageNamed:@"tabBar_essence_click_icon"];
// 产生一张不会进行自动渲染的图片
UIImage *selectedImage = [tempImage imageWithRenderingMode:UIImageRenderingModeAlwaysOriginal];
vc.tabBarItem.selectedImage = selectedImage;
-
直接在xcassets文件中配置图片不被渲染
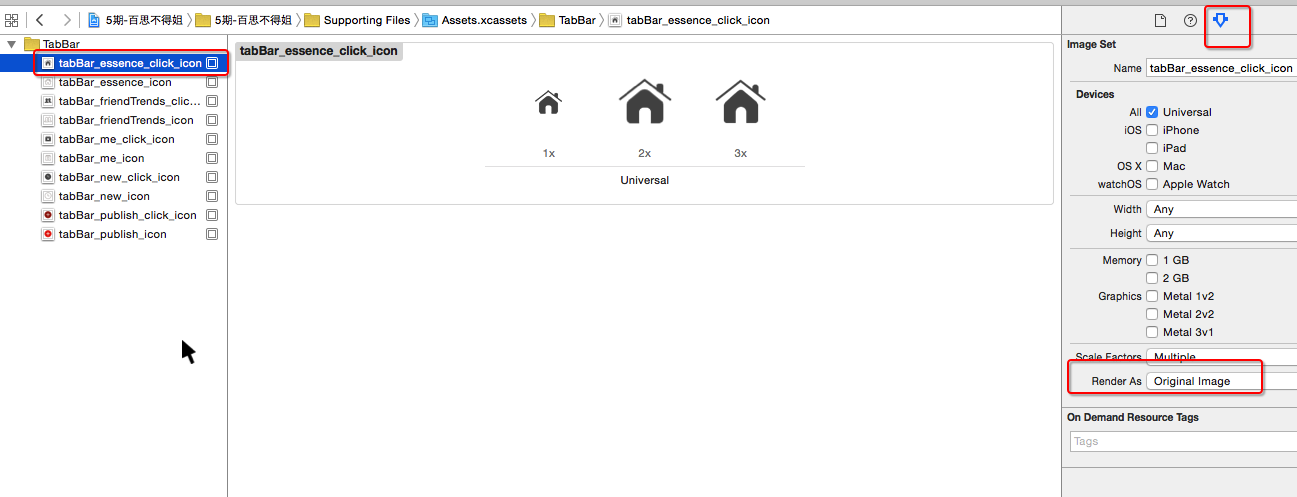
3.2 设置TabBarItem的文字属性
在上述我们队图片修改之后,虽然tabBarItem的图片可以完全按照我们设定的图片进行显示,但是 在开发过程中,我们很多时候还需要对tabBarItem的标题的字体、字号等文字属性进行设定。要设定tabBarItem的文字属性,我们也有两种解决方案:
- 直接设置每一个tabBarItem对象
// 普通状态下的文字属性
NSMutableDictionary *normalAttrs = [NSMutableDictionary dictionary];
normalAttrs[NSFontAttributeName] = [UIFont systemFontOfSize:14];
normalAttrs[NSForegroundColorAttributeName] = [UIColor grayColor];
[vc.tabBarItem setTitleTextAttributes:normalAttrs forState:UIControlStateNormal];

// 选中状态下的文字属性
NSMutableDictionary *selectedAttrs = [NSMutableDictionary dictionary];
selectedAttrs[NSForegroundColorAttributeName] = [UIColor darkGrayColor];
[vc.tabBarItem setTitleTextAttributes:selectedAttrs forState:UIControlStateSelected];
需要注意的是:
// 字典中用到的key
1.iOS7之前(在UIStringDrawing.h中可以找到)
- 比如UITextAttributeFontUITextAttributeTextColor
- 规律:UITextAttributeXXX

2.iOS7开始(在NSAttributedString.h中可以找到)
- 比如NSFontAttributeNameNSForegroundColorAttributeName
- 规律:NSXXXAttributeName
-
通过UITabBarItem的appearance对象统一设置
/**** 设置所有UITabBarItem的文字属性 ****/
UITabBarItem *item = [UITabBarItem appearance];
// 普通状态下的文字属性
NSMutableDictionary *normalAttrs = [NSMutableDictionary dictionary];
normalAttrs[NSFontAttributeName] = [UIFont systemFontOfSize:14];
normalAttrs[NSForegroundColorAttributeName] = [UIColor grayColor];
[item setTitleTextAttributes:normalAttrs forState:UIControlStateNormal];
// 选中状态下的文字属性
NSMutableDictionary *selectedAttrs = [NSMutableDictionary dictionary];
selectedAttrs[NSForegroundColorAttributeName] = [UIColor darkGrayColor];
[item setTitleTextAttributes:normalAttrs forState:UIControlStateSelected];
3.3 UIAppearance
只要一个类遵守UIAppearance,就能获得全局的外观,UIview都可以获取所有的外观,我们可以获取所有的tabBarItem外观标识,但是,一般不用下面这种,因为下面这种方法获取的是全局的所有tabBarItem外观标识,我们在开发时,一般都是自己负责自己开发的部分,所以推荐使用下面第二种方法,只获取当前类的tabBarItem外观标识。
//获取全局的tabBarItem外观标识
UITabBarItem *item = [UITabBarItem appearance];
//获取当前这个类下面的所有tabBarItem
UITabBarItem *item = [UITabBarItem appearanceWhenContainedIn:self, nil]
appearance使用注意:一定要在控件显示之前设置才有用,一般会放在+ (void)load方法中而不放在+(void)initialize中,因为+ (void)load方法只会调用一次,+(void)initialize可能会调用多次,使用时还需要判断。
- load方法:加载类的时候调用,类在什么时候加载呢?程序一起动就调用load方法
- Initialize方法:初始化类,当第一次使用这个类或者子类的时候调用
- viewdidload方法:当viewcontroller第一次即将显示的时候加载。viewController都是懒加载,即都是在即将显示出来时才加载viewdidLoad,但是只有 tabbarcontroller是在一创建控制器的时候就进行加载viewdidLoad。
四 pch文件的定义
PCH文件(Precompile Prefix Header File),也就是预编译头文件,其作用就是,方便你一次性导入在多个文件中同时用到的头文件、宏或者URL地址等(全局使用),可以有效的帮你节约时间,提高开发效率。但是,自从Xcode 5之后,这个文件默认就不再提供了,如果你还想继续使用的话,需要手动创建并配置。至于为什么默认不再提供,可能是出于提高编译效率方面的考虑,毕竟预编译也会提高Build的时间。
具体如何创建和配置PCH文件详情可以参见:ios中pch文件的创建与配置
下面是在编写PCH文件需要注意的一些情况:
#ifndef PrefixHeader_pch
#define PrefixHeader_pch

/*** 如果希望某些内容能拷贝到任何源代码文件(OCCC++等), 那么就不要写在#ifdef __OBJC__和#endif之间 ***/


/***** 在#ifdef __OBJC__和#endif之间的内容, 只会拷贝到OC源代码文件中, 不会拷贝到其他语言的源代码文件中 *****/
#ifdef __OBJC__


#endif
/***** 在#ifdef __OBJC__和#endif之间的内容, 只会拷贝到OC源代码文件中, 不会拷贝到其他语言的源代码文件中 *****/


#endif
五 在Build Setting中配置宏
宏定义除了在类中用#define进行定义之外,在iOS开发过程中,我们还可以通过在Build Setting中进行配置宏,而在Build Setting中定义的宏在项目中会找不到,就是我们通过【command】+【鼠标单击】会显示一个【?】,无法跳到对应定义的位置,这时候可能就是配置在Build Setting中,例如我们经常见到的宏 DEBUG 就配置在配置在Build Setting中。
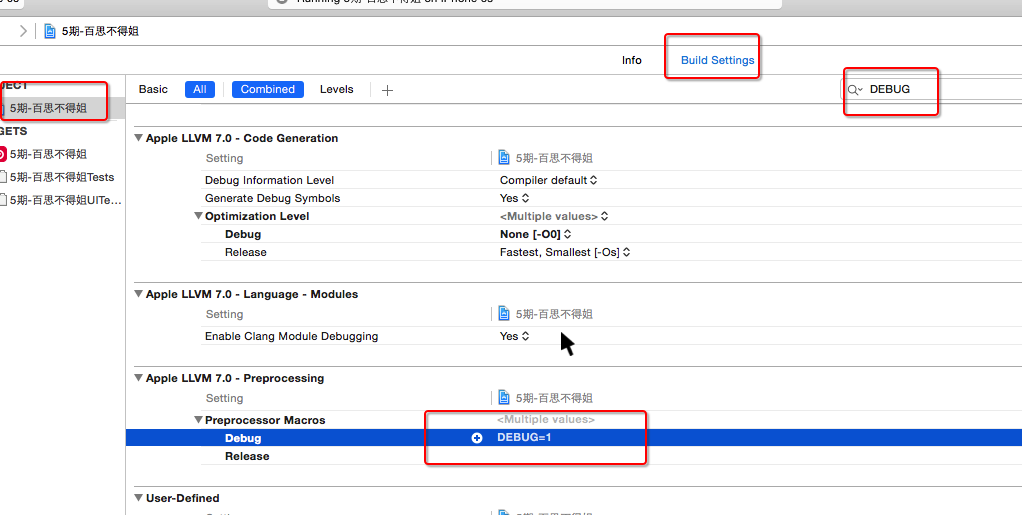
注意点:Build Setting中配置的宏的名字不能全部是小写字母,如果宏的名字全部是小写, 会出现以下错误
