整合过程
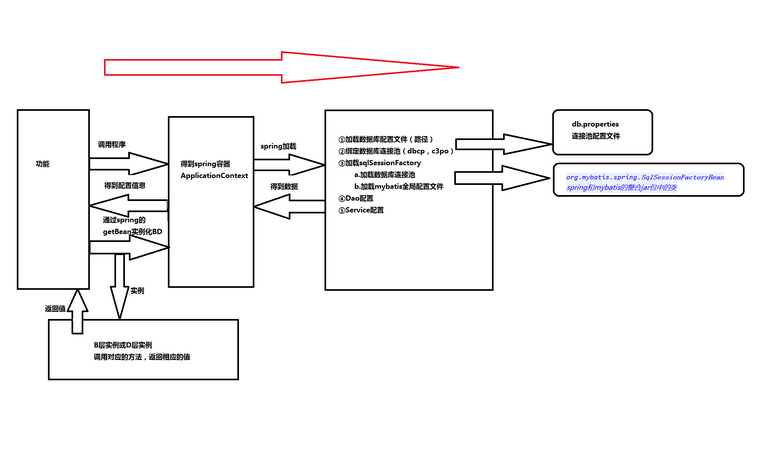
整合思路
1. 创建新的java Project
2. 导入整合所需要的jar包(包括mybatis、spring、整合jar、数据库连接等),下载点击这里。
3. 建立配置文件,包括spring和mybatis的核心配置文件,log4j日志文件。
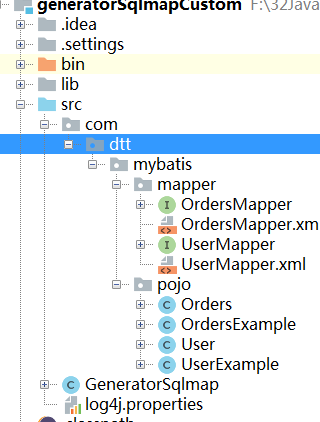
4. 把逆向工程生成的类和映射文件拷贝进来。为了方便测试,小编就只拷贝了User的相关文件。
5.测试
建立新的java Project
新建项目,输入项目名称,命名为mybatis-spring。建立完成后,添加一个名字为lib的文件夹,用于存放相应的jar包。

然后我们把这些jar包,add to build path, 关于关于jar包add to build path与放入lib下的区别
建立配置文件
我们要建立的文件包括:
spring核心配置文件:applicationContext.xml
mybatis核心配置文件:SqlMapConfig.xml
数据库连接池配置文件:db.properties
log4j日志配置文件:log4j.properties
其中比较固定的有,log4j文件:
# Global logging configuration log4j.rootLogger=DEBUG, stdout # Console output... log4j.appender.stdout=org.apache.log4j.ConsoleAppender log4j.appender.stdout.layout=org.apache.log4j.PatternLayout log4j.appender.stdout.layout.ConversionPattern=%5p [%t] - %m%n
db.properties文件,您只需修改自己数据库对应的字段:
jdbc.driver = com.mysql.jdbc.Driver
 jdbc.url=jdbc:mysql://localhost:3306/mybatis?characterEncoding=utf-8
 jdbc.username = root jdbc.password=123456
spring配置文件中可以加载数据库配置文件,所以将数据库连接池托付给spring管理。通过context:property-placeholder标签。
spring通过单例的方式管理SqlSessionFactory。spring和Mybatis整合生成代理对象,使用SqlSessionFactory创建SqlSession。当创建sqlsession的时候需要传入mybatis的配置文件,所以要在其中加载mybatis的全局配置文件。

applicationContext文件(未添加mapper映射):
<?xml version="1.0" encoding="UTF-8"?>
<beans xmlns="http://www.springframework.org/schema/beans"
	xmlns:context="http://www.springframework.org/schema/context" xmlns:p="http://www.springframework.org/schema/p"
	xmlns:aop="http://www.springframework.org/schema/aop" xmlns:tx="http://www.springframework.org/schema/tx"
	xmlns:xsi="http://www.w3.org/2001/XMLSchema-instance"
	xsi:schemaLocation="http://www.springframework.org/schema/beans http://www.springframework.org/schema/beans/spring-beans-4.0.xsd
	http://www.springframework.org/schema/context http://www.springframework.org/schema/context/spring-context-4.0.xsd
	http://www.springframework.org/schema/aop http://www.springframework.org/schema/aop/spring-aop-4.0.xsd http://www.springframework.org/schema/tx http://www.springframework.org/schema/tx/spring-tx-4.0.xsd
	http://www.springframework.org/schema/util http://www.springframework.org/schema/util/spring-util-4.0.xsd">


	<context:property-placeholder location="classpath:db.properties"/>

	<!-- 数据库连接池 -->
	<bean id="dataSource" class="org.apache.commons.dbcp.BasicDataSource"
		destroy-method="close">
		<property name="driverClassName" value="${jdbc.driver}" />
		<property name="url" value="${jdbc.url}" />
		<property name="username" value="${jdbc.username}" />
		<property name="password" value="${jdbc.password}" />
		<property name="maxActive" value="10" />
		<property name="maxIdle" value="5" />
	</bean>

	<!-- Mybatis的工厂 -->
	<bean id="sqlSessionFactoryBean" class="org.mybatis.spring.SqlSessionFactoryBean">
		<property name="dataSource" ref="dataSource"/>
		<!-- 核心配置文件的位置 -->
		<property name="configLocation" value="classpath:sqlMapConfig.xml"/>
	</bean>

	<!-- Dao原始Dao -->
	<bean id="userDao" class="com.dtt.mybatis.dao.UserDaoImpl">
		<property name="sqlSessionFactory" ref="sqlSessionFactoryBean"/>
	</bean>
	<!-- Mapper动态代理开发 -->
	<bean id="userMapper" class="org.mybatis.spring.mapper.MapperFactoryBean">
		<property name="sqlSessionFactory" ref="sqlSessionFactoryBean"/>
		<property name="mapperInterface" value="com.dtt.mybatis.mapper.UserMapper"/>
	</bean>

	<!-- Mapper动态代理开发   扫描 -->
	<bean class="org.mybatis.spring.mapper.MapperScannerConfigurer">
		<!-- 基本包 -->
		<property name="basePackage" value="com.dtt.mybatis.mapper"/>
	</bean>
</beans>
添加了spring,mybatis的配置文件也有改变这个里面的内容也得根据在spring中的映射方式来修改mybatis的配置文件。mybatis的配置文件具体的操作看下文测试。
下面给出一个SqlMapConfig.xml的原始框架,这里要注意的是前面的xml文件的头文件:
<?xml version="1.0" encoding="UTF-8" ?>
<!DOCTYPE configuration
PUBLIC "-//mybatis.org//DTD Config 3.0//EN""http://mybatis.org/dtd/mybatis3-config.dtd">
 <configuration>
<mappers>
 </mappers>
</configuration>
加入逆向工程生成的类和映射文件

整合测试
这里使用的是mapper代理方法的测试。
3.1 建立测试类和方法
建立新的包,小编命名为com.dtt.mybatis.junt;,在这个包内建立一个测试类“JuntTest.java”,写下面的代码:
package com.dtt.mybatis.junit;

import org.junit.Test;
import org.springframework.context.ApplicationContext;
import org.springframework.context.support.ClassPathXmlApplicationContext;

import com.dtt.mybatis.mapper.UserMapper;
import com.dtt.mybatis.pojo.User;

public class JunitTest {


	@Test
	public void testMapper() throws Exception {
		ApplicationContext ac = new ClassPathXmlApplicationContext("applicationContext.xml");
		UserMapper mapper = ac.getBean(UserMapper.class);
//		UserMapper mapper = (UserMapper) ac.getBean("userMapper");
		User user = mapper.findUserById(10);
		System.out.println(user);
	}
}
Spring配置文件和mybatis配置文件
下面是比较重要的地方了,要在Spring配置文件和mybatis中配置。这里要分情况了:
方法一 通过MapperScannerConfigurer进行mapper扫描(建议使用)
只需要配置spring就可以了,不用配置mybatis的SqlMapConfig.xml文件。mapper批量扫描,从mapper包中扫描出mapper接口,自动创建代理对象并且在spring容器中注册。
规范:将mapper.java和mapper.xml映射文件名称保持一致,且在一个目录中,自动扫描出来的mapper的bean的id为mapper类名(手写字母小写)。
比如在测试方法中写的(UserMapper)applicationContext.getBean(“userMapper”);这里用到的就是userMapper,如果我们要查询items表的,就写成(UserMapper)applicationContext.getBean(“itemsMapper”);
在spring的applicationContext.xml配置文件中添加下面的代码:
<bean class="org.mybatis.spring.mapper.MapperScannerConfigurer">
<!-- 指定扫描的包名
        如果扫描多个包,每个包中间使用半角逗号分隔 -->
 <property name="basePackage" value="com.dtt.mybatis.mapper"/>
<property name="sqlSessionFactoryBeanName" value="sqlSessionFactory"/>
 </bean>
db.properties
jdbc.driver=com.mysql.jdbc.Driver
jdbc.url=jdbc:mysql://localhost:3306/mybatis?characterEncoding=utf-8
jdbc.username=root
jdbc.password=123
1.1.1.1. log4j.properties
# Global logging configuration
log4j.rootLogger=DEBUG, stdout
# Console output...
log4j.appender.stdout=org.apache.log4j.ConsoleAppender
log4j.appender.stdout.layout=org.apache.log4j.PatternLayout
log4j.appender.stdout.layout.ConversionPattern=%5p [%t] - %m%n
1.1. Dao的开发
两种dao的实现方式:
1、原始dao的开发方式
2、使用Mapper代理形式开发方式
a) 直接配置Mapper代理
b) 使用扫描包配置Mapper代理
需求:
1. 实现根据用户id查询
2. 实现根据用户名模糊查询
3. 添加用户
创建pojo
public class User implements Serializable {
	/**
	 *
	 */
	private static final long serialVersionUID = 1L;
	private Integer id;
	private String username;// 用户姓名
	private String sex;// 性别
	private Date birthday;// 生日
	private String address;// 地址

	//附加对象List
	private List<Orders> ordersList;


	public List<Orders> getOrdersList() {
		return ordersList;
	}
	public void setOrdersList(List<Orders> ordersList) {
		this.ordersList = ordersList;
	}
	public Integer getId() {
		return id;
	}
	public void setId(Integer id) {
		this.id = id;
	}
	public String getUsername() {
		return username;
	}
	public void setUsername(String username) {
		this.username = username;
	}
	public String getSex() {
		return sex;
	}
	public void setSex(String sex) {
		this.sex = sex;
	}
	public Date getBirthday() {
		return birthday;
	}
	public void setBirthday(Date birthday) {
		this.birthday = birthday;
	}
	public String getAddress() {
		return address;
	}
	public void setAddress(String address) {
		this.address = address;
	}
	@Override
	public String toString() {
		return "User [id=" + id + ", username=" + username + ", sex=" + sex
				+ ", birthday=" + birthday + ", address=" + address + "]";
	}


}
传统dao的开发方式
原始的DAO开发接口+实现类来完成。
需要dao实现类需要继承SqlsessionDaoSupport类
实现Mapper.xml
编写User.xml配置文件,如下:
<?xml version="1.0" encoding="UTF-8" ?>
<!DOCTYPE mapper
PUBLIC "-//mybatis.org//DTD Mapper 3.0//EN"
"http://mybatis.org/dtd/mybatis-3-mapper.dtd">
<mapper namespace="test">
	<!-- 根据用户id查询 -->
	<select id="queryUserById" parameterType="int" resultType="user">
		select * from user where id = #{id}
	</select>

	<!-- 根据用户名模糊查询用户 -->
	<select id="queryUserByUsername" parameterType="string"
		resultType="user">
		select * from user where username like '%${value}%'
	</select>

	<!-- 添加用户 -->
	<insert id="saveUser" parameterType="user">
		<selectKey keyProperty="id" keyColumn="id" order="AFTER"
			resultType="int">
			select last_insert_id()
		</selectKey>
		insert into user
		(username,birthday,sex,address)
		values
		(#{username},#{birthday},#{sex},#{address})
	</insert>

</mapper>
加载Mapper.xml
在SqlMapConfig如下图进行配置:
<configuration>
	<!-- 设置别名 -->
	<typeAliases>
		<!-- 2. 指定扫描包,会把包内所有的类都设置别名,别名的名称就是类名,大小写不敏感 -->
		<package name="com.dtt.mybatis.pojo" />
	</typeAliases>

	<mappers>
		<package name="com.dtt.mybatis.mapper"/>
	</mappers>

</configuration>
实现UserDao接口
public interface UserDao {
	/**
	 * 根据id查询用户
	 *
	 * @param id
	 * @return
	 */
	User queryUserById(int id);

	/**
	 * 根据用户名模糊查询用户列表
	 *
	 * @param username
	 * @return
	 */
	List<User> queryUserByUsername(String username);

	/**
	 * 保存
	 *
	 * @param user
	 */
	void saveUser(User user);

}
实现UserDaoImpl实现类
编写DAO实现类,实现类必须集成SqlSessionDaoSupport
SqlSessionDaoSupport提供getSqlSession()方法来获取SqlSession
package com.itheima.mybatis.mapper;

import com.itheima.mybatis.pojo.User;
import com.itheima.mybatis.pojo.UserExample;
import java.util.List;
import org.apache.ibatis.annotations.Param;

public interface UserMapper {
    int countByExample(UserExample example);

    int deleteByExample(UserExample example);

    int deleteByPrimaryKey(Integer id);

    int insert(User record);

    int insertSelective(User record);

    List<User> selectByExample(UserExample example);

    User selectByPrimaryKey(Integer id);

    int updateByExampleSelective(@Param("record") User record, @Param("example") UserExample example);

    int updateByExample(@Param("record") User record, @Param("example") UserExample example);

    int updateByPrimaryKeySelective(User record);

    int updateByPrimaryKey(User record);
}
配置dao
把dao实现类配置到spring容器中,如下图
<!-- Dao原始Dao -->
	<bean id="userDao" class="com.itheima.mybatis.dao.UserDaoImpl">
		<property name="sqlSessionFactory" ref="sqlSessionFactoryBean"/>
	</bean>
测试方法
创建测试方法,可以直接创建测试Junit用例。
public class JunitTest {


	@Test
	public void testMapper() throws Exception {
		ApplicationContext ac = new ClassPathXmlApplicationContext("applicationContext.xml");
		UserMapper mapper = ac.getBean(UserMapper.class);
//		UserMapper mapper = (UserMapper) ac.getBean("userMapper");
		User user = mapper.findUserById(10);
		System.out.println(user);
	}
}
Mapper代理形式开发dao
编写UserMapper.xml配置文件,如下:
<?xml version="1.0" encoding="UTF-8" ?>
<!DOCTYPE mapper
PUBLIC "-//mybatis.org//DTD Mapper 3.0//EN"
"http://mybatis.org/dtd/mybatis-3-mapper.dtd">


<mapper namespace="com.dtt.mybatis.mapper.UserMapper">


	<!-- 通过ID查询一个用户 -->
	<select id="findUserById" parameterType="Integer" resultType="User">
		select * from user where id = #{id}
	</select>
<!-- 根据用户名模糊查询用户 -->
<select id="queryUserByUsername" parameterType="string"
resultType="user">
select * from user where username like '%${value}%'
</select>
<!-- 添加用户 -->
<insert id="saveUser" parameterType="user">
<selectKey keyProperty="id" keyColumn="id" order="AFTER"
resultType="int">
select last_insert_id()
</selectKey>
insert into user
(username,birthday,sex,address) values
(#{username},#{birthday},#{sex},#{address})
</insert>
</mapper>
实现UserMapper接口
public interface UserMapper {
	/**
	 * 根据用户id查询
	 *
	 * @param id
	 * @return
	 */
	User queryUserById(int id);

	/**
	 * 根据用户名模糊查询用户
	 *
	 * @param username
	 * @return
	 */
	List<User> queryUserByUsername(String username);

	/**
	 * 添加用户
	 *
	 * @param user
	 */
	void saveUser(User user);
}