错误提示&处理方法
参考链接:https://github.com/OmniSharp/omnisharp-vscode/issues/1742
错误:The .NET Core debugger cannot be installed. The debugger requires macOS 10.12 (Sierra) or newer
方法:You can set the option to disable auto extension updates in VS Code, and then manually install v1.11.0from the .vsix file using these instructions. Though the one problem with this is that you will also miss out on new language service features. But this is certainly a great option if you can't upgrade your OS yet, but it is a point-in-time problem.
详细步骤:
参考链接:https://github.com/OmniSharp/omnisharp-vscode/wiki/Installing-Beta-Releases
安装下载:https://github.com/OmniSharp/omnisharp-vscode/releases/tag/v1.11.0
A new release of the C# extension is generally shipped every month or so. During development, interim(临时) beta releases are made available as VSIXs here: https://github.com/OmniSharp/omnisharp-vscode/releases. If you wish to install a beta release, please follow these steps:
Uninstalling a previously-installed C# extension
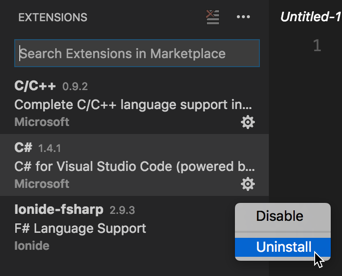
When installing a beta release, it's a good idea to remove any previous versions of the extension. You can do this like so:
-
Open Visual Studio Code and select View->Extensions from the menu to display the Extensions pane.
-
In the Extensions pane, locate the C# extension and click the little 'gear' icon next to it. From the drop-down menu, select 'Uninstall'.

-
Visual Studio Code will ask if you are sure that you want to uninstall the extension. Click "OK" on this prompt.
-
In the Extensions pane, a button will appear next to the C# extension that reads, "Reload". Click this to cause Visual Studio Code to reload without the C# extension installed. Visual Studio Code will ask you whether you are certain whether you wish to reload. Click "OK" to confirm.
Installing a beta release of the C# extension
First, find the release that you wish to install at https://github.com/OmniSharp/omnisharp-vscode/releases (https://github.com/OmniSharp/omnisharp-vscode/releases/tag/v1.11.0) Then, download the .vsix file for that release to your machine. Use the following steps to install the .vsix into Visual Studio Code.
-
Open Visual Studio Code and select View->Extensions from the menu to display the Extensions pane.
-
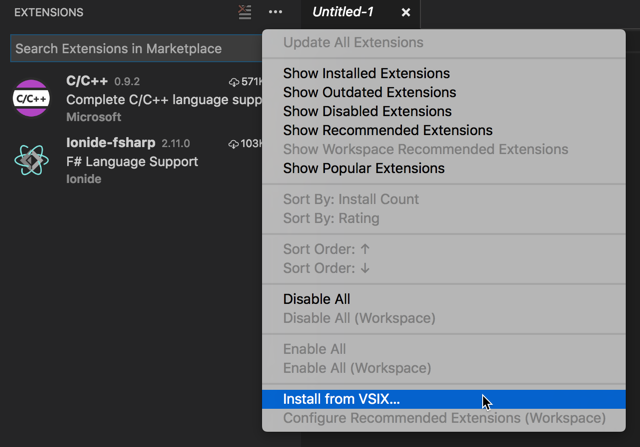
Click the
...at the top-right corner of the Extensions pane and select "Install from VSIX..." on the menu that appears.
-
Locate the
.vsixfile you download and click "Open". -
Visual Studio Code will prompt you to restart to enable the extension. Click "Restart" to confirm.
提示
重新安装C#扩展之后,vs code会更新C#依赖