近年来社交app可谓红红火火,大家每天发微博,分享到朋友圈也是不亦乐乎。我们的Universal应用自然也希望加入社交分享的功能。然而国内主流的社交平台微博和微信还没有推出适用于Universal应用的SDK,怎么办呢?当然敲碗等开饭也是办法,另一方面我们也可以自己做一些努力。今天我们就想分享一下我们在Universal应用中实现分享到微博功能上的探索。
准备
想要分享到微博,先得注册成为微博开发者。我们在http://open.weibo.com/上注册好开发者账号,建立个测试应用,就可以拿到我们的App key和App secret了,准备工作就是这样。
做一些努力
下面就是SDK的问题了,其实微博是有一个官方开源的for Windows 8 SDK的,还是基于Windows RunTime的。这个SDK的下载地址是http://weibowinrtsdk.codeplex.com/。
我们的Universal 应用不也是基于Windows RunTime的吗?是不是通用呢?先把它的代码下载下来吧。在http://weibowinrtsdk.codeplex.com/SourceControl/latest 页面点download,下载下来的内容包括说明文档,SDK的源码,还有一个例子程序。
打开WeiboSDKForWinRT.sln,我们可以看到微博SDK原来是for Windows 8的:

点击一下 重定目标到Windows 8.1, 确定。好了,我们的SDK已经是for Windows 8.1的了:

那我们的Universal应用还有Windows Phone 8.1 怎么办呢?理想的情况是我们在目标里加上Windows Phone 8.1 就可以了,先这么做试试看:
点击 更改… ,勾选Windows Phone 8.1
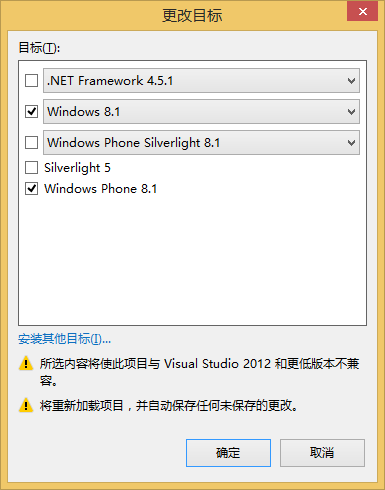
确定


添加好了,SDK项目的后缀也变成了 可移植的。
马上就在 Universal应用里试一试吧。在解决方案里新建个Universal 应用,引用上我们的SDK。
先从Windows 8.1 应用开始吧,调用代码可以从例子程序里copy一些。
我们在空白的MainPage页面上加个button,点击可以调用微博SDK授权并发一条纯文字微博:
MainPage.xaml:
<Page
x:Class="App1.MainPage"
xmlns="http://schemas.microsoft.com/winfx/2006/xaml/presentation"
xmlns:x="http://schemas.microsoft.com/winfx/2006/xaml"
xmlns:local="using:App1"
xmlns:d="http://schemas.microsoft.com/expression/blend/2008"
xmlns:mc="http://schemas.openxmlformats.org/markup-compatibility/2006"
mc:Ignorable="d">
<Grid Background="{ThemeResource ApplicationPageBackgroundThemeBrush}">
<Button Content="Button" HorizontalAlignment="Left" Margin="252,140,0,0" VerticalAlignment="Top" Click="Button_Click"/>
<TextBlock x:Name="statusRun" HorizontalAlignment="Left" Margin="294,249,0,0" TextWrapping="Wrap" Text="TextBlock" VerticalAlignment="Top" Height="23" RenderTransformOrigin="0.5,0.5" Width="644">
</TextBlock>
<TextBlock x:Name="ResultRun" HorizontalAlignment="Left" Margin="280.991,346.281,0,0" TextWrapping="Wrap" Text="TextBlock" VerticalAlignment="Top" RenderTransformOrigin="0.5,0.5" Height="123.454" UseLayoutRounding="False" Width="308.332" d:LayoutRounding="Auto">
</TextBlock>
</Grid>
</Page>
MainPage.xaml.cs:
using System;
using System.Collections.Generic;
using System.IO;
using System.Linq;
using System.Runtime.InteropServices.WindowsRuntime;
using WeiboSDKForWinRT;
using Windows.Foundation;
using Windows.Foundation.Collections;
using Windows.UI.Xaml;
using Windows.UI.Xaml.Controls;
using Windows.UI.Xaml.Controls.Primitives;
using Windows.UI.Xaml.Data;
using Windows.UI.Xaml.Input;
using Windows.UI.Xaml.Media;
using Windows.UI.Xaml.Navigation;
// "空白页"项模板在 http://go.microsoft.com/fwlink/?LinkId=234238 上提供
namespace App2
{
/// <summary>
/// 可独立使用或用于导航至 Frame 内部的空白页。
/// </summary>
public sealed partial class MainPage : Page
{
public MainPage()
{
this.InitializeComponent();
InitData();
}
private void InitData()
{
// TODO:编译运行之前需要开放平台参数.
SdkData.AppKey = "132125341";
SdkData.AppSecret = "55cee081b74dabb1b53bf3b9a9bfa208";
SdkData.RedirectUri = "https://api.weibo.com/oauth2/default.html";
// prepare the pic to be shared.
}
/// <summary>
/// Invoked when this page is about to be displayed in a Frame.
/// </summary>
/// <param name="e">Event data that describes how this page was reached. The Parameter
/// property is typically used to configure the page.</param>
protected override void OnNavigatedTo(NavigationEventArgs e)
{
var oauthClient = new ClientOAuth();
// 判断是否已经授权或者授权是否过期.
if (oauthClient.IsAuthorized == false)
{
oauthClient.LoginCallback += (isSucces, err, response) =>
{
if (isSucces)
{
// TODO: deal the OAuth result.
this.statusRun.Text = "Congratulations, Authorized successfully!";
this.ResultRun.Text = string.Format("AccesssToken:{0}, ExpriesIn:{1}, Uid:{2}",
response.AccessToken, response.ExpriesIn, response.Uid);
}
else
{
// TODO: handle the err.
this.statusRun.Text = err.errMessage;
}
};
oauthClient.BeginOAuth();//异步方法,如果需要在之后执行代码,请加到上面的LoginCallback中
}
}
private async void Button_Click(object sender, RoutedEventArgs e)
{
var engine = new SdkNetEngine();
ISdkCmdBase cmdBase = new CmdPostMessage()
{
Status = "test for post message without picture"
};
var result = await engine.RequestCmd(SdkRequestType.POST_MESSAGE, cmdBase);
if (result.errCode == SdkErrCode.SUCCESS)
{
this.ResultRun.Text = result.content;
this.statusRun.Text = "Post a message without picture successed!";
}
else
{
// TODO: deal the error.
this.statusRun.Text = "Post a message without picture failed!";
}
}
}
}
中间这里注意填上我们之前得到的App key和App secret:
SdkData.AppKey = "";
SdkData.AppSecret = "";
SdkData.RedirectUri = "";
RedirectUri 也是个比较重要的参数,一般情况下填 https://api.weibo.com/oauth2/default.html ,填错了服务器会返回错误。参见http://open.weibo.com/wiki/%E5%B8%B8%E8%A7%81%E9%97%AE%E9%A2%98 的faq:
Q:获取用户授权是出现 error :redirect_uri_mismatch 怎么解决?
A:这是由于回调地址填写错误造成的,解决办法:
- 站内应用:redirect_uri等于应用信息中的"站内应用地址"而非"应用实际地址";
- 其他应用:redirect_uri需与http://open.weibo.com/apps/30871*****/info/advanced (30871*****替换成你应用的AppKey)应用高级信息中的"应用回调页"完全匹配或在绑定的域名下。
注意:修改应用回调页或绑定域名后需要约半小时左右时间生效。
接下来就可以运行啦:

输入微博账号,就可以给我们的Windows 8.1应用授权了:(这里有点要注意的,如果我们的应用没有提交并通过审核的话,只能用自己的账号给应用授权)
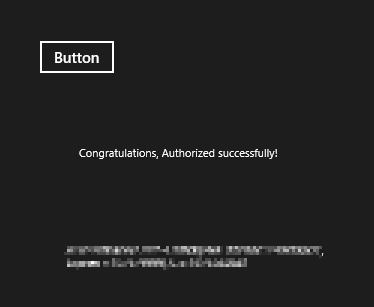
现在可以点击一下button:

哈哈,成功了。看看我们的微博,是不是多了一条:

这样子Windows 8.1应用的分享到微博就基本搞定啦,下面我们看看Windows Phone 8.1应用的。
继续努力
先尝试一下在Windows Phone 8.1应用中照Windows 8.1应用的方法调用微博SDK:

出错咯。原来 WebAuthenticationBroker.AuthenticateAsync 这个方法在Windows Phone 8.1 上没有实现 -_-|||。赶紧查查资料,原来Windows Phone 8.1上要使用 WebAuthenticationBroker.AuthenticateAndContinue 这个方法。参见 https://code.msdn.microsoft.com/windowsapps/Web-Authentication-d0485122。
简单的说就是调用 WebAuthenticationBroker.AuthenticateAndContinue 方法以后,会暂时跳出我们的Windows Phone 8.1 应用,在系统提供的一个专门的空间内得到WebAuthenticationResult,再通过我们的Windows Phone 8.1 应用的onActive事件将其传回应用,再根据WebAuthenticationResult的结果继续调用ContinueWebAuthentication进行下一步的认证工作。
这样一来我们的SDK代码为了适应Universal 应用的Windows 应用和Windows Phone 应用就有了分歧,这正是条件编译派上用场的时候了。
我们将ClientOAuth.cs中的 GetAuthorizeCode 方法替换为如下:
/// <summary>
/// 授权获取authorize_code.
/// </summary>
private async void GetAuthorizeCode()
{
string oauthUrl = string.Format("{0}/oauth2/authorize?client_id={1}&response_type=code&redirect_uri={2}&display=mobile"
, Constants.ServerUrl2_0, SdkData.AppKey, SdkData.RedirectUri);
Uri startUri = new Uri(oauthUrl, UriKind.Absolute);
Uri endUri = new Uri(SdkData.RedirectUri, UriKind.Absolute);
// 调出认证页面.
#if WINDOWS_PHONE_APP
WebAuthenticationBroker.AuthenticateAndContinue(startUri, endUri);
#else
var authenResult = await WebAuthenticationBroker.AuthenticateAsync(WebAuthenticationOptions.None, startUri, endUri);
switch (authenResult.ResponseStatus)
{
case WebAuthenticationStatus.Success:
{
string authorize_code = string.Empty;
var data = authenResult.ResponseData;
authorize_code = SdkUility.GetQueryParameter(data, "code");
if (string.IsNullOrEmpty(authorize_code) == false)
{
Authorize(authorize_code);
}
}
break;
case WebAuthenticationStatus.UserCancel:
{
SdkAuthError err = new SdkAuthError();
err.errCode = SdkErrCode.USER_CANCEL;
err.errMessage = Constants.SdkMsg.OAuthUserCanceled;
if (null != LoginCallback)
LoginCallback(false, err, null);
}
break;
case WebAuthenticationStatus.ErrorHttp:
default:
{
SdkAuthError err = new SdkAuthError();
err.errCode = SdkErrCode.NET_UNUSUAL;
err.errMessage = Constants.SdkMsg.NetException;
if (null != LoginCallback)
LoginCallback(false, err, null);
}
break;
}
#endif
}
public void continueAuth(WebAuthenticationResult authenResult)
{
switch (authenResult.ResponseStatus)
{
case WebAuthenticationStatus.Success:
{
string authorize_code = string.Empty;
var data = authenResult.ResponseData;
authorize_code = SdkUility.GetQueryParameter(data, "code");
if (string.IsNullOrEmpty(authorize_code) == false)
{
Authorize(authorize_code);
}
}
break;
case WebAuthenticationStatus.UserCancel:
{
SdkAuthError err = new SdkAuthError();
err.errCode = SdkErrCode.USER_CANCEL;
err.errMessage = Constants.SdkMsg.OAuthUserCanceled;
if (null != LoginCallback)
LoginCallback(false, err, null);
}
break;
case WebAuthenticationStatus.ErrorHttp:
default:
{
SdkAuthError err = new SdkAuthError();
err.errCode = SdkErrCode.NET_UNUSUAL;
err.errMessage = Constants.SdkMsg.NetException;
if (null != LoginCallback)
LoginCallback(false, err, null);
}
break;
}
}
现在我们的SDK的条件编译还没有生效,我们需要新建一个For Windows Phone的SDK:

把我们原有SDK的文件添加为链接:

注意CmdModel 下的文件,以及RestSharp.winmd 的引用也要加进来。还有我们的程序集名称因为新建项目的原因变化了,也得改回去。

改为

现在把Windows Phone 8.1应用的引用替换成WeiboSDKForWinRTPhone的。
接下来就可以果断地借鉴例子程序Web authentication broker sample 了,把它的ContinuationManager.cs拷贝过来。参见 https://code.msdn.microsoft.com/windowsapps/Web-Authentication-d0485122。
让 MainPage 实现 IWebAuthenticationContinuable 的接口:
public sealed partial class MainPage : Page, IWebAuthenticationContinuable
再给 MainPage 加上个实现 IWebAuthenticationContinuable 接口中 ContinueWebAuthentication进行下一步的方法:
public void ContinueWebAuthentication (WebAuthenticationBrokerContinuationEventArgs ex)
{
var oauthClient = new ClientOAuth();
oauthClient.LoginCallback += (isSucces, err, response) =>
{
if (isSucces)
{
// TODO: deal the OAuth result.
this.statusRun.Text = "Congratulations, Authorized successfully!";
this.ResultRun.Text = string.Format("AccesssToken:{0}, ExpriesIn:{1}, Uid:{2}",
response.AccessToken, response.ExpriesIn, response.Uid);
}
else
{
// TODO: handle the err.
this.statusRun.Text = " Authorized Failed!";
this.ResultRun.Text = err.errMessage;
}
};
oauthClient.continueAuth(ex.WebAuthenticationResult);
}
最后处理一下App.xaml.cs中的 事件:
#if WINDOWS_PHONE_APP
ContinuationManager continuationManager;
/// <summary>
/// Handle OnActivated event to deal with File Open/Save continuation activation kinds
/// </summary>
/// <param name="e">Application activated event arguments, it can be casted to proper sub-type based on ActivationKind</param>
protected override void OnActivated(IActivatedEventArgs e)
{
base.OnActivated(e);
continuationManager = new ContinuationManager();
Frame rootFrame = Window.Current.Content as Frame;
// Do not repeat app initialization when the Window already has content,
// just ensure that the window is active
if (rootFrame == null)
{
// Create a Frame to act as the navigation context and navigate to the first page
rootFrame = new Frame();
// Place the frame in the current Window
Window.Current.Content = rootFrame;
}
if(rootFrame.Content == null)
{
rootFrame.Navigate(typeof(MainPage));
}
var continuationEventArgs = e as IContinuationActivatedEventArgs;
if (continuationEventArgs != null)
{
// Call ContinuationManager to handle continuation activation
continuationManager.Continue(continuationEventArgs, rootFrame);
}
Window.Current.Activate();
}
#endif
赶紧运行看看:

好吧,又出错了。看起来是跳转到应用外失败了,是不是我们太早跳转了呢?把OnNavigatedTo中的授权的过程放到 Page 的 Loaded 事件里试试吧:

仍然不行,那只有采用延迟的办法了:
private async void Page_Loaded(object sender, RoutedEventArgs e)
{
await Task.Delay(1000);
var oauthClient = new ClientOAuth();
// 判断是否已经授权或者授权是否过期.
if (oauthClient.IsAuthorized == false)
{
oauthClient.LoginCallback += (isSucces, err, response) =>
{
if (isSucces)
{
// TODO: deal the OAuth result.
this.statusRun.Text = "Congratulations, Authorized successfully!";
this.ResultRun.Text = string.Format("AccesssToken:{0}, ExpriesIn:{1}, Uid:{2}",
response.AccessToken, response.ExpriesIn, response.Uid);
}
else
{
// TODO: handle the err.
this.statusRun.Text = err.errMessage;
}
};
oauthClient.BeginOAuth();
}
}
再看看行不行?


好了,终于大功告成。
结尾
我们这个修改过的微博SDK可以在https://code.msdn.microsoft.com/windowsapps/Share-To-Weibo-in-c99da5fa 找到。其中难免会有一些Bug,欢迎大家指正。
分享代码,改变世界!
Windows Phone Store App link:
http://www.windowsphone.com/zh-cn/store/app/博客园-uap/500f08f0-5be8-4723-aff9-a397beee52fc
Windows Store App link:
http://apps.microsoft.com/windows/zh-cn/app/c76b99a0-9abd-4a4e-86f0-b29bfcc51059
GitHub open source link:
https://github.com/MS-UAP/cnblogs-UAP
MSDN Sample Code:
https://code.msdn.microsoft.com/CNBlogs-Client-Universal-477943ab