1、首先感谢肖祥博主的案例:https://www.cnblogs.com/xiao987334176/p/13739249.html
2、环境安装
(1)安装Anaconda:
下载地址:https://www.anaconda.com/products/individual
(2)安装:scrapy
(3)安装:Pycharm
(4)安装:Xpath helper
教程参考:
获取插件:https://blog.csdn.net/weixin_41010318/article/details/86472643
配置过程:https://www.cnblogs.com/pfeiliu/p/13483562.html
3、爬取过程
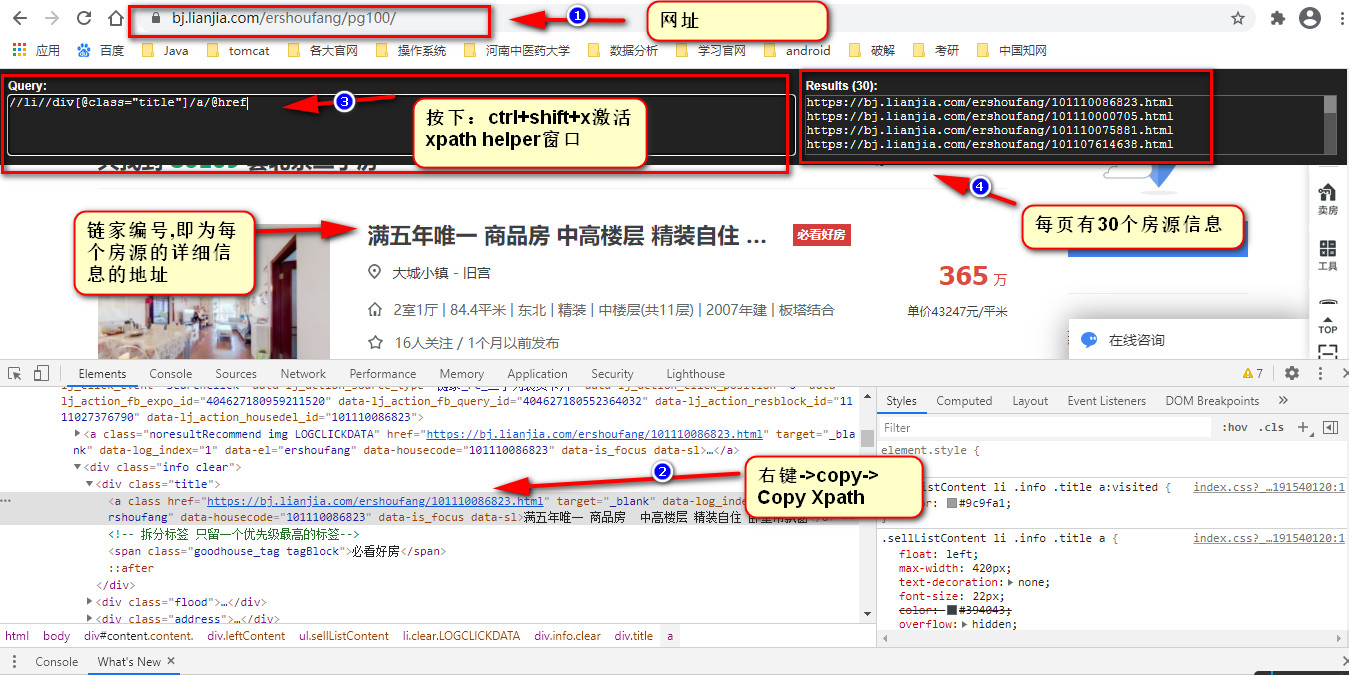
(1)网页分析:
网址:
第一页:https://bj.lianjia.com/ershoufang/
第二页:https://bj.lianjia.com/ershoufang/pg1/
末尾页:https://bj.lianjia.com/ershoufang/pg100/
利用xpath helper 分析出房源的链家编号:
(2)详细代码:
目录:
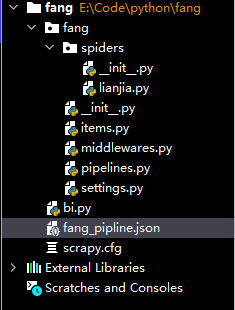
创建项目:
# 打开Pycharm,并打开Terminal,执行以下命令
scrapy startproject fang
cd fang
scrapy genspider lianjia bj.lianjia.com
在scrapy.cfg同级目录,创建bi.py,用于启动Scrapy项目,内容如下:


# !/usr/bin/python3
# -*- coding: utf-8 -*-
# 在项目根目录下新建:bi.py
from scrapy.cmdline import execute
# 第三个参数是:爬虫程序名
# --nolog什么意思?
execute(['scrapy', 'crawl', 'lianjia', '--nolog'])
lianjia.py
# -*- coding: utf-8 -*-
import scrapy
from scrapy import Request  # 导入模块
import math
import re
from fang.items import FangItem
from selenium.webdriver import ChromeOptions
from selenium.webdriver import Chrome


class LianjiaSpider(scrapy.Spider):
    name = 'lianjia'
    allowed_domains = ['changde.lianjia.com']
    base_url = "https://changde.lianjia.com/ershoufang/pg"

    # 实例化一个浏览器对象
    def __init__(self):
        # 防止网站识别Selenium代码
        # selenium启动配置参数接收是ChromeOptions类,创建方式如下:
        options = ChromeOptions()
        # 添加启动参数
        # 浏览器不提供可视化页面. linux下如果系统不支持可视化不加这条会启动失败
        options.add_argument("--headless")  # => 为Chrome配置无头模式
        # 添加实验性质的设置参数
        # 设置开发者模式启动,该模式下webdriver属性为正常值
        options.add_experimental_option('excludeSwitches', ['enable-automation'])
        options.add_experimental_option('useAutomationExtension', False)
        # 禁用浏览器弹窗
        self.browser = Chrome(options=options)
        # 最新解决navigator.webdriver=true的方法
        self.browser.execute_cdp_cmd("Page.addScriptToEvaluateOnNewDocument", {
            "source": """
                               Object.defineProperty(navigator, 'webdriver', {
                                 get: () => undefined
                               })
                             """
        })

        super().__init__()

    def start_requests(self):
        print("开始爬虫")
        self.base_url = "https://changde.lianjia.com/ershoufang/pg"
        url = self.base_url + str(2)
        print("url", url)
        # url = "https://news.163.com/"
        # 一个Request对象表示一个HTTP请求,它通常是在爬虫生成,并由下载执行,从而生成Response
        # url(string) - 此请求的网址
        # callback(callable) - 将使用此请求的响应(一旦下载)作为其第一个参数调用的函数。
        # 如果请求没有指定回调,parse()将使用spider的 方法。请注意,如果在处理期间引发异常,则会调用errback。
        # 仍有许多参数:method='GET', headers, body, cookies, meta, encoding='utf-8', priority=0, dont_filter=False, errback
        response = scrapy.Request(url=url, callback=self.parse_index)
        yield response

        # 整个爬虫结束后关闭浏览器
        def close(self, spider):
            print("关闭爬虫")
            self.browser.quit()

        # 访问主页的url, 拿到对应板块的response

    def parse_index(self, response):
        print("访问主页")
        # 获取分页
        # 查询条数
        ret_num = 3000
        # print("ret_num", ret_num, type(ret_num))
        # 计算分页,每一页30条
        jsfy = int(ret_num) / 30
        # 向上取整
        page_num = math.ceil(jsfy)
        # print("page_num",page_num)

        for n in range(2, page_num + 1):
            n += 1
            # 下一页url
            url = self.base_url + str(n)
            print("url", url)
            # 访问下一页,有返回时,调用self.parse_details方法
            yield scrapy.Request(url=url, callback=self.parse_details)

    def parse_details(self, response):
        # 获取页面中要抓取的信息在网页中位置节点
        node_list = response.xpath('//ul[@class="sellListContent"]/li/div[1]')

        count = 0
        # 遍历节点,进入详情页,获取其他信息
        for node in node_list:
            count += 1
            try:
                # # 名称
                BeiJingFangYuan_Id = node.xpath('./div[@class="title"]/a/@href').extract()

                if BeiJingFangYuan_Id:
                    BeiJingFangYuan_Id = BeiJingFangYuan_Id[0].strip()

                print("BeiJingFangYuan_Id", BeiJingFangYuan_Id)


                # item
                item = FangItem()
                item['ChangDeFangYuan_Id'] = BeiJingFangYuan_Id
                yield item
            except Exception as e:
                print(e)

        print("本次爬取数据: %s条" % count)


    '''def parse(self, response):
        pass
    '''
items.py
# Define here the models for your scraped items
#
# See documentation in:
# https://docs.scrapy.org/en/latest/topics/items.html

import scrapy

class FangItem(scrapy.Item):
    # define the fields for your item here like:
    # name = scrapy.Field()
    BeiJingFangYuan_Id = scrapy.Field()
    pass
pipelines.py
# Define your item pipelines here
#
# Don't forget to add your pipeline to the ITEM_PIPELINES setting
# See: https://docs.scrapy.org/en/latest/topics/item-pipeline.html


# useful for handling different item types with a single interface
from itemadapter import ItemAdapter
import json

class FangPipeline(object):
    def __init__(self):
        # python3保存文件 必须需要'wb' 保存为json格式
        # 为了方便,保存在一个json文件中。当然,也可以设置保存到数据库中。
        self.f = open("fang_pipline.json", 'wb')

    # 在pipeline中写json文件
    def process_item(self, item, spider):
        # 读取item中的数据 并换行处理
        # json.dumps 序列化时对中文默认使用的ascii编码.想输出真正的中文需要指定ensure_ascii=False
        content = json.dumps(dict(item), ensure_ascii=False) + ',
'
        # f.write写入中文出错解决方法
        self.f.write(content.encode('utf=8'))
        return item

    def close_spider(self, spider):
        # 关闭文件
        self.f.close()
修改settings.py,应用pipelines
# Scrapy settings for fang project
#
# For simplicity, this file contains only settings considered important or
# commonly used. You can find more settings consulting the documentation:
#
#     https://docs.scrapy.org/en/latest/topics/settings.html
#     https://docs.scrapy.org/en/latest/topics/downloader-middleware.html
#     https://docs.scrapy.org/en/latest/topics/spider-middleware.html

BOT_NAME = 'fang'

SPIDER_MODULES = ['fang.spiders']
NEWSPIDER_MODULE = 'fang.spiders'


# Crawl responsibly by identifying yourself (and your website) on the user-agent
#USER_AGENT = 'fang (+http://www.yourdomain.com)'

# Obey robots.txt rules
ROBOTSTXT_OBEY = False

# Configure maximum concurrent requests performed by Scrapy (default: 16)
#CONCURRENT_REQUESTS = 32

# Configure a delay for requests for the same website (default: 0)
# See https://docs.scrapy.org/en/latest/topics/settings.html#download-delay
# See also autothrottle settings and docs
#DOWNLOAD_DELAY = 3
# The download delay setting will honor only one of:
#CONCURRENT_REQUESTS_PER_DOMAIN = 16
#CONCURRENT_REQUESTS_PER_IP = 16

# Disable cookies (enabled by default)
#COOKIES_ENABLED = False

# Disable Telnet Console (enabled by default)
#TELNETCONSOLE_ENABLED = False

# Override the default request headers:
#DEFAULT_REQUEST_HEADERS = {
#   'Accept': 'text/html,application/xhtml+xml,application/xml;q=0.9,*/*;q=0.8',
#   'Accept-Language': 'en',
#}

# Enable or disable spider middlewares
# See https://docs.scrapy.org/en/latest/topics/spider-middleware.html
#SPIDER_MIDDLEWARES = {
#    'fang.middlewares.FangSpiderMiddleware': 543,
#}

# Enable or disable downloader middlewares
# See https://docs.scrapy.org/en/latest/topics/downloader-middleware.html
#DOWNLOADER_MIDDLEWARES = {
#    'fang.middlewares.FangDownloaderMiddleware': 543,
#}

# Enable or disable extensions
# See https://docs.scrapy.org/en/latest/topics/extensions.html
#EXTENSIONS = {
#    'scrapy.extensions.telnet.TelnetConsole': None,
#}

# Configure item pipelines
# See https://docs.scrapy.org/en/latest/topics/item-pipeline.html
ITEM_PIPELINES = {
    'fang.pipelines.FangPipeline': 300,
}

# Enable and configure the AutoThrottle extension (disabled by default)
# See https://docs.scrapy.org/en/latest/topics/autothrottle.html
#AUTOTHROTTLE_ENABLED = True
# The initial download delay
#AUTOTHROTTLE_START_DELAY = 5
# The maximum download delay to be set in case of high latencies
#AUTOTHROTTLE_MAX_DELAY = 60
# The average number of requests Scrapy should be sending in parallel to
# each remote server
#AUTOTHROTTLE_TARGET_CONCURRENCY = 1.0
# Enable showing throttling stats for every response received:
#AUTOTHROTTLE_DEBUG = False

# Enable and configure HTTP caching (disabled by default)
# See https://docs.scrapy.org/en/latest/topics/downloader-middleware.html#httpcache-middleware-settings
#HTTPCACHE_ENABLED = True
#HTTPCACHE_EXPIRATION_SECS = 0
#HTTPCACHE_DIR = 'httpcache'
#HTTPCACHE_IGNORE_HTTP_CODES = []
#HTTPCACHE_STORAGE = 'scrapy.extensions.httpcache.FilesystemCacheStorage'
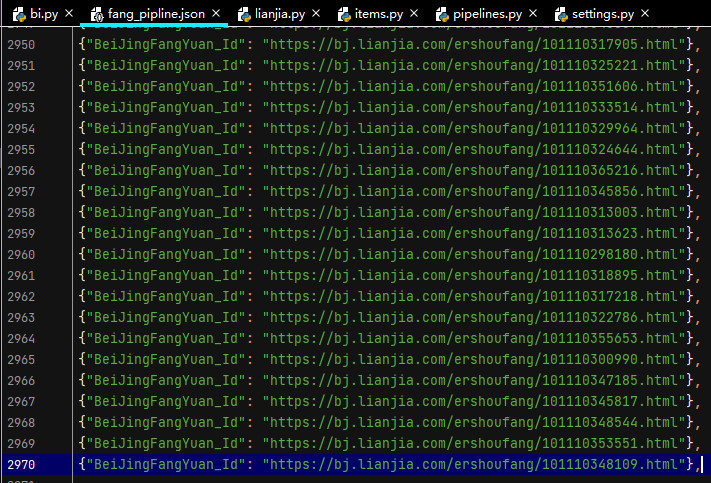
执行bi.py,启动爬虫项目,效果如下: