前端构建场景有两种,一种是单页面构建,另一种是多入口构建多页面应用程序(我视野比较小,目前就知道这两种),下面我们针对这两种场景总结了几种抽离第三方类库以及公共文件的解决方案。
如果有哪些地方优化不周到,请指点一二,另外求关注求星星,么么哒
单页面构建:
常规配置
const path = require('path');
const MiniCssExtractPlugin = require('mini-css-extract-plugin');
const HtmlWebpackPlugin = require('html-webpack-plugin');
const { CleanWebpackPlugin } = require('clean-webpack-plugin')

module.exports = {
    mode: "development",
    entry: {
        app: './app.js'
    },
    output: {
        path: path.resolve(__dirname, './build/'),
        filename: "bundle-[chunkhash:8].js"
    },
    devtool: "source-map",
    module: {
        rules: [
            {
                test: /.js$/,
                use: {
                    loader: 'babel-loader',
                },
                exclude: /node_modules/
            },
            {
                test: /.css$/,
                use: [
                    MiniCssExtractPlugin.loader,
                    'css-loader'
                ],
                exclude: /node_modules/
            },
            {
                test: /.less$/,
                use: [
                    MiniCssExtractPlugin.loader,
                    'css-loader',    // translates CSS into CommonJS
                    'less-loader',     // compiles Less to CSS
                ],
                exclude: /node_modules/
            },
            {
                test: /.(jpe?g|png|gif|svg)$/i,
                use: [{
                    loader: 'file-loader',
                    options: {
                        limit: 1024,
                    }
                }],
            }
        ]
    },
    plugins: [
        new MiniCssExtractPlugin({
            filename: "[name].[chunkhash:8].css",
            chunkFilename: "[id].[chunkhash:8].css"
        }),
        new HtmlWebpackPlugin({
            title: 'webpack',
            template: './index.html',
            chunks: ['app']
        }),
        new CleanWebpackPlugin()
    ],
}
在脚本种我们常规写法是这样的
require('./main-less.less');
require('./main-css.css');
const ReactDOM = require('react-dom');
const React = require('react');
import Main from './main.js';
// /**
//  *  引入 scope hisiting test
//  */
// import B from './ScopeHisitingTest/b';
ReactDOM.render(
    <Main />,
    document.getElementById('app')
)
我们看下构建输出结果
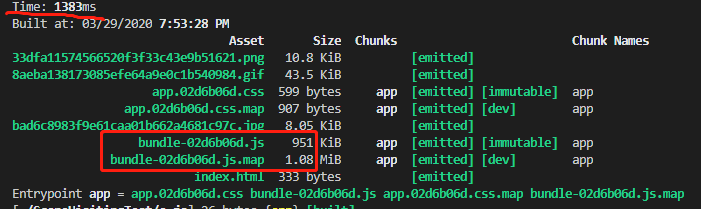
现在我们看到这个应该思考三个问题
1.脚本部分,难道每个页面都要写一边import React&ReactDOM 吗
2.构建体积能不能再缩小一点
3.构建速度能不能在快一点
以上三个问题都会在开发过程中耽误开发效率,我们开始处理这三个问题
方案1
html全局引用第三方类库,比如React,因为React源码中将React挂在到了window上,这么做解决了什么呢,脚本里面我们不用在每一个页面中引用第三方类库了,我们看下代码
<!DOCTYPE html>
<html>

<head>
    <meta charset="UTF-8">
</head>

<body>
    <div id='app'></div>
    <script crossorigin src="https://unpkg.com/react@16/umd/react.development.js"></script>
    <script crossorigin src="https://unpkg.com/react-dom@16/umd/react-dom.development.js"></script>
</body>

</html>
好了解决了脚本部分不用每个页面都需要import一次了
构建体积怎么减小呢
这里我们可以借助webpack插件,下面我们上代码
 externals: {
        'react': 'react',
        'react-dom': 'react-dom'
    },
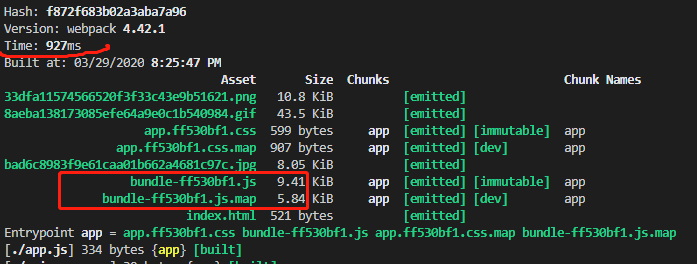
我们将两个第三方类库打包的时候不依赖进去,通过这种方式告诉webpack,在构建过程中引用react以从内存中引用的方式,我们看下打包效果

可以明显的看到,采用这种用法之后会有一个问题就是,我们在目标脚本文件里面就不能在引用第三方类库了,不然打包进去,external会以具体文件形式引用第三方类库,从而导致找不到而报错,直接用就好了,我们毕竟要解决的就是这个问题嘛。
以上就是第一种解决方案,当然这并不是根本的解决方案,只是个大体思路,我们可以再改进一下。
第二种
通过组织模块的形式包装第三方类库,从而打到第三方类库挂载到全局的效果
首先创建一个用来专门打包第三方的webpack
const path = require('path');
module.exports = {
    mode: 'development',
    entry: {
        app: './vendorentry.js',
    },
    output: {
        path: path.resolve(__dirname, './vendor/'),
        filename: "dll.js",
        library:'util',
        libraryTarget: 'window'
    },
}
这里就不做任何优化了,毕竟打包第三方的,我们也不需要在提取什么文件了。这里注意的是通过组织模块打包方式libraryTarget,以及暴露给全局的名称util。
创建一个入口文件,来引用第三方类库的集合
import $ from "jquery";
import React from "react";
import ReactDOM from "react-dom";

window.React = React;
window.ReactDOM = ReactDOM;
window.$ = $;

export { $, React, ReactDOM };
输出结果
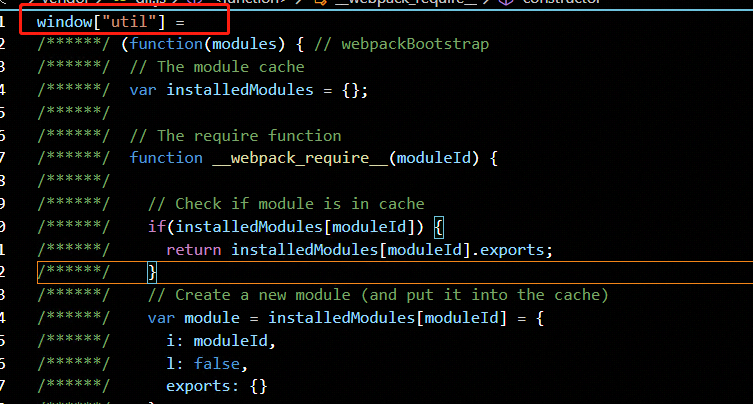
所有的第三方都在util下,其实我们只是规定了在业务逻辑的webpack中要以某种形式去加载,而不是打到最终包里,这就是我们的核心目的。
html中可以动态替换目标dll,配置如下
  new HtmlWebpackPlugin({
            templateContent: () => {
                let template = path.resolve(__dirname, './index.html');
                return read(template)
                    .toString()
                    .replace('$dll$', '../vendor/dll.js');
            },
            title: 'index',
            template: './index.html',
            filename: 'index.html',
            chunks: ['app'],
            hash: true
        }),
业务逻辑webpack配置
   externals: {
        'react': 'window.util.React',
        'react-dom': 'window.util.ReactDOM',
        'jQuery': 'window.util.jquery',
        '$': 'window.util.jquery'
    }
第三种
第三种方式采用将第三方类库打包到指定的dll中,通过webpack构建应用时引用
涉及两个Plugin,分别是DllReferencePlugin,DllPlugin
首先创建一个专门针对dll的webpack配置文件
const webpack = require('webpack');
const path = require('path');

module.exports = {
    entry: {
        react: [
            'react',
            'react-dom'
        ]
    },
    output: {
        filename: '[name].dll.js',
        path: path.resolve(__dirname, './distDll/dll/'),
        library: '[name]_dll_[hash]'
    },
    plugins: [
        new webpack.DllPlugin({
            name: '[name]_dll_[hash]',
            context: __dirname,
            path: path.join(__dirname, 'distDll/dll', '[name].manifest.json')
        })
    ]
}
然后执行这个webpack,生成dll以及描述模块运行依赖的manifest.json,我们应用的webpack需要引用这个dll
 new webpack.DllReferencePlugin({
            context: __dirname,
            manifest: require('./distDll/dll/react.manifest.json')
        }),
到这里就结束了吗,并不是,我们执行下webpack会发现,React找不到了,我们首先考虑到什么,难道是external的问题吗,你会发现跟它一点关系没有,难道我们每次写还要导入第三方类库吗,解决方案
ProvidePlugin
   new webpack.ProvidePlugin({
            'React': 'react',
            'ReactDOM': 'react-dom'
        })
这样就解决了这个问题,我们看下构建效果
同样也达到了我们的目的。
多入口
多入口采用optimization分离,其实与多页面分离第三方与common部分的用法是一样的,我们就跟多页面一起具体了。
多页面解决方案
基本配置
const path = require('path');
const webpack = require('webpack');
const MiniCssExtractPlugin = require('mini-css-extract-plugin');
const { CleanWebpackPlugin } = require('clean-webpack-plugin')
const HtmlWebpackPlugin = require('html-webpack-plugin');

module.exports = {
    mode: 'development',
    entry: {
        app1: './app1.js',
        app2: './app2.js'
    },
    output: {
        path: path.resolve(__dirname, './build/'),
        filename: "[name]-[chunkhash].js"
    },
    devtool: "source-map",
    module: {
        rules: [
            {
                test: /.less$/,
                use: [
                    MiniCssExtractPlugin.loader,
                    {
                        loader: 'css-loader',
                    },
                    'less-loader',

                ],
                exclude: /node_modules/
            },
            {
                test: /.js$/,
                use: [
                    'cache-loader',
                    {
                        loader: 'babel-loader',
                    }
                ],
                exclude: /node_modules/
            }
        ]
    },
    plugins: [
        new MiniCssExtractPlugin({
            filename: '[name].[hash:5].css',
        }),
        new CleanWebpackPlugin(),
        new HtmlWebpackPlugin({
            title: 'index1',
            template: './index1.html',
            filename: 'index1.html',
            chunks: ['app1', 'common'],
            // hash: true
        }),
        new HtmlWebpackPlugin({
            title: 'index2',
            template: './index2.html',
            filename: 'index2.html',
            chunks: ['app2', 'common'],
            // hash: true
        }),
        new webpack.HashedModuleIdsPlugin(),
    ],

}
打包效果

问题很明显,速度慢,体积过大,这里还有个问题就是,app1的与app2引用共同的文件导致的体积过大,也就是我们要解决的如何提取common部分的问题,这里我们就不讨论脚本import 第三方的问题了,上面有解决方案了。
提取common部分
optimization: {
        runtimeChunk: {
            "name": "manifest"
        },
        splitChunks: {
            chunks: 'all',
            cacheGroups: {
                default: false,
                vendors: false,
                common: {
                    test: /.(s*)js$/,
                    chunks: 'all',
                    minChunks: 2,
                    minSize: 0,
                    name: 'common',
                    enforce: true,
                    priority: -11
                },
                vendors: {
                    test: /[\/]node_modules[\/]/,
                    name: "vendors",
                    priority: -10,
                    chunks: 'all',
                    reuseExistingChunk: true,
                    enforce: true
                },
                style: {
                    name: 'style',
                    test: /.less$/,
                    chunks: 'all',
                    enforce: true
                }
            }
        },
        runtimeChunk:{
            name:'manifest'
        }
    },
这里我们要做的是,提供commonjs,合并css(提取common部分也是可以的,毕竟页面也不可能用全部的css,做法与提取commonjs是一样的,配置minChunks最小为2就可以了),提供第三方类库。
我们看下打包效果
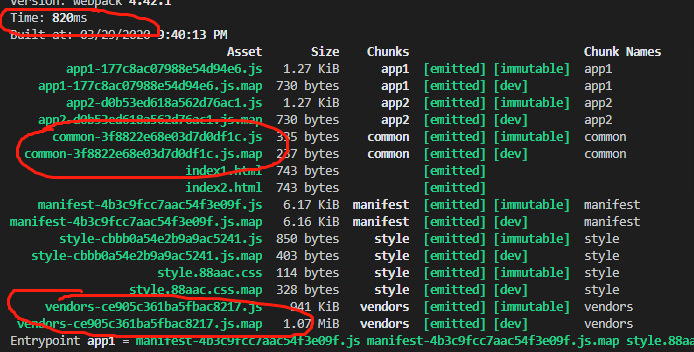
速度提升了,同时生成了common文件以及提三方文件集合verndors文件,嗯,目前解决了我们要解决的问题,上面单页面场景同样适用,浏览器缓存这个一般不会变得vendors,也达到了提升效率问题,
但是有没有想过一个问题,就是每一次webpack构建过程,是不是都要打一次这个包呢,浪费时间了吧,于是我们采用什么方式呢,没错~采用DllPlugin与DllReferencePlugin来提取一次第三方,
剩下common部分每一次构建都去重新打一次。
代码同样引用dll
 new webpack.DllReferencePlugin({
            context: __dirname,
            manifest: require('./distDll/dll/react.manifest.json')
        })
构建效果

效果就是大幅度提升构建速度。
最终配置文件
const path = require('path');
const webpack = require('webpack');
const MiniCssExtractPlugin = require('mini-css-extract-plugin');
const { CleanWebpackPlugin } = require('clean-webpack-plugin')
const HtmlWebpackPlugin = require('html-webpack-plugin');

module.exports = {
    mode: 'development',
    entry: {
        app1: './app1.js',
        app2: './app2.js'
    },
    output: {
        path: path.resolve(__dirname, './build/'),
        filename: "[name]-[chunkhash].js"
    },
    devtool: "source-map",
    module: {
        rules: [
            {
                test: /.less$/,
                use: [
                    MiniCssExtractPlugin.loader,
                    {
                        loader: 'css-loader',
                        // options: {
                        //     sourceMap: true,
                        //     modules: true,
                        //     localIdentName: '[name]---[local]---[hash:base64:5]'
                        // }
                    },
                    'less-loader',

                ],
                exclude: /node_modules/
            },
            {
                test: /.js$/,
                use: [
                    'cache-loader',
                    {
                        loader: 'babel-loader',
                        options: {
                            // cacheDirectory: path.join(__dirname,'./build/', 'babel_cache')
                            // happyPackMode: true,
                            // transpileOnly: true
                        }
                    }
                ],
                exclude: /node_modules/
            }
        ]
    },
    optimization: {
        runtimeChunk: {
            "name": "manifest"
        },
        splitChunks: {
            chunks: 'all',
            cacheGroups: {
                default: false,
                vendors: false,
                common: {
                    test: /.(s*)js$/,
                    chunks: 'all',
                    minChunks: 2,
                    minSize: 0,
                    name: 'common',
                    enforce: true,
                    priority: -11
                },
                // vendors: {
                //     test: /[\/]node_modules[\/]/,
                //     name: "vendors",
                //     priority: -10,
                //     chunks: 'all',
                //     reuseExistingChunk: true,
                //     enforce: true
                // },
                style: {
                    name: 'style',
                    test: /.less$/,
                    chunks: 'all',
                    enforce: true
                }
            }
        },
        runtimeChunk:{
            name:'manifest'
        }
    },
    plugins: [
        new MiniCssExtractPlugin({
            filename: '[name].[hash:5].css',
        }),
        new CleanWebpackPlugin(),
        new HtmlWebpackPlugin({
            title: 'index1',
            template: './index1.html',
            filename: 'index1.html',
            chunks: ['app1', 'common'],
            // hash: true
        }),
        new HtmlWebpackPlugin({
            title: 'index2',
            template: './index2.html',
            filename: 'index2.html',
            chunks: ['app2', 'common'],
            // hash: true
        }),
        new webpack.HashedModuleIdsPlugin(),
        new webpack.DllReferencePlugin({
            context: __dirname,
            manifest: require('./distDll/dll/react.manifest.json')
        })
    ],

}
以上就是针对webpack构建优化全部总结,涉及第三方抽取,common抽取等问题。
求个关注~谢谢,么么哒~