1.安裝前環境
1.1.關閉防火墻(主備機)
systemctl stop firewalld
systemctl disable firewalld
systemctl disable NetworkManager
systemctl stop NetworkManager
vi /etc/selinux/config
1.2.修改主機名(主備機)
vi /etc/hostname
--------------------
pcs01
--------------------
1.3.配置心跳IP(主備機)
不要加gateway,否則會導致辦公IP不通
兩個IP應該在不同的段,否則無法使用冗餘環(rrp)
cd /etc/sysconfig/network-scripts/
vi ifcfg-enp0s8
----------------------------------
IPADDR=192.168.56.2
NETMASK=255.255.255.0
----------------------------------
vi ifcfg-enp0s9
----------------------------------
IPADDR=192.168.57.2
NETMASK=255.255.255.0
----------------------------------
service network restart
1.4.修改hosts(主備機)
vi /etc/hosts
##############################
xxx.xxx.xxx.xxx pcs01
xxx.xxx.xxx.xxx pcs02
192.168.56.2 pcs01-A
192.168.56.3 pcs02-A
192.168.57.2 pcs01-B
192.168.57.3 pcs02-B
##############################
2.安裝
2.1.安裝軟體(主備庫)
yum install pcs fence-agents-all -y
2.2.創建集群
2.2.1.用户hacluster设置密码(主備庫)
passwd hacluster
2.2.2.啟動PCS守護進程(主備庫)
systemctl enable pcsd
systemctl start pcsd
systemctl status pcsd
2.2.3.認證集群
pcs cluster auth pcs01-A pcs01-B pcs02-A pcs02-B -u hacluster -p xxxxxx
2.2.4.創建并打開集群
# 創建集群
pcs cluster setup --name test_cluster pcs01-A,pcs01-B pcs02-A,pcs02-B
# 開啟集群
pcs cluster start --all
# 查看集群
pcs cluster status
# 集群開機自啟動
pcs cluster enable --all
3.配置Fence設備
3.1.ILO中配置Fence設備
3.1.1.ILO中打開IPMI功能
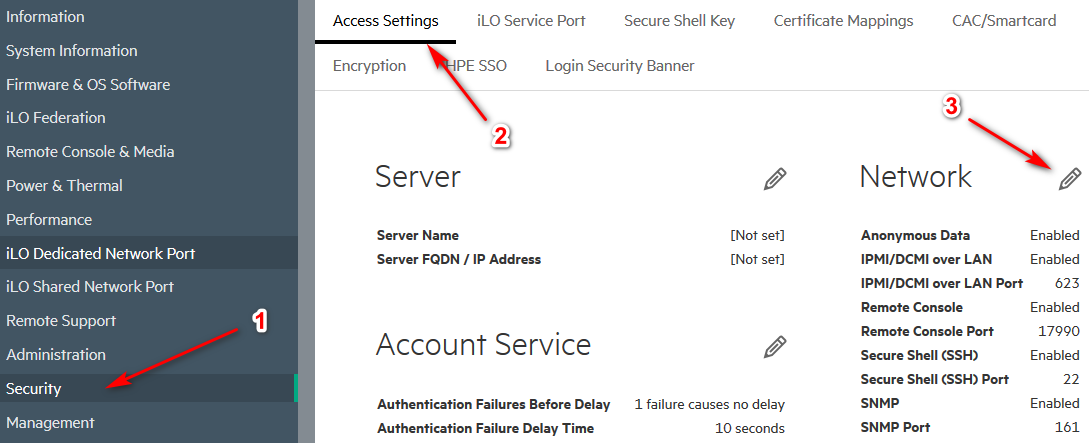
Security--->Access Settings--->IPMI/DCMI over LAN

3.1.2..集群添加Fence設備
# 顯示可用的Fence設備
pcs stonith list
# 顯示具體設備的Fence選項
pcs stonith describe fence_ilo5
# 添加
pcs stonith create fence_pcs01 fence_ilo5 pcmk_host_list="pcs01-A" ipaddr="xxx.xxx.xxx.xxx" lanplus="1" login="administrator" passwd="xxxxxx"
pcs stonith create fence_pcs02 fence_ilo5 pcmk_host_list="pcs02-A" ipaddr="xxx.xxx.xxx.xxx" lanplus="1" login="administrator" passwd="xxxxxx"
# 顯示配置的Fence設備
pcs stonith show
# 測試Fence設備,執行完,查看pcs01節點是否被重啟
pcs stonith fence pcs01-A
pcs stonith fence pcs02-A
3.2.VirtualBox配置Fence設備
3.2.1.下載安裝軟件包
VirtualBox配置Fence設備需要fence_vbox軟件包,使用yum安裝的fence-agents-all中並不包含fence-agents-vbox,因此需要自己下載或者源碼安裝,Fence-agents GitHub地址
源碼安裝:
git colne https://github.com/ClusterLabs/fence-agents.git
cd fence-agents
yum install autoconf automake libtool  gcc-c++ make nss-devel libxml2-devel libuuid-devel pexpect python-requests libvirt-devel libqb-devel byacc
./autogen.sh
./configure
make && make install
網上下載rpm包安裝:
# 查看當前fence-agents的版本
rpm -qa|grep -i fence
# 搜索引擎直接搜索對應版本的rpm包,本例使用fence-agents-vbox-4.2.1-41.el7_9.3.x86_64,但未找到,找到了一個4.9版本的
# fence-agents-vbox依賴fence-agents-common,因此需要先卸載以前的fence-agents-common
yum remove fence-agents-common
rpm -ivh fence-agents-common-4.9.0-1.2.5fd617.el7.noarch.rpm fence-agents-vbox-4.9.0-1.2.5fd617.el7.noarch.rpm
3.2.2.集群添加Fence設備
# 顯示可用的Fence設備
pcs stonith list
# 顯示具體設備的Fence選項
pcs stonith describe fence_vbox
# 添加
# ipaddr是虛擬機所在實體機的IP,用戶名和密碼也是實體機的,port是虛擬機的名字或者uuid
pcs stonith create fence_pcs01 fence_vbox pcmk_host_list="pcs01-A" ipaddr="xxx.xxx.xxx.xxx" login="root" passwd="xxxxxx" port="PCS01"
pcs stonith create fence_pcs02 fence_vbox pcmk_host_list="pcs02-A" ipaddr="xxx.xxx.xxx.xxx" login="root" passwd="xxxxxx" port="PCS02"
# 顯示配置的Fence設備
pcs stonith show
# 測試Fence設備,執行完,查看pcs01節點是否被重啟
pcs stonith fence pcs01-A
pcs stonith fence pcs02-A
3.3.其他Fence設備管理命令
# 修改Fence設備選項
pcs stonith update stonith_id [stonith_device_options]
# 刪除Fence設備
pcs stonith delete stonith_id
4.裁決設備
在REDHAT6時,可以使用裁決磁盤,在REDHAT7無法在使用裁決磁盤而使用qdevice代替
4.1.創建裁決設備
本例中裁決設備主機名為qdevice,以下操作全部在qdevice上執行
yum install pcs corosync-qnetd
systemctl start pcsd.service
systemctl enable pcsd.service
# 安裝配置net類型的qdevice
pcs qdevice setup model net --enable --start
# 顯示qdevice詳情
pcs qdevice status net --full
# 關閉防火墻或者配置防火墻
firewall-cmd --permanent --add-service=high-availability
firewall-cmd --add-service=high-availability
systemctl stop firewalld
# 配置hacluster的密碼
passwd hacluster
4.2.添加裁決設備到集群
集群所有節點在hosts中添加裁決設備并安裝軟件包
# 修改hosts
vi /etc/hosts
-----------------------
xxx.xxx.xxx.xxx qdevice
-----------------------
# 安裝corosync-qdevice軟件包
yum install corosync-qdevice
以下操作全部在其中一個集群節點中執行
# 認證裁決設備
pcs cluster auth qdevice -u hacluster
# 添加裁決設備
pcs quorum device add model net host=qdevice algorithm=ffsplit
# 查看狀態
pcs quorum config
pcs quorum status
pcs quorum device status
4.3.其他常用操作
# qdevice主機上打開關閉創建的device
pcs qdevice start net
pcs qdevice stop net
pcs qdevice enable net
pcs qdevice disable net
# 刪除一個創建的device
pcs qdevice destroy net
# 集群節點中修改qdevice設置
pcs quorum device update model algorithm=lms
# 移除qdevice
pcs quorum device remove
5.添加配置資源
5.1.添加資源
5.1.1.查看資源代理
# 查看所有資源代理腳本
pcs resource list
# 查看資源相關命令幫助
pcs resource standard
# 查看資源代理供應商
pcs resource providers
# 過濾資源代理腳本,string可以是資源名稱,供應商名稱等
pcs resource list string
pcs resource list heartbeat
5.1.2.添加相應資源
# 虛擬IP
pcs resource describe ocf:heartbeat:IPaddr2
pcs resource create pcs-vip ocf:heartbeat:IPaddr2 ip=xxx.xxx.xxx.xxx nic=bond0 cidr_netmask=24 iflabel=0
# 文件系統,這裡我增加了卸載時間,避免卸載失敗
pcs resource describe ocf:heartbeat:Filesystem
pcs resource create fs-data01 ocf:heartbeat:Filesystem device="/dev/sdb1" directory=/data01 fstype=ext4 op stop timeout=120s
# 數據庫,其中的HOME替换为自己的实际地址
pcs resource describe ocf:heartbeat:oracle
pcs resource create monkeydb ocf:heartbeat:oracle sid=monkeydb home="ORACLE_HOME" user=oracle op stop timeout=180s
# 監聽,添加監聽前要保證有tnsnames.ora文件(可以使用netmgr添加)並且其中有以ORACLE_SID為名稱的TNS,用於tnsping進行監控
# sid (required) (unique): The Oracle SID (aka ORACLE_SID). Necessary for the monitor op, i.e. to do tnsping SID.
pcs resource describe ocf:heartbeat:oralsnr
pcs resource create listener ocf:heartbeat:oralsnr sid=monkeydb home="ORACLE_HOME" user=oracle tns_admin="ORACLE_HOME /network/admin"
5.1.3.其他資源相關命令
# 查看配置的資源及資源組
pcs resource show [--full]
# 修改資源參數
pcs resource update resource_id [resource_options]
5.2.添加資源組
5.2.1.添加資源組
資源組中的資源按照順序啟動,逆序停止
# 創建資源組
pcs resource group add pcs-group pcs-vip
# 添加資源,before和after選項可以改變加入資源的位置
pcs resource group add pcs-group fs-data01 --before pcs-vip
# 查看集群中的組
pcs resource group list
5.2.2.資源組其他操作
# 刪除資源組或者資源組中的資源
pcs resource group remove group_name resource_id
# 修改資源組的粘性
pcs resource meta pcs-group resource-stickiness=100
6.日常管理命令
6.1.移動資源
- 一定要加lifetime,否則會添加位置閒置,例如下面的例子,會在pcs01-A添加資源粘性為無窮,之後如果pcs01-A重啟之後,資源會切換到02后再次切換為01
- lifetime至少為1S,如果為0S,資源不會移動
pcs resource move pcs-group pcs01-A lifetime=1S
6.2.凍結解凍資源
standby,讓某個節點無法運行任何一個資源,但是資源仍在集群管理下,因此停掉某個資源后,此資源會被重啟
unmanage,維護模式,集群不在監控資源的狀態
pcs cluster standby node
pcs cluster unstandby node

pcs resource unmanage pcs-group
pcs resource manage pcs-group
# 清理資源的錯誤信息
pcs resource cleanup pcs-group
6.3.停止啟動集群
# all停止所有節點集群,node停止指定節點的集群
pcs cluster stop [--all][node]
pcs cluster start [--all][node]
6.4.添加刪除集群節點
# 第一個node是關鍵字
pcs cluster node add node
pcs cluster node remove node
6.5.狀態查看
pcs status cluster
pcs status resource
pcs status quorum
pcs quorum device status
7.腦裂驗證
7.1.利用防火墻
# 在pcs01節點
iptables -I INPUT -s 192.168.56.3 -j DROP
iptables -I INPUT -s 192.168.57.3 -j DROP
# 測試結束后,用如下命令解除屏蔽
iptables -D INPUT -s 192.168.56.3 -j DROP
iptables -D INPUT -s 192.168.57.3 -j DROP
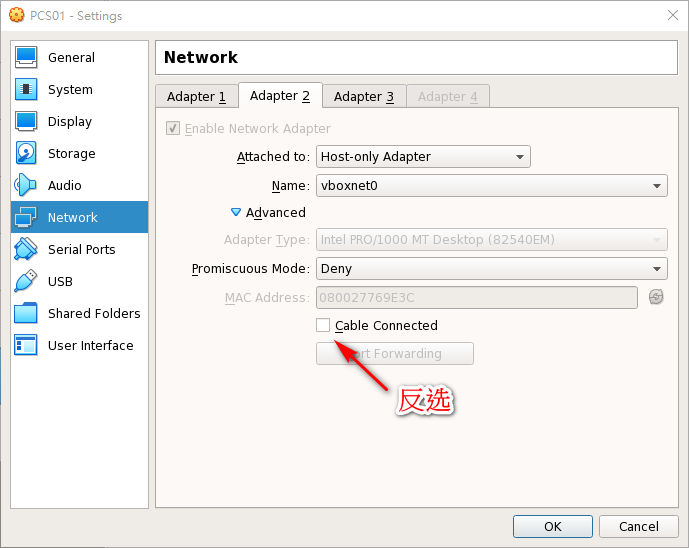
7.2.斷掉虛擬機的心跳網卡

8.新增目錄
8.1.新增目錄(主備庫)
mkdir /data02
8.2.分區磁盤(主庫)
fdisk /dev/sdc
8.3.重啟或者執行命令(備庫)
# 如果不重啟或者執行命令,備庫是沒有對應的/dev/sdc1設備的
partprobe /dev/sdc
8.4.格式化磁盤并掛載(主庫)
mkfs -t ext4 /dev/sdc1
mount /dev/sdc1 /data02/
chown -R oracle.oinstall /data02/
8.5.新增資源
pcs resource create fs-data02 ocf:heartbeat:Filesystem device="/dev/sdc1" directory=/data02 fstype=ext4 op stop timeout=120s --group pcs-group --before monkeydb
9.PCS相关文件
9.1.日志文件
cat /var/log/cluster/corosync.log
9.2.配置文件
cat /var/lib/pacemaker/cib/cib.xml
10.PCS中配置HA-LVM
10.1.修改LVM配置文件
#1. 下面命令和修改/etc/lvm/lvm.conf將locking_type=1和use_lvmetad=0效果相通
lvmconf --enable-halvm --services --startstopservices
#2.修改lvm.conf中volume_list,將不受pacemaker控制的卷組加入,例如本地的根目錄和家目錄
volume_list = [ "centos" ]
10.2.重新生成initramfs
重新生成initramfs開機影像檔,防止開機啟動pacemaker管理的卷組
cp /boot/initramfs-$(uname -r).img /boot/initramfs-$(uname -r).img.$(date +%m-%d-%H%M%S).bak
dracut -H -f /boot/initramfs-$(uname -r).img $(uname -r)
reboot
10.3.配置LVM資源
pcs resource describe ocf:heartbeat:LVM
pcs resource create lvm-data01 volgrpname=vg01 exclusive=true
11.PCS中配置POSTGRESQL
pcs resource describe ocf:heartbeat:pgsql
pcs resource create postgresql pgctl=/usr/local/pgsql/bin/pg_ctl pgdata=/pgdata/data pgport=5432 psql=/usr/local/pgsql/bin/psql