作者:十岁的小男孩
QQ:929994365
无用
本文仅用于学习研究,非商业用途,欢迎大家指出错误一起学习,文章内容翻译自 MACE 官方手册,记录本人阅读与开发过程,力求不失原意,但推荐阅读原文。
本文是mace学习的第二步,如何撰写Yaml文件,将pb模型部署到该文件中进行编译。若环境尚未搭建完毕的同学请看第一篇环境搭建,编译出的库在安卓中如何使用请浏览第三步即mace工程化。
MACE(1)-----环境搭建:https://www.cnblogs.com/missidiot/p/9480033.html
MACE(3)-----工程化:https://www.cnblogs.com/missidiot/p/9717633.html
小米官方文档编写部署文件:https://mace.readthedocs.io/en/latest/user_guide/basic_usage.html
目录
准备模型文件
创建部署文件
高级用法
1.准备模型文件
说明:本文只关注TensorFlow平台。
准备好预先训练的TensorFlow model.pb文件。使用图形转换工具 优化模型以进行推理。此工具将通过进行多个优化来提高推理效率,例如操作员折叠,冗余节点删除等。我们强烈建议MACE用户在构建之前使用它。
# CPU/GPU:
./transform_graph
    --in_graph=/path/to/your/tf_model.pb
    --out_graph=/path/to/your/output/tf_model_opt.pb
    --inputs='input node name'
    --outputs='output node name'
    --transforms='strip_unused_nodes(type=float, shape="1,64,64,3")
        strip_unused_nodes(type=float, shape="1,64,64,3")
        remove_nodes(op=Identity, op=CheckNumerics)
        fold_constants(ignore_errors=true)
        flatten_atrous_conv
        fold_batch_norms
        fold_old_batch_norms
        remove_control_dependencies
        strip_unused_nodes
        sort_by_execution_order'
注:(尚未搞清楚,以下文件的如何用)
2. 创建部署文件(model.yaml)
转换模型或构建库时,MACE需要读取YAML文件,此文件称为模型部署文件。模型部署文件包含模型和构建选项的所有信息。构建过程包括解析模型部署文件,转换模型,构建MACE核心库以及打包生成的模型库。
一个部署文件将正常生成一个库,但如果指定了多个ABI,则将为每个ABI生成一个库。部署文件还可以包含多个模型。例如,AI相机应用程序可以包含面部识别,对象识别和语音识别模型,所有这些都可以在一个部署文件中定义。
下例为mace官方提供的例子:
# The name of library
library_name: mobilenet
target_abis: [arm64-v8a]
model_graph_format: file
model_data_format: file
models:
  mobilenet_v1: # model tag, which will be used in model loading and must be specific.
    platform: tensorflow
    # path to your tensorflow model's pb file. Support local path, http:// and https://
    model_file_path: https://cnbj1.fds.api.xiaomi.com/mace/miai-models/mobilenet-v1/mobilenet-v1-1.0.pb
    # sha256_checksum of your model's pb file.
    # use this command to get the sha256_checksum: sha256sum path/to/your/pb/file
    model_sha256_checksum: 71b10f540ece33c49a7b51f5d4095fc9bd78ce46ebf0300487b2ee23d71294e6
    # define your model's interface
    # if there multiple inputs or outputs, write like blow:
    # subgraphs:
    # - input_tensors:
    #     - input0
    #     - input1
    #   input_shapes:
    #     - 1,224,224,3
    #     - 1,224,224,3
    #    output_tensors:
    #      - output0
    #      - output1
    #    output_shapes:
    #      - 1,1001
    #      - 1,1001
    subgraphs:
      - input_tensors:
          - input
        input_shapes:
          - 1,224,224,3
        output_tensors:
          - MobilenetV1/Predictions/Reshape_1
        output_shapes:
          - 1,1001
  # cpu, gpu or cpu+gpu
      runtime: cpu+gpu
      winograd: 0
Command:
# Get device's soc info.(尚未搞清楚在哪用)
adb shell getprop | grep platform

# command for generating sha256_sum,获取检测码,路径指向pb文件目录(直接在终端下使用)
sha256sum /path/to/your/file
配置:
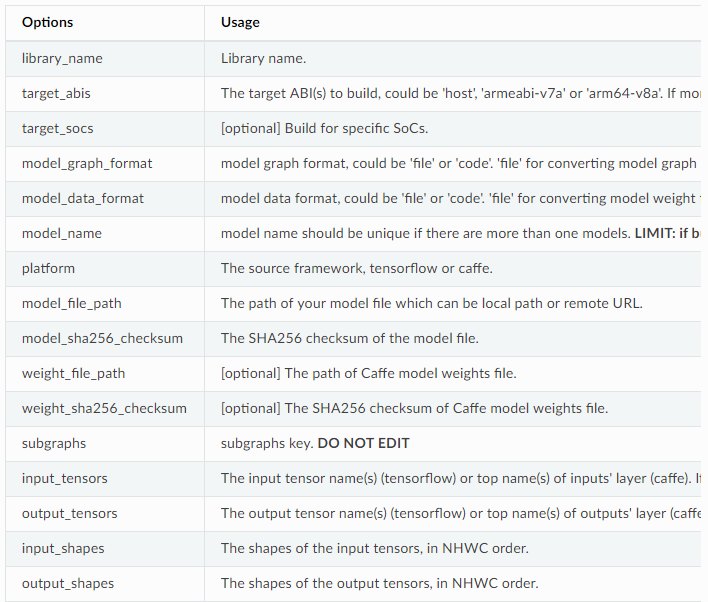
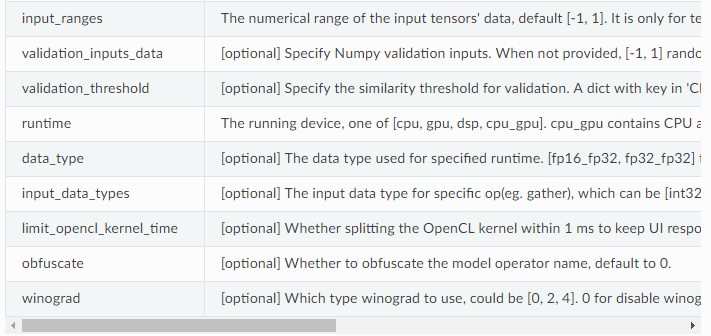
注:[option]为可选的,在部署文件中可选。
3. 高级用法
3.1 将模型转换成C++代码
1. 更改部署文件
如果要保护模型,可以将模型转换为C ++代码。还有两种情况:
1.1 将模型图转换为代码并使用以下模型配置将权重建模到文件。
model_graph_format: code
model_data_format: file
将模型图和模型权重转换为具有以下模型配置的代码。
model_graph_format: code
model_data_format: code
以上两步当model_graph_format: code时候后期会生成mace_engine_factory.h文件,后期遇到再解释(未完成,尚未知其用途)
1.2 另一种模型保护方法obfuscate用于混淆模型运算符的名称。(未知)
2. 将模型转换为代码
python tools/converter.py convert --config=/path/to/model_deployment_file.yml
该命令将在builds / $ {library_name} / model目录中生成$ {library_name} .a,在builds / $ {library_name} / include中生成 ** .h *,如下面的dir-tree。
# model_graph_format: code
# model_data_format: file

builds
  ├── include
  │   └── mace
  │       └── public
  │           ├── mace_engine_factory.h
  │           └── mobilenet_v1.h
  └── model
      ├── mobilenet-v1.a
      └── mobilenet_v1.data

# model_graph_format: code
# model_data_format: code

builds
  ├── include
  │   └── mace
  │       └── public
  │           ├── mace_engine_factory.h
  │           └── mobilenet_v1.h
  └── model
      └── mobilenet-v1.a
3. 部署
libmace.a和$ {library_name} .a链接到您的目标。
参阅mace/examples/example.cc完整用法。以下列出了关键步骤。
// Include the headers
#include "mace/public/mace.h"
#include "mace/public/mace_runtime.h"
// If the model_graph_format is code
#include "mace/public/${model_name}.h"
#include "mace/public/mace_engine_factory.h"

// ... Same with the code in basic usage

// 4. Create MaceEngine instance
std::shared_ptr<mace::MaceEngine> engine;
MaceStatus create_engine_status;
// Create Engine from compiled code
create_engine_status =
    CreateMaceEngineFromCode(model_name.c_str(),
                             model_data_file, // empty string if model_data_format is code
                             input_names,
                             output_names,
                             device_type,
                             &engine);
if (create_engine_status != MaceStatus::MACE_SUCCESS) {
  // Report error
}

// ... Same with the code in basic usage
3.2 调整特点的SoC的GPU内核(尚未搞清楚干啥)
如果您想使用特定设备的GPU,您只需target_socs在YAML文件中指定,然后为其调整MACE lib(OpenCL内核),这可能会提高1~10%的性能。
1.更改模型部署文件(.yml)
指定target_socs模型中的部署文件(.yml):
target_socs: [sdm845]
注意:获取设备的soc信息:adb shell getprop | grep平台
2.转换模型
python tools/converter.py convert --config=/path/to/model_deployment_file.yml
3.调整
tools / converter.py将启用GPU内核的自动调整。这通常需要一些时间才能完成,具体取决于模型的复杂程度。
python tools/converter.py run --config=/path/to/model_deployment_file.yml --validate
该命令将在builds / $ {library_name} / opencl中生成两个文件,如下面的dir-tree。
builds
└── mobilenet-v2
    ├── model
    │   ├── mobilenet_v2.data
    │   └── mobilenet_v2.pb
    └── opencl
        └── arm64-v8a
           ├── moblinet-v2_compiled_opencl_kernel.MiNote3.sdm660.bin
           └── moblinet-v2_tuned_opencl_parameter.MiNote3.sdm660.bin
mobilenet-v2-gpu_compiled_opencl_kernel.MI6.msm8998.bin代表用于模型的OpenCL二进制文件,可以加速初始化阶段。详情请参阅OpenCL规范。
mobilenet-v2-tuned_opencl_parameter.MI6.msm8998.bin代表SoC的调整OpenCL参数。
4.部署
更改上面生成的文件名称以防止发生冲突,并将它们推送到您自己设备的目录中。
使用与前面的过程类似,下面列出了不同的关键步骤。
// Include the headers
#include "mace/public/mace.h"
#include "mace/public/mace_runtime.h"

// 0. Set pre-compiled OpenCL binary program file paths and OpenCL parameters file path when available
if (device_type == DeviceType::GPU) {
  mace::SetOpenCLBinaryPaths(path/to/opencl_binary_paths);
  mace::SetOpenCLParameterPath(path/to/opencl_parameter_file);
}

// ... Same with the code in basic usage.