数据集描述
总共(200)类图像,每一类图像都存放在一个以类别名称命名的文件夹下,每张图片的命名格式如下图:

数据预处理
首先分析一下我们在数据预处理阶段的目标和工作流程
-
获取每张图像以及对应的标签
-
划分测试集和训练集
-
通过写数据集类的方式,获取数据集并进一步获得DataLoader
-
打印图片,验证效果
获取图像及标签
all_imgs_path = glob.glob(r'E:irdsirds**.jpg') # 获取所有图像路径列表
all_labels_name = [i.split('\')[3].split('.')[1] for i in all_imgs_path] # 获取每张图像的标签名
label_to_index = dict([(v, k) for k, v in enumerate(unique_labels)]) # 将标签名映射到数值
# 获取每张图片的数值标签
all_labels = []
for img in all_imgs_path:
    for k, v in label_to_index.items():
        if k in img:
            all_labels.append(v)
划分测试集和训练集
以下代码可以作为模板来用,不做额外解释
np.random.seed(2021)
index = np.random.permutation(len(all_imgs_path))
all_imgs_path = np.array(all_imgs_path)[index]
all_labels = np.array(all_labels)[index]
s = int(len(all_imgs_path) * 0.8)

train_path = all_imgs_path[:s]
train_labels = all_labels[:s]
test_path = all_imgs_path[s:]
test_labels = all_labels[s:]
通过写数据集类的方式,获取数据集并进一步获得DataLoader
以下代码可以作为模板来用,不做额外解释
transform = transforms.Compose([
    transforms.Resize((224, 224)),
    transforms.ToTensor()
])

class BirdsDataset(data.Dataset):
    def __init__(self, img_paths, labels, transform):
        self.imgs = img_paths
        self.labels = labels
        self.transforms = transform
    def __getitem__(self, index):
        img = self.imgs[index]
        label = self.labels[index]
        pil_img = Image.open(img)
        pil_img = pil_img.convert('RGB') # 这一句是专门用来解决一种RuntimeError的
        np_img = np.array(pil_img, dtype = np.uint8)
        if np_img.shape == 2:
            img_data = np.repeat(np_img[:, :, np.newaxis], 3, axis = 2)
            pil_data = Image.fromarray(img_data)
        data = self.transforms(pil_img)
        return data, label
    def __len__(self):
        return len(self.imgs)

train_ds = BirdsDataset(train_path, train_labels, transform)
test_ds = BirdsDataset(test_path, test_labels, transform)
train_dl = data.DataLoader(train_ds, batch_size = 32) # 这里只是提取卷积基,不做训练,因此不用shuffle
test_dl = data.DataLoader(test_ds, batch_size = 32)
结果查看
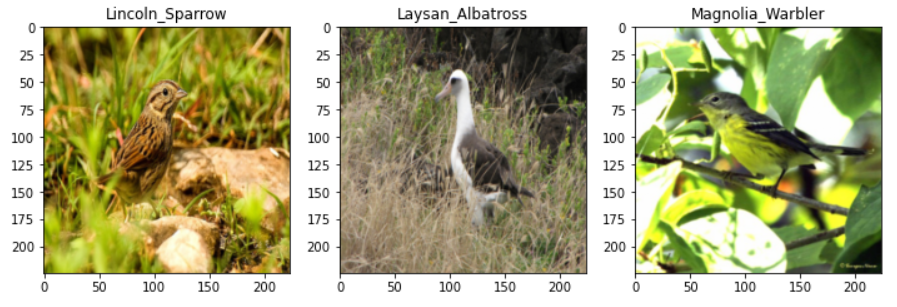
取出一个批次的数据,绘图
img_batch, label_batch = next(iter(train_dl))
plt.figure(figsize = (12, 8)) # 定义画布大小
index_to_label = dict([(k, v) for k, v in enumerate(unique_labels)])
for i, (img, label) in enumerate(zip(img_batch[:3], label_batch[:3])):
    img = img.permute(1, 2, 0).numpy() # 将channel放在最后一维
    plt.subplot(1, 3, i + 1)
    plt.title(index_to_label.get(label.item()))
    plt.imshow(img)
结果如下:
提取卷积基
这一阶段的工作流程如下:
-
获取DenseNet预训练模型,使用feature部分
-
使用卷积基提取图像特征,并存放在列表中
预训练模型获取
my_densenet = models.densenet121(pretrained = True).features

if torch.cuda.is_available():
    my_densenet = my_densenet.cuda()

for p in my_densenet.parameters():
    p.requires_grad = False
提取图像特征
train_features = []
train_features_labels = []
for im, la in train_dl:
    out = my_densenet(im.cuda())
    out = out.view(out.size(0), -1) # 这里需要进行扁平化操作,因为后面要进行线性模型预测
    train_features.extend(out.cpu().data) # 这里注意是extend,extend可以将一个列表加到另一个列表的后面
    train_features_labels.extend(la)

test_features = []
test_features_labels = []
for im, la in test_dl:
    out = my_densenet(im.cuda())
    out = out.view(out.size(0), -1)
    test_features.extend(out.cpu().data)
    test_features_labels.extend(la)
重新定义数据集
因为后面要通过线性模型来预测,因此之前的图像数据集就不好用了
因此需要用刚刚提取到的特征,重新制作数据集
class FeatureDataset(data.Dataset):
    def __init__(self, feature_list, label_list):
        self.feature_list = feature_list
        self.label_list = label_list
    def __getitem__(self, index):
        return self.feature_list[index], self.label_list[index]
    def __len__(self):
        return len(self.feature_list)

train_feature_ds = FeatureDataset(train_features, train_features_labels)
test_feature_ds = FeatureDataset(test_features, test_features_labels)
train_feature_dl = data.DataLoader(train_feature_ds, batch_size = 32, shuffle = True)
test_feature_dl = data.DataLoader(test_feature_ds, batch_size = 32)
模型定义与预测
这里定义一个线性模型即可
模型定义
class FCModel(nn.Module):
    def __init__(self, in_size, out_size):
        super().__init__()
        self.linear = nn.Linear(in_size, out_size)
    def forward(self, input):
        return self.linear(input)

in_feature_size = train_features[0].shape[0]
net = FCModel(in_feature_size, 200)

device = torch.device("cuda:0" if torch.cuda.is_available() else "cpu")
net.to(device)

loss_func = torch.nn.CrossEntropyLoss()
optimizer = torch.optim.Adam(net.parameters(), lr = 0.00001)
epochs = 30
模型训练
def fit(epoch, model, trainloader, testloader):
correct = 0
total = 0
running_loss = 0
model.train()
for x, y in trainloader:
y = torch.tensor(y, dtype = torch.long)
x, y = x.to(device), y.to(device)
y_pred = model(x)
loss = loss_func(y_pred, y)
optimizer.zero_grad()
loss.backward()
optimizer.step()
with torch.no_grad():
y_pred = torch.argmax(y_pred, dim = 1)
correct += (y_pred == y).sum().item()
total += y.size(0)
running_loss += loss.item()
epoch_acc = correct / total
epoch_loss = running_loss / len(trainloader.dataset)
test_correct = 0
test_total = 0
test_running_loss = 0
model.eval()
with torch.no_grad():
for x, y in testloader:
y = torch.tensor(y, dtype = torch.long)
x, y = x.to(device), y.to(device)
y_pred = model(x)
loss = loss_func(y_pred, y)
y_pred = torch.argmax(y_pred, dim = 1)
test_correct += (y_pred == y).sum().item()
test_total += y.size(0)
test_running_loss += loss.item()
epoch_test_acc = test_correct / test_total
epoch_test_loss = test_running_loss / len(testloader.dataset)
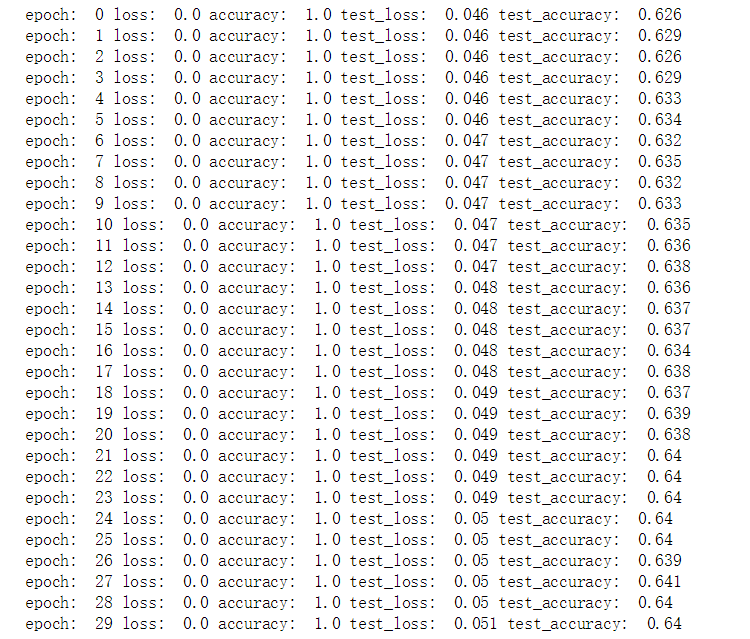
print('epoch: ', epoch,
'loss: ', round(epoch_loss, 3),
'accuracy: ', round(epoch_acc, 3),
'test_loss: ', round(epoch_test_loss, 3),
'test_accuracy: ', round(epoch_test_acc, 3))
return epoch_loss, epoch_acc, epoch_test_loss, epoch_test_acc
train_loss = []
train_acc = []
test_loss = []
test_acc = []
for epoch in range(epochs):
epoch_loss, epoch_acc, epoch_test_loss, epoch_test_acc = fit(epoch, net, train_feature_dl, test_feature_dl)
train_loss.append(epoch_loss)
train_acc.append(epoch_acc)
test_loss.append(epoch_test_loss)
test_acc.append(epoch_test_acc)
训练结果