多线程threading
1.threading模块
multiprocess模块的完全模仿了threading模块的接口,二者在使用层面,有很大的相似性
1.1模块的创建


 1 from threading import Thread
 2 import time
 3 def sayhi(name):
 4     time.sleep(2)
 5     print('%s say hello' %name)
 6
 7 if __name__ == '__main__':
 8     t=Thread(target=sayhi,args=('egon',))
 9     t.start()
10     print('主线程')
 1 from threading import Thread
 2 import time
 3 class Sayhi(Thread):
 4     def __init__(self,name):
 5         super().__init__()
 6         self.name=name
 7     def run(self):
 8         time.sleep(2)
 9         print('%s say hello' % self.name)
10
11
12 if __name__ == '__main__':
13     t = Sayhi('egon')
14     t.start()
15     print('主线程')
1.2多线程与多进程比较
 1 from threading import Thread
 2 from multiprocessing import Process
 3 import os
 4
 5 def work():
 6     print('hello',os.getpid())
 7
 8 if __name__ == '__main__':
 9     #part1:在主进程下开启多个线程,每个线程都跟主进程的pid一样
10     t1=Thread(target=work)
11     t2=Thread(target=work)
12     t1.start()
13     t2.start()
14     print('主线程/主进程pid',os.getpid())
15
16     #part2:开多个进程,每个进程都有不同的pid
17     p1=Process(target=work)
18     p2=Process(target=work)
19     p1.start()
20     p2.start()
21     print('主线程/主进程pid',os.getpid())
 1 from threading import Thread
 2 from multiprocessing import Process
 3 import os
 4
 5 def work():
 6     print('hello')
 7
 8 if __name__ == '__main__':
 9     #在主进程下开启线程
10     t=Thread(target=work)
11     t.start()
12     print('主线程/主进程')
13     '''
14     打印结果:
15     hello
16     主线程/主进程
17     '''
18
19     #在主进程下开启子进程
20     t=Process(target=work)
21     t.start()
22     print('主线程/主进程')
23     '''
24     打印结果:
25     主线程/主进程
26     hello
27     '''
 1 from  threading import Thread
 2 from multiprocessing import Process
 3 import os
 4 def work():
 5     global n
 6     n=0
 7
 8 if __name__ == '__main__':
 9     # n=100
10     # p=Process(target=work)
11     # p.start()
12     # p.join()
13     # print('主',n) #毫无疑问子进程p已经将自己的全局的n改成了0,但改的仅仅是它自己的,查看父进程的n仍然为100
14
15
16     n=1
17     t=Thread(target=work)
18     t.start()
19     t.join()
20     print('主',n) #查看结果为0,因为同一进程内的线程之间共享进程内的数据
21 同一进程内的线程共享该进程的数据?
1.3Thread类的其他方法
Thread实例对象的方法
  # isAlive(): 返回线程是否活动的。
  # getName(): 返回线程名。
  # setName(): 设置线程名。

threading模块提供的一些方法:
  # threading.currentThread(): 返回当前的线程变量。
  # threading.enumerate(): 返回一个包含正在运行的线程的list。正在运行指线程启动后、结束前,不包括启动前和终止后的线程。
  # threading.activeCount(): 返回正在运行的线程数量,与len(threading.enumerate())有相同的结果。
from threading import Thread
import threading
from multiprocessing import Process
import os

def work():
    import time
    time.sleep(3)
    print(threading.current_thread().getName())


if __name__ == '__main__':
    #在主进程下开启线程
    t=Thread(target=work)
    t.start()

    print(threading.current_thread().getName())
    print(threading.current_thread()) #主线程
    print(threading.enumerate()) #连同主线程在内有两个运行的线程
    print(threading.active_count())
    print('主线程/主进程')

    '''
    打印结果:
    MainThread
    <_MainThread(MainThread, started 140735268892672)>
    [<_MainThread(MainThread, started 140735268892672)>, <Thread(Thread-1, started 123145307557888)>]
    主线程/主进程
    Thread-1
    '''
 1 from threading import Thread
 2 import time
 3 def sayhi(name):
 4     time.sleep(2)
 5     print('%s say hello' %name)
 6
 7 if __name__ == '__main__':
 8     t=Thread(target=sayhi,args=('egon',))
 9     t.start()
10     t.join()
11     print('主线程')
12     print(t.is_alive())
13     '''
14     egon say hello
15     主线程
16     False
17     '''
1.4守护线程
无论是进程还是线程,都遵循:守护xx会等待主xx运行完毕后被销毁。需要强调的是:运行完毕并非终止运行
#1.对主进程来说,运行完毕指的是主进程代码运行完毕
#2.对主线程来说,运行完毕指的是主线程所在的进程内所有非守护线程统统运行完毕,主线程才算运行完毕
#1 主进程在其代码结束后就已经算运行完毕了(守护进程在此时就被回收),然后主进程会一直等非守护的子进程都运行完毕后回收子进程的资源(否则会产生僵尸进程),才会结束,
#2 主线程在其他非守护线程运行完毕后才算运行完毕(守护线程在此时就被回收)。因为主线程的结束意味着进程的结束,进程整体的资源都将被回收,而进程必须保证非守护线程都运行完毕后才能结束。
from threading import Thread
import time
def sayhi(name):
    time.sleep(2)
    print('%s say hello' %name)

if __name__ == '__main__':
    t=Thread(target=sayhi,args=('egon',))
    t.setDaemon(True) #必须在t.start()之前设置
    t.start()

    print('主线程')
    print(t.is_alive())
    '''
    主线程
    True
    '''
 1 from threading import Thread
 2 import time
 3 def foo():
 4     print(123)
 5     time.sleep(1)
 6     print("end123")
 7
 8 def bar():
 9     print(456)
10     time.sleep(3)
11     print("end456")
12
13
14 t1=Thread(target=foo)
15 t2=Thread(target=bar)
16
17 t1.daemon=True
18 t1.start()
19 t2.start()
20 print("main-------")
2.锁
2.1GIL锁
Python代码的执行由Python虚拟机(也叫解释器主循环)来控制。Python在设计之初就考虑到要在主循环中,同时只有一个线程在执行。虽然 Python 解释器中可以“运行”多个线程,但在任意时刻只有一个线程在解释器中运行。
对Python虚拟机的访问由全局解释器锁(GIL)来控制,正是这个锁能保证同一时刻只有一个线程在运行。
在多线程环境中,Python 虚拟机按以下方式执行:
a、设置 GIL;
b、切换到一个线程去运行;
c、运行指定数量的字节码指令或者线程主动让出控制(可以调用 time.sleep(0));
d、把线程设置为睡眠状态;
e、解锁 GIL;
d、再次重复以上所有步骤。
在调用外部代码(如 C/C++扩展函数)的时候,GIL将会被锁定,直到这个函数结束为止(由于在这期间没有Python的字节码被运行,所以不会做线程切换)编写扩展的程序员可以主动解锁GIL。
2.2同步锁
from threading import Thread
import os,time
def work():
    global n
    temp=n
    time.sleep(0.1)
    n=temp-1
if __name__ == '__main__':
    n=100
    l=[]
    for i in range(100):
        p=Thread(target=work)
        l.append(p)
        p.start()
    for p in l:
        p.join()

    print(n) #结果可能为99
import threading
R=threading.Lock()
R.acquire()
'''
对公共数据的操作
'''
R.release()
 1 from threading import Thread,Lock
 2 import os,time
 3 def work():
 4     global n
 5     lock.acquire()
 6     temp=n
 7     time.sleep(0.1)
 8     n=temp-1
 9     lock.release()
10 if __name__ == '__main__':
11     lock=Lock()
12     n=100
13     l=[]
14     for i in range(100):
15         p=Thread(target=work)
16         l.append(p)
17         p.start()
18     for p in l:
19         p.join()
20
21     print(n) #结果肯定为0,由原来的并发执行变成串行,牺牲了执行效率保证了数据安全
#不加锁:并发执行,速度快,数据不安全
from threading import current_thread,Thread,Lock
import os,time
def task():
    global n
    print('%s is running' %current_thread().getName())
    temp=n
    time.sleep(0.5)
    n=temp-1


if __name__ == '__main__':
    n=100
    lock=Lock()
    threads=[]
    start_time=time.time()
    for i in range(100):
        t=Thread(target=task)
        threads.append(t)
        t.start()
    for t in threads:
        t.join()

    stop_time=time.time()
    print('主:%s n:%s' %(stop_time-start_time,n))

'''
Thread-1 is running
Thread-2 is running
......
Thread-100 is running
主:0.5216062068939209 n:99
'''


#不加锁:未加锁部分并发执行,加锁部分串行执行,速度慢,数据安全
from threading import current_thread,Thread,Lock
import os,time
def task():
    #未加锁的代码并发运行
    time.sleep(3)
    print('%s start to run' %current_thread().getName())
    global n
    #加锁的代码串行运行
    lock.acquire()
    temp=n
    time.sleep(0.5)
    n=temp-1
    lock.release()

if __name__ == '__main__':
    n=100
    lock=Lock()
    threads=[]
    start_time=time.time()
    for i in range(100):
        t=Thread(target=task)
        threads.append(t)
        t.start()
    for t in threads:
        t.join()
    stop_time=time.time()
    print('主:%s n:%s' %(stop_time-start_time,n))

'''
Thread-1 is running
Thread-2 is running
......
Thread-100 is running
主:53.294203758239746 n:0
'''

#有的同学可能有疑问:既然加锁会让运行变成串行,那么我在start之后立即使用join,就不用加锁了啊,也是串行的效果啊
#没错:在start之后立刻使用jion,肯定会将100个任务的执行变成串行,毫无疑问,最终n的结果也肯定是0,是安全的,但问题是
#start后立即join:任务内的所有代码都是串行执行的,而加锁,只是加锁的部分即修改共享数据的部分是串行的
#单从保证数据安全方面,二者都可以实现,但很明显是加锁的效率更高.
from threading import current_thread,Thread,Lock
import os,time
def task():
    time.sleep(3)
    print('%s start to run' %current_thread().getName())
    global n
    temp=n
    time.sleep(0.5)
    n=temp-1


if __name__ == '__main__':
    n=100
    lock=Lock()
    start_time=time.time()
    for i in range(100):
        t=Thread(target=task)
        t.start()
        t.join()
    stop_time=time.time()
    print('主:%s n:%s' %(stop_time-start_time,n))

'''
Thread-1 start to run
Thread-2 start to run
......
Thread-100 start to run
主:350.6937336921692 n:0 #耗时是多么的恐怖
'''

)
2.3死锁
进程也有死锁与递归锁,在进程那里忘记说了,放到这里一切说了额
所谓死锁: 是指两个或两个以上的进程或线程在执行过程中,因争夺资源而造成的一种互相等待的现象,若无外力作用,它们都将无法推进下去。此时称系统处于死锁状态或系统产生了死锁,这些永远在互相等待的进程称为死锁进程,如下就是死锁
from threading import Lock as Lock
import time
mutexA=Lock()
mutexA.acquire()
mutexA.acquire()
print(123)
mutexA.release()
mutexA.release()
解决方法,递归锁,在Python中为了支持在同一线程中多次请求同一资源,python提供了可重入锁RLock。
这个RLock内部维护着一个Lock和一个counter变量,counter记录了acquire的次数,从而使得资源可以被多次require。直到一个线程所有的acquire都被release,其他的线程才能获得资源。上面的例子如果使用RLock代替Lock,则不会发生死锁:
from threading import RLock as Lock
import time
mutexA=Lock()
mutexA.acquire()
mutexA.acquire()
print(123)
mutexA.release()
mutexA.release()
典型问题:科学家吃面
import time
from threading import Thread,Lock
noodle_lock = Lock()
fork_lock = Lock()
def eat1(name):
    noodle_lock.acquire()
    print('%s 抢到了面条'%name)
    fork_lock.acquire()
    print('%s 抢到了叉子'%name)
    print('%s 吃面'%name)
    fork_lock.release()
    noodle_lock.release()

def eat2(name):
    fork_lock.acquire()
    print('%s 抢到了叉子' % name)
    time.sleep(1)
    noodle_lock.acquire()
    print('%s 抢到了面条' % name)
    print('%s 吃面' % name)
    noodle_lock.release()
    fork_lock.release()

for name in ['哪吒','egon','yuan']:
    t1 = Thread(target=eat1,args=(name,))
    t2 = Thread(target=eat2,args=(name,))
    t1.start()
    t2.start()
import time
from threading import Thread,RLock
fork_lock = noodle_lock = RLock()
def eat1(name):
    noodle_lock.acquire()
    print('%s 抢到了面条'%name)
    fork_lock.acquire()
    print('%s 抢到了叉子'%name)
    print('%s 吃面'%name)
    fork_lock.release()
    noodle_lock.release()

def eat2(name):
    fork_lock.acquire()
    print('%s 抢到了叉子' % name)
    time.sleep(1)
    noodle_lock.acquire()
    print('%s 抢到了面条' % name)
    print('%s 吃面' % name)
    noodle_lock.release()
    fork_lock.release()

for name in ['哪吒','egon','yuan']:
    t1 = Thread(target=eat1,args=(name,))
    t2 = Thread(target=eat2,args=(name,))
    t1.start()
    t2.start()
3.信号量
同进程的一样
Semaphore管理一个内置的计数器,
每当调用acquire()时内置计数器-1;
调用release() 时内置计数器+1;
计数器不能小于0;当计数器为0时,acquire()将阻塞线程直到其他线程调用release()。
实例:(同时只有5个线程可以获得semaphore,即可以限制最大连接数为5):
from threading import Thread,Semaphore
import threading
import time
# def func():
#     if sm.acquire():
#         print (threading.currentThread().getName() + ' get semaphore')
#         time.sleep(2)
#         sm.release()
def func():
    sm.acquire()
    print('%s get sm' %threading.current_thread().getName())
    time.sleep(3)
    sm.release()
if __name__ == '__main__':
    sm=Semaphore(5)
    for i in range(23):
        t=Thread(target=func)
        t.start()
池与信号量:与进程池是完全不同的概念,进程池Pool(4),最大只能产生4个进程,而且从头到尾都只是这四个进程,不会产生新的,而信号量是产生一堆线程/进程
4.事件
同进程的一样
线程的一个关键特性是每个线程都是独立运行且状态不可预测。如果程序中的其 他线程需要通过判断某个线程的状态来确定自己下一步的操作,这时线程同步问题就会变得非常棘手。为了解决这些问题,我们需要使用threading库中的Event对象。 对象包含一个可由线程设置的信号标志,它允许线程等待某些事件的发生。在 初始情况下,Event对象中的信号标志被设置为假。如果有线程等待一个Event对象, 而这个Event对象的标志为假,那么这个线程将会被一直阻塞直至该标志为真。一个线程如果将一个Event对象的信号标志设置为真,它将唤醒所有等待这个Event对象的线程。如果一个线程等待一个已经被设置为真的Event对象,那么它将忽略这个事件, 继续执行
event.isSet():返回event的状态值;
event.wait():如果 event.isSet()==False将阻塞线程;
event.set(): 设置event的状态值为True,所有阻塞池的线程激活进入就绪状态, 等待操作系统调度;
event.clear():恢复event的状态值为False。
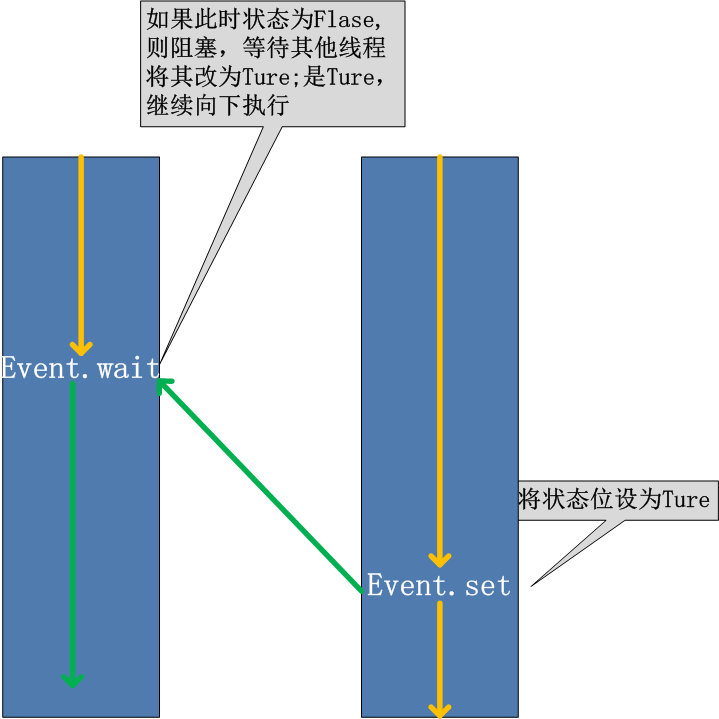
例如,有多个工作线程尝试链接MySQL,我们想要在链接前确保MySQL服务正常才让那些工作线程去连接MySQL服务器,如果连接不成功,都会去尝试重新连接。那么我们就可以采用threading.Event机制来协调各个工作线程的连接操作
import threading import time,random from threading import Thread,Event def conn_mysql(): count=1 while not event.is_set(): if count > 3: raise TimeoutError('链接超时') print('<%s>第%s次尝试链接' % (threading.current_thread().getName(), count)) event.wait(0.5) count+=1 print('<%s>链接成功' %threading.current_thread().getName()) def check_mysql(): print('�33[45m[%s]正在检查mysql�33[0m' % threading.current_thread().getName()) time.sleep(random.randint(2,4)) event.set() if __name__ == '__main__': event=Event() conn1=Thread(target=conn_mysql) conn2=Thread(target=conn_mysql) check=Thread(target=check_mysql) conn1.start() conn2.start() check.start()
5.线程队列
queue队列 :使用import queue,用法与进程Queue一样
queue is especially useful in threaded programming when information must be exchanged safely between multiple threads.
class queue.Queue(maxsize=0) #先进先出
import queue

q=queue.Queue()
q.put('first')
q.put('second')
q.put('third')

print(q.get())
print(q.get())
print(q.get())
'''
结果(先进先出):
first
second
third
'''
class queue.LifoQueue(maxsize=0) #last in fisrt out
import queue

q=queue.LifoQueue()
q.put('first')
q.put('second')
q.put('third')

print(q.get())
print(q.get())
print(q.get())
'''
结果(后进先出):
third
second
first
'''
class queue.PriorityQueue(maxsize=0) #存储数据时可设置优先级的队列
import queue

q=queue.PriorityQueue()
#put进入一个元组,元组的第一个元素是优先级(通常是数字,也可以是非数字之间的比较),数字越小优先级越高
q.put((20,'a'))
q.put((10,'b'))
q.put((30,'c'))

print(q.get())
print(q.get())
print(q.get())
'''
结果(数字越小优先级越高,优先级高的优先出队):
(10, 'b')
(20, 'a')
(30, 'c')
'''
6.Python标准模块--concurrent.futures
https://docs.python.org/dev/library/concurrent.futures.html
#1 介绍
concurrent.futures模块提供了高度封装的异步调用接口
ThreadPoolExecutor:线程池,提供异步调用
ProcessPoolExecutor: 进程池,提供异步调用
Both implement the same interface, which is defined by the abstract Executor class.

#2 基本方法
#submit(fn, *args, **kwargs)
异步提交任务

#map(func, *iterables, timeout=None, chunksize=1)
取代for循环submit的操作

#shutdown(wait=True)
相当于进程池的pool.close()+pool.join()操作
wait=True,等待池内所有任务执行完毕回收完资源后才继续
wait=False,立即返回,并不会等待池内的任务执行完毕
但不管wait参数为何值,整个程序都会等到所有任务执行完毕
submit和map必须在shutdown之前

#result(timeout=None)
取得结果

#add_done_callback(fn)
回调函数
#介绍
The ProcessPoolExecutor class is an Executor subclass that uses a pool of processes to execute calls asynchronously. ProcessPoolExecutor uses the multiprocessing module, which allows it to side-step the Global Interpreter Lock but also means that only picklable objects can be executed and returned.

class concurrent.futures.ProcessPoolExecutor(max_workers=None, mp_context=None)
An Executor subclass that executes calls asynchronously using a pool of at most max_workers processes. If max_workers is None or not given, it will default to the number of processors on the machine. If max_workers is lower or equal to 0, then a ValueError will be raised.


#用法
from concurrent.futures import ThreadPoolExecutor,ProcessPoolExecutor

import os,time,random
def task(n):
    print('%s is runing' %os.getpid())
    time.sleep(random.randint(1,3))
    return n**2

if __name__ == '__main__':

    executor=ProcessPoolExecutor(max_workers=3)

    futures=[]
    for i in range(11):
        future=executor.submit(task,i)
        futures.append(future)
    executor.shutdown(True)
    print('+++>')
    for future in futures:
        print(future.result())
#介绍
ThreadPoolExecutor is an Executor subclass that uses a pool of threads to execute calls asynchronously.
class concurrent.futures.ThreadPoolExecutor(max_workers=None, thread_name_prefix='')
An Executor subclass that uses a pool of at most max_workers threads to execute calls asynchronously.

Changed in version 3.5: If max_workers is None or not given, it will default to the number of processors on the machine, multiplied by 5, assuming that ThreadPoolExecutor is often used to overlap I/O instead of CPU work and the number of workers should be higher than the number of workers for ProcessPoolExecutor.

New in version 3.6: The thread_name_prefix argument was added to allow users to control the threading.Thread names for worker threads created by the pool for easier debugging.

#用法
与ProcessPoolExecutor相同
from concurrent.futures import ThreadPoolExecutor,ProcessPoolExecutor

import os,time,random
def task(n):
    print('%s is runing' %os.getpid())
    time.sleep(random.randint(1,3))
    return n**2

if __name__ == '__main__':

    executor=ThreadPoolExecutor(max_workers=3)

    # for i in range(11):
    #     future=executor.submit(task,i)

    executor.map(task,range(1,12)) #map取代了for+submit
from concurrent.futures import ThreadPoolExecutor,ProcessPoolExecutor
from multiprocessing import Pool
import requests
import json
import os

def get_page(url):
    print('<进程%s> get %s' %(os.getpid(),url))
    respone=requests.get(url)
    if respone.status_code == 200:
        return {'url':url,'text':respone.text}

def parse_page(res):
    res=res.result()
    print('<进程%s> parse %s' %(os.getpid(),res['url']))
    parse_res='url:<%s> size:[%s]
' %(res['url'],len(res['text']))
    with open('db.txt','a') as f:
        f.write(parse_res)


if __name__ == '__main__':
    urls=[
        'https://www.baidu.com',
        'https://www.python.org',
        'https://www.openstack.org',
        'https://help.github.com/',
        'http://www.sina.com.cn/'
    ]

    # p=Pool(3)
    # for url in urls:
    #     p.apply_async(get_page,args=(url,),callback=pasrse_page)
    # p.close()
    # p.join()

    p=ProcessPoolExecutor(3)
    for url in urls:
        p.submit(get_page,url).add_done_callback(parse_page) #parse_page拿到的是一个future对象obj,需要用obj.result()拿到结果